background image

Safety Warnings

GB

2

CLASS 1 LASER PRODUCT

This Compact Disc player is classified as a
CLASS 1 LASER product.

Use of controls, adjustments or performance of
procedures other than those specified herein
may result in hazardous radiation exposure.

CAUTION-INVISIBLE LASER RADIATION
WHEN OPEN AND INTER LOCKS DEFEATED,
AVOID EXPOSURE TO BEAM.

This symbol indicates that
dangerous voltage which can cause
electric shock is present inside this
unit.

This symbol alerts you to important
operating and maintenance
instructions accompanying the unit.

WARNING: To reduce the risk of fire or electric

shock, do not expose this
appliance to rain or moisture.

CAUTION: TO PREVENT ELECTRIC SHOCK,

MATCH WIDE BLADE OF PLUG
TO WIDE SLOT, FULLY INSERT.

CAUTION:
TO REDUCE THE RISK OF ELECTRIC
SHOCK, DO NOT REMOVE REAR COVER, NO
USER SERVICEABLE PARTS INSIDE, REFER
SERVICING TO QUALIFIED SERVICE
PERSONNEL.

RISK OF ELECTRIC 

SHOCK. DO NOT OPEN

CAUTION

Wiring the Mains Power Supply Plug

IMPORTANT NOTICE

The main lead on this equipment is supplied with a moulded plug incorporating a fuse. The value of the fuse is indicated on
the pin face of the plug and if it requires replacing, a fuse approved to BS1362 of the same rating must be used.

Never use the plug with the fuse cover removed. If the cover is detachable and a replacement is required, it must be of the
same colour as the fuse fitted in the plug. Replacement covers are available from your dealer. If the fitted plug is not
suitable for the power points in your house or the cable is not long enough to reach a power point, you should obtain a
suitable safety approved extension lead or consult your dealer for assistance. However, if there is no alternative to cutting
off the plug, remove the fuse and then safely dispose of the plug. Do not connect the plug to a main socket as there is a risk
of shock hazard from the bared flexible cord.

Never attempt to insert bare wires directly into a main socket. A plug and fuse must be used at all times.

IMPORTANT

The wires in the main lead are coloured in accordance with the following code:–

BLUE = NEUTRAL          BROWN = LIVE

As these colours may not correspond to the coloured markings identifying the terminals in your plug, proceed as follows:–

The wire coloured BLUE must be connected to the terminal marked with the letter N or coloured BLUE or BLACK. The wire
coloured BROWN must be connected to the terminal marked with the letter L or coloured BROWN or RED.

WARNING: DO NOT CONNECT EITHER WIRE TO THE EARTH TERMINAL WHICH IS MARKED WITH THE LETTER E

OR BY THE EARTH SYMBOL          ,  OR COLOURED GREEN OR GREEN AND YELLOW.

CLASS 1 LASER PRODUCT
KLASSE 1 LASER PRODUKT
LUOKAN 1 LASER LAITE
KLASS 1 LASER APPARAT
PRODUCTO LASER CLASE 1

MM-29/39(GB)  3/31/04 13:38  Page 2

Summary of Contents for MM-29

Page 1: ...MICRO COMPACT SYSTEM WITH REMOTE CONTROL MM 29 MM 39 Instruction Manual ...

Page 2: ... cover removed If the cover is detachable and a replacement is required it must be of the same colour as the fuse fitted in the plug Replacement covers are available from your dealer If the fitted plug is not suitable for the power points in your house or the cable is not long enough to reach a power point you should obtain a suitable safety approved extension lead or consult your dealer for assis...

Page 3: ...assette Playback Mode 10 Tape Counter 10 Maintaining the Sound Quality 10 Recording a Radio Programme 11 Recording a CD with the CD Synchro Feature 11 Repeat A B Function 11 Recommendations for Recording 11 OTHER FEATURES Timer Function 12 Cancelling the Timer 12 Sleep Timer 13 Super Bass Sound 13 Equalizer 13 About RDS broadcasting 14 PTY Program Type indication and PTY SEARCH function 15 CD Digi...

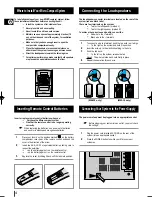
Page 4: ...AA LR03 or equivalent batteries taking care to respect the polarities on the battery against on the remote control on the battery against on the remote control 3 Replace the cover by sliding it back until it clicks into position The loudspeaker connector terminals are located on the rear of the system red and black tabs There are four terminals on the system Two for the left speaker marked L Two f...

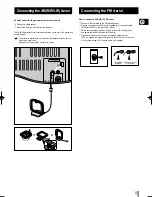
Page 5: ...Connect a 75Ω antenna to the FM aerial terminal Plug the connector on the FM aerial supplied into the coaxial socket 75Ω marked FM on the rear of the system Follow the instructions given on Page 8 to tune into a radio station and determine the best position for the aerial If reception is poor you may need to install an outdoor aerial To do so connect an outdoor FM aerial to the FM socket on the re...

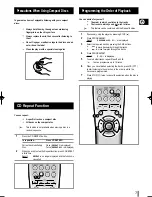
Page 6: ...e CD function by pressing CD on the front panel 2 Open the compact disc compartment by pressing down and releasing the cover 3 Place your disc in the compartment with the label on the disc facing upwards 4 Close the compartment by pushing down on the cover until it clicks into place Result The display indicates the number of tracks on the disc 5 Press the PLAY PAUSE button Result The first track o...

Page 7: ...ult REPEAT is no longer displayed and the function is cancelled You can decide for yourself The order in which you listen to the tracks The tracks to which you do not wish to listen This feature can be combined with the Repeat function 1 If necessary stop the player by pressing STOP 2 Press PROGRAM SET Result PROGRAM and P 01 are displayed 3 Select the required track by pressing the SKIP buttons t...

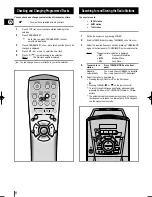
Page 8: ... front panel 3 Select the required frequency band by pressing TUNER BAND again on the front panel or TUNER BAND on the remote control Result The appropriate indication is displayed FM Frequency Modulation MW Medium Wave LW Long Wave 4 To search for a Press TUNING MODE on the front station panel Manually One or more times until MANUAL is displayed Automatically One or more times until AUTO is displ...

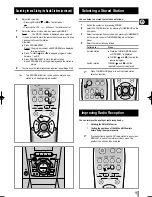
Page 9: ... as follows 1 Switch the system on by pressing POWER 2 Select the TUNER function by pressing TUNER BAND on the front panel 3 Select the required frequency band by pressing TUNER BAND on the remote control or TUNER BAND again on the front panel 4 Select the radio station as follows To listen to Press A stored station a Press the TUNING MODE button until PRESET is displayed b TUNING and to select th...

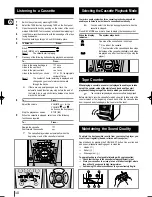
Page 10: ... to both sides of a cassette automatically You can select this function during playback or when the cassette is stopped Press REV MODE one or more times to display the required symbol When the display The system plays back indicates One side of the cassette and then stops One side of the cassette The other side of the cassette and then stops Both sides of the cassette indefinitely both sides are p...

Page 11: ... When you select CD TAPE Repeat A B playback the music passages to which you were listening is repeated 3 times 1 Press CD TAPE button Result The CD TAPE player starts playing 2 Press REPEAT A B button Result The indications appear START The flashes appear A B A Time is memorized 3 Press REPEAT A B button Result The indications appear END B Time is memorized Your selected passages are repeated 3 t...

Page 12: ...minutes by pressing TUNING and d Press PROGRAM SET Result VOL XX is displayed where XX corresponds to the volume already set 6 Press TUNING and to adjust the volume level and press PROGRAM SET Result The source to be selected is displayed 7 Press TUNING and to select the source to be played when the system switches on If you select You must also TAPE cassette Insert a recorded cassette in one of t...

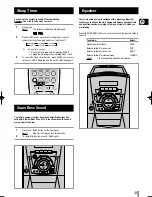
Page 13: ... called SBS Super Bass Sound This function makes the sound more powerful and real 1 Press the S BASS button on the front panel Result SBS ON is displayed for a few seconds 2 To cancel this function press S BASS again Your micro audio system is equipped with a preset equalizer that enables you to choose the most appropriate balance between treble and bass frequencies according to the type of music ...

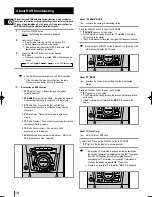
Page 14: ...raffic programs 6 TA Traffic Announcement Shows that a traffic announcement is in progress 7 EON Enhanced Other Networks Information Offers the RDS information on other networks About RDS broadcasting PS NAME RT CT Current FM frequency About PS NAME MODE Displays the name of broadcasting station Press the DISPLAY button to select the PS NAME PS NAME appears on the display If the PS information is ...

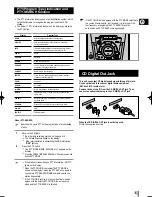
Page 15: ... the station is transmitting no PTY information NO PTY lights on the display When the PTY MODE is selected The PTY MODE is shown on the display press the PTY KEY once again to convert into PTY SEARCH MODE and auto search the station sequentially If the PTY MODE received in the course of auto search agrees with the selected PTY MODE the auto search stops and the PTY SEARCH is finished PTY Program T...

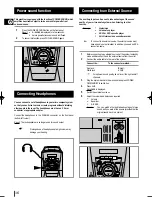
Page 16: ...cro audio system when listening to other sources Example A television A video disc player A DAT or DCC cassette player A Hi Fi stereo video cassette recorder To connect to an external source the external source must have an audio output terminal In addition you need an RCA connection cable 1 Before connecting to an external source set the system to standby mode and disconnect it and the external s...

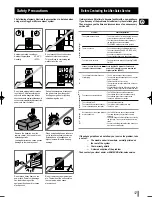
Page 17: ... damage of the equipment fire hazard or cause electric shock Problem The system does not work There is no sound The Timer does not work Incase it is not worked even the action is taken as above The compact disc player does not start playing The tape does not start playing The volume falls off The cassette is not erased correctly There is excessive wow and flutter Reception is poor or no radio stat...

Page 18: ...ON BUTTONS TAPE MM 39 only TAPE MM 29 only 2 POWER ON OFF 3 EQUALIZER PRESET 4 REV MODE 5 HEADPHONES JACK 6 PTY 7 DISPLAY 18 POWER SOUND 19 CD OPEN 10 AUX 11 FUNCTION CONTROL 12 REC PAUSE 13 S BASS 14 REPEAT A B 15 CD SYNCHRO 16 VOLUME CONTROL ...

Page 19: ... SEARCH 9 INFRA RED SIGNAL TRANSMITTER 10 TIMER CLOCK SETTING 11 TIMER SWITCH ON AND OFF 12 AUX 13 PROGRAM SET 14 FREQUENCY BAND SELECTION 15 FM MONO STEREO 16 TAPE PLAY AND AUTO REVERSE TAPE PLAY MM 29 only 17 TAPE PLAYBACK RECORD STOP 18 CD PLAY AND PAUSE 19 VOLUME INCREASE 20 TUNING MODE 21 VOLUME DECREASE GB 19 Remote Control MM 39 only ...

Page 20: ...atio 90 dB at 1 KHz with filter D A conversion 16 bit Wow and flutter Outside measurable limits Error correction system Cross Interleave Reed Solomon Code CIRC Laser type AIGaAS semiconductor Laser wave length 780 nm Disc sizes Diameter 120 or 80 mm Thickness 1 2 mm Scanning velocity 1 2 1 4m sec Rotation speed 200 to 500 rpm CASSETTE PLAYER Playing speed Normal speed 4 75 cm sec Recording system ...

Page 21: ...ELECTRONICS THIS APPLIANCE IS MANUFACTURED BY AH68 00059Y ...

Reviews: