background image

Basic Printing

12

2

Basic Printing 

This chapter explains the printing options and common printing 
tasks in Windows. 

This chapter includes:

• Printing a Document
• Printer Settings

- Layout Tab
- Paper Tab
- Graphics Tab
- Extras Tab
- About Tab
- Printer Tab
- Using a Favorite Setting
- Using Help

Printing a Document

N

OTES

• Your printer driver 

Properties

 window that appears in this 

User’s Guide may differ depending on the printer in use. 

However the composition of the printer properties window is 

similar.

• Check the Operating System(s) that are compatible 

with your printer. Please refer to the OS Compatibility 

section of Printer Specifications in your Printer User’s 

Guide.

• If you need to know the exact name of your printer, you can 

check the supplied CD-ROM.

The following procedure describes the general steps required 
for printing from various Windows applications. The exact steps 
for printing a document may vary depending on the application 

program you are using. Refer to the User’s Guide of your 
software application for the exact printing procedure.

1

Open the document you want to print.

2

Select 

Print

 from the 

File

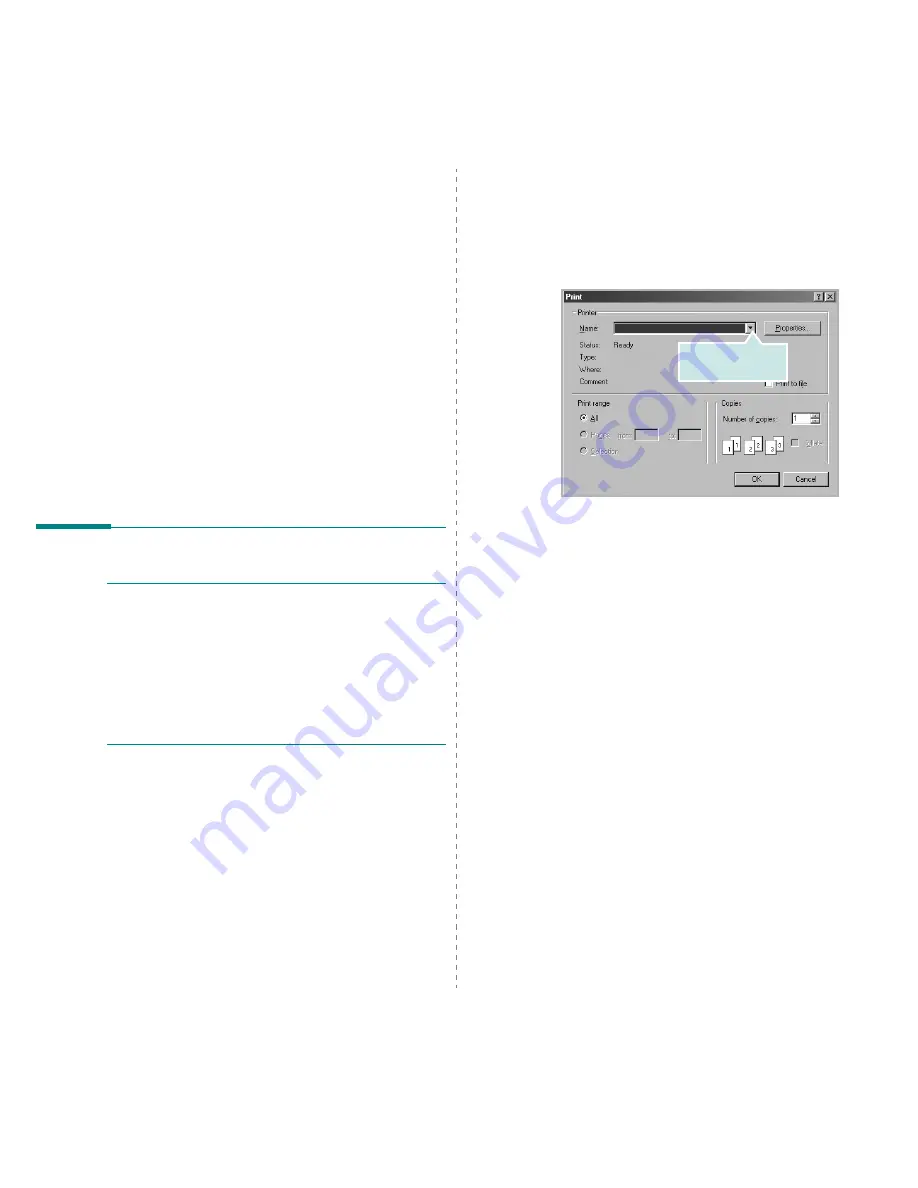
 menu. The Print window is 

displayed. It may look slightly different depending on your 
application. 
The basic print settings are selected within the Print 
window. These settings include the number of copies and 
print range.

3

Select 

your printer driver

 from the 

Name

 drop-down 

list.

4

To take advantage of the printer features provided by your 
printer driver, click 

Properties

 or 

Preferences 

in the 

application’s Print window. For details, see “Printer 

Settings” on page 13.
If you see 

Setup

Printer

, or 

Options

 in your Print 

window, click it instead. Then click 

Properties

 on the next 

screen.

5

Click 

OK

 to close the printer properties window.

6

To start the print job, click 

OK

 or 

Print

 in the Print 

window.

Make sure that your 
printer is selected.

Summary of Contents for ML ML-2510

Page 1: ...User s Guide User s Guide Samsung Samsung ML 2510 Series ML 2570 Series Monochrome Laser Printer Monochrome Laser Printer ...

Page 2: ...td Centronics is a trademark of Centronics Data Computer Corporation IBM and IBM PC are trademarks of International Business Machines Corporation PCL and PCL 6 are trademarks of Hewlett Packard company Microsoft Windows Windows 98 Windows Me Windows 2000 Windows NT 4 0 Windows XP 32 64 bit and Windows 2003 are registered trademarks of Microsoft Corporation PostScript 3 is a trademark of Adobe Syst...

Page 3: ...8 65 65 0 15 min www samsung com fr GERMANY 01805 121213 0 12 min www samsung de HUNGARY 06 40 985 985 www samsung com hu ITALIA 199 153 153 www samsung com it LUXEMBURG 02 261 03 710 www samsung lu NETHERLANDS 0900 20 200 88 0 10 min www samsung com nl NORWAY 231 627 22 www samsung com no POLAND 0 801 801 881 www samsung com pl PORTUGAL 80 8 200 128 www samsung com pt SLOVAKIA 0850 123 989 www sa...

Page 4: ...4 Network setup Introduction 4 1 Supported operating systems 4 1 Installing an external wired network interface server 4 2 5 Loading print media Selecting print media 5 1 Loading paper 5 4 Knowing an output location 5 6 6 Basic printing Printing a document 6 1 Canceling a print job 6 1 7 Ordering supplies and accessories Toner cartridge 7 1 Accessory 7 1 How to purchase 7 1 8 Maintenance Cleaning ...

Page 5: ...t 9 4 Understanding the LEDs 9 4 Solving general printing problems 9 5 Solving print quality problems 9 7 Common Windows problems 9 9 Common PostScript problems 9 9 Common Linux problems 9 10 Common Macintosh problems 9 10 10 Specifications Printer specifications 10 1 ...

Page 6: ...uid has been spilled into the machine If the machine has been exposed to rain or water If the machine does not operate properly after instructions have been followed If the machine has been dropped or the cabinet appears damaged If the machine exhibits a sudden and distinct change in performance 14 Adjust only those controls covered by the operating instructions Improper adjustment of other contro...

Page 7: ...tween the equipment and receiver Connect the equipment into an outlet on a circuit different from that to which the receiver is connected Consult the dealer or an experienced radio TV technician for help CAUTION Changes or modifications not expressly approved by the manufacturer responsible for compliance could void the user s authority to operate the equipment Canadian Radio Interference Regulati...

Page 8: ... to the pin marked by the letter E or by the safety Earth symbol or colored green and yellow or green You must connect the blue wire to the pin which is marked with the letter N or colored black You must connect the brown wire to the pin which is marked with the letter L or colored red You must have a 13 amp fuse in the plug adaptor or at the distribution board ...

Page 9: ...ates of the EEC Commission This declaration is valid for all samples that are part of this declaration which are manufactured according to the production charts appendix The standards relevant for the evaluation of safety EMC requirements are as follows 1 Certificate of conformity Test report issued by 2 Technical documentation kept at LVD SEMKO EMC SAMSUNG Electronics EURO Q A Lab in the U K Sams...

Page 10: ...ssional documents Print Watermarks You can customize your documents with words such as Confidential See the Software Section Print Posters The text and pictures of each page of your document are magnified and printed across the sheet of paper and can then be taped together to form a poster See the Software Section Save time and money Your printer allows you to use toner save mode to save toner See...

Page 11: ...compatible with Linux and Macintosh Your printer comes with both Parallel and USB interfaces You can also use a Network interface The ML 2571N comes with a built in network interface 10 100 Base TX However you need to buy and install the external wired network interface server to the ML 2510 and ML 2570 Features ML 2510 ML 2570 ML 2571N IEEE 1284 Parallel I I I USB 2 0 I USB 1 1 Compatible with US...

Page 12: ...ter s full features and contains information for maintaining your printer troubleshooting and installing accessories This user s guide also contains a Software Section providing you with information on how to print documents with your printer on various operating systems and how to use the supplied software utilities Network Printer User s Guide Contained on the network utilities CD provides you w...

Page 13: ...e area should be well ventilated and away from direct sunlight or sources of heat cold and humidity Do not set the printer close to the edge of your desk or table Clearance space Front 482 6 mm enough space so that tray can be opened Back 100 mm enough space for ventilation Right 100 mm enough space for ventilation Left 100 mm enough space for ventilation ...

Page 14: ...conds A demo page prints out Using toner save mode Toner save mode allows the printer to use less toner on each page Activating this mode extends the life of your toner cartridge and reduces your cost per page beyond what one would experience in the normal mode but it reduces print quality This setting is not available with the 1200dpi Best setting You can set the toner save mode from the printer ...

Page 15: ... ML 2571N only PCL6 driver Use this driver to print documents in the PCL6 PCL5e language ML 2570 ML 2571N only Postscript Printer Description PPD file Use the PostScript driver to print documents with complex fonts and graphics in the PostScript language ML 2570 ML 2571N only User s Guide in PDF Linux Printer driver Use this driver to run your printer from a Linux computer and print documents Smar...

Page 16: ...rinting O O O X O O Watermark O O X X X X Overlay O O X X X X Note Overlay is not supported in Windows NT 4 0 System requirements Before you begin ensure that your system meets the following requirements Windows Item Requirements Recommended Operating system Windows 98 Me NT 4 0 2000 XP 32 64 bit 2003 CPU Windows 98 Me NT 4 0 2000 Pentium II 400 MHz or higher Pentium III 933 MHz Windows XP 32 64 b...

Page 17: ...0 1 SuSE 8 2 9 2 Processor Pentium IV 1 GHz or higher RAM 256 MB or higher Free disk page 1 GB or higher Software Linux Kernel 2 4 or higher Glibc 2 2 or higher CUPS SANE Item Requirements Operating system Macintosh 10 3 ML 2510 8 6 9 2 and 10 1 10 4 ML 2570 ML 2571N RAM 128 MB Free disk space 200 MB Connection USB interface Network interface ...

Page 18: ...rporate intranet access SyncThru Web Service A web server embedded to your network print server which allows you to configure the network parameters necessary for the printer to connect to various network environments SetIP A utility program allowing you to select a network interface and manually configure the addresses for use with the TCP IP protocol For further details refer to the user s guide...

Page 19: ... server The ML 2571N is equipped with wired network interface allowing you to use your printer on a network To use the ML 2510 and ML 2570 in network environments you need to buy an optional external wired network interface server For order information see page 7 1 ...

Page 20: ...e The print media you choose should be appropriate for your project Size You can use any size print media that fits easily within the paper adjusters of the paper tray Weight Your printer supports print media weights as follows 16 to 43 lb 60 to 163 g m2 for the standard tray and manual tray 20 to 24 lb 75 to 90 g m2 for the manual duplex printing Brightness Some print media are whiter than others...

Page 21: ...93 x 9 84 inches Executive 184 2 x 266 7 mm 7 25 x 10 5 inches A5 148 5 x 210 mm 5 85 x 8 27 inches A6 105 x 148 5 mm 4 13 x 5 85 inches Envelope Envelope Monarch 98 4 x 190 5 mm 3 88 x 7 5 inches 20 to 24 lb 75 to 90 g m2 1 sheet of paper for the manual tray Envelope No 10 105 x 241 mm 4 12 x 9 5 inches Envelope DL 110 x 220 mm 4 33 x 8 66 inches Envelope C5 162 x 229 mm 6 38 x 9 02 inches Envelo...

Page 22: ...oid paper jams To prevent print media such as transparencies and label sheets from sticking together remove them as they print out Guidelines for special print media Type Guidelines Envelopes Successful printing on envelopes depends upon the quality of the envelopes When selecting envelopes consider the following factors Weight The weight of the envelope paper should not exceed 90 g m2 24 lb or ja...

Page 23: ...for only a single pass through the printer Do not use labels that are separating from the backing sheet or are wrinkled bubbled or otherwise damaged Card stock or custom sized materials Do not print on print media smaller than 76 mm 3 inches wide or 127 mm 5 inches long In the software application set margins at least 6 4 mm 0 25 inches away from the edges of the material Type Guidelines Loading p...

Page 24: ...blems 2 Adjust the manual tray paper width guides to the width of the paper Do not force too much or the paper will bend which could result in a paper jam or skew 3 When you print a document set the paper source and type in the software application See the Software Section Tips on using the manual tray Load only one sheet of print media at a time in the manual tray To prevent paper jams do not add...

Page 25: ...s up the print media and prints 6 Insert the next sheet into the manual tray and press the Cancel button Repeat this step for every page to be printed Note If you do not press the Cancel button after a pause the printer will automatically pick the print media Knowing an output location The output tray collects paper face down in the order in which the sheets were printed Note If you continuously p...

Page 26: ...as the printer group in Windows delete the job as follows 1 Click the Windows Start button 2 For Windows 98 Me NT 4 0 2000 select Settings and then Printers For Windows XP 32 64 bit 2003 select Printers and Faxes 3 Double click the Samsung ML 2510 Series Samsung ML 2570 Series Samsung ML 2570 Series PCL 6 or Samsung ML 2570 Series PS icon 4 From the Document menu select Cancel Printing Windows 98 ...

Page 27: ...ing accessory to your ML 2510 and ML 2570 printer How to purchase To order Samsung authorized supplies or accessories contact your local Samsung dealer or the retailer where you purchased your printer or visit www samsungprinter com and select your country region for information on calling for technical support Type Yielda a ISO 19752 5 coverage Part number High yield Approx 3 000 pages ML 2010D3 ...

Page 28: ... the cloth slightly with water but be careful not to let any water drip onto or into the printer Cleaning the inside of the printer 1 Turn the printer off and unplug the power cord Wait for the printer to cool down 2 Open the front cover and pull the toner cartridge out Set it on a clean flat surface Caution Cleaning the cabinet of the printer with cleaning materials containing large amounts of al...

Page 29: ...ul not to reach too far into the printer The fuser area may be hot Note The long strip of glass is hard to locate 6 Reinsert the manual tray 7 Hold the toner cartridge by the handle and slowly insert the cartridge into the opening in the printer Tabs on the sides of the cartridge and corresponding grooves within the printer will guide the cartridge into the correct position until it locks into pla...

Page 30: ...te streaks and light printing occur The Smart Panel program window appears on the computer The Error LED blinks red If this happens you can temporarily reestablish print quality by redistributing the remaining toner in the cartridge In some cases white streaks or light printing will still occur even after you have redistributed the toner 1 Open the front cover 2 Pull the toner cartridge out 3 Thor...

Page 31: ...tch the drum of the cartridge 5 Remove the paper protecting the toner cartridge by pulling the packing tape 6 Hold the toner cartridge by the handle and slowly insert the cartridge into the opening in the printer Tabs on the sides of the cartridge and corresponding grooves within the printer will guide the cartridge into the correct position until it locks into place completely 7 Close the front c...

Page 32: ...feed problems resulting from worn parts and to maintain your printer in top working condition the following items will need to be replaced when the specified number of pages have been printed or when the life span of each item has expired Samsung highly recommends that an authorized service provider dealer or the retailer where you bought the printer replaces the items Items Yield Average Transfer...

Page 33: ... the printer In the paper feed area In the standard tray 1 Remove the jammed paper by gently pulling it straight out Make sure that all of the paper is properly aligned in the standard tray If the paper does not move when you pull or if you do not see the paper in this area check the fuser area around the toner cartridge See page 9 2 2 Open and close the front cover to resume printing the document...

Page 34: ...l when removing paper from the printer 2 If necessary pull the manual tray out 3 Remove the jammed paper by gently pulling it out If you do not see the jammed paper or if there is any resistance removing the paper stop pulling and go to the paper exit area See page 9 3 4 If necessary reinsert the manual tray 5 Replace the toner cartridge and close the front cover Printing automatically resumes Cau...

Page 35: ...efore opening the covers 4 Loosen the jammed paper if it is caught in the heat roller Then gently pull the jammed paper out 5 Close the inner cover and top cover Printing automatically resumes Tips for avoiding paper jams By selecting the correct print media types most paper jams can be avoided When a paper jam occurs follow the steps outlined on page 9 1 Follow the procedures on page 5 4 Ensure t...

Page 36: ...he checklist does not resolve the printer problem check the following troubleshooting sections Understanding the LEDs on page 9 4 Solving general printing problems on page 9 5 Common Windows problems on page 9 9 Common PostScript problems on page 9 9 Common Linux problems on page 9 10 Common Macintosh problems on page 9 10 Understanding the LEDs LED Status Description Error Red On A paper jam has ...

Page 37: ...make sure that the printer is attached to the correct one The printer does not print Continued The printer may be configured incorrectly Check the printer properties to ensure that all of the print settings are correct The printer driver may be incorrectly installed Reinstall the printer driver See the Software Section Try printing a test page The printer is malfunctioning Check the LEDs on the co...

Page 38: ...debris inside the printer Open the front cover and remove the debris Condition Possible cause Suggested solutions The printer prints but the text is wrong garbled or incomplete The printer cable is loose or defective Disconnect and reconnect the printer cable Try a print job that you have already printed successfully If possible attach the cable and printer to another computer and try a print job ...

Page 39: ...anufacturing processes can cause some areas to reject toner Try a different kind or brand of paper The toner cartridge may be defective See Vertical repetitive defects on the next column If these steps do not correct the problems contact a service representative Vertical lines If black vertical streaks appear on the page The drum inside the toner cartridge has probably been scratched Install a new...

Page 40: ...e paper curl See page 5 2 Turn over the stack of paper in the tray Also try rotating the paper 180 in the tray Condition Suggested solutions Wrinkles or creases Ensure that the paper is loaded properly Check the paper type and quality See page 5 2 Turn over the stack of paper in the tray Also try rotating the paper 180 in the tray Back of printouts are dirty The transfer roller may be dirty See pa...

Page 41: ...e following situations are PostScript language specific and may occur when several printer languages are being used Fail To Print A printer timeout error occurred messages appear These messages may appear during printing Just keep waiting until the printer finishes printing If the message appears in standby mode or after printing has been completed check the connection and or whether an error has ...

Page 42: ...t device file when printing a document Please avoid changing print job parameters via LPR GUI for example while a print job is in progress Known versions of CUPS server break the print job whenever print options are changed and then try to restart the job from the beginning Since Unified Linux Driver locks mfp port while printing the abrupt termination of the driver keeps the port locked and there...

Page 43: ... 2571N Power save mode Less than 6 5 W ML 2510 8 5 W ML 2570 ML 2571N Noise levelb Standby mode Less than 35 dBA Printing mode Less than 53 dBA Toner cartridge lifec 3 000 pages at ISO 19752 5 coverage ships with 1 000 pages starter toner cartridge Duty cycle Monthly Up to 10 000 pages Weight 8 9 Kg including consumables Package weight Paper 1 6 Kg Plastic 0 3 Kg External dimensions W x D x H 13 9...

Page 44: ...river ML 2570 ML 2571N only Windows 98 Me NT 4 0 2000 XP 32 64 bit 2003 PostScript driver ML 2570 ML 2571N only Windows 98 Me NT 4 0 2000 XP 32 64 bit 2003 Macintosh OS 8 6 9 2 10 1 10 4 Options Ethernet 10 100 Base TX wired network interface server ML 2510 ML 2570 only a Print speed will be affected by operating system used computing perfor mance application software connection method print media...

Page 45: ...aper exit area 9 3 standard tray 9 1 paper load manual tray 5 5 standard tray 5 4 paper size specifications 5 2 paper type specifications 5 2 PostScript problems 9 9 print quality problems solve 9 7 printing configuration page 8 5 demo page 2 1 problems 9 5 problem solve checklist 9 4 Linux 9 10 Macintosh 9 10 paper jams 9 1 printing 9 5 printing quality 9 7 PS errors 9 9 Windows 9 9 Q quality pro...

Page 46: ...Samsung Printer Software section ...

Page 47: ...nting 4 Installing Software for Network Printing 7 Changing the Software Language 10 Reinstalling Printer Software 10 Removing Printer Software 11 Chapter 2 BASIC PRINTING Printing a Document 12 Printer Settings 13 Layout Tab 13 Paper Tab 14 Graphics Tab 15 Extras Tab 16 About Tab 16 Printer Tab 16 Using a Favorite Setting 17 Using Help 17 ...

Page 48: ... 21 Deleting a Watermark 21 Using Overlays 22 What is an Overlay 22 Creating a New Page Overlay 22 Using a Page Overlay 22 Deleting a Page Overlay 22 Chapter 4 USING WINDOWS POSTSCRIPT DRIVER ML 2570 2571N ONLY Printer Settings 23 Advanced 23 Using Help 23 Chapter 5 SHARING THE PRINTER LOCALLY Setting Up a Host Computer 24 Setting Up a Client Computer 24 Chapter 6 USING SMART PANEL Understanding S...

Page 49: ...Printers Configuration 29 Ports Configuration 30 Configuring Printer Properties 30 Printing a Document 31 Printing from Applications 31 Printing Files 31 Chapter 8 USING YOUR PRINTER WITH A MACINTOSH Installing printer driver for Macintosh 32 ML 2510 only 32 ML 2570 ML 2571N only 33 Setting Up the Printer 33 ML 2510 only 33 ML 2570 ML 2571N only 34 Printing 34 Printing a Document 34 Changing Print...

Page 50: ...ached to a network skip this step and go to Installing Software for Network Printing on page 7 You can install the printer software using the typical or custom method NOTE If the New Hardware Wizard window appears during the installation procedure click in the upper right corner of the box to close the window or click Cancel Typical Installation This is recommended for most users All components ne...

Page 51: ... and skip to step 7 6 If the test page prints out correctly click Yes If not click No to reprint it 7 To register yourself as a user of Samsung Printers in order to receive information from Samsung select the checkbox and click Finish You are now sent to the Samsung web site Otherwise just click Finish NOTE After setup is complete if your printer driver doesn t work properly reinstall the printer ...

Page 52: ... don t want to connect the printer at this time click Next and No on the following screen Then the installation will start and a test page will not be printed at the end of the installation The installation window that appears in this User s Guide may differ depending on the printer and interface in use 6 Select the components to be installed and click Next NOTE You can change the desired installa...

Page 53: ...d for most users All components necessary for printer operations will be installed 1 Make sure that the printer is connected to your network and powered on For details about connecting to the network see the supplied printer s User s Guide 2 Insert the supplied CD ROM into your CD ROM drive The CD ROM should automatically run and an installation window appears If the installation window does not a...

Page 54: ... Finish Otherwise just click Finish NOTE After setup is complete if your printer driver doesn t work properly reinstall the printer driver See Reinstalling Printer Software on page 10 Custom Installation You can choose individual components to install and set a specific IP address 1 Make sure that the printer is connected to your network and powered on For details about connecting to the network s...

Page 55: ...ss or MAC address print a Network Configuration page b Configure an IP address subnet mask and gateway for the printer manually and click Configure to set the specific IP address for the network printer c Click Next 6 Select the components to be installed After selecting the components the following window appears You can also change the printer name set the printer to be shared on the network set...

Page 56: ...r the printer To find a shared network printer UNC Path select Shared Printer UNC and enter the shared name manually or find a shared printer by clicking the Browse button You will see a component list so that you can reinstall any item individually NOTE If your printer is not already connected to the computer the following window will appear After connecting the printer click Next If you don t wa...

Page 57: ...intenance 3 Select Remove and click Next You will see a component list so that you can remove any item individually 4 Select the components you want to remove and then click Next 5 When your computer asks you to confirm your selection click Yes The selected driver and all of its components are removed from your computer 6 After the software is removed click Finish ...

Page 58: ...om various Windows applications The exact steps for printing a document may vary depending on the application program you are using Refer to the User s Guide of your software application for the exact printing procedure 1 Open the document you want to print 2 Select Print from the File menu The Print window is displayed It may look slightly different depending on your application The basic print s...

Page 59: ... refer to the corresponding Windows User s Guide or online help 1 Click the Windows Start button 2 Select Printers and Faxes 3 Select your printer driver icon 4 Right click on the printer driver icon and select Printing Preferences 5 Change the settings on each tab click OK Layout Tab The Layout tab provides options to adjust how the document appears on the printed page The Layout Options includes...

Page 60: ...ne sheet at a time into the Manual Tray or Multi Purpose Tray If the paper source is set to Auto Selection the printer automatically picks up print material in the following tray order Manual Tray or Multi Purpose Tray Tray1 Type Set Type to correspond to the paper loaded in the tray from which you want to print This will let you get the best quality printout If not print quality may not be acheiv...

Page 61: ...printer to use less toner on each page Off If you don t need to save toner when printing a document select this option Advanced Options You can set advanced settings by clicking the Advanced Options button TrueType Options This option determines what the driver tells the printer about how to image the text in your document Select the appropriate setting according to the status of your document Thi...

Page 62: ...r document rather than downloading the fonts used in your document Because downloading fonts takes time selecting this option can speed up your printing time When using Printer fonts the printer will try to match the fonts used in your document to those stored in its memory If however you use fonts in your document that are very different from those resident in the printer your printed output will...

Page 63: ...tem from the Favorites drop down list The printer is now set to print according to the Favorites setting you selected To delete a Favorites item select it from the list and click Delete You can also restore the printer driver s default settings by selecting Printer Default from the list Using Help Your printer has a help screen that can be activated by clicking the Help button in the printer prope...

Page 64: ... Printing Multiple Pages on One Sheet of Paper N Up Printing You can select the number of pages to print on a single sheet of paper To print more than one page per sheet the pages will be reduced in size and arranged in the order you specify You can print up to 16 pages on one sheet 1 To change the print settings from your software application access printer properties See Printing a Document on p...

Page 65: ...g the sheets together 4 Click the Paper tab select the paper source size and type 5 Click OK and print the document You can complete the poster by pasting the sheets together 0 15 inches 0 15 inches Printing Booklets This printer feature allows you to print your document on both sides of the paper and arranges the pages so that the paper can be folded in half after printing to produce a booklet 1 ...

Page 66: ...rint the document NOTE If your printer does not have a duplex unit you should complete the printing job manually The printer prints every other page of the document first After printing the first side of your job the Printing Tip window appears Follow the on screen instructions to complete the printing job Long Edge Short Edge 2 5 3 2 5 3 2 5 3 2 5 3 Printing a Reduced or Enlarged Document You can...

Page 67: ... message displays in the preview window When the First Page Only box is checked the watermark prints on the first page only 4 Select watermark options You can select the font name style size or grayscale level from the Font Attributes section and set the angle of the watermark from the Message Angle section 5 Click Add to add a new watermark to the list 6 When you have finished editing click OK an...

Page 68: ...ST Dear ABC Regards WORLD BEST Using a Page Overlay After an overlay has been created it is ready to be printed with your document To print an overlay with a document 1 Create or open the document you want to print 2 To change the print settings from your software application access printer properties See Printing a Document on page 12 3 Click the Extras tab 4 Select the desired overlay from the O...

Page 69: ...se NOTES Most Windows applications will override settings you specify in the printer driver Change all print settings available in the software application first and change any remaining settings using the printer driver The settings you change remain in effect only while you are using the current program To make your changes permanent make them in the Printers folder The following procedure is fo...

Page 70: ...ied CD ROM Setting Up a Host Computer 1 Start Windows 2 From the Start menu select Printers and Faxes 3 Double click your printer driver icon 4 From the Printer menu select Sharing 5 Check the Share this printer box 6 Fill in the Shared Name field and then click OK Setting Up a Client Computer 1 Right click the Windows Start button and select Explorer 2 Open your network folder in the left column ...

Page 71: ...ick this icon in Linux If you are a Windows user from the Start menu select Programs or All Programs your printer driver name Smart Panel NOTES If you have already installed more than one Samsung printer first select the printer model you want in order to use the corresponding Smart Panel Right click in Windows or Linux or click in Mac OS X the Smart Panel icon and select your printer name The Sma...

Page 72: ...the Smart Panel icon and select Options The following window opens Display when job is finished for network printer The computer shows the Smart Panel popup window or balloon when your job is complete in Windows Only for Windows network supported printers Display when error occurs during printing The computer shows the Smart Panel popup window or balloon when an error occurs during printing Displa...

Page 73: ...talled automatically this is possible on a wide set of the most popular Linux clones Installing the Unified Linux Driver Installing the Unified Linux Driver 1 Make sure that you connect your machine to your computer Turn both the computer and the machine on 2 When the Administrator Login window appears type in root in the Login field and enter the system password NOTE You must log in as a super us...

Page 74: ... in the Login field and enter the system password NOTE You must log in as a super user root to install the printer software If you are not a super user ask your system administrator 2 Insert the printer software CD ROM The CD ROM will automatically run If the CD ROM does not automatically run click the icon at the bottom of the desktop When the Terminal screen appears type in If the CD ROM is seco...

Page 75: ... Printers Configuration button Scanners Configuration button for MFP device only Ports Configuration button Printers Configuration Printers configuration has the two tabs Printers and Classes Printers Tab You can see the current system s printer configuration by clicking on the printer icon button on the left side of the Unified Driver Configurator window You can use the following printer control ...

Page 76: ...pen the Unified Driver Configurator If necessary switch to Printers configuration 2 Select your machine on the available printers list and click Properties 3 The Printer Properties window opens The following five tabs display at the top of the window General allows you to change the printer location and name The name entered in this tab displays on the printer list in Printers configuration Connec...

Page 77: ...es files such as color options image size or image position Device allows you to set the print resolution paper source and destination 5 Click Apply to apply the changes and close the Properties window 6 Click OK in the LPR GUI window to start printing 7 The Printing window appears allowing you to monitor the status of your print job To abort the current job click Cancel Printing Files You can pri...

Page 78: ...onnect your printer to the computer Turn on your computer and printer 2 Insert the CD ROM which came with your printer into the CD ROM drive 3 Double click CD ROM icon that appears on your Macintosh desktop 4 Double click the MAC_Installer folder 5 Double click the MAC_Printer folder 6 Double click the Samsung SPL2 Installer icon 7 Enter the password and click OK 8 The Samsung SPL Installer window...

Page 79: ...fore connecting your printer make sure that your printer supports a network interface by referring to Printer Specifications in your Printer User s Guide 1 Follow the instructions on Installing printer driver for Macintosh on page 32 to install the PPD and Filter files on your computer 2 Open Print Setup Utility from the Utilities folder 3 Click Add on the Printer List 4 Select the IP Printing tab...

Page 80: ...our computer 2 Open Print Center or Printer Setup Utility from the Utilities folder 3 Click Add on the Printer List 4 Select the USB tab 5 Select your printer name and click Add 6 If Auto Select does not work properly select Samsung in Printer Model and your printer name in Model Name Your machine appears on the Printer List and is set as the default printer Printing NOTES The Macintosh printer s ...

Page 81: ...e and adjusting print quality Select Printer Features from the Presets drop down list to access the following features Mac OS 10 3 Image Mode ML 2570 2571N Image Mode allows the user to enhance printouts The available options are Normal and Text Enhance Fit to Page ML 2570 ML 2571N This printer feature allows you to scale your print job to any selected paper size regardless of the digital document...

Page 82: ...application select Print from the File menu 2 Select Layout 3 Select the number of pages you want to print on one sheet of paper on the Pages per Sheet drop down list 4 Select the page order from the Layout Direction option To print a border around each page on the sheet select the option you want from the Border drop down list 5 Click Print and the printer prints the selected number of pages on o...

Page 83: ...ing Macintosh 36 Windows 18 O orientation print 31 Windows 13 overlay create 22 delete 22 print 22 P Paper properties set 14 paper size set 14 print 31 paper source set 31 Windows 14 paper type set Macintosh 35 print 31 poster print 19 PostScript driver installing 23 print document 12 fit to page 20 from Macintosh 34 from Windows 12 N up Macintosh 36 Windows 18 overlay 22 poster 21 scaling 20 wate...

Page 84: ...pe option 15 software install Macintosh 32 Windows 4 reinstall Windows 10 system requirements Macintosh 32 uninstall Macintosh 32 Windows 11 status monitor use 25 T toner save set 15 U uninstall software Macintosh 32 Windows 11 uninstalling MFP driver Linux 28 W watermark create 21 delete 21 edit 21 print 21 ...

Page 85: ...www samsungprinter com GGGGGGGGGGGGGRev 2 00 ...

Reviews: