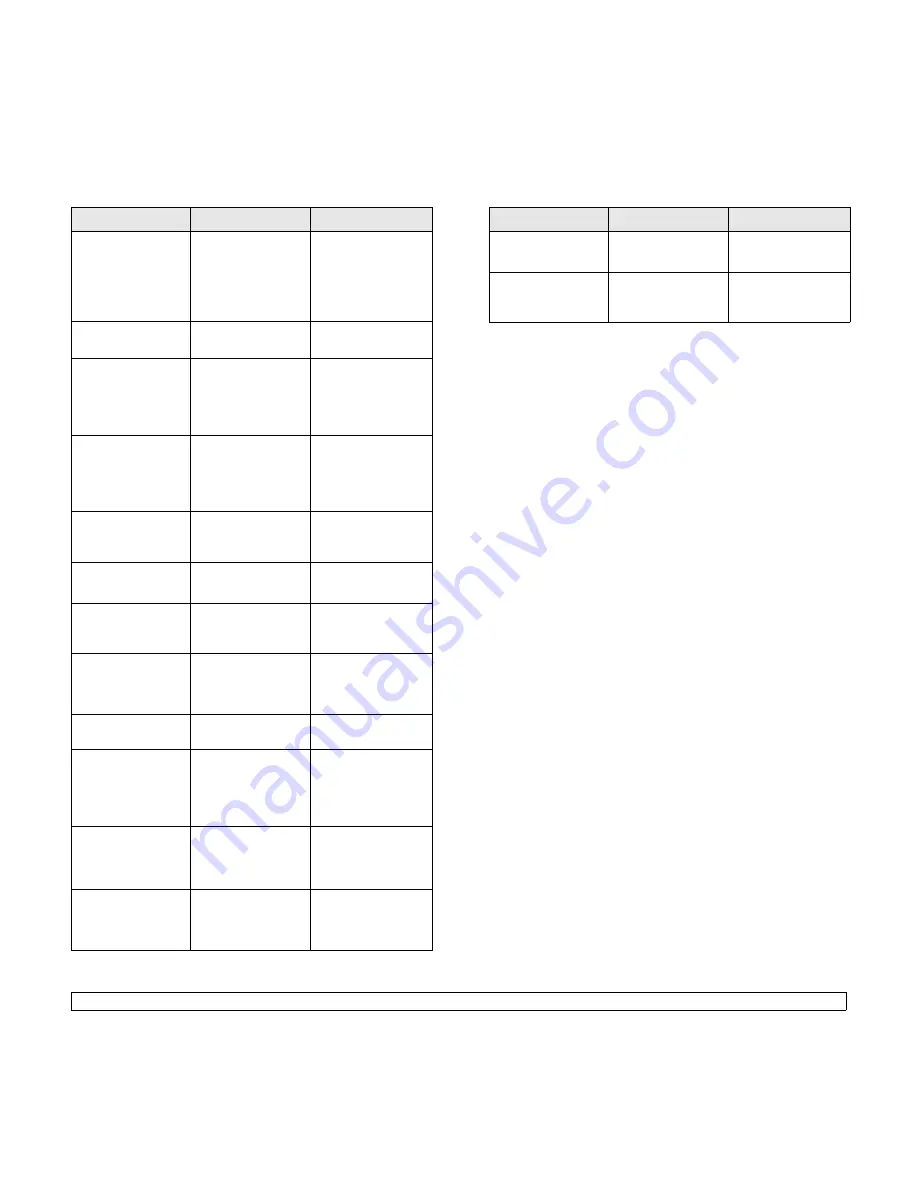
Samsung ML-3470 User Manual Download Page 49

9

.7   

<Troubleshooting>

LSU Motor Error

Cycle Power

A problem has 
occurred in the LSU 
(Laser Scanning 
Unit).

Unplug the 

power 

cord

 and plug it back 

inches. If the 
problem persists, 
please call for 
service.

Main Motor 
Locked

There is a problem 
in the main motor.

Open and then close 
the 

front cover

.

Open Heat Error

Cycle Power

There is a problem 
in the fuser unit.

Unplug the 

power 

cord

 and plug it back 

in. If the problem 
persists, please call 
for service.

Over Heat Error

Cycle Power

There is a problem 
in the fuser unit.

Unplug the 

power 

cord

 and plug it back 

in. If the problem 
persists, please call 
for service.

Paper Jam 0

Open/Close Door

Paper has jammed 
in the feeding area 
of the tray.

Clear the jam. See 
page 9.1 and 
page 9.1.

Paper Jam 1

Open/Close Door

Paper has jammed 
in the fuser area.

Clear the jam. See 
page 9.3.

Paper Jam 2

Check Inside

Paper has jammed 
in the paper exit 
area.

Clear the jam. See 
page 9.3.

Printing...

The printer is 
printing jobs using 
the displayed 
language.

Complete your 
printing.

Ready

The printer is on-line 
and ready to printer.

Use your printer.

Self Diagnostic 
LSU

The LSU(Laser 
Scanning Unit) in 
your printer is 
checking some 
problems detected.

Please wait a few 
minutes.

Self Diagnostic 
Temperature

The engine in your 
printer is checking 
some problems 
detected.

Please wait a few 
minutes.

Sleeping...

The printer is on 
power save mode.

When data is 
received, it switches 
to on-line 
automatically.

Message

Meaning

Suggested solutions

Tray 1

Paper Empty

There is no paper in 
the 

tray 1

.

Load paper in the 

tray 1

. See page 5.5.

Tray 2

Paper Empty

There is no paper in 
the 

optional tray 2

.

Load paper in the 

optional tray 2

. See 

page 5.5.

Message

Meaning

Suggested solutions

Summary of Contents for ML-3470

Page 1: ......

Page 2: ...Samsung logo are trademarks of Samsung Electronics Co Ltd IBM and IBM PC are trademarks of International Business Machines Corporation PCL and PCL 6 are trademarks of Hewlett Packard company Microsoft Windows and Windows Vista are either registered trademarks or trademarks of Microsoft Corporation PostScript 3 is a trademark of Adobe System Inc UFST and MicroType are registered trademarks of Agfa ...

Page 3: ...00 299 0013 www samsung com latin HONDURAS 800 7919267 HONG KONG 3698 4698 www samsung com hk HUNGARY 06 80 SAMSUNG 726 7864 www samsung com INDIA 3030 8282 1800 110011 www samsung com INDONESIA 0800 112 8888 www samsung com ITALIA 800 SAMSUNG 726 7864 www samsung com JAMAICA 1 800 234 7267 www samsung com latin JAPAN 0120 327 527 www samsung com jp LATVIA 800 7267 www samsung com lv LITHUANIA 8 8...

Page 4: ...64 www samsung com latin TURKEY 444 77 11 www samsung com U A E 800 SAMSUNG 726 7864 8000 4726 www samsung com U K 0845 SAMSUNG 726 7864 www samsung com U S A 1 800 SAMSUNG 726 7864 www samsung com us UKRAINE 8 800 502 0000 www samsung com UZBEKISTAN 8 10 800 500 55 500 www samsung com uz VENEZUELA 0 800 100 5303 www samsung com latin VIETNAM 1 800 588 889 www samsung com COUNTRY CUSTOMER CARE CEN...

Page 5: ... font setting 2 6 3 Software overview Supplied software 3 1 Printer driver features 3 2 System requirements 3 2 4 Network setup ML 3471ND only Introduction 4 1 Supported operating systems 4 1 Configuring TCP IP 4 2 Using SetIP program 4 2 Configuring EtherTalk 4 3 Setting Ethernet speed 4 3 Restoring the network configuration 4 3 Printing a network configuration page 4 3 5 Loading print media Sele...

Page 6: ...g checklist 9 6 Understanding display messages 9 6 Toner cartridge related messages 9 8 Solving general printing problems 9 9 Solving print quality problems 9 11 Common Windows problems 9 13 Common PostScript problems 9 13 Common Linux problems 9 14 Common Macintosh problems 9 14 10 Installing accessories Precautions when installing accessories 10 1 Installing a memory DIMM 10 1 Installing a wirel...

Page 7: ...equently used 13 Unplug the machine from the PC and AC wall outlet and refer servicing to qualified service personnel under the following conditions When any part of the power cord plug or connecting cable is damaged or frayed If liquid has been spilled into the machine If the machine has been exposed to rain or water If the machine does not operate properly after instructions have been followed I...

Page 8: ...environmentally safe recycling Business users should contact their supplier and check the terms and conditions of the purchase contract This product should not be mixed with other commercial wastes for disposal Radio Frequency Emissions FCC Regulations This device complies with Part 15 of the FCC Rules Operation is subject to the following two conditions This device may not cause harmful interfere...

Page 9: ...n of the laws of the member states related to low voltage equipment January 1 1996 Council Directive 89 336 EEC 92 31 EEC approximation of the laws of the Member States related to electromagnetic compatibility March 9 1999 Council Directive 1999 5 EC on radio equipment and telecommunications terminal equipment and the mutual recognition of their conformity A full declaration defining the relevant ...

Page 10: ... where use of wireless devices may be restricted or eliminated When in environments where you are uncertain of the sanction to use wireless devices ask the applicable authority for authorization prior to use or turning on the wireless device Every country has different restrictions on the use of wireless devices Since your system is equipped with a wireless device when traveling between countries ...

Page 11: ...v ...

Page 12: ...aple the pages See the Software Section Print Posters The text and pictures of each page of your document are magnified and printed across the sheet of paper and can then be taped together to form a poster See the Software Section 9 8 Save time and money This printer allows you to use toner save mode to save toner See page 2 5 You can print on both sides of the paper to save paper See the Software...

Page 13: ...0 Base TX NA I Wireless LAN IEEE 802 11 b g Wireless LAN NA O PostScript Emulation I I Duplex printinga a Printing on both sides of paper I I Printer overview Front view 1 output tray 7 multi purpose tray 2 control panel 8 front cover 3 handle 9 output support 4 paper level indicator 10 multi purpose tray paper width guides 5 optional tray 2 11 multi purpose tray extension 6 tray 1 The figure abov...

Page 14: ...d ML 3471ND 1 Menu Enters Menu mode and scrolls through the available menus 2 scroll buttons Scroll through the options available in the selected menu and increase or decrease values 3 OK Confirms the selection on the display 4 Back Sends you back to the upper menu level 5 Toner Save Allows you to save on toner by using less toner in printing 6 Duplex Allows you to print documents on both sides of...

Page 15: ...d and you selected Continue at the Toner Exhausted prompt See page 9 6 The toner cartridge is low Order a new toner cartridge You can temporarily improve print quality by redistributing the toner See page 8 3 Finding more information You can find information for setting up and using your from the following resources either printed or onscreen Quick Install Guide Provides information on setting up ...

Page 16: ...ined by the height of the machine above sea level The following information will guide you on how to set your machine to the best print quality or best quality of print Before you set the altitude value find the altitude where you are using the machine 1 Ensure that you have installed the printer driver with the provided Printer Software CD 2 Double click the Smart Panel icon on the Windows task b...

Page 17: ...roll buttons to access the desired setting option or the required value 5 Press OK to save your selection An asterisk appears next to the selection on the display indicating that it is now the default 6 Press Stop to return to Standby mode After 60 seconds of inactivity no key being pressed the printer automatically returns to Standby mode Note Print settings made from the printer driver on a conn...

Page 18: ...em Explanation Orientation Choose the default orientation of the print image on the page Simplex Margin Set the margin of print materials for one sided printing You can increase or decrease the value in 1 mm increments Portrait Landscape Duplex To print on both sides of paper choose the binding edge as follows Long Edge Flip on the long edge Prints pages to read like a book Short Edge Flip on the ...

Page 19: ...t from enhanced line screening Darkness You can lighten or darken the print on the page by changing the toner density setting The Normal setting usually produces the best result Use the Light toner density setting to save toner Image Enhance This item enhances the print quality Normal Doesn t enhance the quality Text Enhance Enhances letters and simple figures System Setup menu Use the System Setu...

Page 20: ...ing Point Size item PCL46 PCL54 s interval and point size are fixed Item Explanation PostScript This menu provides you with the Print PS Error menu item EPSON This menu sets the EPSON emulation configuration Symbol This item selects the symbol to be used in PCL emulation The symbol is the group of numbers marks and special signs being used when printing letters Point Size When you select one betwe...

Page 21: ...Network Info This item print a page showing the network parameters you set Item Explanation Printing a demo page Print a demo page to make sure that the printer is operating correctly 1 Press Menu and then OK when Information appears 2 Press the scroll buttons until Demo Page appears and press OK A demo page prints out Changing the display language To change the language that is displayed on the c...

Page 22: ... 2 Press OK to access the font setting 3 Press the left right arrow until Setup displays 4 Press the left right arrow until PCL displays 5 Press the left right arrow until Symbol displays 6 Press the left right arrow until your preferred font displays 7 Press OK 8 Press Stop to return to machine ready mode Note Following information shows the proper font list for corresponding languages Russian CP...

Page 23: ...r s status and alerts you when an error occurs during printing Printer Settings Utility This program is automatically installed when you install the Smart Panel PostScript Printer Description PPD file Use the PostScript driver to print documents with complex fonts and graphics in the PostScript language Set IP Use this program to set your printer s TCP IP addresses User s Guide in PDF Linux Printe...

Page 24: ...ce for first page O X O X Watermark O X X X Overlay O X X X System requirements Before you begin ensure that your system meets the following requirements Windows Note For Windows 2000 XP 2003 Vista users with administrator privileges can install the software Item Requirements Recommended Operating system Windows 2000 XP 2003 Vista CPU Windows 2000 Pentium II 400 MHz or higher Pentium III 933 MHz W...

Page 25: ...2 10 1 SuSE 8 2 9 2 Processor Pentium IV 1 GHz or higher RAM 256 MB or higher Free disk page 1 GB or higher Software Linux Kernel 2 4 or higher Glibc 2 2 or higher CUPS SANE Item Requirements Operating system Macintosh 8 6 9 2 and 10 1 10 5 RAM 128 MB Free disk space 200 MB Connection USB interface Network interface ...

Page 26: ...ing network devices and lets you remotely monitor and troubleshoot network machines from any sith with corporate internet access Download this program from http solution samsungprinter com SyncThru Web Service A web server embedded to your network print server which allows you to configure the network parameters necessary for the printer to connect to various network environments SetIP Utility pro...

Page 27: ...ttom line of the display 2 Press OK when TCP IP appears 3 Press the scroll buttons until DHCP or BOOTP appears and press OK 4 Press Stop to return to Standby mode Using SetIP program This program is for the network IP setting using the MAC address which is the hardware serial number of the network printer card or interface Especially it is for the network administrator to set several network IPs a...

Page 28: ... Ethernet Speed appears and press OK 3 Press the scroll buttons until the speed you want appears and press OK 4 Press Stop to return to Standby mode Restoring the network configuration You can return the network configuration to its default settings 1 Press Menu until Network appears on the bottom line of the display and press OK 2 Press the scroll buttons until Clear Setting appears and press OK ...

Page 29: ...hoose should be appropriate for your project Size You can use any size media that fits easily within the paper adjusters of the paper tray Weight Your printer supports print media weights as follows 16 to 24 lb bond 60 to 90 g m2 for the tray 1 and optional tray 2 16 to 43 lb bond 60 to 163 g m2 for the multi purpose tray 20 to 24 lb 75 to 90 g m2 for the duplex printing Brightness Some print medi...

Page 30: ...Executive 184 2 x 266 7 mm 7 25 x 10 5 inches A5 148 5 x 210 mm 5 85 x 8 27 inches A6 105 x 148 5 mm 4 13 x 5 85 inches Envelope Envelope Monarch 98 4 x 190 5 mm 3 88 x 7 5 inches 75 to 90 g m2 20 to 24 lb 5 sheets of 75 g m2 20 lb in the multi purpose tray Envelope COM 10 105 x 241 mm 4 12 x 9 5 inches Envelope DL 110 x 220 mm 4 33 x 8 66 inches Envelope C5 162 x 229 mm 6 38 x 9 02 inches Envelop...

Page 31: ...heet at a time through the multi purpose tray to avoid paper jams To prevent print media such as transparencies and label sheets from sticking together remove them as they print out Guidelines for special print media Media type Guidelines Envelopes Successful printing on envelopes depends upon the quality of the envelopes When selecting envelopes consider the following factors Weight The weight of...

Page 32: ...o not run a sheet of labels through the printer more than once The adhesive backing is designed for only a single pass through the printer Do not use labels that are separating from the backing sheet or are wrinkled bubbled or otherwise damaged Card stock or custom sized materials Do not print on media smaller than 76 mm 3 inches wide or 127 mm 5 inches long In the software application set margins...

Page 33: ... the multi purpose tray You can load previously printed paper The printed side should be facing up with an uncurled edge at the front If you experience problems with paper feed turn the paper around Note that the print quality is not guaranteed Changing the size of the paper in the tray 1 To load longer sizes of paper such as Legal sized paper you need to adjust the paper guides to extend the pape...

Page 34: ...ng on the media type you are using keep the following loading guidelines Envelopes Flap side down and with the stamp area on the top left side If you need to do the printing job with a wrinkled envelopes open the rear cover see page 5 8 Push the pressure lever on each side down Transparencies Print side up and the top with the adhesive strip entering the printer first Labels Print side up and top ...

Page 35: ...ansparencies If not they may tear while exiting the printer Using manual feed mode You can manually load a sheet of print material in the multi purpose tray if you select Manual Feed in the Source option from the Paper tab when you change print settings to print a document See the Software Section Manually loading paper can be helpful when you want to check the print quality after each page is pri...

Page 36: ...er is printing Printing to the output tray Face down The output tray collects paper face down in the order in which the sheets were printed The tray should be used for most print jobs 1 1 rear cover 2 output tray 2 Printing to the rear cover Face up Using the rear cover paper comes out of the printer face up Printing from the multi purpose tray to the rear cover provides a straight paper path Usin...

Page 37: ...waiting in a print queue or print spooler such as the printer group in Windows delete the job as follows 1 Click the Windows Start button 2 For Windows 2000 select Settings and then Printers For Windows XP 2003 select Printers and Faxes For Windows Vista select Control Panel Hardware and Sound Printers 3 Double click the Samsung ML 3470 Series icon 4 From the Document menu select Cancel Windows 20...

Page 38: ...ber Optional tray If you are experiencing frequent paper supply problems you can attach an additional 250 sheet tray You can print documents on various sizes and types of print materials ML S3050A Memory DIMM Extends your printer s memory capacity ML 00MB 32 MB ML 00MC 64 MB ML 00MD 128 MB ML MEM140 256 MB IEEE 802 11 b g Wireless LAN carda a Depending on your country wireless LAN cards may not be...

Page 39: ...If your machine or its surrounding is contaminated with toner we recommend you to use a cloth or tissue dampened with water to clean it Toner blown into the air by a vacuum cleaner maybe harmful Caution Cleaning the cabinet of the printer with cleaning materials containing large amounts of alcohol solvents or other strong substances can discolor or crack the cabinet Cleaning the inside of the prin...

Page 40: ...fe The life of the toner cartridge depends on the amount of toner that print jobs require When printing text at 5 coverage the toner cartridge lasts an average of either 10 000 or 4 000 pages The original toner cartridge supplied with the printer lasts an average of 4 000 pages however it varies depending on the product configuration The actual number may also be different depending on the print d...

Page 41: ...dge Use the handle on the cartridge to avoid touching this area 3 Thoroughly roll the cartridge 5 or 6 times to distribute the toner evenly inside the cartridge Note If toner gets on your clothing wipe it off with a dry cloth and wash clothing in cold water Hot water sets toner into fabric 4 Hold the toner cartridge by the handle and slowly insert the cartridge into the opening in the printer 5 Ta...

Page 42: ...ing the Toner Low Replace Toner message When the Toner Low Replace Toner message appears you can configure not to see this message again not to disturb you 1 Press Menu until System Setup appears on the bottom line of the display and press OK 2 Press the scroll buttons until Maintenance appears and press OK 3 Press the scroll buttons until CLR Empty MSG appears and press OK 4 Select On and press O...

Page 43: ...jerk the paper If the paper tears ensure that all fragments of paper are removed otherwise a jam will occur again When a paper jam occurs the Status LED lights red Open and close the front cover The jammed paper automatically exit the printer If the paper does not exit check the display on the control panel The message indicating the corresponding location of the paper jam appears Refer to the tab...

Page 44: ...snaps into place Printing automatically resumes In the optional tray 2 1 Pull the optional tray 2 open 2 Remove the jammed paper from the printer If the paper does not move when you pull or if you do not see the paper in this area stop and go to step 3 3 Pull tray 1 half way out 4 Pull the paper straight up and out 5 Insert the trays back into the printer Printing automatically resumes In the mult...

Page 45: ... the paper exit area 1 Open and close the front cover The jammed paper is automatically ejected from the printer 2 Gently pull the paper out of the output tray If you do not see the jammed paper or if there is any resistance when you pull stop and go to the next step 3 Open the rear cover 4 If you see the jammed paper push the pressure lever on each side down and remove the paper Return the pressu...

Page 46: ... jammed paper out If the jammed paper does not move when you pull push the pressure lever on each side down to loose the paper and then remove it 9 Return the lever door stopper and guide to their original position 10 Close the rear cover Printing automatically resumes In the duplex unit area If the duplex unit is not inserted correctly paper jam may occur Make sure that the duplex unit is inserte...

Page 47: ...ectly Do not overload the tray Ensure that the paper level is below the paper capacity mark on the inside wall of the tray Do not remove paper from the tray while your printer is printing Flex fan and straighten paper before loading Do not use creased damp or highly curled paper Do not mix paper types in a tray Use only recommended print media See page 5 1 Ensure that the recommended print side of...

Page 48: ...ge 9 6 Solving general printing problems on page 9 9 Common Windows problems on page 9 13 Common Macintosh problems on page 9 14 Common PostScript problems on page 9 13 Common Linux problems on page 9 14 Understanding display messages Messages appear on the Smart Panel program window or the control panel display to indicate the printer s status or errors Refer to the tables below to understand the...

Page 49: ...Close Door Paper has jammed in the fuser area Clear the jam See page 9 3 Paper Jam 2 Check Inside Paper has jammed in the paper exit area Clear the jam See page 9 3 Printing The printer is printing jobs using the displayed language Complete your printing Ready The printer is on line and ready to printer Use your printer Self Diagnostic LSU The LSU Laser Scanning Unit in your printer is checking so...

Page 50: ...tion turn the printer off and on to have this message appear again and then re select Stop or Continue NonGenuine Toner Replace Toner1 The toner cartridge installed is not a Samsung genuine cartridge This message appears when you selected Stop at the NonGenuine Toner prompt Install the Samsung genuine toner cartridge NonGenuine Toner Replace Toner The toner cartridge installed is not a Samsung gen...

Page 51: ...he printer properties to ensure that all of the print settings are correct The printer driver may be incorrectly installed Reinstall the printer driver See the Software Section Try printing a test page The printer is malfunctioning Check the display message on the control panel to determine if the printer is indicating a system error Printer selects print materials from the wrong paper source The ...

Page 52: ...ble and printer to another computer and try a print job that you know works Finally try a new printer cable Condition Possible cause Suggested solutions The printer prints but the text is wrong garbled or incomplete Continued The wrong printer driver was selected Check the application s printer selection menu to ensure that your printer is selected The software application is malfunctioning Try pr...

Page 53: ...Vertical repetitive defects on the next page If these steps do not correct the problems contact a service representative Aa AaBb BbCc Cc Aa AaBb BbCc Cc Aa AaBb BbCc Cc Aa AaBb BbCc Cc Aa AaBb BbCc Cc AaBbCc AaBbCc AaBbCc AaBbCc AaBbCc AaBbCc AaBbCc AaBbCc AaBbCc AaBbCc Vertical lines If black vertical streaks appear on the page The drum inside the toner cartridge has probably been scratched Insta...

Page 54: ... or creases Ensure that the paper is loaded properly Check the paper type and quality See page 5 2 Open the rear cover and try printing to the rear cover face up Turn over the stack of paper in the tray Also try rotating the paper 180 in the tray Condition Suggested solutions A AaBbCc AaBbCc AaBbCc AaBbCc AaBbCc Back of printouts are dirty The transfer roller may be dirty See page 8 1 Check for le...

Page 55: ... in standby mode or after printing has been completed check the connection and or whether an error has occurred Condition Suggested solutions Common PostScript problems The following situations are PostScript language specific and may occur when several printer languages are being used Note To receive a printed or screen displayed message when PostScript errors occur open the Print Options window ...

Page 56: ...id changing print job parameters via LPR GUI for example while a print job is in progress Known versions of CUPS server break the print job whenever print options are changed and then try to restart the job from the beginning Since Unified Linux Driver locks port while printing the abrupt termination of the driver keeps the port locked and therefore unavailable for subsequent print jobs If this si...

Page 57: ...re sensitive to static electricity Before installing or removing an internal accessories discharge static electricity from your body by touching something metal such as the metal back plate on any device plugged into a grounded power source If you walk round before finishing installation discharge any static electricity once again Installing a memory DIMM Your printer has a dual in line memory mod...

Page 58: ...msung ML 3470 Series printer 5 Click the right mouse button on the printer icon and select Properties 6 For Windows 2000 XP 2003 Vista select Device Settings tab 7 Select the amount of memory you installed from Printer Memory in the Installable Option section 8 Click OK Installing a wireless network interface card ML 3471ND is equipped with a network interface which allows you to use your printer ...

Page 59: ...and press OK Search List The wireless network interface card on your printer searches for wireless networks in the area and shows the results Custom You can configure the wireless settings according to your needs 5 If you selected Search List press the scroll buttons to select a network and press OK If you selected Custom set each network options Edit SSID Enter the SSID the name that identifies a...

Page 60: ...til Wireless appears and press OK 3 Press the scroll buttons until WLAN Security appears and press OK 4 Press the scroll buttons until Static WEP appears and press OK 5 Press the scroll buttons until Encryption appears and press OK Note If you have set the authentication type to Open System the Encryption menu does not display 6 Set each encryption option and press OK Encrypt Type Select an encryp...

Page 61: ... x 433 4 x 285 mm 15 75 x 17 1 x 11 2 inches Operating environment Temperature 10 32 C 50 90 F Humidity 20 80 RH Printer language PCL 6e PostScript 3 IBM ProPrinter EPSON SPL Memory ML 3470D 32MB Max 288 MB ML 3471ND 64 MB Max 320 MB 32 64 128 or 256 MB optional memory available Use only the Samsung approved DIMM Fonts 1 bitmap 45 scalable 136 PostScript3 fonts Interface IEEE 1284 Bidirectional Pa...

Page 62: ...rating systems 4 1 TCP IP 4 2 wireless 10 3 O output location select 5 8 output tray 5 8 P paper guidelines 5 3 paper jam clear around the toner cartridge 9 3 duplex area 9 4 multi purpose tray 9 2 optional tray 2 9 2 paper exit area 9 3 tray 1 9 1 paper level indicator 5 4 paper load multi purpose tray 5 6 tray 1 optional tray 2 5 5 paper size setting 2 3 specifications 5 2 paper type setting 2 3...

Page 63: ... toner cartridge checkig remaining toner 8 2 cleaning 8 2 maintaining 8 2 redistributing 8 3 replacing 8 3 8 4 toner save mode use 2 5 W Windows problems 9 13 wireless network interface card install 10 2 wireless network setup 10 3 ...

Page 64: ...Samsung Printer Software section ...

Page 65: ... 11 Chapter 2 BASIC PRINTING Printing a Document 12 Printing to a file PRN 13 Printer Settings 13 Layout Tab 14 Paper Tab 14 Graphics Tab 15 Extras Tab 16 About Tab 17 Printer Tab 17 Using a Favorite Setting 17 Using Help 17 Chapter 3 ADVANCED PRINTING Printing Multiple Pages on One Sheet of Paper N Up Printing 18 Printing Posters 19 Printing Booklets 19 Printing on Both Sides of Paper 20 Printing...

Page 66: ...ARING THE PRINTER LOCALLY Setting Up a Host Computer 24 Setting Up a Client Computer 24 Chapter 6 USING SMART PANEL Understanding Smart Panel 25 Opening the Troubleshooting Guide 26 Using Printer Settings Utility 26 Using Onscreen Help File 26 Changing the Smart Panel Program Settings 26 Chapter 7 USING YOUR PRINTER IN LINUX Getting Started 27 Installing the Unified Linux Driver 27 Installing the ...

Page 67: ...plications 31 Printing Files 31 Chapter 8 USING YOUR PRINTER WITH A MACINTOSH Installing Software 32 Printer driver 32 Setting Up the Printer 33 For a Network connected 33 For a USB connected 33 Printing 34 Printing a Document 34 Changing Printer Settings 34 Printing Multiple Pages on One Sheet of Paper 36 Duplex Printing 36 ...

Page 68: ...ble If your printer is attached to a network skip this step and go to Installing Software for Network Printing on page 7 You can install the printer software using the typical or custom method NOTE If the New Hardware Wizard window appears during the installation procedure click in the upper right corner of the box to close the window or click Cancel Typical Installation This is recommended for mo...

Page 69: ... sent to the Samsung web site Otherwise just click Finish NOTE After setup is complete if your printer driver doesn t work properly reinstall the printer driver See Reinstalling Printer Software on page 10 Custom Installation You can choose individual components to install 1 Make sure that the printer is connected to your computer and powered on 2 Insert the supplied CD ROM into your CD ROM drive ...

Page 70: ...in this User s Guide may differ depending on the printer and interface in use 6 Select the components to be installed and click Next NOTE You can change the desired installation folder by clicking Browse 7 After the installation is finished a window asking you to print a test page appears If you choose to print a test page select the checkbox and click Next Otherwise just click Next and skip to st...

Page 71: ...n Setup exe in Install or run program field and click Continue in the User Account Control window 3 Click Next If necessary select a language from the drop down list View User s Guide Allows you to view the User s Guide If your computer doesn t have Adobe Acrobat click on this option and it will automatically install Adobe Acrobat Reader for you 4 Select Typical installation for a network printer ...

Page 72: ...M into your CD ROM drive The CD ROM should automatically run and an installation window appears If the installation window does not appear click Start and then Run Type X Setup exe replacing X with the letter which represents your drive and click OK If you use Windows Vista click Start All programs Accessories Run and type X Setup exe If the AutoPlay window appears in Windows Vista click Run Setup...

Page 73: ...ss window appears Do as follows a Select a printer to be set with a specific IP address from the list b Configure an IP address subnet mask and gateway for the printer manually and click Configure to set the specific IP address for the network printer c Click Next 6 Select the components to be installed After selecting the components the following window appears You can also change the printer nam...

Page 74: ...the Browse button You will see a component list so that you can reinstall any item individually NOTE If your printer is not already connected to the computer the following window will appear After connecting the printer click Next If you don t want to connect the printer at this time click Next and No on the following screen Then the installation will start and a test page will not be printed at t...

Page 75: ...intenance 3 Select Remove and click Next You will see a component list so that you can remove any item individually 4 Select the components you want to remove and then click Next 5 When your computer asks you to confirm your selection click Yes The selected driver and all of its components are removed from your computer 6 After the software is removed click Finish ...

Page 76: ...r printing from various Windows applications The exact steps for printing a document may vary depending on the application program you are using Refer to the User s Guide of your software application for the exact printing procedure 1 Open the document you want to print 2 Select Print from the File menu The Print window is displayed It may look slightly different depending on your application The ...

Page 77: ...iffer depending on the printer in use If you access printer properties through the Printers folder you can view additional Windows based tabs refer to your Windows User s Guide and the Printer tab see Printer Tab on page 17 NOTES Most Windows applications will override settings you specify in the printer driver Change all print settings available in the software application first and change any re...

Page 78: ...Printing on page 18 For details see Printing Posters on page 19 For details see Printing Booklets on page 19 Double sided Printing Double sided Printing allows you to print on both sides of paper If this option does not appear your printer does not have this feature For details see Printing on Both Sides of Paper on page 20 Landscape Portrait Paper Tab Use the following options to set the basic pa...

Page 79: ... have this feature Scaling Printing Scaling Printing allows you to automatically or manually scale your print job on a page You can choose from None Reduce Enlarge and Fit to Page For details see Printing a Reduced or Enlarged Document on page 20 For details see Fitting Your Document to a Selected Paper Size on page 20 Graphics Tab Use the following Graphic options to adjust the print quality for ...

Page 80: ...print darker than on a normal document Some printers do not support this feature Extras Tab You can select output options for your document See Printing a Document on page 12 for more information about accessing the printer properties Click the Extras tab to access the following feature Watermark You can create a background text image to be printed on each page of your document For details see Usi...

Page 81: ...orite Setting The Favorites option which is visible on each properties tab allows you to save the current properties settings for future use To save a Favorites item 1 Change the settings as needed on each tab 2 Enter a name for the item in the Favorites input box 3 Click Save When you save Favorites all current driver settings are saved To use a saved setting select the item from the Favorites dr...

Page 82: ... Printing Multiple Pages on One Sheet of Paper N Up Printing You can select the number of pages to print on a single sheet of paper To print more than one page per sheet the pages will be reduced in size and arranged in the order you specify You can print up to 16 pages on one sheet 1 To change the print settings from your software application access printer properties See Printing a Document on p...

Page 83: ...ck the Paper tab select the paper source size and type 5 Click OK and print the document You can complete the poster by pasting the sheets together 0 15 inches 0 15 inches Printing Booklets This printer feature allows you to print your document on both sides of the paper and arranges the pages so that the paper can be folded in half after printing to produce a booklet 1 To change the print setting...

Page 84: ...cument NOTE If your printer does not have a duplex unit you should complete the printing job manually The printer prints every other page of the document first After printing the first side of your job the Printing Tip window appears Follow the on screen instructions to complete the printing job Long Edge Short Edge 2 5 3 2 5 3 2 5 3 2 5 3 Printing a Reduced or Enlarged Document You can change the...

Page 85: ... message displays in the preview window When the First Page Only box is checked the watermark prints on the first page only 4 Select watermark options You can select the font name style size or grayscale level from the Font Attributes section and set the angle of the watermark from the Message Angle section 5 Click Add to add a new watermark to the list 6 When you have finished editing click OK an...

Page 86: ...ST Dear ABC Regards WORLD BEST Using a Page Overlay After an overlay has been created it is ready to be printed with your document To print an overlay with a document 1 Create or open the document you want to print 2 To change the print settings from your software application access printer properties See Printing a Document on page 12 3 Click the Extras tab 4 Select the desired overlay from the O...

Page 87: ...tions will override settings you specify in the printer driver Change all print settings available in the software application first and change any remaining settings using the printer driver The settings you change remain in effect only while you are using the current program To make your changes permanent make them in the Printers folder The following procedure is for Windows XP For other Window...

Page 88: ...D ROM Setting Up a Host Computer 1 Start Windows 2 From the Start menu select Printers and Faxes 3 Double click your printer driver icon 4 From the Printer menu select Sharing 5 Check the Share this printer box 6 Fill in the Shared Name field and then click OK Setting Up a Client Computer 1 Right click the Windows Start button and select Explore 2 Select My Network Places and then right click Sear...

Page 89: ...dy installed more than one Samsung printer first select the printer model you want in order to use the corresponding Smart Panel Right click in Windows or Linux or click in Mac OS X the Smart Panel icon and select your printer name The Smart Panel window and its contents shown in this Software User s Guide may differ depending on the printer or Operating System in use The Smart Panel program displ...

Page 90: ...the Smart Panel icon and select Options The following window opens Display when job is finished for network printer The computer shows the Smart Panel popup window or balloon when your job is complete in Windows Only for Windows and Mac OS x network supported printers Display when error occurs during printing The computer shows the Smart Panel popup window or balloon when an error occurs during pr...

Page 91: ...talled automatically this is possible on a wide set of the most popular Linux clones Installing the Unified Linux Driver Installing the Unified Linux Driver 1 Make sure that you connect your machine to your computer Turn both the computer and the machine on 2 When the Administrator Login window appears type in root in the Login field and enter the system password NOTE You must log in as a super us...

Page 92: ... in the Login field and enter the system password NOTE You must log in as a super user root to install the printer software If you are not a super user ask your system administrator 2 Insert the printer software CD ROM The CD ROM will automatically run If the CD ROM does not automatically run click the icon at the bottom of the desktop When the Terminal screen appears type in If the CD ROM is seco...

Page 93: ...ified Driver Configurator Printers Configuration button Ports Configuration button Printers Configuration Printers configuration has the two tabs Printers and Classes Printers Tab You can see the current system s printer configuration by clicking on the printer icon button on the left side of the Unified Driver Configurator window You can use the following printer control buttons Refresh renews th...

Page 94: ...pen the Unified Driver Configurator If necessary switch to Printers configuration 2 Select your machine on the available printers list and click Properties 3 The Printer Properties window opens The following five tabs display at the top of the window General allows you to change the printer location and name The name entered in this tab displays on the printer list in Printers configuration Connec...

Page 95: ...es files such as color options image size or image position Device allows you to set the print resolution paper source and destination 5 Click Apply to apply the changes and close the Properties window 6 Click OK in the LPR GUI window to start printing 7 The Printing window appears allowing you to monitor the status of your print job To abort the current job click Cancel Printing Files You can pri...

Page 96: ...rnet cable 2 Turn on your computer and the machine 3 Insert the PostScript driver CD ROM which came with your machine into the CD ROM drive 4 Double click the Samsung_LBP on your Macintosh desktop 5 Double click the MAC_Installer folder 6 Double click the MAC_Printer folder 7 For Mac OS 8 6 9 2 double click the Samsung_LBP Installer Classic icon For Mac OS 10 1 or higher double click the Samsung_L...

Page 97: ...dd on the Printer List For MAC OS 10 5 press the icon then a display window will pop up 4 Select the AppleTalk tab For MAC OS 10 3 select the Rendezvous tab For MAC OS 10 4 click Default Browser and find the Bonjour For MAC OS 10 5 click Default and find the Bonjour The name of your machine appears on the list Select SEC000xxxxxxxxx from the printer box where the xxxxxxxxx varies depending on your...

Page 98: ...ick Print when you finish setting the options Make sure that your printer is selected Changing Printer Settings You can use advanced printing features when using your printer From your Macintosh application select Print from the File menu The printer name which appears in the printer properties window may differ depending on the printer in use Except for the name the composition of the printer pro...

Page 99: ...est quality printout If you load a different type of print material select the corresponding paper type Printer Features This tab provides options for selecting the paper type and adjusting print quality Select Printer Features from the Presets drop down list to access the following features Reverse Duplex Printing Allows you to select general print order compare to duplex print order Fit to Page ...

Page 100: ...document The binding options are Long Edge Binding Which is the conventional layout used in book binding Short Edge Binding Which is the type often used with calendars 1 From your Macintosh application select Print from the File menu 2 Select the Layout 3 Select a binding orientation from Two Sided Printing option 4 Click Print and the printer prints on both sides of the paper CAUTION If you have ...

Page 101: ...acintosh 36 Windows 18 O orientation print 31 Windows 14 overlay create 22 delete 22 print 22 P Paper properties set 14 paper size set 14 print 31 paper source set 31 Windows 15 paper type set Macintosh 35 print 31 poster print 19 PostScript driver installing 23 print document 12 fit to page 20 from Macintosh 34 from Windows 12 N up Macintosh 36 Windows 18 overlay 22 poster 21 PRN 13 scaling 20 wa...

Page 102: ... option 15 software install Macintosh 32 Windows 4 reinstall Windows 10 system requirements Macintosh 32 uninstall Windows 11 status monitor use 25 T toner save set 15 U uninstall software Windows 11 uninstalling driver Linux 28 W watermark create 21 delete 21 edit 21 print 21 ...

Page 103: ...Rev 4 00 ...

Reviews: