background image

I

NTRODUCTION

1.

4

Print in various environments

• You can print in 

Windows 95/98/Me/NT 4.0/2000/XP

.

• Your printer is compatible with 

Linux

 and 

Macintosh

.

• Your printer comes with both the 

Parallel

 and 

USB


interfaces. 

You can also use a 

network interface

. ML-2551N and 

ML-2552W comes with a built-in network interface, 10/100 
Base TX. ML-2552W also has a wireless network interface. But, 
you need to add the optional network interface card to 
ML-2550.

Printer Features

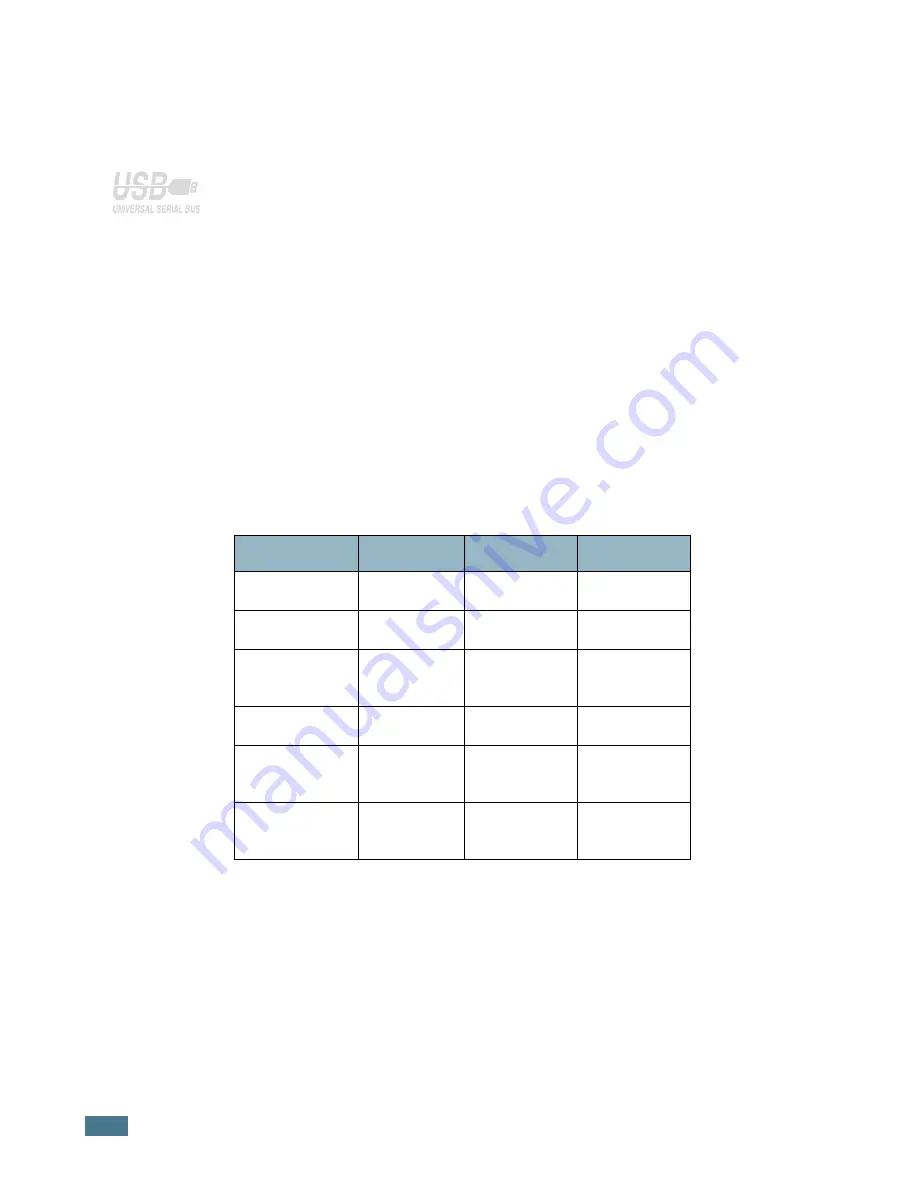
The table below lists a general overview of features supported 
by your printer.

(S: Standard, O: Option)

Features

ML-2550

ML-2551N

ML-2552W

IEEE 1284

S

S

S

USB 2.0S

S

S

Network 
Interface

O

S

S

Wireless LAN

O

O

S

PostScript 
Emulation

O

S

S

Serial 
Interface

O

O

O

Summary of Contents for ML-2551N

Page 1: ...SAMSUNG LASER PRINTER User s Guide ML 2550 Series ...

Page 2: ...rks of Hewlett Packard company Centronics is a trademark of Centronics Data Computer Corporation IBM and IBM PC are trademarks of International Business Machines Corporation Apple AppleTalk TrueType LaserWriter and Macintosh are trademarks of Apple Computer Inc Microsoft Windows Windows 9x Windows Me Windows 2000 Windows NT and Windows XP are registered trademarks of Microsoft Corporation PostScri...

Page 3: ...For Local Printing 2 10 For Network Printing 2 12 Turning the Printer On 2 13 Printing a Demo Page 2 14 Changing the Display Language 2 14 Installing Printer Software 2 15 Printer Driver Features 2 16 Installing Printer Software in Windows 2 17 Installing the USB Driver in Windows 98 Me 2 20 Chapter 3 USING THE CONTROL PANEL Understanding the Control Panel 3 2 Display 3 2 Buttons 3 3 Using Control...

Page 4: ...nal Tray2 4 8 Using the Multi Purpose Tray 4 8 Using the Manual Feed Mode 4 12 Printing on Envelopes 4 14 Printing on Labels 4 17 Printing on Transparencies 4 19 Printing on Preprinted Paper 4 21 Printing on Card Stock or Custom sized Materials 4 22 Chapter 5 PRINTING TASKS Printing a Document 5 2 Cancelling a Print Job 5 5 Using a Favorite Setting 5 6 Using Help 5 6 Setting Paper Properties 5 7 U...

Page 5: ...er 6 4 Replacing the Toner Cartridge 6 6 Cleaning the Printer 6 7 Cleaning the Outside 6 7 Cleaning the Inside 6 7 Consumables and Replacement Parts 6 10 Chapter 7 SOLVING PROBLEMS Troubleshooting Checklist 7 2 Solving General Printing Problems 7 3 Clearing Paper Jams 7 7 In the Paper Feed Area 7 7 Around the Toner Cartridge 7 10 In the Paper Exit Area 7 12 In the Duplex Area 7 13 Tips for Avoidin...

Page 6: ...iver B 5 Using PS Printer Driver Features B 6 Accessing Printer Properties B 6 Appendix C USING YOUR PRINTER IN LINUX Installing the Printer Driver C 2 System Requirements C 2 Installing the Printer Driver C 2 Changing the Printer Connection Method C 6 Uninstalling the Printer Driver C 7 Using the Configuration Tool C 8 Changing LLPR Properties C 10 Appendix D PRINTING FROM DOS APPLICATIONS About ...

Page 7: ...TER OPTIONS Precautions When Installing Printer Options F 2 Installing Memory and PostScript DIMMs F 3 Removing the Memory or PS DIMM F 6 Installing a Network or Serial Interface Card F 6 Installing an Optional Paper Tray F 10 Appendix G SPECIFICATIONS Printer Specifications G 2 Paper Specifications G 3 Overview G 3 Supported Sizes of Paper G 4 Guidelines for Using Paper G 5 Paper Specifications G...

Page 8: ...t considered to be hazardous The laser system and printer are designed so there is never any human access to laser radiation above a Class I level during normal operation user maintenance or prescribed service condition WARNING Never operate or service the printer with the protective cover removed from Laser Scanner assembly The reflected beam although invisible can damage your eyes When using thi...

Page 9: ...rt 15 of the FCC rules These limits are designed to provide reasonable protection against harmful interference in a residential installation This equipment generates uses and can radiate radio frequency energy and if not installed and used in accordance with the instructions may cause harmful interference to radio communications However there is no guarantee that interference will not occur in a p...

Page 10: ...ne of 20 cm 8 inches separation between the device and the body for use of a wireless device near the body this does not include extremities This device should be used more than 20 cm 8 inches from the body when wireless devices are on The power output of the wireless device or devices which may be embedded in your printer is well below the RF exposure limits as set by the FCC This transmitter mus...

Page 11: ...nnection to the analogue public switched telephone network PSTN in accordance with Directive 1999 5 EC The product has been designed to work with the national PSTNs and compatible PBXs of the European countries In the event of problems you should contact the Euro QA Lab of Samsung Electronics Co Ltd in the first instance The product has been tested against TBR21 and or TBR 38 To assist in the use ...

Page 12: ... be present embedded in your printer system The following section is a general overview of considerations while operating a wireless device Additional limitations cautions and concerns for specific countries are listed in the specific country sections or country group sections The wireless devices in your system are only qualified for use in the countries identified by the Radio Approval Marks on ...

Page 13: ...ed examples where use of wireless devices may be restricted or eliminated When in environments where you are uncertain of the sanction to use wireless devices ask the applicable authority for authorization prior to use or turning on the wireless device Every country has different restrictions on the use of wireless devices Since your system is equipped with a wireless device when traveling between...

Page 14: ...xiii ...

Page 15: ...Do not disassemble the printer Doing so may give you an electric shock If you continuously print many pages the surface of the output tray may become hot Be careful not to touch the surface especially for children ...

Page 16: ...1 INTRODUCTION Congratulations on the purchase of your printer This chapter includes Special Features Printer Components ...

Page 17: ...y2 supports all standard sizes of paper Two output tray select either the top output face down or the rear output tray face up for the most convenient access Straight through paper path capability from the Multi Purpose Tray to the rear output tray Create professional documents You can customise your documents using Watermarks such as Confidential See page 5 18 Print Booklets This feature enables ...

Page 18: ...y Star guidelines for energy efficiency Expand the printer capacity This printer has 32 MB of memory which can be expanded to 144 MB An optional PostScript 3 Emulation PS DIMM adds PS printing ML 2551N and ML 2552W comes with PostScript 3 Emulation An optional Serial interface card allows you to use the serial connection Network interface enables network printing You can add the optional network i...

Page 19: ... and ML 2552W comes with a built in network interface 10 100 Base TX ML 2552W also has a wireless network interface But you need to add the optional network interface card to ML 2550 Printer Features The table below lists a general overview of features supported by your printer S Standard O Option Features ML 2550 ML 2551N ML 2552W IEEE 1284 S S S USB 2 0 S S S Network Interface O S S Wireless LAN...

Page 20: ...Face down Control Panel see page 3 2 Tray1 500 sheet paper feeder Toner cartridge Top Cover Paper level indicator Control board cover needed to access the control board to install printer options Multi Purpose Tray Output Support Optional Tray2 500 sheet paper feeder ...

Page 21: ...ws a ML 2552W Parallel port USB port Power switch Network port ML 2550 Option ML 2551N ML 2552W Standard Wireless network antenna port ML 2550 ML 2551N Option ML 2552W Standard Rear output tray Face up Optional Tray2 cable connector Power receptacle ...

Page 22: ...setting up your printer This chapter includes Unpacking Installing the Toner Cartridge Loading Paper Connecting a Printer Cable Turning the Printer On Printing a Demo Page Changing the Display Language Installing Printer Software SETTING UP YOUR PRINTER ...

Page 23: ...ith the following items NOTES If any items are missing or damaged notify your dealer immediately Components may differ from one country to another The CD ROM contains the printer driver the User s Guide and the Adobe Acrobat Reader programme 2 Carefully remove all of the packing tapes from the printer Toner Cartridge Power Cord CD ROM Setup Guide ...

Page 24: ... Allow extra space for opening covers and trays The area should be well ventilated and away from direct sunlight or sources of heat cold and humidity Do not set the printer close to the edge of your desk or table Clearance Space Front 482 6 mm enough space so that trays can be removed Back 320 mm enough space to allow opening of the rear cover Right 100 mm Left 100 mm enough space for ventilation ...

Page 25: ...ght scratch the drum of the cartridge 3 Locate the sealing tape at the end of the toner cartridge Carefully pull the tape completely out of the cartridge and discard it NOTE The sealing tape should be longer than 550 mm when correctly removed Holding the toner cartridge pull the sealing tape straight to remove it from the cartridge Be careful not to cut the tape If this happens you cannot use the ...

Page 26: ...ge to light for more than a few minutes Cover it with a piece of paper if left exposed for more than a few minutes If toner gets on your clothing wipe it off with a dry cloth and wash clothing in cold water Hot water sets toner into fabric 5 Locate the cartridge slots inside the printer one on each side 6 Grasp the handle and insert the cartridge in the printer until it snaps into place ...

Page 27: ...closed NOTE When printing text at 5 coverage you can expect a toner cartridge life of approximately 10 000 pages 5 000 pages for the toner cartridge that is shipped with the printer Loading Paper You can load approximately 500 sheets of paper in the tray 1 Pull the tray out of the printer ...

Page 28: ...traighten the edges on a level surface 3 Load paper with the print side facing down You can load previously printed paper The printed side should be facing up with an uncurled edge at the top side If you experience problems with paper feed turn the paper around Make sure that all four corners are flat in the tray ...

Page 29: ...want to change the paper size in the tray refer to Changing the Paper Size in the Tray below 5 Slide the tray back into the printer Changing the Paper Size in the Tray If you load long paper in the tray you should adjust the paper guides to the paper length 1 Push the back plate of the tray outwards completely so that it can extend the length of the tray ...

Page 30: ...ts to the desired paper size marked at the bottom of the tray 3 Squeeze the paper width guide and adjust it to the desired paper size marked at the bottom of the tray NOTES Do not push the width guide far enough to cause the material to warp If you do not adjust the width guide it may cause paper jams ...

Page 31: ...ect the printer to the parallel port of the computer requires a certified parallel cable You will need to buy a IEEE1284 compliant cable 1 Make sure that both the printer and the computer are turned off 2 Plug the parallel printer cable into the connector on the back of the printer Push the metal clips down to fit inside the notches on the cable plug 3 Connect the other end of the cable to the par...

Page 32: ...the USB printer cable into the connector on the back of the printer 3 Connect the other end of the cable to the USB port on your computer See your computer User s Guide if you need help NOTES For printing using the USB interface you must be running Windows 98 Me 2000 XP or Macintosh with the OS 8 6 and the G3 processor or higher If you want to print using the USB interface in Windows 98 Me you mus...

Page 33: ...rinter you can replace the network interface card to one supporting the wireless LAN interface For details about installing the card see page F 6 Using an Ethernet Cable 1 Make sure that both the printer and the computer are turned off 2 Plug one end of the Ethernet cable into the Ethernet network port on the Printer 3 Plug the other end of the cable into a network LAN connection See your computer...

Page 34: ...Turning the Printer On 1 Plug the power cord into the power receptacle on the back of the printer 2 Plug the other end into a properly grounded AC outlet and turn on the printer using the power switch CAUTIONS The fusing area at the rear portion of the inside of your printer is hot when powered Be careful not to be burned when accessing this area Do not disassemble the printer when it is powered D...

Page 35: ... demo page showing the printer s features and capabilities prints out Changing the Display Language To change the language that is displayed on the control panel take the following steps 1 Press the Menu button on the control panel until you see Setup on the bottom line of the display 2 Press the Enter button to access the menu 3 Press the scroll button or until you see LCD Language on the bottom ...

Page 36: ...r information about installing the PostScript driver Remote Control Panel for Dos applications Go to Appendix D Printing From DOS Applications for information about installing the DOS print software and printing from DOS applications USB driver for adding the USB port to Windows 98 Me You must first install the USB driver for the USB connection in Windows 98 Me See Installing the USB Driver in Win...

Page 37: ...iver Feature SPL PostScript Win 2000 XP Win 9x Win NT4 0 Mac Win 2000 XP Win 9x Win NT4 0 Mac Toner Save Y Y Y N Y Y Y N Print quality option Y Y Y Y Y Y Y Y Double sided printing Y Y Y N Y Y Y Y Booklet printing Y Y Y N Y N N N Poster printing Y Y Y N N N N N Multiple pages per sheet N up Y Y Y Y Y Y N Y Scale printing Y Y Y Y Y Y Y Y Fit to page printing Y Y Y N Y Y Y Y Different source for firs...

Page 38: ... for the CD ROM drive and click OK NOTE If the New Hardware Found window appears during the installation procedure click the icon in the upper right corner of the window or click Cancel 2 When the language selection window appears select the appropriate language If you can t find the desired language from the window use the scroll button on the bottom right of the screen to display more languages ...

Page 39: ...2 18 SETTING UP YOUR PRINTER 3 Click Install the Samsung Software on your PC 4 Click Next 5 When the installation is completed click Finish ...

Page 40: ... When reinstallation is done click Finish Removing Printer Software 1 From the Start menu select Programs 2 Select Samsung ML 2550 Series and then Samsung ML 2550 Series Driver Maintenance 3 The Samsung ML 2550 Series Driver Maintenance window appears Check Remove and then click Next 4 When you are asked to confirm your selection click OK The Samsung ML 2550 Series printer driver and all of its co...

Page 41: ...st and click OK Installing the USB Driver in Windows 98 Me 1 Connect the printer to your computer using the USB cable and turn them on For further details see page 2 11 2 The Add New Hardware Wizard window appears Click Next 3 Place the CD ROM in the CD ROM drive and check Search for the best driver for your device and click Next Once you have installed the Remote Control Panel programme this list...

Page 42: ...selection window appears select the appropriate language NOTE If you already installed the printer software this window doesn t appear 8 Follow the instructions on the window to complete the printer software installation For more details see page 2 17 NOTES If you want to use your printer with a parallel cable remove the USB cable and connect the parallel cable Then reinstall the printer driver If...

Page 43: ...2 22 SETTING UP YOUR PRINTER MEMO ...

Page 44: ...3 This chapter describes how to use the printer s control panel This chapter includes Understanding the Control Panel Using Control Panel Menus USING THE CONTROL PANEL ...

Page 45: ...printer switches to off line Offline The printer is off line and cannot print If you press On Line Continue the printer switches to on line Printing XXX xxx is the current emulation The printer is printing If you want to cancel printing press Cancel Sleeping The printer is in Power Save mode consuming less power When a print job is received from the computer or if any button is pressed the printer...

Page 46: ...to off line Orange On The printer stops printing due to a major error Check the display message See page 7 20 for details on the meaning of the error message Blinking A minor error occurs and the printer is waiting an error to be cleared Check the display message When the problem is cleared the printer resumes printing If you want to ignore this warning press this button Off The printer is off lin...

Page 47: ...mode is enabled and the printer uses less toner to print a document If the button backlight is off the mode is disabled and the printer will print in the normal quality For more information on the Toner Save mode see page 5 9 Press to enable or disable the double sided printing If the button backlight is on the printer print on both sides of paper with long edge binding If the button backlight is ...

Page 48: ...menu item displays on the bottom line 2 Press the Enter button to access the menu 3 Press the scroll button or until the desired menu item displays on the bottom line 4 Press the Enter button to confirm the selected item 5 If the selected menu item has submenus repeat steps 3 and 4 6 Press the scroll button or until the desired setting option displays on the bottom line or enter the required value...

Page 49: ...Jam Recovery Altitude Adj Auto CR Job Time Out RS 232C Maintenance Printer See page 3 13 Default Set Current Job Information See page 3 7 Configuration Menu Map Demo Page PS3 Font List PCL Font List EPSON Fonts Graphics See page 3 12 Resolution Image Enhance Toner Save Density EPSON See page 3 18 Font Auto Wrap Character Set Character Tab LPI Pitch PCL See page 3 16 Typeface Symbol Lines Pitch Poi...

Page 50: ... The demo page allows you to check if your printer properly performs printing PS3 Font List PCL Font List EPSON Fonts The font sample list shows all of the fonts currently available in the selected language For a ML 2550 printer the PS3 Font list item is available only when the optional PS DIMM is installed Item Explanation Tray Source Using this item you can set the tray you will use If you selec...

Page 51: ...Paper Select for plain paper Thick Select for thick paper Thin Select for thin paper Bond Select for thick paper Color Paper Select for coloured paper Card Stock Select for card stocks Labels Select for labels Transparency Select for transparencies Envelope Select for envelops Preprinted Preprinted is for paper with something else printed on it such as letterhead Item Explanation Values Letter Leg...

Page 52: ...ect from Tray Source and the selected tray is empty the printer automatically prints from other trays If this menu item is set to Off the On Line Continue button backlight blinks in orange and the printer doesn t work until you insert paper into the specified tray Item Explanation Values Off On ...

Page 53: ...ing edge as followings Long Edge Flip on long edge Prints pages to read like a book Short Edge Flip on short edge Prints pages to read by flipping over like a note pad Select Off to print on one side of paper Values Portrait Landscape Portrait Landscape Values Off Long Edge Short Edge Long Edge in the Portrait orientation Long Edge in the Landscape orientation 2 5 3 2 5 3 2 5 3 2 5 3 Short Edge in...

Page 54: ...t binding from 0 0 to 22 mm increasing by 1mm Long Binding Set the right margin of the rear side for long binding from 0 0 to 22 mm increasing by 1mm Simplex Margin Set the margin of print materials for one sided printing Top Margin Set the top margin from 0 0 to 9 9 inches increasing by 0 1 inches Left Margin Set the left margin from 0 0 to 9 9 inches increasing by 0 1 inches Copies Set the defau...

Page 55: ...d photos or some business graphics that will benefit from enhanced line screening Image Enhance This item enhances the print quality Normal Doesn t enhance the quality Image Enhance Enhances bitmap images like scanned pictures Text Enhance Enhances letters and simple figures Toner Save To get the most from your toner supply set this menu to Off If you set this menu to On the print quality may be r...

Page 56: ...e of the text that appears on the control panel display and information printing Emulation The printer language defines how the computer communicates with the printer If you select Auto your printer can change the printer language automatically For a ML 2550 printer PS3 is available only when the optional PS DIMM is installed Power Save When the printer does not receive data for an extended period...

Page 57: ...atically clear the message and continue printing Jam Recovery This item determines how the printer behaves when a paper jam occurs Off The printer does not reprint pages Printing performance might be increased with this setting On The printer automatically reprints pages after you clear the paper jam Altitude Adj You can optimise the print quality depending on the air pressure such as in a high gr...

Page 58: ...ng a setting higher than 19200 bps with the COM port may cause unexpected errors in DOS mode Robust XON Turns use of XON OFF of serial communication control on or off When this item is set to On the printer sends a continuous stream of XONs to the computer to indicate that the serial port is ready to receive more data Maintenance This item allows you to maintain the toner cartridge OPC Cleaning Cl...

Page 59: ...PCL46 PCL54 s interval and point size are fixed Symbol This item selects the symbol to be used in PCL emulation The symbol is the group of numbers marks and special signs being used when printing letters lines This item allows you to set vertical spacing from 5 to 128 lines for the default paper size The lines may differ according to the paper size and printing orientation Pitch When you select on...

Page 60: ...t to use Item Explanation Print PS Error You can select whether or not your printer prints an error list when a PS error occurs Select On to print PS 3 emulation errors If an error occurs the job stops processing the error message prints and the printer flushes the job If this menu is set to Off the job is flushed without an indication of the error For a ML 2550 printer this menu is available only...

Page 61: ... the print material Character Set This item allows you to select a character set of the desired language Character Tab This item selects the character set LPI You can set the number of lines printed in one vertical inch Pitch You can determine the font size by setting the number of characters that will print in one horizontal inch of type Values SANSERIF ROMAN Values On Off Values USA FRANCE GERMA...

Page 62: ...Get Method You can set this item only when you set Config TCP to Yes Static You can enter IP address subnetmask and gateway manually BOOTP The BOOTP server allots the IP address to you automatically DHCP The DHCP server allots the IP address to you automatically IP Address You can select this item only when you set IP Get Method to Static This item lets you enter the IP address manually Press the ...

Page 63: ...1st byte between 0 and 255 and then press the Enter button For the 2nd to the 4th byte you can set the value in the same way AppleTalk This item lets you select whether or not you use the AppleTalk protocol Select On to use the protocol Netware This item selects whether you want to use the Netware protocol If you select On you can access the Config Netware menu item In the Config Netware menu you ...

Page 64: ... to use the IEEE 802 3 frame type EN_II Select this value to use the ETHERNET II frame type EN_SNAP Select this value to use the SNAP frame type Reset Network This item reboots the network interface card Default Set This item restores the factory default of the network configuration This setting will only take effect after you have reset the printer Print Net CFG This item print a page showing the...

Page 65: ...USING THE CONTROL PANEL 3 22 MEMO ...

Page 66: ...the different paper trays for the best print quality This chapter includes Choosing Paper and Other Materials Selecting the Output Location Loading Paper Printing on Envelopes Printing on Labels Printing on Transparencies Printing on Preprinted Paper Printing on Card Stock or Custom sized Materials USING PRINT MATERIALS ...

Page 67: ...ny size paper that fits easily within the paper adjusters of the paper tray Weight Your printer supports paper weight as follows 16 28 lbs 60 105 g m2 bond for the Tray1 or optional Tray2 16 43 lbs 60 163 g m2 bond for the Multi Purpose Tray Brightness Some papers are whiter than others and produce sharper more vibrant images Surface smoothness The smoothness of the paper affects how crisp the pri...

Page 68: ...n A4 210 x 297 mm B5 182 x 257 mm A5 148 x 210 mm 500 500 500 500 500 500 200 100 100 100 100 100 100 100 1 1 1 1 1 1 1 Envelopes No 10 4 12 x 9 5 in Monarch 3 87 x 7 5 in C5 162 x 229 mm DL 110 x 220 mm B5 176 x 250 mm 10 10 10 10 10 1 1 1 1 1 Labels b Letter 8 5 x 11 in A4 210 x 297 mm b If you are experiencing excessive jamming feed one sheet at a time through the Multi Purpose Tray 25 25 1 1 T...

Page 69: ...per with embossed lettering perforations or texture that is too smooth or too rough Coloured paper should be of the same high quality as white photocopy paper The pigments must withstand the printer s fusing temperature of 400 F 205 C for 0 1 second without deterioration Do not use paper with a coloured coating that was added after the paper was produced Preprinted forms must be printed with nonfl...

Page 70: ... problems such as excessive curl try printing to the rear output tray To avoid paper jams do not open or close the rear output tray while the printer is printing Printing to the Top Output Tray Face down The top output tray collects paper face down in correct order The top output tray should be used for most print jobs NOTE If you continuously print many pages the surface of the output tray may be...

Page 71: ... the following over 100 sheets of paper continuously envelopes labels small custom size paper postcards paper lighter than 60 g m2 16 lb or heavier than 105 g m2 28 lb transparencies some special transparencies may have stacking problem by curl In that case please use the top output tray face down To open the rear output tray 1 Open the rear door by pulling it down The cover functions as the outpu...

Page 72: ...overloaded with printed pages it may fall from the printer Remove the pages so that the tray is not overloaded Loading Paper Proper paper loading helps prevent paper jams and ensure trouble free printing Do not remove the paper tray while a job is printing Doing so may cause a paper jam See Sizes and Capacities on page 4 3 for acceptable paper size and capacities for each tray The paper level bar ...

Page 73: ...urpose Tray is located in the front of your printer It can be closed when you are not using it making the printer more compact The Multi Purpose Tray can hold several sizes and types of paper such as transparencies cards and envelopes You may also want to use the Multi Purpose Tray for single page print jobs on letterheads coloured paper for use as separator sheets or other special materials that ...

Page 74: ...terials should be loaded face up with the top edge going into the Multi Purpose Tray first and be placed on the centre of the tray Do not place objects on the Multi Purpose Tray Also avoid pressing down or applying excessive force on it The tray may fall apart from the printer To load paper in the Multi Purpose Tray 1 Pull the Multi Purpose Tray down towards you 2 Slide the extender to extend the ...

Page 75: ...h the print side face up If you want to print on previously printed paper from the Multi Purpose Tray the printed side should be facing down with an uncurled edge to the printer If you experience problems with paper feed turn the paper around NOTE Make sure that you have not loaded too much print materials The print material buckles if you load a stack that is too deep or push it in too far ...

Reviews: