background image

8

ENGLISH

SETTING THE TImE

Your microwave oven has an inbuilt clock. When power is supplied, “:0”, 
“88:88” or “12:00” is automatically displayed on the display. Please set the 
current time. The time can be displayed in either the 24-hour or 12-hour 
notation. You must set the clock:

•  When you first install your microwave oven
•  After a power failure

Do not forget to reset the clock when you switch to and from summer 
or winter time.

1.  To display the time 

in the...

Then press the ( ) 

button...

24-hour notation
12-hour notation

Once
Twice

2. 

Press the ( ) and ( ) buttons to set the hour.

3. 

Press the ( ) button.

4. 

Press the ( ) and ( ) buttons to set the minute.

5. 

Press the ( ) button.

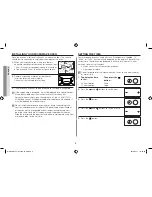
INSTaLLING yOUr mICrOwavE OvEN

Place the oven on a flat level surface 85 cm above the floor. The surface 
should be strong enough to safely bear the weight of the oven.

1. 

When you install your oven, make sure there is 
adequate ventilation for your oven by leaving at least 
10 cm (4 inches) of space behind and, on the sides 
of the oven and 20 cm (8 inches) of space above.

2. 

Remove all packing materials inside the oven.
Install the roller ring and turntable. 
Check that the turntable rotates freely.

3. 

This microwave oven has to be positioned so that plug is accessible.

If the supply cord is damaged, it must be replaced by a special cord or 
assembly available from the manufacturer or its service agent.  
For your personal safety, plug the cable into a 3-pin, 230 Volt, 50Hz, 
AC earthed socket. If the power cable of this appliance is damaged, it 
must be replaced by a special cable.

Do not install the microwave oven in hot or damp surroundings like 
next to a traditional oven or radiator. The power supply specifications 
of the oven must be respected and any extension cable used must 
be of the same standard as the power cable supplied with the oven. 
Wipe the interior and the door seal with a damp cloth before using your 
microwave oven for the first time.

10 cm 

behind

20 cm 

above

10 cm on 

the side

85 cm of 

the floor

MW89MST_SLI_03493S-01-EN.indd   8

2012-05-11   �� 5:26:46

Summary of Contents for ME89M

Page 1: ...chasing this Samsung product Please register your product at www samsung com register Microwave oven Owner s instructions ME89M ME89MST MW89M MW89MST This manual is made with 100 recycled paper MW89MST_SLI_03493S 01 EN indd 1 2012 05 11 5 26 36 ...

Page 2: ... to do if you are in doubt or have a problem 9 Cooking reheating 9 Using the deodorization feature 9 Power levels 10 Stopping the cooking 10 Adjusting the cooking time 10 Using the auto reheat feature 10 Auto reheat settings 11 Using the auto power defrost feature 11 Auto power defrost settings 11 Using the power steam function 12 power steam settings 12 Setting a standing time 13 Using the memory...

Page 3: ...ty of ways 1 Coupler already placed over the motor shaft in the base of the oven Purpose The coupler rotates the turntable 2 Roller ring to be placed in the centre of the oven Purpose The roller ring supports the turntable 3 Turntable to be placed on the roller ring with the centre fitting to the coupler Purpose The turntable serves as the main cooking surface it can be easily removed for cleaning...

Page 4: ...nal injury or property damage Warning Fire hazard Warning Hot surface Warning Electricity Warning Explosive material Do NOT attempt Follow directions explicitly Do NOT disassemble Unplug the power plug from the wall socket Do NOT touch Make sure the machine is grounded to prevent electric shock Important Call the service center for help Note Precautions to avoid possible exposure to excessive micr...

Page 5: ...top model only Do not use benzene thinner alcohol steam cleaner or high pressure cleaner to clean the appliance Ensure that the power voltage frequency and current are the same as those of the product specifications Plug the power plug into the wall socket firmly Do not use a multiple plug adapter an extension cord or an electric transformer Do not hook the power cord on a metal object insert the ...

Page 6: ...uctions Immerse the scalded area in cold water for at least 10 minutes Cover with a clean dry dressing Do not apply any creams oils or lotions During use the appliance becomes hot Care should be taken to avoid touching heating elements inside the oven WARNING The contents of feeding bottles and baby food jars shall be stirred or shaken and the temperature checked before consumption in order to avo...

Page 7: ...c Do not cover the ventilation slots with cloth or paper They may catch fire as hot air escapes from the oven The oven may also overheat and switch itself off automatically and will remain off until it cools sufficiently Always use oven mitts when removing a dish from the oven to avoid unintentional burns Do not touch heating elements or interior oven walls until the oven has cooled down Stir liqu...

Page 8: ...ng at least 10 cm 4 inches of space behind and on the sides of the oven and 20 cm 8 inches of space above 2 Remove all packing materials inside the oven Install the roller ring and turntable Check that the turntable rotates freely 3 This microwave oven has to be positioned so that plug is accessible If the supply cord is damaged it must be replaced by a special cord or assembly available from the ...

Page 9: ...nnect the power plug and reconnect it Reset the time If the above guidelines do not enable you to solve the problem contact your local dealer or SAMSUNG after sales service Cooking reheating The following procedure explains how to cook or reheat food Always check your cooking settings before leaving the oven unattended First place the food in the centre of the turntable Then close the door 1 Press...

Page 10: ...r levels You can choose among the power levels below Power level Output HIGH 850 W MEDIUM HIGH 600 W MEDIUM 450 W MEDIUM LOW 300 W DEFROST 180 W LOW KEEP WARM 100 W If you select higher power level the cooking time must be decreased If you select lower power level the cooking time must be increased Stopping the cooking You can stop cooking at any time to check the food 1 To stop temporarily Open t...

Page 11: ...you to defrost meat poultry or fish The defrost time and power level are set automatically Use only dishes that are microwave safe First place the frozen food in the centre of the turntable and close the door 1 Press the Auto Power Defrost button one or more times Refer to the table on the side Result The following indication is displayed 2 Select the food weight by pressing and buttons It is poss...

Page 12: ...50 300 4 5 Bowl lid Recommendations Use parboiled white rice Put rice into the steam cooker Add double quantity of cold water Cover with lid After cooking stir before standing time After cooking remove moisture in the cavity by using kitchen paper 2 Peeled potatoes 100 150 200 250 300 350 400 450 500 550 2 3 Bowl lid Recommendations Weigh the potatoes after peeling washing and cutting into similar...

Page 13: ...mory so that you do not have to reset them each order You can store two different setting Storing the settings 1 To programme the Then press the button First setting Second setting Once Display is P1 Twice Display is P2 2 Set your cooking programme as usual cooking time and power level see if necessary 3 Press the button Result Your setting are now stored in the oven s memory Using the settings Fi...

Page 14: ... to penetrate the food without being reflected or absorbed by the dish used Care must therefore be taken when choosing the cookware If the cookware is marked microwave safe you do not need to worry The following table lists various types of cookware and indicates whether and how they should be used in a microwave oven Cookware Microwave safe Comments Aluminum foil Can be used in small quantities t...

Page 15: ...ven The following parts of your microwave oven should be cleaned regularly to prevent grease and food particles from building up Inside and outside surfaces Door and door seals Turntable and roller rings Always ensure that the door seals are clean and the door closes properly Failure to maintain the oven in a clean condition could lead to deterioration of the surface that could adversely affect th...

Page 16: ...is microwave oven is not intended for commercial use Technical specifications SAMSUNG strives to improve its products at all times Both the design specifications and these user instructions are thus subject to change without notice Model ME89M ME89MSTMW89M MW89MST Power source 230 V 50 Hz Power consumption Microwave 1250 W Output power 100 W 850 W IEC 705 Operating frequency 2450 MHz Magnetron OM7...

Reviews: