background image

English - 19

04

  COOKING GUIDE

Food

Remove 

from oven

After standing 

(10 MIN.)

Beef

Rare

135 °F

145 °F

Medium

150 °F

160 °F

Well Done

160 °F

170 °F

Pork

Medium

150 °F

160 °F

Well Done

160 °F

170 °F

Poultry

Dark meat

170 °F

180 °F

Light meat

160 °F

170 °F

COOKING POULTRY

Place the poultry on a microwave-safe roasting rack in a 

microwave-safe dish and cover with wax paper to prevent 

spattering. Use aluminum foil to shield the bone tips, thin 

pieces of meat, or areas that may start to overcook.

Check the temperature in several places before letting the 

poultry stand the recommended time.

Food

Cooking time/

power level

Instructions

Whole 

chicken

Up to 4 

lbs.

Cooking Time: 

7-11 min. / lb.

180 °F dark 

meat

170 °F light 

meat

Place the chicken breast-

side down on the roasting 

rack. Cover with wax paper. 

Turn over half way through 

cooking process. Cook until 

the juices run clear and the 

meat near the bone is no 

longer pink. Let stand for 

5-10 minutes.

Power Level:

Medium High 

(7).

Chicken 

pieces

Up to 2 

lbs.

Cooking Time: 

7-10 min. / lb.

180 °F dark 

meat

170 °F light 

meat

Place the chicken bone-side 

down on the dish, with the 

thickest portions towards 

the outside of the dish. 

Cover with wax paper. Turn 

over halfway through the 

cooking process. Cook until 

the juices run clear and the 

meat near the bone is no 

longer pink. Let stand for 

5-10 minutes.

Power Level:

Medium High 

(7).

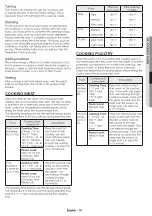
Turning

Turn foods over midway through the cooking cycle 

to expose all parts to the microwave energy. This is 

especially important with large items such as roasts.

Standing

Foods cooked in the microwave build up internal heat 

and continue to cook for a few minutes after the oven 

stops. Let foods stand to complete the cooking process, 

especially foods such as roasts and whole vegetables. 

Roasts need this time to complete cooking in the center 

without overcooking the outer areas. All liquids, such as 

soup or hot chocolate should be shaken or stirred when 

cooking is complete. Let liquids stand a moment before 

serving. When heating baby food, stir well and test the 

temperature before serving.

Adding moisture

Microwave energy is attracted to water molecules. Food 

that is uneven in moisture content should be covered or 

allowed to stand so that the heat disperses evenly. Add a 

small amount of water to dry food to help it cook.

Venting

After covering a dish with plastic wrap, vent the plastic 

wrap by turning back one corner to let excess steam 

escape.

COOKING MEAT

Place the meat fat side down on a microwave-safe 

roasting rack in a microwave-safe dish. Use narrow strips 

of aluminum foil to shield any bone tips or thin pieces of 

meat. Check the temperature in several places before 

letting the meat stand the recommended time.

The following temperatures are the removal temperatures. 

The temperature of the food will rise during standing time.

Food

Cooking time/

power level

Instructions

Roast beef 

(boneless)

Up to 4 lbs.

Cooking Time:

3-9 min. / lb. for 

145 °F - Rare

10-15 min. / lb. for 

160 °F - Medium

12-17 min. / lb. for 

170 °F - Well Done

Place the roast fat-

side down on the 

roasting rack and 

cover with wax paper. 

Turn over halfway 

through the cooking 

process. Let stand for 

10 to 15 minutes.

Power Level:

High (10) for first 

5 minutes, then 

Medium (5).

Pork 

(boneless 

or bone-in)

Up to 4 lbs.

Cooking Time:

13-17 min. / lb. at 

170 °F Well Done

Place the pork fat-side 

down on the roasting 

rack and cover with 

wax paper. Turn 

over halfway through 

cooking process. 

Let stand for 10 to 

15 minutes.

Power Level:

High (10) for first 

5 minutes, then 

Medium (5).

The following temperatures are the removal temperatures. 

The temperature of the food will rise during standing time. 

Expect a 10 °F rise in temperature during the standing 

time. 

Summary of Contents for ME18H704SFG

Page 1: ...imagine the possibilities Thank you for purchasing this Samsung product Microwave Oven user manual ME18H704SF...

Page 2: ...is manual to take full advantage of your microwave oven s many benefits and features WHAT YOU NEED TO KNOW ABOUT SAFETY INSTRUCTIONS Warnings and Important Safety Instructions in this manual do not co...

Page 3: ...the cord away from heated surfaces including the back of the oven 15 Do not let the cord hang over the edge of a table or counter 16 When cleaning surfaces of the door and oven that come together whe...

Page 4: ...ot lined up correctly If there is any damage do not operate the oven and notify your dealer immediately Make sure to install your oven in a location with adequate space Remove all foreign substances s...

Page 5: ...wn There is dangerous voltage inside If the oven needs to be repaired contact an authorized service center near you Do not attempt to repair disassemble or modify the appliance yourself Because a high...

Page 6: ...r heavy objects over the door when opening the door The food or object may fall and this may result in burns or injury Do not abruptly cool the door the inside of the appliance or the dish by pouring...

Page 7: ...t button 14 Fit choice button 15 Soften melt button 15 Kids meals button 16 Snacks button 16 Microwave cooking times Power levels 17 Keep warm COOKWARE GUIDE 17 17 Microwave safe utensils COOKING GUID...

Page 8: ...1 800 SAMSUNG 726 7864 or register online at www samsung com register When contacting Samsung please provide the specific model and serial number information which is usually located on the back or b...

Page 9: ...2 See page 14 See page 13 See page 16 See page 10 See page 11 See page 11 See page 10 11 See page 15 See page 17 See page 10 See page 10 See page 16 Oven Control Panel Glass Turntable Door Safety Lock...

Page 10: ...very four months When it is time to clean or replace the filter the microwave displays the Filter message to remind you to clean or replace the filter To remove the message touch the number 0 when the...

Page 11: ...able during and after cooking METAL SHELF Use the metal shelf to cook more than one item at the same time CAUTION Do not use a microwave browning dish on the shelf The shelf could overheat Do not use...

Page 12: ...F Let stand for 5 minutes Frozen breakfast Co 3 4 to 8 oz Use this button for frozen sandwiches breakfast entrees pancakes waffles etc Follow the package instructions for covering and standing Let the...

Page 13: ...ypes of food Food Amount Procedure Roast Beef Pork 2 5 6 0 lbs Start with the food placed fat side down After each stage turn the food over and shield any warm portions with narrow strips of aluminum...

Page 14: ...fork afterwards Let stand 5 minutes before serving 2 2 Servings FC 4 Oatmeal 1 1 Package Follow the package directions for the recommended amount of water needed Stir well before and afterwards 2 2 P...

Page 15: ...button repeatedly to cycle through the available items Refer to the Kids meals table below for a list of the items 2 Press the number 1 or 2 button to select the amount Refer to the Kids meals table...

Page 16: ...own time length and power level The power level lets you control the heating intensity from Warm 1 to High 10 One stage cooking For simple one stage cooking you only need to set the cooking time The p...

Page 17: ...safe The following table lists various types of cookware and indicates if and how they should be used in a microwave oven MICROWAVE SAFE UTENSILS If you are not sure whether an item is microwave safe...

Page 18: ...ming tough Foods with a non porous skin such as potatoes or hot dogs should be pierced to prevent bursting Putting heating oil or fat in the microwave is not recommended Fat and oil can suddenly boil...

Page 19: ...vegetables Roasts need this time to complete cooking in the center without overcooking the outer areas All liquids such as soup or hot chocolate should be shaken or stirred when cooking is complete L...

Page 20: ...tems pointing towards the edge of the dish and the tips toward the center When cooking cut vegetables always cover the dish with a lid or vented microwavable plastic wrap Whole unpeeled vegetables suc...

Page 21: ...RIOR It s best to clean spills on the outside of your microwave oven as they occur Use a soft cloth and warm soapy water Rinse and dry CAUTION Do not get water into the vents Never use abrasive produc...

Page 22: ...st free dry location Dust and dampness may adversely affect the ability of the microwave parts WARNING Do not repair replace or service any part of your microwave oven yourself Allow only a qualified...

Page 23: ...HARCOAL FILTER If your oven is vented to the inside the charcoal filter should be replaced every 6 to 12 months and more often if necessary The charcoal filter cannot be cleaned To order a new charcoa...

Page 24: ...d oven floor Make sure the turntable and roller ring are positioned correctly Causes TV or radio interference This is similar to interference caused by other small appliances such as hair dryers Move...

Page 25: ...t and shall not apply to the following including but not limited to damage which occurs in shipment delivery and installation applications and uses for which this product was not intended altered prod...

Page 26: ...g but not limited to damage which occurs in shipment delivery and installation applications and uses for which this product was not intended altered product or serial numbers cosmetic damage or exteri...

Page 27: ...memo memo...

Page 28: ...www samsung com ca_fr support French Scannez le code QR ou rendez vous sur le site www samsung com spsn pour voir nos vid os et d monstrations en direct d utilisation Requiert l installation d un lect...

Page 29: ...un monde de possibilit s Nous vous remercions d avoir choisi ce produit Samsung Four micro ondes Manuel d utilisation ME18H704SF...

Page 30: ...uillez le lire attentivement afin de profiter pleinement des nombreux avantages et fonctions qu offre votre four micro ondes CE QUE VOUS DEVEZ SAVOIR SUR LES CONSIGNES DE S CURIT Les avertissements et...

Page 31: ...n dans l eau 14 Tenez le cordon loign des surfaces chaudes y compris de l arri re du four 15 Ne laissez pas le cordon pendre par dessus le bord d une table ou d un comptoir 16 Lorsque vous nettoyez le...

Page 32: ...r guli rement toute substance trang re poussi re ou eau pr sente sur les bornes et les points de contact de la fiche d alimentation l aide d un chiffon sec D branchez la fiche et nettoyez la l aide d...

Page 33: ...de S curit lorsque vous utilisez votre four Ne tentez jamais de r parer le four vous m me La tension circulant l int rieur est tr s lev e Si le four n cessite des r parations contactez un centre de d...

Page 34: ...s sur la porte lors de son ouverture En cas de chute vous risqueriez de vous br ler ou de vous blesser Ne cr ez pas de choc thermique brutal au niveau de la porte de l int rieur de l appareil ou du pl...

Page 35: ...f rences 15 Bouton ramollir faire fondre 15 Bouton menus enfants 16 Bouton en cas 16 Temps de cuisson au four micro ondes et puissances 17 Maintien au chaud GUIDE DES R CIPIENTS 17 17 Ustensiles adap...

Page 36: ...de carte contactez Samsung Electronics Inc au 1 800 SAMSUNG 726 7864 ou inscrivez vous en ligne sur www samsung com register Avant de contacter Samsung munissez vous des informations qui vous seront d...

Page 37: ...10 Reportez vous la page 11 Reportez vous la page 11 Reportez vous aux pages 10 11 Reportez vous la page 15 Reportez vous la page 17 Reportez vous la page 10 Reportez vous la page 10 Reportez vous la...

Page 38: ...emplacer le filtre le micro ondes affiche le message Filter Filtre afin de vous rappeler que vous devez nettoyer ou remplacer le filtre Pour supprimer le message appuyez sur le num ro 0 en mode veille...

Page 39: ...Utilisez des maniques pour manipuler le plateau tournant pendant et apr s la cuisson GRILLE M TALLIQUE La grille m tallique permet de faire cuire plusieurs aliments en m me temps ATTENTION Ne posez p...

Page 40: ...ser pendant 5 minutes Petit d jeuner surgel Co 3 4 8 oz Utilisez ce bouton pour les sandwichs surgel s petits d jeuners cr pes gaufres etc Suivez les instructions figurant sur l emballage pour conna t...

Page 41: ...vous faites d congeler diff rentes cat gories d aliments Type d aliment Quantit Instructions R ti de b uf porc 2 5 6 0 lb Placez la viande dans le four c t gras vers le bas Une fois la 1 re phase de d...

Page 42: ...tre portions dans un bol adapt la cuisson au four micro ondes Remuez bien avant la cuisson et regardez si le riz a gonfl l aide d une fourchette ult rieurement Laissez reposer 5 minutes avant de servi...

Page 43: ...ndes Coupez en deux dans le sens vertical Laissez reposer pendant 2 minutes BOUTON MENUS ENFANTS 1 Appuyez sur le bouton Kids Meals Menus enfants Appuyez plusieurs fois sur le bouton pour faire d file...

Page 44: ...e vous permet de r gler la chaleur de Warm Chaud 1 High lev 10 Cuisson en une tape Pour une cuisson simple en une seule tape il vous suffit de r gler le temps de cuisson La puissance se r gle automati...

Page 45: ...senter une mention sp cifiant qu il convient une cuisson aux micro ondes Le tableau suivant r pertorie la liste des divers types de r cipient ainsi que leur m thode d utilisation dans un four micro o...

Page 46: ...n rent la chaleur n cessaire la cuisson des aliments CONSEILS G N RAUX D UTILISATION DU MICRO ONDES Les aliments denses comme les pommes de terre chauffent plus lentement que les autres aliments Les...

Page 47: ...rties aux micro ondes Cette m thode se r v le particuli rement efficace pour la cuisson de grandes pi ces de viande comme les r tis Position debout Les aliments cuits aux micro ondes conservent la cha...

Page 48: ...coup s en morceaux recouvrez toujours le plat d un couvercle ou d un film plastique perfor adapt la cuisson aux micro ondes Avant la cuisson percez la peau des l gumes entiers non pel s ex pommes de...

Page 49: ...de votre four micro ondes Garder votre four micro ondes propre permet d am liorer ses performances d viter les r parations inutiles et de prolonger sa dur e de vie NETTOYAGE DE LA PARTIE EXT RIEURE Il...

Page 50: ...EMENT Ne r parez pas et ne remplacez pas vous m me les l ments du four Seul un technicien qualifi peut effectuer les r parations Si le four est en panne ou n cessite une intervention technique d branc...

Page 51: ...r du four le filtre charbon doit tre remplac tous les 6 12 mois ou plus si n cessaire Le filtre charbon ne doit pas tre nettoy Pour commander un nouveau filtre charbon contactez le Service des pi ces...

Page 52: ...que le plateau tournant et son anneau sont plac s correctement Provoque des interf rences sur la radio ou le t l viseur Ces interf rences sont semblables celles provoqu es par les autres petits appare...

Page 53: ...mes ci apr s y compris mais sans s y limiter tout dommage survenant au cours de l exp dition la livraison et l installation toute utilisation de l appareil contraire au but auquel il tait destin tout...

Page 54: ...tout dommage survenant au cours de l exp dition la livraison et l installation toute utilisation de l appareil contraire au but auquel il tait destin tout num ro de produit ou de s rie effac tout dom...

Page 55: ...notes notes...

Page 56: ...E SITE INTERNET U S A Consumer Electronics 1 800 SAMSUNG 726 7864 www samsung com us support CANADA 1 800 SAMSUNG 726 7864 www samsung com ca support English www samsung com ca_fr support French Veuil...

Reviews: