Samsung MAX-VN75 Instruction Manual Download Page 17

GB

17

You can store up to:

15 FM stations                     

(option)

15 AM stations
15 FM stations

8 AM(MW) stations            (option)

7 LW stations

15 FM stations

5 MW stations                   

(option)

5 SW1 stations 
5 SW2 stations

Switch the system on by pressing On/Standby.

Select the TUNER function by pressing TUNER on the front panel.

Select the required frequency band by pressing TUNER (Band)
again on the front panel or TUNER (BAND) on the remote control.
Result: The appropriate indication is displayed:

FM

Frequency Modulation

AM(MW)

Medium Wave

LW(OPTION)

Long Wave

SW1, SW2(OPTION)

Short Wave

To search for a 

Press Preset/Manual on the front panel 

station...

or Tuning Mode on the remote control

Manually

One or more times until 

MANUAL

is dis-

played.

Automatically

One or more times until 

AUTO

is displayed.

Select the station to be stored by:

Turning the Moving Jog knob to the right or to the left to increase
or decrease the frequency respectively
or

Pressing Tuning

or 

on the remote control

To scroll through the frequencies faster when searching manu-
ally, hold down the

Preset/Manual Down or Up

buttons.

The automatic search procedure may stop on a frequency that
does not correspond to a radio station. If this happens, use the
manual search mode.

Adjust the volume by:

Turning the Volume knob on the front panel
or

Pressing the  VOL. + or – buttons on the remote control

Select the stereo or mono mode by pressing Mono/ST.

If you do not want to store the radio station found, revert to Step 4
and search for another station.
Otherwise:
Press Preset Memory on the front panel.

Result: The programme number and 

PRGM

are displayed for a few seconds. 

Press  Preset/Manual Down and Up to assign a programme

number between 1 and 15.

Press Preset Memory to store the radio station.

Result:

PRGM

is no longer displayed and the station is stored. 

To store any other radio frequencies required, repeat Steps to 8.

The PROGRAM function can be used to assign a new station to

an existing programme number.

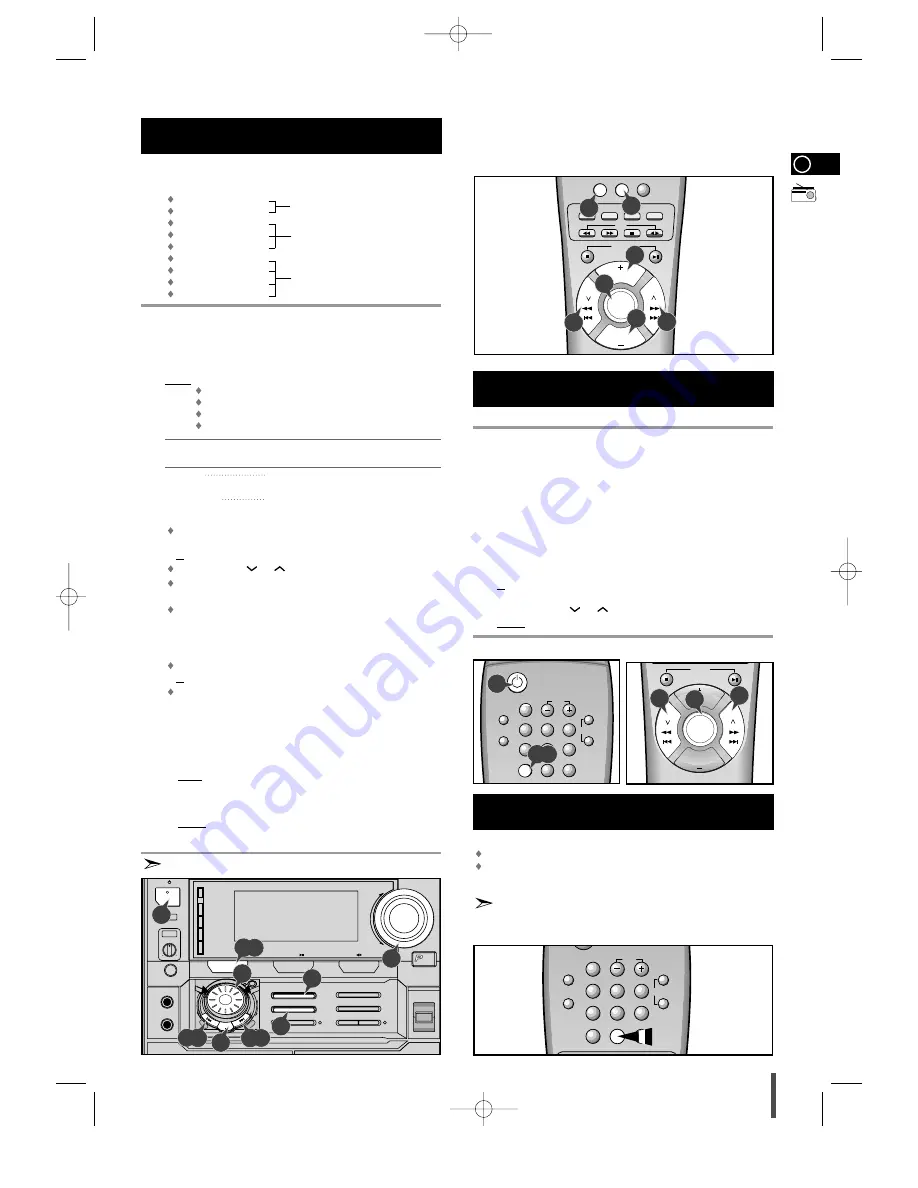
You can listen to a stored radio station as follows:

Switch the system on by pressing On/Standby.

Select the TUNER function by pressing TUNER on remote control.

Select the required frequency band by pressing TUNER (BAND) on
the remote control or TUNER (Band) again on the front panel.

Press the Preset/Manual button on the front panel of the unit, or the
Tuning Mode button on the remote control until “

PRESET

” is displayed.

Tuning the Moving Jog on the front panel left or right until the
desired station is found.
or
Select the desired station by pressing the station number stored,
using the Tuning 

or 

button on the remote control.

Result: The desired station is now received. 

You can improve the quality of radio reception by:

Rotating the 

FM

or 

AM

(MW) aerial

Testing the positions of the 

FM

and 

AM

(MW) aerials before fixing

them permanently

If reception from a specific 

FM

radio station is poor, press

Mono/ST. 

to switch from stereo mode to mono. The quality of

the sound will be improved.

Selecting a Stored Station

Improving Radio Reception

Searching for and Storing the Radio
Stations (continued)

1
2
3

4

5

On/Standby

Menu On/Off

Menu

Disc Skip

Return

Sound

TUNER

BAND

Mono/ST. Echo


On/Off

NTSC/PAL

Slow

Single Step

CD Repeat

Mute

Key Control

#

b

Volume

Tuning

Mode

Volume

VCD / CD

Searching for and Storing the Radio
Stations 

1
2
3

4

5

6

7

8

9

1

Volume

Tuning

Mode

Volume

5

5

4

TUNER

TAPE

Timer


On/Off

AI Off

Deck 1/2

Counter Reset

BAND

Mono/ST. Echo


On/Off

Volume

Tuning

Mode

Volume

VCD / CD

Game

Demo

Timer/

Clock

NTSC/PAL

Return

Rev Mode

Deck 1/2

Counter Reset

Dolby NR

Normal

CD REC/Pause

High

Dubbing

Mono/ST

Preset/Memory

REC/Pause

Program

TAPE

Volume

VCD / CD

TUNER

Band

Select  /

CD Repeat

Shuffle

CD Synchro

S.BASS

ower

Surround

EQ

3D Surround

AUX

On/Standby

+

MIC Mixing

Echo

Min

Phones

Max

MIC1

MIC 2

Preset/Manual

Manual EQ /Enter

Moving Control

Up

Down

Menu

+

Menu

Previsos

Next

ower

+

TUNER

Preset/Manual

7

3

1

2,3

5,8

5,8

4

7

8

5

Menu On/Off

Menu

Disc Skip

Return

Sound

TUNER

BAND

Mono/ST. Echo


On/Off

NTSC/PAL

Slow

Single Step

CD Repeat

Mute

Key Control

#

b

Volume

Tuning

Mode

Volume

5

5

6

6

4

6

2,3

 MAX-VN75/GB-15~28  5/23/03 8:34  Page 17

Summary of Contents for MAX-VN75

Page 1: ...Instruction Manual THREE CD CHANGER VIDEO CD MINI COMPACT SYSTEM MAX VN75 ...

Page 2: ... unit This symbol alerts you to important operating and maintenance instructions accompa nying the unit WARNING To reduce the risk of fire or electric shock do not expose this appliance to rain or moisture CAUTION TO PREVENT ELECTRIC SHOCK MATCH WIDE BLADE OF PLUG TO WIDE SLOT FULLY INSERT CLASS 1 LASER PRODUCT KLASSE 1 LASER PRODUKT LUOKAN 1 LASER LAITE KLASS 1 LASER APPARAT PRODUCTO LASER CLASE ...

Page 3: ...speed 16 Sound Select Function 16 NTSC PAL Function 16 KEY CONTROL Function 16 TUNER Searching for and Storing the Radio Stations 17 Selecting a Stored Station 17 Improving Radio Reception 17 TAPE DECK Listening to a Cassette 18 CD Synchro Record Feature 18 Recording a Compact Disc 18 Recording a Radio Programme 19 Copying a Cassette Dubbing 19 Selecting the Cassette Playback Mode Deck 2 Only 19 T...

Page 4: ...eset Manual or Stop Button 21 CD Track or Radio Station Search Down Up 22 Moving Jog 23 Manual EQ Enter 24 REC Pause 25 Preset Memory 26 Mono ST 27 Shuffle 28 Cassette Deck 2 29 CD Synchro 30 CD Repeat 31 Program 32 3D Surround 33 EQ 34 S BASS 35 Power Surround 36 Volume 37 Function Selection Buttons 38 Disc Change 39 Open Close 40 Compact Disc Compartment Front Panel View 1 2 3 4 5 6 7 8 9 11 10 ...

Page 5: ...7 Deck Stop 18 Deck Play 19 Counter Reset 20 Deck 1 2 21 Mono Stereo 22 Echo On and Off 23 Return 24 Single Step 25 Key Control 26 Sound 27 Menu Selection On Standby Menu On Off Menu Disc Skip Return Sound TUNER TAPE TimerOn Off AI Off Deck 1 2 CounterReset BAND Mono ST EchoOn Off NTSC PAL Slow Single Step CD Repeat Mute Key Control Volume Tuning Mode Volume VCD CD b 1 2 3 4 5 6 7 8 9 10 11 12 13 ...

Page 6: ...onnector Terminal 3 AM MW LW Aerial Connector Terminal 4 AUX Input 5 Loudspeaker Connector Terminal 6 Voltage Selector OPTION 7 Audio Output Connectors 8 Video Output Connectors IMPEDANCE 6Ω AM ANT AUX IN 1 2 R L OPTION AUDIO OUT VIDEO OUT FM ANT 75Ω SW ANT 1 2 3 4 5 6 7 8 ...

Page 7: ...easonable distance on either side of the system to ensure good stereo sound Direct the loudspeakers towards the listening area For optimum performance make sure that both speakers are placed at an equal distance above the floor Where to Install Your Mini Compact System Connecting the Loudspeakers Disc 1 Disc 2 Disc 3 Disc Change Open Close Game Demo Timer Clock NTSC PAL Return Rev Mode DECK 1 2 Co...

Page 8: ...y against on the remote control Replace the cover by sliding it back until it clicks into position Inserting Remote Control Batteries 1 2 3 Using the Audio Cord Connect the Audio Output Terminals Left Right of the System with the Audio Input Terminals Left Right of the Video Input Cassette Recorder so as to Record VCD Using the Video Cord Connect the Video Output Terminal of the system with the Vi...

Page 9: ...he instructions given on Page 17 to tune into a radio station and determine the best position for the aerial If reception is poor you may need to install an outdoor aerial To do so connect an outdoor FM aerial to the FM socket on the rear of the system using 75Ω coaxial cable not supplied How to connect a WIRE TYPE aerial Spread the SW aerial out and attach the ends to a wall in the posi tion prov...

Page 10: ... Select CD Repeat Shuffle CD Synchro AUX On Standby MICMixing Echo Min Phones Max MIC 1 Preset Manual ManualEQ Enter MovingControl Up Down Menu Menu Previs xt 2 1 3 5 7 4 6 You can view the various functions available on your system Press the Demo button Result The various functions available are listed in turn on the dis play All these functions are described in detail in this booklet For instruc...

Page 11: ...ound EQ 3D Surround AUX On Standby MICMixing Echo Min Phones Max MIC 1 MIC 2 Preset Manual ManualEQ Enter MovingControl Up Down Menu Menu Previso s Next VCD CD Open Close Disc 1 Disc 2 Disc 3 1 2 5 4 5 5 When you have loaded at least one compact disc into the player you can start listening to it Always treat your compact discs with care refer if necessary to the section entitled Precautions When U...

Page 12: ... To select a specific disc press the corresponding Disc 1 2 3 button on the front panel or Disc Skip on the remote control until the required disc indicator flashes Result All the discs will be played in turn starting with the one selected If you wish to play the current disc only press Repeat on the remote control one or more times until 1 CD is displayed If you use the Disc 1 2 3 function when l...

Page 13: ...gram to confirm your selection Result The selection is stored and is displayed To select other tracks repeat Steps 4 to 6 Press VCD CD to listen to the track selection in the order programmed To Turn the Moving Jog knob Listen to the current track again One notch to the left Listen to the previous track Two notches to the left Listen to the next track One notch to the right Skip forwards or backwa...

Page 14: ...urn on the On Standby switch and set the VCD mode Press the Open Close button on the unit to open the CD tray Result OPEN is displayed and CD tray slides open Load a video CD S with the label facing upwards in the tray Press the Open Close button again to close the CD tray To playback In version 1 1 press the Select button for direct access to the film as there is no menu on screen In version 2 0 ...

Page 15: ...p Search buttons when the desired passage has been found In the video CD version 1 1 or MENU OFF mode where the disc s contents are over 15 minutes long you can scan up or down by inter vals of five minutes To Press Scan forwards by 5 minute intervals Scan backwards by 5 minute intervals Result The picture is still and the disc s contents are forwarded or reversed by 5 minute intervals Playback th...

Page 16: ...ppears in the display and on the TV screen You can select between listening to the tone from the left channel the right channel or both channels Sound Select Function LCH RCH L RCH TUNER TAPE TimerOn Off AI Off Deck 1 2 CounterReset BAND Mono ST EchoOn Off NTSC PAL Slow Single Step Mute Key Control VCD CD b Demo Timer Clock NTSC PAL Return Rev Mode DECK 1 2 Counter Reset Dolby NR Mono ST Preset Me...

Page 17: ...mme number You can listen to a stored radio station as follows Switch the system on by pressing On Standby Select the TUNER function by pressing TUNER on remote control Select the required frequency band by pressing TUNER BAND on the remote control or TUNER Band again on the front panel Press the Preset Manual button on the front panel of the unit or the Tuning Mode button on the remote control un...

Page 18: ...y Insert a blank cassette in Deck 2 Select the VCD CD function by pressing VCD CD on the front panel Load a compact disc Select the required disc Select the required track and press CD Synchro directly to start recording at the beginning of the disc Result REC is displayed and recording starts To stop Press Recording and playing the compact disc The direct recording mode enables you to start recor...

Page 19: ...ide of the cassette and then stops Both sides of the cassette indefinitely until you press stop Game Demo Timer Clock NTSC PAL Return Rev Mode DECK 1 2 Counter Reset Dolby NR Normal CD REC Pause High Dubbing Mono ST Preset Memory REC Pause Program TAPE Volume VCD CD TUNER Band Select CD Repeat Shuffle CD Synchro S BASS ower Surround EQ 3D Surround AUX On Standby MIC Mixing Echo Min Phones Max MIC ...

Page 20: ...Deck 1 2 CounterReset BAND Mono ST EchoOn Off NTSC PAL Slow Single Step CD Repeat Mute Key Control b Your mini compact system has a Dolby Noise Reduction feature produced under license in order to remove back ground noise noise or hiss when listening to a cassette To activate the DOLBY NR mechanism press Dolby NR on the front panel To deactivate the DOLBY NR mechanism press Dolby NR again For good...

Page 21: ...left d Press Manual EQ Enter Result VOL XX is displayed where XX corresponds to the vol ume already set Turn the Moving Jog knob to adjust the volume level and press Manual EQ Enter Result The source to be selected is displayed Turn the Moving Jog knob to select the source to be played when the system switches on If you select You must also TAPE cassette Insert a recorded cassette in one of the de...

Page 22: ...tte To cancel AI OFF function press AI Off one or more times until OFF is displayed Your mini compact system is equipped with the function of Power Sound and Power Surround The function of Power Sound amplifies bass and improves high key or bass twice as much for you to appreciate powerful real sound The Power Surround replaces conventional stereo sound with a wider and more true to life sound It ...

Page 23: ...er Selecting an Equalizer Preset Your mini compact system is equipped with a preset equalizer that allows you to choose the most appropriate balance between treble and bass frequencies according to the type of music you are listening to Press EQ on the front panel until the required option is selected Equalizer mode PASS Normal balance linear POP Balance suitable for pop music ROCK Balance suitabl...

Page 24: ...dphones to your mini compact system so that you can listen to music or radio programmes without disturbing other people in the room The earphones must have a 6 3 mm jack or an appropriate adapter Connect the headphones to the Phones jack on the front panel Result The loudspeakers are no longer used to output the sound Prolonged use of headphones at a high volume may damage your hearing Game Functi...

Page 25: ... MIC 1 MIC 2 Preset Manual ManualEQ Enter MovingControl Up Dow n Menu Menu Previso s Next Do not place potted plants or vases on top of the unit Moisture entering the unit could lead to dangerous electric shock and can cause equipment damage In such events immediately disconnect the main plug from the socket When there are thunderstorms disconnect the main plug from the socket Main voltage peaks d...

Page 26: ...ways takes a little time to become familiar with a new appli ance If you have any of the problems listed below try the solu tions given They may save you the time and inconvenience of an unnecessary service call If the above guidelines do not allow you to solve the problem take a note of The model and serial numbers normally printed on the rear of the system Your warranty details A clear descripti...

Page 27: ...armonic distortion 0 3 COMPACT DISC PLAYER Capacity 3 discs Frequency range 20 Hz 20 KHz 1 dB Signal noise ratio 90 dB at 1 KHz with filter Distortion 0 05 at 1 KHz Channel separation 74 dB Disc sizes Diameter 120 or 80 mm Thickness 1 2 mm TAPE DECK Frequency range 125 Hz 8 KHz Signal noise ratio 40 dB Channel separation 35 dB Erasing effect 60 dB AMPLIFIER Output power 6 Ω 2 x 200 Watts RMS total...

Page 28: ...ELECTRONICS THIS APPLIANCE IS MANUFACTURED BY AH68 00438B MAX VN75 GB 15 28 5 23 03 8 34 Page 28 ...

Reviews: