


GB
13
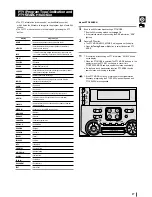
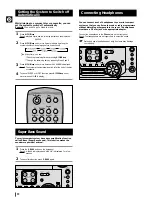
You can repeat indefinitely:
A specific track on a compact disc.
All tracks on the compact disc selected.
All discs loaded in the carrousel
To repeat...
Press CD Repeat on the Front
Panel one or more times until...
The current track indefinitely
REPEAT 1
is displayed
The selected disc
REPEAT 1 CD
is displayed
All discs loaded
REPEAT ALL CD
is displayed
When you wish to stop the Repeat function, press CD Repeat until
ALL
CD
or
1 CD
is displayed, or press
.
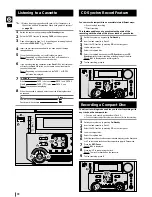
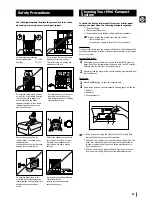
You can decide:
The order in which you listen to the tracks on the discs loaded
Which tracks you do not wish to listen to
You can program up to 24 tracks.
You must stop the compact disc player before selecting the tracks.
This feature can be combined with the Repeat function.
If the CD function is selected, stop the player by pressing
.
Load the selected CDs.
Press Program.
Result: The following indications are displayed:
(01 = Program no., DI = Disc no., – – = Track no. on the disc)
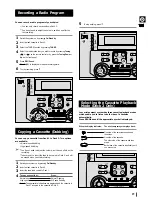
If necessary, select the disc containing the required track by pressing
the corresponding Disc (1, 2, 3) button.
Select the required track by turning the Multi Jog knob:
To the left to move back through the tracks
To the right to move forward through the tracks
Press Program to confirm your selection.
Result: The selection is stored and is displayed.
To select other tracks, repeat Steps 4 to 6.
Press CD (
) to listen to the track selection in the order
programmed.
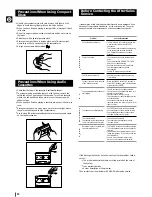
To...
Turn the Multi Jog knob...
Listen to the current track again
One notch to the left
Listen to the previous track
Two notches to the left
Listen to the next track
One notch to the right
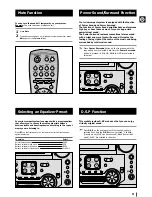
Skip forwards or backwards one
The appropriate number of
or more tracks
notches to the right or to the
left
To cancel the selection, press
.
Once if the compact disc player is stopped
Result:
PRGM
is no longer displayed.
If you open the compartment, the selection is cancelled.
If you select the number of a disc which is not loaded or a
track which does not exist on the CD, the selection skips to the
next programmed track.
You can also use the
/
buttons to select the required
tracks in step
5
,
9
.
1
2
3
4
5
6
8
9
10
Repeating One or All Tracks on the
Compact Discs
1
2
Programming the Order of Playback
Mul
ti Function
Multi Jog
Mono/ST
REC/Pause
Down
Normal
Dubbing
HI - Speed
CD
Synchro
Program
Shuffle
CD
Repeat
Preset/
Memory
Deck 1/2
REV.Mode
CD
AUX
TAPE
TUNER
Band
D / P / S
DIRECT PLAY & SELECTION
CD–R/RW PLAYBACK
Up
Tuning Mode
-- Disc Selection / Direct Play --
Volume
+
_
Mul
ti Function
Multi Jog
Disc 1
Disc 2
Disc 3
Demo
Timer
/Clock
Mono/ST
REC/Pause
Down
Normal
Dubbing
HI - Speed
CD
Synchro
Program
Shuffle
E
CD
Repeat
Preset/
Memory
Deck 1/2
REV.Mode
CD
AUX
TAPE
TUNER
Band
D / P / S
DIRECT PLAY & SELECTION
CD–R/RW PLAYBACK
Up
Tuning Mode
PTY
RDS
Display
7
Disc 1
Disc 2
Disc 3
CD
Tuning Mode
4
8
3,6
1,10
5,9