background image

GB

37

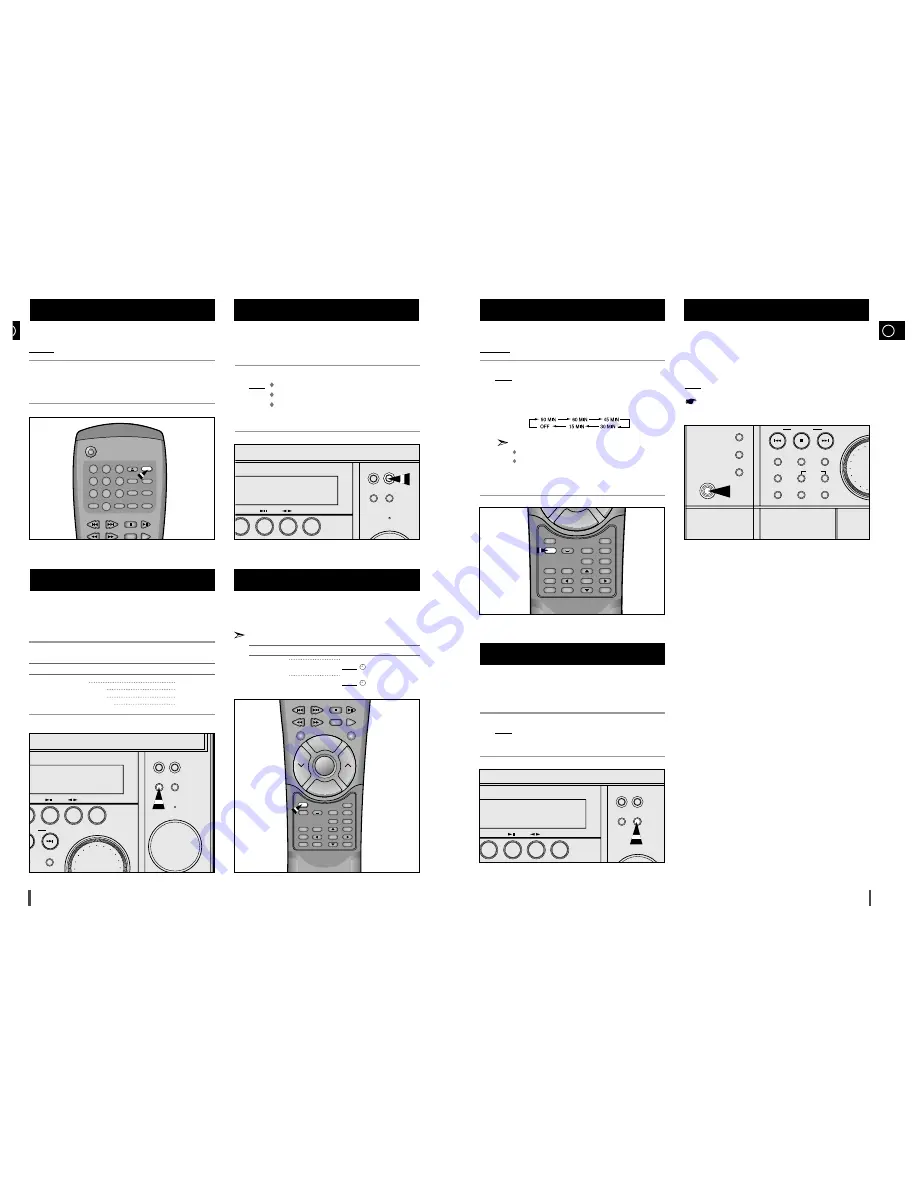
You can set the system to switch off automatically.
Example: You wish to go to sleep to music.

Press 

Sleep

.

Result: The following indications are displayed:

Press 

Sleep

one or more times to indicate how long the system

should continue playing before it switches off:

At any time, you can:

Check the remaining time by pressing 

Sleep

Change the remaining time by repeating Steps 

1

and 

2

To cancel the automatic switch-off, press 

Sleep

one or more times

the word 

SLEEP

disappears.

Your mini-compact system has a bass amplification function
called S.Bass (Super Bass Sound). This function makes the
bass more powerful.

Press the 

S. Bass

button on the front panel.

Result:

SBS ON

is displayed for a few seconds.

To cancel this function, press 

S. Bass

again.

You can connect a set of headphones to your mini-compact
system so that you can listen to music or radio programmers
without disturbing other people in the room. The earphones
must have a 6.3 mm jack or an appropriate adapter.

Connect the headphones to the 

Phones

jack on the front panel.

Result: The loudspeakers are no longer used to output the sound.

Prolonged use of headphones at a high volume may damage
your hearing.

1

2

Setting the System to Switch off
Automatically

Super Bass Sound

Connecting Headphones

Sleep

Repeat
A       B

Title

Angle

Audio

Display

Set up

Return

AUX

Book Mark

Menu

Sub Title

Zoom

Step

Enter

Timer On/Off

Volume

1

2

3

90 MIN 

B

36

You can turn the sound off temporarily on your system.
Example: You wish to answer a telephone call.

Press 

Mute

.

To switch the sound back on (at the same volume as before), press

Mute

again or the 

Volume

buttons.

Your mini-compact system is equipped with a preset equalizer
that allows you to choose the most appropriate balance
between treble and bass frequencies, according to the type of
music you are listening to.

Press 

EQ

on the front panel or 

EQ

on the remote control until the required

option is selected. 

To obtain a...

Select...

Normal balance (linear)

PASS

Balance suitable for pop music

POP

Balance suitable for rock music

ROCK

Balance suitable for classic music

CLASSIC

This system is equipped with the Power Sound feature, which
makes the sound more powerful and full-bodied.

Press 

Power Sound

button on the front panel. 

Result: The 

Power Sound

button on the front panel lights up red.

P. SOUND

is displayed for a few seconds.

A more powerful resonant sound is diffused.

To cancel this function, press 

Power Sound

again.

After having set the timer, it will start automatically as shown
by the TIMER indication on the display. If you no longer wish
to use the timer, you must cancel it.

You can stop the timer at any time (system on or in standby mode).

To...

Press Timer-On/Off...

Cancel the timer

Once.
Result:      is no longer displayed.

Restart the timer 

Twice.
Result:      is displayed again.

Mute Function

Selecting an Equalizer Preset

Cancelling the Timer

2

1

Power Sound Function

DVD/CD

On/Standby

DECK

Open/Close

Digital

3D Sound

Power Sound

S.Bass

Disc Skip

Clear

Repeat

Program

EQ

Mute

10/0

1

2

3

4

5

6

7

8

9

Sleep

Repeat
A       B

Title

Angle

Audio

Display

Set up

Return

AUX

Book Mark

Menu

Sub Title

Zoom

Step

Enter

Timer On/Off

DVD/CD

+

Volume

Tuning

Mode

Volume

DECK

Deck 1/2

Band

1

2

Dubbing

Mode

Up

R

DVD/CD

TAPE

AUX

ry

REV.Mode

Multi Jog

Volume

EQ

S.Bass

3-D Sound Power Sound

Communication

Band

TUNER

DVD/CD

TAPE

AUX

Volume

EQ

S.Bass

3-D Sound Power Sound

Communication

Band

TUNER

DVD/CD

TAPE

AUX

Volume

EQ

S.Bass

3-D Sound Power Sound

Communication

Mono/ST.

Display

Counter

Reset

Down

Deck 1/2

CD Synchro

REC/Pause

Record Lock

Dubbing

Normal

High

Tuning Mode

Up

Memory

REV.Mode

M

Enter

Phones

Summary of Contents for MAX-DN64

Page 1: ...Instruction Manual THREE CD CHANGER MINI COMPACT SYSTEM DVD VIDEO CD CD MAX DN64 ...

Page 2: ...l advantage of its features Use of controls adjustments or performance of procedures other than those specified herein may result in hazardous radiation exposure CAUTION INVISIBLE LASER RADIATION WHEN OPEN AND INTERLOCKS DEFEATED AVOID EXPO SURE TO BEAM This symbol indicates that dangerous voltage which can cause electric shock is present inside this unit This symbol alerts you to important operat...

Page 3: ... 3 4 5 6 7 8 9 DVD CD 1 2 3 4 5 6 7 8 9 10 11 12 13 14 15 36 35 34 33 32 31 30 29 28 27 26 25 24 23 22 21 20 19 18 17 16 1 Compact Disc Compartment 2 Function Selection buttons 3 CD Track or radio station search Down Up 4 Display RDS 5 Demo 6 On Standby 7 Timer Clock 8 PTY RDS 9 Mono ST 10 Display 11 Headphone Jack Connector 12 Enter 13 Cassette Deck 1 14 Counter Reset 15 CD Synchro 16 Deck 1 2 17...

Page 4: ... Standby Demo Timer Clock RDS PTY Display Mono ST Display Counter Reset Down Deck 1 2 CD Synchro REC Pause Record Lock Dubbing Normal High Tuning Mode Up Band R TUNER DVD CD TAPE AUX Memory REV Mode Multi Jog Volume EQ S Bass 3 D Sound Power Sound Enter Phones Communication 1 2 SP B 6 Rear Panel View 1 SUPER WOOFER PRE OUT 2 FM AERIAL CONNECTOR TERMINAL 3 AM AERIAL CONNECTOR TERMINAL 4 DVD CD DIGI...

Page 5: ... SPEAKERS 6Ω LINE OUT DIGITAL OUT OPTICAL AUX IN AM ANT FM 75Ω VIDEO OUT SUPER WOOFER PRE OUT S VIDEO OUT PLAY OUT RECORD IN OPTICAL RECORD IN AUX IN LINE OUT DIGITAL OUT OPTICAL MD recorder Refer to page 38 to give a full detail of the peripheral connection methods This unit can output DVD CD digital sound signals through this jack Use an optical cable to connect digital audio equipment DAT deck ...

Page 6: ...time even when you are using another func tion by pressing Timer Clock once Setting the Clock Viewing the Various Functions on Your System 2 1 1 2 3 4 5 6 7 The AM aerial for long and medium waves can be Placed on a stable surface Fixed to the wall you must first remove the base The AM aerial connector terminals are located on the rear of the system and are marked AM To avoid noise interference ch...

Page 7: ... Place a disc gently into the tray with the disc s label facing up Press the Play Pause button or Open Close button to close the disc tray Press the 3 D Sound button in POWER OFF then it is converted to and select the TYPE you want Example Select PAL if TV is for PAL When disk is set to NTSC in PAL it doesn t operate The CD disc changer can contain up to three 12 cm or 8 cm compact discs without u...

Page 8: ...32X on DVD or high speed playback on VCD no sound will be heard Though 2X SCAN AUDIO in ON in SETUP MENU no sound will be heard on discs which are recorded with LPCM or DTS Depending on the disc audio may or may not be heard when a disc is in 2X playback mode Searching Skipping through a Chapter or Track If you want to display the title chapter time audio and subti tle information on a DVD press t...

Page 9: ...aying a DVD Press the Repeat button once to display the current status Press the Repeat button twice to repeat the chapter currently play ing Press the Repeat button a third time to repeat the title currently playing Press the Repeat button again to turn off the repeat feature DVD repeats playback by chapter or title CD and VCD repeat playback by disc or track Depending on the disc the Repeat func...

Page 10: ... Pause button The disc will be played back in pro grammed order Press Clear button to resume normal Playback Use the UP DOWN button to select CLEAR LAST TRACK or CHAPTER or TITLE Press the Enter button to delete the last track or chapter or title in the program order Program Playback in a specific Order REPEAT TRACK REPEAT ALL REPEAT OFF 1 2 3 4 DVD CD DECK Open Close Digital 3D Sound Power Sound ...

Page 11: ... are represented by abbreviations Use the UP DOWN button to select STEREO R CHANNEL or L CHANNEL on a VCD CD Even when the microphone has been connected press the audio button and the UP DOWN button to select a wanted action Selecting Audio INDEX VIEW 01 02 03 04 05 06 07 08 09 1 2 3 4 Sleep Repeat A B Title Angle Audio Display Set up Return AUX Book Mark Menu Sub Title Zoom Step Enter Timer On Of...

Page 12: ...g the Angle button Check to see if an ANGLE mark is present at the upper right hand corner of the screen When an ANGLE mark is shown press the Angle button An example of Angle information display Use the UP DOWN button to select the desired screen angle Then press the Enter button An example of Angle information display Use the LEFT RIGHT button to determine whether or not the ANGLE mark will be d...

Page 13: ...mark function may not work Using the Bookmark Function Cont d The Setup menu lets you customize your MAX DN64 player by allowing you to select various language preferences set up a parental level even adjust the player to the type of television screen you have i e widescreen Press the Setup button on the remote in the play only DVD or stop mode PLAYER MENU Setup of the Display Language See P23 Use...

Page 14: ...ark Menu Sub Title Zoom Step Enter Timer On Off Vo ume Enter Enter 2 3 4 5 1 How to make the SETUP MENU disappear or return to menu screen during set up Using the Audio Language Example Setting up in ENGLISH Press the Setup button on the remote in the play or stop mode Press the UP DOWN button to select to Audio Press the Enter button Press the UP DOWN button to select ENGLISH Select ORIGINAL if y...

Page 15: ...ENGLISH 2 DISC MENU ENGLISH 3 AUDIO ENGLISH 4 SUBTITLE ENGLISH 5 PARENTAL UNLOCKED 6 AUDIO OPTIONS 7 DISPLAY OPTIONS RETURN ENTER 1 1 B 26 Press the Setup button on the remote in the play or stop mode Use the UP DOWN button to select AUDIO OPTIONS Then press the Enter button Use the UP DOWN button to select the desired item Then press the Enter button DOLBY DIGITAL OUT MPEG 2 DIGITAL OUT PAL Only ...

Page 16: ...lly One or more times until AUTO is displayed Select the station to be stored by Turning the Multi Jog knob to the right or to the left to increase or decrease the frequency respectively or Pressing Tuning or on the remote control To scroll through the frequencies faster when searching manu ally hold down the Tuning Mode Down or Up buttons The automatic search procedure may stop on a frequency tha...

Page 17: ...nal Press the On Standby button Receive the FM radio See the radio receiving method on the page 28 FM and frequency are shown on the display If the received station transfers the RDS information RDS appears automatically on the display Press the RDS Display button to select the desired RDS mode Whenever the button is pressed RDS mode changes as follows PS NAME RT CT Current FM frequency The RDS fu...

Page 18: ...ording and playing the compact disc The function of CD Synchro is operated in only CD Always treat your cassettes with care refer if necessary to the section entitled Precautions When Using Audio Cassettes on page 39 Switch the system on by pressing the On Standby button Select the TAPE function by pressing TAPE on the front panel Open either cassette deck 1 or 2 by pushing and releasing the deck ...

Page 19: ... recording protection is activated only during recording When the Record Lock is on the lamp is on do not open the cassette door When releasing press Record Lock button once again Timer Function For the Protection of being Recorded 7 8 9 5 6 1 2 3 4 You can copy a cassette from Deck 1 to Deck 2 Two options are available Normal speed dubbing High speed dubbing You do not need to adjust the volume a...

Page 20: ...hoose the most appropriate balance between treble and bass frequencies according to the type of music you are listening to Press EQ on the front panel or EQ on the remote control until the required option is selected To obtain a Select Normal balance linear PASS Balance suitable for pop music POP Balance suitable for rock music ROCK Balance suitable for classic music CLASSIC This system is equippe...

Page 21: ...into the main socket and press On Standby to switch it on Select the AUX source by pressing AUX on the front panel one or more times Result AUX is displayed Switch the external source on Adjust the volume and balance as required Volume Equalizer Example You can watch a film and take advantage of stereo sound provided that the original sound track is in stereo as if you were in a cinema The followi...

Page 22: ...ed at this time because 1 The DVD s software restricts it 2 The DVD s software doesn t support the feature e g angles 3 The feature is not available at the moment 4 You ve requested a title or chapter number or search time that is out of range Check if the disc has a Menu Some of the functions selected in the Setup Menu may not work properly if the disc is not encoded with the corresponding functi...

Page 23: ...nsitivity 10 dB Total harmonic distortion 0 3 COMPACT DISC PLAYER Capacity 3 discs Frequency range 20 Hz 20 KHz 1 dB Signal noise ratio 90 dB at 1 KHz with filter Distortion 0 05 at 1 KHz Channel separation 74 dB Disc sizes Diameter 120 or 80 mm Thickness 1 2 mm TAPE DECK Frequency range 125 Hz 12 KHz Signal noise ratio 40 dB Channel separation 35 dB Erasing effect 60 dB AMPLIFIER Output power 6Ω ...

Page 24: ...ELECTRONICS THIS APPLIANCE IS MANUFACTURED BY A H 6 8 0 0 6 6 5 B ...

Reviews: