background image

53

54

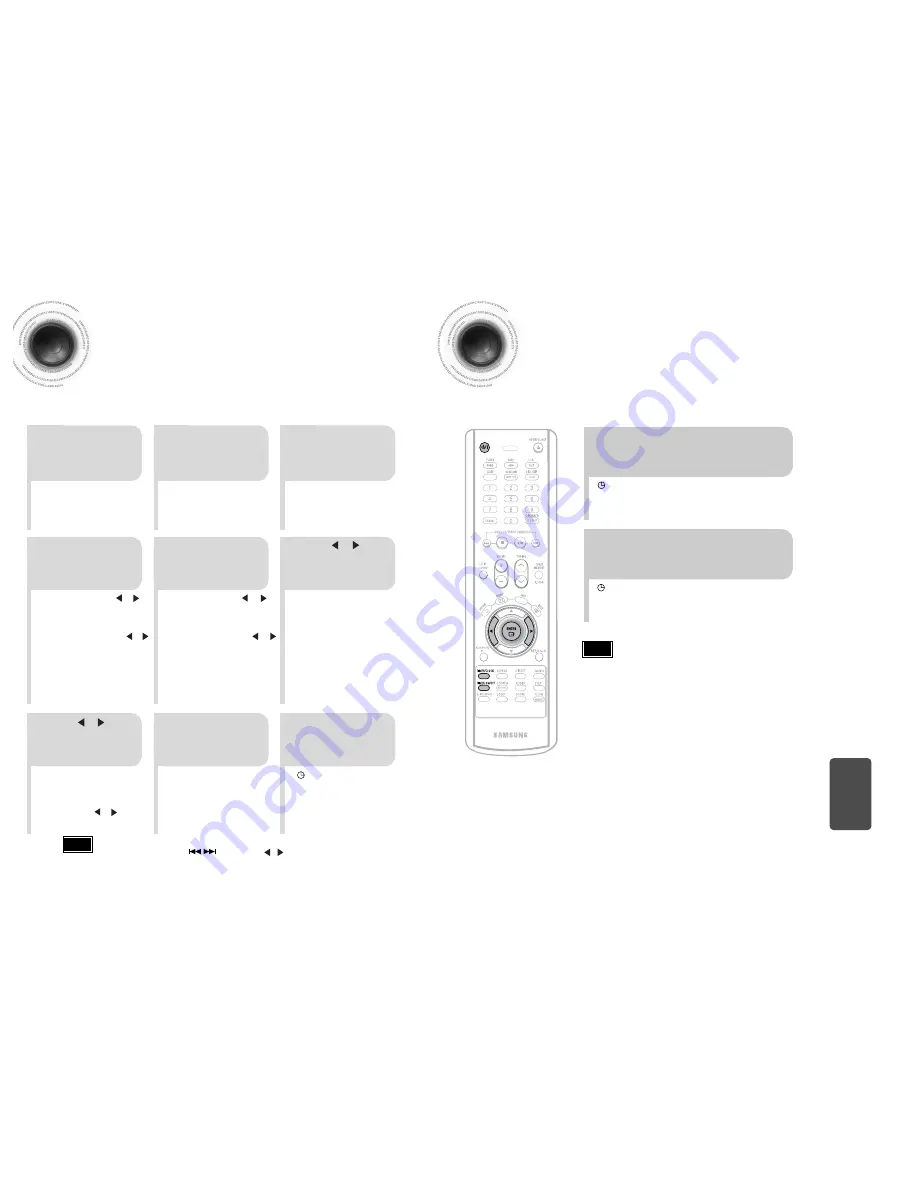
Timer Function

The timer enables you to switch the system on or off at specific times.

If you no longer want the system to be switched on or off automatically, you must cancel the timer.

Before setting the timer, check that the current time is correct.

For each step, you have a few seconds to set the required options. 
If you exceed this time, you must start again.

Example:

You wish to wake up to music every morning.

Canceling the Timer

ON TIME

is displayed (instead

of the equalizer symbols) for a
few seconds, followed by any
switch-on time already set; you
can set the timer switch-on time.

The source to be selected is
displayed.

2

1

3

Switch the system
on by pressing

STANDBY/ON

.

Press

TIMER/CLOCK

until 

TIMER

is

displayed.

Press the 

ENTER

button.

is displayed to the top right of

the time, indicating that the timer
has been set. 

• 

The system will switch on and off
automatically at the required
times.

8

7

9

Press     or     button
to select the source to
be played when the
system switches on.

Press 

ENTER

to

confirm the timer.

Press

STANDBY/ON 

to

set the system to
standby mode.

5

4

a

. Set the hour by pressing      or

button.

b.

Press 

ENTER 

.

The minutes flash.

c.

Set the minutes by pressing      or
button.

d.

Press 

ENTER

.

OFF TIME

is displayed (instead

of the equalizer symbols) for a few
seconds, followed by any switch-
off time already set; you can now
set the timer switch-off time.

TAPE (cassette) : Insert a cassette

tape.

TUNER (radio) : 

a

Press 

ENTER

.

b

Select a preset
station by pressing

or      .

CD (compact disc) : Load a compact

disc.

a

. Set the hour by pressing      or

button.

b.

Press 

ENTER

.

The minutes flash.

c.

Set the minutes by pressing      or
button.

d.

Press 

ENTER

.

VOL 10

is displayed, where 10

corresponds to the volume
already set.

Set the timer
switch-off time.

6

Press     or     button
to adjust the volume
level and press

ENTER

.

Set the timer
switch-on time.

Note

If the timer switch on and off times are identical, the word 

ERROR

is displayed.

Note

You can cancel the timer while the power is on or while the player is in standby.

After having set the timer, it will start automatically as shown by the TIMER indication on the display.
If you no longer wish to use the timer, you must cancel it.

• 

is no longer displayed.

To cancel the timer, press 

TIMER ON/OFF

once.

• 

is displayed again.

To resume the timer, press 

TIMER ON/OFF

again.

MISCELLANEOUS

You can also use Multi Jog or                 button to instead      ,      button on the remote control in step 4,5,6,7.   

Summary of Contents for MAX-DC20600

Page 1: ...MINI COMPONENT SYSTEM DVD VCD CD MP3 CD CD R RW PLAYBACK MAX DC650 V I D E O COMPACT DIGITAL AUDIO COMPACT DIGITAL VIDEO Instruction Manual AH68 01674C THIS APPLIANCE IS MANUFACTURED BY CD SYNCHRO USB MONO ST ...

Page 2: ...nderstorms disconnect AC main plug from the wall outlet Voltage peaks due to lightning could damage the unit Do not expose the unit to direct sunlight or other heat sources This could lead to overheating and malfunction of the unit The battery used with this product contain chemicals that are harmful to the environment Do not dispose of batteries in the general household trash Use of controls adju...

Page 3: ...r TAPE all in a single player Power Saving Function The MAX DC650 automatically shuts itself off after 20 minutes in the stop mode TV Screen Saver Function The MAX DC650 automatically brightens and darkens the brightness of the TV screen after 3 minutes in the stop mode The MAX DC650 automatically switches itself into the power saving mode after 20 minutes in the screen saver mode Customized TV Sc...

Page 4: ...EAKERS OUT 6 110V 127V 220V 240V 1 SW Antenna Connector Option 2 FM Antenna Connector 3 AM Antenna Connector 4 AUX Input 5 LINE OUT 6 S Video Output Connector If the TV is equipped with an S Video input connector S VIDEO IN connect it to the player s S Video output jack 7 Video Output Connector Connect the TV s video input jacks VIDEO IN to the VIDEO OUT connector 8 Component Video Output Connecto...

Page 5: ...atteries Batteries that look similar may differ in voltage Always replace both batteries at the same time Do not expose batteries to heat or flame Remote Control 7 Description Caution MONO ST LATIN SOUND button VOLUME button MENU button POWER STANDBY ON button OPEN CLOSE button TUNER BAND button TAPE PLAY button REPEAT button MUTE button P SURROUND XT buttons EZ VIEW NTSC PAL button TIMER CLOCK bu...

Page 6: ...V to VIDEO 2 Press the TV VIDEO button on the remote control of TV to set the TV to S VIDEO 2 Connect the connecting jacks 2 to the back of mini compact system Make sure the polarities and are correct Connecting the Speakers Before moving or installing the product be sure to turn off the power and disconnect the power cord Speakers Place these speakers in front of your listening position facing in...

Page 7: ...interlaced scanning process by which a video image is drawn in a series of passes The progressive scanning method is desirable for dealing with moving objects Progressive Scan FULL FRAME What is Progressive or Non Interlaced Scanning This function works only on TVs equipped with component video inputs Y Pr Pb that support Progressive Video It does not work on TVs with conventional component inputs...

Page 8: ...the antenna wire around until you find a location where reception is good then fasten it to a wall or other rigid surface If reception is poor connect an outdoor antenna Before attaching a 75Ω coaxial cable with a standard type connector disconnect the supplied FM antenna 1 Connect the AM loop antenna supplied to the AM and terminals 2 If reception is poor connect an outdoor single vinyl covered w...

Page 9: ... even when you are using another function by pressing TIMER CLOCK once CLOCK is displayed 2 Press TIMER CLOCK twice 1 Switch the system on by pressing STANDBY ON button TIMER appears in the display The current time is now set 5 When the correct time is displayed press ENTER Increase the minutes Decrease the minutes 4 When the correct hour is displayed press ENTER The minutes flash Increase the hou...

Page 10: ... 320kbps AC3s from 128kbps to 448kbps and WMAs from 56kbps to 160kbps are supported In addition for subtitles this unit will support Text format SMI SPEC VIDEO Compatibility DivX3 11 Up to the latest VERSION WMV WMV V1 V2 V3 V7 AUDIO Compatibility MP3 CBR 80kbps 320kbps AC3 CBR 128kbps 448kbps WMA CBR 56kbps 160kbps Each time you press the button your selection will toggle between SUBTITLE ON and ...

Page 11: ...ton the previous file is selected To play back the disc at a faster speed press and hold or during playback Each time you press and hold either button the playback speed will change as follows 2x 4x 8x 32x Normal Compatible Devices 1 USB devices that support USB Mass Storage v1 0 USB devices that operate as a removable disk in Windows 2000 or later without additional driver installation 2 MP3 Play...

Page 12: ...s a Chapter Each title on a DVD disc is divided into several smaller sections called chapters appears on the TV screen If this symbol appears on the TV screen while buttons are being operated that operation is not possible with the disc currently being played What is a Track File A section of video or a music file recorded on a VCD CD or MP3 CD Screen Display DVD display VCD display CD display MP3...

Page 13: ...ack or directory file will be played But you cannot skip chapters consecutively The picture moves forward one frame each time the button is pressed during playback Playing Frame by Frame Press STEP button When watching a VCD with a track longer than 15 minutes each time is pressed playback will skip back or forward 5 minutes TITLE 01 05 CHAPTER 002 040 TITLE 01 05 CHAPTER 004 040 Something like yo...

Page 14: ...ton Each time the button is pressed during playback the repeat playback mode changes as follows DVD VCD CD MP3 JPEG Repeat playback operation is not possible with version 2 0 VCD discs if PBC is turned on To use Repeat Playback on a VCD with PBC you should set the PBC to OFF in the disc menu See page 33 CHAPTER Repeatedly plays the selected chapter TITLE Repeatedly plays the selected title RANDOM ...

Page 15: ...bottom of the TV screen can be removed by pressing the EZ VIEW button This function will not work if the DVD is recorded with multi camera angle format Black bars may not disappear because some DVD discs have a built in horizontal to vertical ratio Note SELECT ZOOM POSITION A B Repeat Playback A B Repeat Playback does not work on MP3 and JPEG discs To select AB Repeat Playback from the information...

Page 16: ...ng to a Specific Time Press the numeric buttons You can press on the remote control to move directly to the desired title chapter or track Depending on the disc you may not be able to move to the selected title or time Something like you Back for good Love of my life More than words I need you My love Uptown girl DVDRECEIVER SMARTNAVI SELECT 03 Move Select Stop Note Selecting Audio Subtitle Langua...

Page 17: ...red with a digital camera or camcorder or JPEG files on a PC can be stored on a CD and then played back with this DVD player Slide Mode JPEG Place the JPEG disc on the disc tray Each time the button is pressed the slide moves backward or forward Press to skip to the next slide 1 Playback starts automatically Each image is shown for 5 seconds before another image is displayed Press the OPEN CLOSE b...

Page 18: ...en PBC ON and OFF When you select the disc menu that is not supported by the disc the This menu is not supported message appears on the screen 1Press MENU button Press Cursor buttons to move to DISC MENU and then press ENTER button 4 Press ENTER button 3 Press Cursor buttons to select the desired item PBC Playback Control Function When playing a VCD version 2 0 you can select and view various scen...

Page 19: ...lian 1512 Serbian 1051 Aymara 1209 Hausa 1353 Moldavian 1513 Siswati 1052 Azerbaijani 1217 Hindi 1356 Marathi 1514 Sesotho 1053 Bashkir 1226 Croatian 1357 Malay 1515 Sundanese 1057 Byelorussian 1229 Hungarian 1358 Maltese 1516 Swedish 1059 Bulgarian 1233 Armenian 1363 Burmese 1517 Swahili 1060 Bihari 1235 Interlingua 1365 Nauru 1521 Tamil 1069 Bislama 1239 Interlingue 1369 Nepali 1525 Tegulu 1066 ...

Page 20: ...t your TV or monitor For a standard TV select either 4 3LB or 4 3PS option according to personal preference Select 16 9 if you have a wide screen TV Select this to view a 16 9 picture in the full screen mode on your wide screen TV You can enjoy the wide screen aspect Select this to play a 16 9 picture in the letter box mode on a conventional TV Black bars will appear at the top and bottom of the s...

Page 21: ...d Level 6 you cannot view DVDs with Level 7 or higher The higher the level the closer the content is to violent or adult material 3 5 Press Cursor button to move to PARENTAL and then press ENTER button Press Cursor button to select the desired rating level and then press ENTER button Enter the password and then press ENTER button Note 2 1 Press MENU button Press Cursor button to move to Setup and ...

Page 22: ...press ENTER button To Change the Wallpaper 5 4 Press MENU button to exit the setup screen Press to select the desired USER and then press ENTER Select this to set the Samsung Logo image as your wallpaper Select this to set the desired image as your wallpaper Press RETURN button to return to the previous level Press MENU button to exit the setup screen 41 42 COPY LOGO DATA will be displayed on the ...

Page 23: ...r the effect Press RETURN button to return to the previous level AV SYNC Setup Press RETURN button to return to the previous level Press MENU button to exit the setup screen Audio menu appears 2 1 Setup menu appears AV SYNC screen appears 3 Press Cursor buttons to move to Audio and then press ENTER button Press Cursor buttons to move to AV SYNC and then press ENTER button Press the MENU button 4 Y...

Page 24: ... MONO ST button to listen in Mono Stereo This applies only when listening to an FM station To tune in to a preset station press on the remote control to select a channel Refer to Step 2 on page 41 to automatically or manually tune in to a station 2 1 Each time the button is pressed the band switches between FM MW SW1 2 PROGRAM flashes in the display 3 Example Presetting FM 89 1 in the memory Press...

Page 25: ...Press TAPE on the player to select the Tape function Switch the system on by pressing STANDBY ON Rewind the cassette DOWN button Fast forward the cassette UP button 5 4 Side A Tape button once Side B Tape button twice Tape 2 only Press TAPE 1 2 button to select the cassette to be played Press the PUSH EJECT of the cassette tape to open the cassette door and insert a cassette Press the button if ne...

Page 26: ...o synchronize the start of the recording with the start of the disc or track of your choice Press the OPEN CLOSE button to open the CD door Insert a CD and press the OPEN CLOSE button to close the CD door Press the PUSH EJECT button to open the cassette door insert a cassette and then close the cassette door Insert the cassette with the safety tabs 2 1 3 Insert a blank cassette in Tape 2 Switch th...

Page 27: ...the CD selection buttons to select the desired song Load a compact disc Press REC PAUSE button Press the DVD CD button Direct recording The cassette tape you want to record on must have the safety tabs intact Note Recording a Radio Program You can record a radio program of your choice You do not need to adjust the volume as it has no effect on the recording 2 1 3 Insert a blank cassette in Tape 2 ...

Page 28: ... pressing or button b Press ENTER The minutes flash c Set the minutes by pressing or button d Press ENTER OFF TIME is displayed instead of the equalizer symbols for a few seconds followed by any switch off time already set you can now set the timer switch off time TAPE cassette Insert a cassette tape TUNER radio a Press ENTER b Select a preset station by pressing or CD compact disc Load a compact ...

Page 29: ...S Balance suitable for pop music POP Balance suitable for rock music ROCK Balance suitable for classic music CLASSIC Balance suitable for hall HALL Balance suitable for live LIVE Balance suitable for cinema CINEMA Turn SOUND MODE on the front panel or Press SOUND MODE on the remote control until the required option is selected Selecting SOUND MODE Your mini compact system is equipped with a preset...

Page 30: ...at a high volume may damage your hearing Note Plug the microphone with a 6 3ø MIC jack into microphone terminal 58 Connecting Headphones Microphone option The various functions available are listed in turn on the display All these functions are described in detail in this booklet For instructions on how to use them refer to the appropriate sections DEMO Function You can view the various functions ...

Page 31: ...not be playable Disc is rotating but no picture is produced Picture quality is poor and picture is shaking Is the remote control being operated within its operation range of angle and distance Are the batteries exhausted The remote control does not work 60 59 Do not touch the playback side of the disc Hold the disc by the edges so that fingerprints will not get on the surface Do not stick paper or...

Page 32: ...t rate and high bit rate e g 32Kbps 320Kbps the sound may skip during playback If more than 500 tracks are recorded on a single CD a maximum of 500 tracks can be played If more than 300 folders are recorded on a single CD a maximum of 300 folders can be played What is MP3 MP3 is short for MPEG 1 Audio Layer 3 and MPEG is an acronym for Moving Pictures Experts Group MP3 is a file format with compre...

Page 33: ...ictures and sound have been recorded by means of digital signals Incorporating a new video compression technology MPEG 2 and high density recording technology a DVD disc comprises two 0 6 mm thick discs bonded together An acronym for Pulse Code Modulation another name for digital audio This is recorded on a video CD version 2 0 Selected scenes or information can be chosen from the menu displayed o...

Reviews: