background image

GB

30

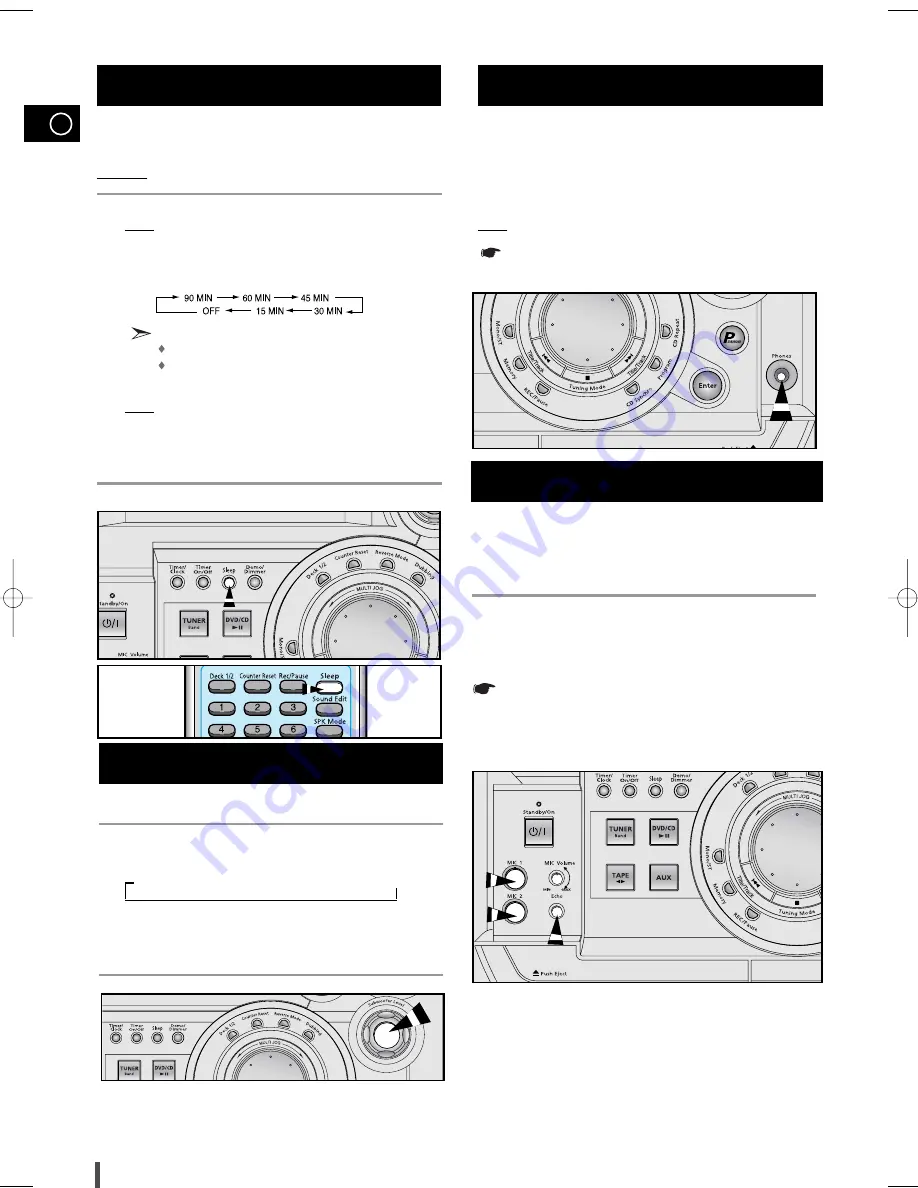
You can connect a set of headphones to your mini-compact
system so that you can listen to music or radio programmers
without disturbing other people in the room. The earphones
must have a 3.5 mm jack or an appropriate adapter.

Connect the headphones to the Phones jack on the front panel.
Result: The loudspeakers are no longer used to output the sound.

Prolonged use of headphones at a high volume may damage
your hearing.

While listening to a compact disc or a cassette, you can
set the system to switch off automatically
Example: 

You wish to go to sleep to music.

Press Sleep.
Result: playback starts and the following indications are displayed:

Press Sleep one or more times to indicate how long the 
system should continue playing before it switches off:

At any time, you can:

Check the remaining time by pressing Sleep

Change the remaining time by repeating Steps and 2

Press Sleep one or more times until 

SLEEP 

is displayed.

Result: The system will automatically switch off at the end of the disc

or cassette.

To cancel SLEEP function, press Sleep one or more times until 

OFF

is display.

Setting the System to Switch off
Automatically

Connecting Headphones

1

2

3

4

90 MIN 

Subwoofer function stresses low tones providing thudding
sound effects. 

Turn Subwoofer Level knob on the front panel or press the Sub-
woofer Level 
button on the remote control.
Press the button on the remote control repeatedly to select

OFF 

WOOFER1 

➞ 

WOOFER2 

➞ 

WOOFER3 

➞ 

WOOFER4”

or turn the knob on the front panel repeatedly to select 

OFF 

WOOFER1 

WOOFER 2 

WOOFER3 

WOOFER4”

You can select the level of low tones you desire.

1

2

Subwoofer Level Function 

The microphone enables the user to mix in his or her vocals to
sing-along with the music or recording .

Preparation
Plug the microphone with a 6.3mm mic jack into microphone terminal.

Turn the MIC Level knob to adjust the mic volume.

Press Echo button to select ECHO 1,ECHO 2, OFF.

The sound will be changed to 2.1 channels from 5.1 channels when
plugging the microphone into MIC jack.

Microphone Function

1

2

  MAX-DB630 GB noR 26~35  1/10/04 10:30 AM  Page 30

Summary of Contents for MAX-DB9900

Page 1: ...Instruction Manual THREE CD CHANGER MINI COMPACT SYSTEM DVD VIDEO CD CD R RW PLAYBACK MAX DB9900 ...

Page 2: ... instructions accompanying the unit WARNING To reduce the risk of fire or electric shock do not expose this appliance to rain or moisture CAUTION TO PREVENT ELECTRIC SHOCK MATCH WIDE BLADE OF PLUG TO WIDE SLOT FULLY INSERT CLASS 1 LASER PRODUCT KLASSE 1 LASER PRODUKT LUOKAN 1 LASER LAITE KLASS 1 LASER APPARAT PRODUCTO LASER CLASE 1 RISK OF ELECTRIC SHOCK DO NOT OPEN CAUTION TO REDUCE THE RISK OF E...

Page 3: ...arching 14 Forward Reverse Searching Cont d 15 Repeat Playback 15 Using Disc Menu Title 15 Program Playback 16 Program Playback Cont d 17 Selecting the Audio Language Subtitle Language 17 Various DVD Functions 18 System Setup 18 System Setup Cont d 19 Setting up the Language Features 19 MP3 Playback 20 MP3 Playback Cont d 21 Dolby Surround 22 Dolby Surround Cont d 23 TUNER Searching for and Storin...

Page 4: ...ction buttons CD track DVD Title select 15 CD Synchro Recording 16 Cassette Deck 2 17 Program 18 CD Repeat 19 Enter 20 Headphone Jack Connector 21 Power Surround 22 Multi jog DVD Chapter select 23 Subwoofer Level 24 TAPE Normal Speed Dubbing 25 Sound Mode 26 Volume 27 Tape Reverse Mode 28 CD Open Close 29 Disc Change 30 Disc Selection buttons 31 Tape Counter Reset 32 Deck 1 2 1 2 4 5 6 7 8 10 9 11...

Page 5: ...tion Frequency Time etc 6 FM Mode STEREO 7 EQ 8 D S P 9 Tape Reverse Mode 10 CD Synchro Recording 11 Tuner Frequency unit 12 Dobly select Functions 13 Sleep 14 CD Repeat Mode 15 MP3 CD 16 Clock 17 Playing Disc Number 18 Recording 19 Tape 1 2 20 Tuning Mode Auto 21 CD Program or Tuner Memory to Program 22 Tuner Preset 23 TUNED ...

Page 6: ...ng Up Down CD Search button Standby On button AUX button TUNER Band button Title button Audio MO ST button Subtitle button Display button Return button Menu button Timer On Off button Mute button Subwoofer Level button Disc Skip button Dolby Surround button Go To button DSP EQ button P Surround button Direction Enter DVD button Number 0 9 buttons Deck 1 2 button Clear button Setup button Slow butt...

Page 7: ...atteries in the remote control so they match the polarity to and to Use the correct type of batteries Batteries that look similar may differ in voltage Always replace both batteries at the same time Do not expose batteries to heat or flame To open the remote control cover push the top of the cover then slide downward The remote control can be used up to approximately 23 feet 7 meters in a straight...

Page 8: ...Red jack R right White jack L left For optimum sound quality do not invert the right and left channels Plug the system back into the main socket and press Standby On to switch it on Select the AUX source by pressing AUX Result AUX is displayed Switch the external source on Adjust the volume and balance as required Volume Equalizer Example You can watch a film and take advantage of stereo sound pro...

Page 9: ...Two for the right speaker marked R To achieve the correct sound quality connect the Red wire to the terminals Black wire to the terminals To connect a wire to a terminal push the tab as far as it will go To the right on the system Insert the wire up to the plastic sheathing in the hole Push the tab back To the left on the system until it clicks into place To the top on the loudspeaker Result The w...

Page 10: ... the FM aerial supplied into the coaxial socket 75Ω marked FM on the rear of the system Follow the instructions given on Page 24 to tune into a radio station and determine the best position for the aerial If reception is poor you may need to install an outdoor aerial To do so connect an outdoor FM aerial to the FM socket on the rear of the system using a 75Ω coaxial cable not supplied Connecting t...

Page 11: ...nd VCR optional Connection of the MD recorder optional This unit can output DVD CD digital sound signals through this jack Use an optical cable to connect digital audio equipment DAT deck MD recorder etc Remove the dust cap 1 from the DVD CD DIGITAL OUT jack Then connect an optical cable plug to the DVD CD DIGITAL OUT jack When the DVD CD DIGITAL OUT jack is not being used Attach the supplied dust...

Page 12: ...t purchase the mini compact system After a power failure After unplugging the unit For each step you have a few seconds to set the required options If you exceed this time you must start again Switch the system on by pressing Standby On Press Timer Clock twice Result CLOCK is displayed Press Enter Result The hour flashes To Turn the Multi Jog knob to the Increase the hours Right Decrease the hours...

Page 13: ...r repeat Steps 2 to 5 Keep the compartment closed whenever you are not using it to prevent dust from entering You can load or unload compact discs when the radio tape or auxiliary source function is selected Playing a Disc 1 2 3 Loading and Changing Compact Discs 1 2 3 4 5 6 1 5 Press the Play Pause button during playback To resume press the Play Pause button again Depending on the disc the initia...

Page 14: ...pause mode it will stop Turning the sound off temporarily The On Screen Display disappears V I D E O 1 2 1 8 00 00 00 T C V I D E O ENG ENG OFF 1 3 1 1 DVD indicator TITLE indicator TITLE ELAPSED indicator CHAPTER indicator ANGLE indicator REPEAT indicator DISC TYPE indicator AUDIO LANGUAGE indicator SUBTITLE LANGUAGE indicator X 2 X 4 X 8 PLAY X 2 X 4 X 8 PLAY Skipping through a Chapter Press the...

Page 15: ...ss the different features Press the Enter button only the remote control The selected item will play Using the Title Menu Press the Title button For DVDs containing multiple titles you can view the title of each movie Depending on the disc this function may either not work at all or may work differently Using Disc Menu Title 1 2 3 Forward Reverse Searching Con t d Repeat playback allows you to rep...

Page 16: ...r At this time you can continue programming if you want to When programming more than 10 tracks select and then press the Enter button The program selection screen where you can program up to 10 additional tracks appears Program Playback 1 2 3 4 5 PROGRAM MENU SELECT ENTER TITLE CHAPT PREVIOUS NEXT TITLE CHAPT 2 3 4 5 6 7 8 9 10 1 PLAY FINISH PROGRAM TITLE CHAPT PREVIOUS NEXT TITLE CHAPT 2 1 3 4 5...

Page 17: ...nguage Press the Subtitle button Depending on the number of languages recorded on a DVD disc a different subtitle language KOREAN ENGLISH JAPANESE etc is selected each time the button is pressed To make the subtitles disappear select OFF The word INVALID appears on the TV screen If this message appears on the TV screen while buttons are being operated that operation is not possible with that parti...

Page 18: ...sired sub item and then press the Enter button System Setup Press the Setup button again To End the System Setup 1 2 3 4 5 Selecting the desired Screen Angle Press the Angle button This function only works with discs on which multiple angles have been recorded During playback press the Angle button to select the desired angle in 1 3 2 3 3 3 normal in that order 2 OFF 1 3 2 3 3 3 ENGLISH CHINESE CH...

Page 19: ...8 rating levels on a disc If LEVEL 6 is selected a disc which contains rating LEVEL 7 and above cannot be played If you select NEW PASSWORD the screen changes and enables you to enter the new password DIGITAL OUTPUT Select this if Dolby Digital 5 1 CH connections have been made Sends a digital signal that carries the Dolby Digital 5 1 or DTS multichannel information to your external decoder Select...

Page 20: ... quality choose a higher bit rate The most popular bit rate for encoding recording is 128 Kbps MP3 File Compatibility This system can only read MP3 files that are recorded in the format that is compliant with ISO 9660 Level 1 or Level 2 The system can read or play MP3 files only with the extension code mp3 ID3 tags cannot be shown on the display An MP3 file can contain file information called ID3 ...

Page 21: ...joy only repeat play Press the Repeat button The indication corresponding to the selected mode appears on the TV screen Each time you press the button repeat mode changes as follows REPEAT RANDOM All tracks recorded on the disc will be played once at random REPEAT ONE Current track will be repeated REPEAT DIR Tracks in the current directory will be repeated REPEAT DISC All tracks on the disc will ...

Page 22: ...s case use the DSP system instead DOLBY SURROUND P R O L O G I C PRO Logic 3 STEREO PASS Adjusting Speaker Level Balance The unit is equipped with a built in test signal generator called a noise sequencer which outputs a noise signal that travels from channel to channel This enables the simple adjustment of sound levels to achieve at the listening position the same apparent loudness from each chan...

Page 23: ... to 90 centimeters 2 to 3 feet above prime listening position ear level If the space behind the listening position is insufficient i e too close to the wall place the rear speakers facing each other on either side Subwoofer Speaker Place the subwoofer at any convenient location within the vicinity of the listening position Dolby Surround Cont d Distance of A 50 100 400 200 Value ms 1 3 2 6 3 9 5 3...

Page 24: ... scroll through the frequencies faster when searching manu ally hold down the Tuning Mode Down or Up buttons The automatic search procedure may stop on a frequency that does not correspond to a radio station If this happens use the manual search mode Adjust the volume by Turning the Volume knob on the front panel or Pressing the Volume or buttons on the remote control Select the FM stereo or mono ...

Page 25: ...Switch the system on by pressing Standby ON Select the TUNER function by pressing Band on remote control Select the required frequency band by pressing Band on the remote control or TUNER Band again on the front panel Press the Tuning Mode button on the front panel of the unit or the Tuning Mode button on the remote control until PRESET is displayed Tuning the Multi Jog on the front panel left or ...

Page 26: ...two different ways Synchro nised recording Direct recording This feature enables you to synchronize the start of the recording with the start of the disc or track of your choice Switch the system on by pressing Standby On Insert a blank cassette in Deck 2 Select the CD function by pressing CD on the front panel Load a compact disc Select the required disc Select the required track and press CD Syn...

Page 27: ...t The appropriate indications are displayed and the cassette in Deck 1 is copied to the cassette in Deck 2 To stop dubbing press Your mini compact system has three cassette playback modes which enable you to listen to both sides of a cassette automatically Press REV Mode until the appropriate symbol is displayed When the display indicates The mini compact system plays back One side of the selected...

Page 28: ... Press Enter Result The minutes flash c Set the minutes by tuning the Multi Jog knob to the right or to the left d Press Enter Result VOL XX is displayed where XX corresponds to the volume already set Press Tuning Down and Up to adjust the volume level and press Enter Result The source to be selected is displayed Turn the Multi Jog knob to select the source to be played when the system switches on...

Page 29: ...i compact system is equipped with a preset equalizer that allows you to choose the most appropriate balance between treble and bass frequencies according to the type of music you are listening to Press EQ button on the remote control until the required option is selected Each time the EQ button is pressed in sequence the equalizer modes and sounds mode PASS POP ROCK CLASSIC HALL LIVE CINEMA DISCO ...

Page 30: ...LEEP is displayed Result The system will automatically switch off at the end of the disc or cassette To cancel SLEEP function press Sleep one or more times until OFF is display Setting the System to Switch off Automatically Connecting Headphones 1 2 3 4 90 MIN Subwoofer function stresses low tones providing thudding sound effects Turn Subwoofer Level knob on the front panel or press the Sub woofer...

Page 31: ...ock To obtain the best possible results from your mini compact system you must clean the following elements regularly The outer casing The compact disc player The cassette players heads rollers and drive capstans Always unplug the system from the wall outlet Before cleaning it If you are not going to be using it for a long time Outer Casing Clean the outer casing regularly using a soft cloth and a...

Page 32: ...ures Avoid using 120 minute cassettes as they place unnecessary strain on the tape mechanism Handle your compact discs with care Always hold them by the edges to avoid leaving fingerprints on the shiny surface When you have finished playing a compact disc always put it back in its case Do not fix paper or adhesive tape to the discs and do not write on the label Clean them with a special purpose cl...

Page 33: ...ogy DO NOT play CD ROM CD I CD R and DVD ROM in this player CDGs play audio only not graphics An LP is recorded as an analog signal with more distortion CD is recorded as a Digital Signal with better audio quality less distor tion and less deterioration of audio quality over time 20 min 74 min 20 min 8 cm 12 cm 8 cm Audio Video Audio Both the DVD player and the discs are coded by region These regi...

Page 34: ...d a set of earphones The loudspeaker wires have been disconnected The Mute button has been pressed The timer has been stopped by pressing Timer On Off Press the P SURROUND button for 5 seconds in power OFF standby the system is returned the original position RESET The DVD CD function has not been selected The disc has been inserted face down or is either dirty or scratched The laser sensor is dirt...

Page 35: ...0 dB Total harmonic distortion 0 5 COMPACT DISC PLAYER Capacity 3 discs Frequency range 20 Hz 20 KHz 1 dB Signal noise ratio 85 dB at 1 KHz with filter Distortion 0 1 at 1 KHz Channel separation 70 dB Disc sizes Diameter 120 or 80 mm Thickness 1 2 mm TAPE DECK Frequency range 125 Hz 10 KHz Signal noise ratio 40 dB Channel separation 35 dB Erasing effect 60 dB AMPLIFIER front speakers 2 x 30 Watts ...

Page 36: ...THIS APPLIANCE IS MANUFACTURED BY AH68 01394K ...

Reviews: