background image

English-

50

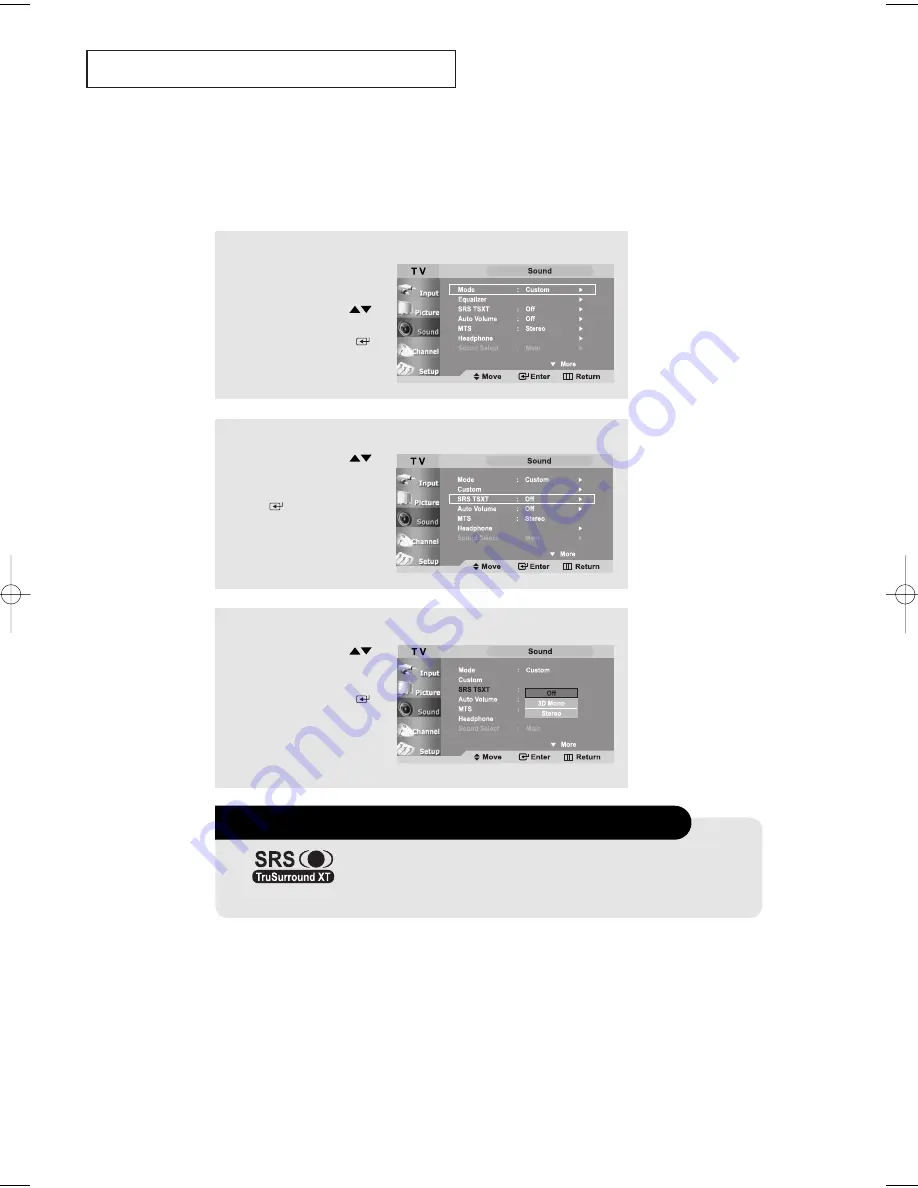
Setting the TruSurround XT(SRS TSXT)

Emphasizes midrange and bass and provides a simulated surround-sound
experience.

O

P E R AT I O N

2

Press the 

UP/DOWN

buttons to select “SRS
TSXT”, then press the

ENTER

button.

1

Press the 

MENU

button to

display the menu.

Press the 

UP/DOWN

buttons to select “Sound”,
then press the 

ENTER

button.

3

Press the 

UP/DOWN

buttons to select “Off”, 
“3D Mono ”, “Stereo”, 
then press the 

ENTER

button.

Press the 

EXIT

button 

to exit.

TRADEMARK & LABEL LICENSE NOTICE

is a trademark of SRS Labs,Inc. 

TruSurround XT

technology is 

incorporated under license from SRS labs, Inc.

BN68-00653A-01Eng.qxd  5/7/04 9:05 AM  Page 50

Summary of Contents for LT-P266W

Page 1: ...n 400 Valley Road Suite 201 Mount Arlington NJ 07856 www samsungusa com Canada Samsung Electronics Canada Inc Samsung Customer Care 7037 Financial Drive Mississauga Ontario L5N 6R3 www samsung ca LT P326W This device is a Class B digital apparatus BN68 00653A 01Eng 00COVER 5 7 04 9 57 AM Page 1 ...

Page 2: ...ting a DVD Player 14 Connecting a Digital TV Set Top Box 14 Connecting a PC 14 ANYNET 16 What is the Anynet 16 Anynet 17 Connecting TV DVD VCR Combo Connecting AV Signal Cables 18 Connecting TV DVD Receiver Connecting AV Signal Cables 19 Connecting TV DVD Combo DVD Receiver Connecting AV Signal Cables 20 Chapter 3 Operation Turning the TV On and Off 21 Changing Channels 21 Using the Channel Button...

Page 3: ...7 Changing the Screen Size 48 Freezing the Picture 48 Adjusting the Color Tone 49 Setting the TruSurround XT SRS TSXT 50 Automatic Volume Control 51 Special Sound Options 52 Adjusting the Headphone Sound 53 Selecting the Main or Sub Sound 54 Sub Woofer 55 Setting the Clock 56 Setting the On Off Timer 57 Setting the Sleep Timer 59 Viewing Closed Captions 60 Using the V Chip 62 Color Weakness 68 Sel...

Page 4: ...My Color Control Users can adjust colors to their preference by adjusting skin sky and grass tones I2C Intelligent Image Control Automatically detects the input visual signal and adjusts to creat optimum contrast IBC Intelligent Brightness Control Adjusts the screen brightness automatically depending on the brightness of the surrounding environment Color Weakness This feature enable those with a c...

Page 5: ... Press to increase or decrease the volume Also used to select items on the on screen menu MENU Press to see an on screen menu of your TV s features SOURCE Displays a menu of all of the available input sources TV AV S VIDEO Component 1 Component 2 HDMI DVI PC POWER INDICATOR Lights when unit is in standby mode Lights green after setting on off timer REMOTE CONTROL SENSOR Aim the remote control towa...

Page 6: ... AUDIO INPUT Connect to the audio output jack on your DVD Set top Box PC VIDEO D SUB INPUT Connect to the video output port on your PC PC AUDIO D SUB INPUT Connect to the audio output jack on your PC COMPONENT IN 2 Connect component video audio from a DVD VCR Set top Box COMPONENT IN 1 Connect component video audio from a DVD VCR Set top Box S VIDEO Connect a Video signal from a camcorder or VCR A...

Page 7: ...olume See Page 21 SOURCE Press to display all of the available video sources See Page 31 UP DOWN LEFT RIGHT ENTER Use to select on screen menu items and change menu values The remote control will only function with VCR or DVD units that are compatible with the LCD TV PIP FUNCTIONS Picture in Picture ON OFF See pages 41 42 POWER Turns the TV on and off See Page 21 P SIZE Press to change the screen ...

Page 8: ...o select channels over 100 For example to select channel 121 press 100 then press 2 and 1 See Page 29 Anynet Press the Anynet button to bring up the Anynet menu See Page 16 STILL Press to stop the action during a particular scene Press again to resume normal video See Page 48 MTS Multi channel Television Stereo Press to choose stereo mono or Separate Audio Program SAP broadcast See Page 52 SRS See...

Page 9: ... two AAA size batteries Make sure to match the and ends of the batteries with the diagram inside the compartment Installing Batteries in the Remote Control 1 Slide the cover out completely YOUR NEW TV If remote control doesn t work Check the following 1 Is the TV power switch on 2 Are the plus and minus ends of the batteries reversed 3 Are the batteries drained 4 Is there a power outage or is the ...

Page 10: ... antennas see Separate VHF and UHF Antennas on page 8 Antennas with 300 ohm Flat Twin Leads If you are using an off air antenna such as a roof antenna or rabbit ears that has 300 ohm twin flat leads follow the directions below Chapter Two INSTALLATION 1 Place the wires from the twin leads under the screws on a 300 75 ohm adaptor not supplied Use a screwdriver to tighten the screws 2 Plug the adapt...

Page 11: ...er into the ANT IN terminal on the bottom of the rear panel INSTALLATION Antennas with 75 ohm Round Leads 1 Plug the antenna lead into the ANT IN terminal on the bottom of the back panel Separate VHF and UHF Antennas If you have two separate antennas for your TV one VHF and one UHF you must combine the two antenna signals before connecting the antennas to the TV This procedure requires a an option...

Page 12: ...hannels If your cable box descrambles only some channels such as premium channels follow the instructions below You will need a two way splitter an RF A B switch and four lengths of coaxial cable These items are available at most electronics stores 1 Find and disconnect the cable that is connected to the ANTENNA IN terminal on your cable box This terminal might be labeled ANT IN VHF IN or simply I...

Page 13: ...B switch 6 Connect the last coaxial cable between the OUT terminal on the RF A B switch and the VHF UHF terminal on the rear of the TV INSTALLATION After you ve made this connection set the A B switch to the A position for normal viewing Set the A B switch to the B position to view scrambled channels When you set the A B switch to B you will need to tune your TV to the cable box s output channel w...

Page 14: ...of digital audio 5 1 channels The difference between HDMI and DVI is that the HDMI device is smaller in size has the HDCP High Definition Content Protection coding feature installed and supports multi channel digital audio INSTALLATION 1 Connect HDMI cable from the TV to the input terminal of the HDMI device How to connect Core Core provided reduces EMI E1ectromagnetic Interference noises from ele...

Page 15: ...erent back panel configuration A coaxial cable is usually included with a VCR If not check your local electronics store If you have a mono non stereo VCR use the Y connector not supplied to hook up to the left and right audio input jacks of the TV If your VCR is stereo you must connect two cables Connecting a VCR These instructions assume that you have already connected your TV to an antenna or a ...

Page 16: ... AV OUT 2 Connect a set of audio cables between the AUDIO OUT jacks on the VCR and the AUDIO INPUT jacks on the TV Connecting a DVI D Cable Note If you are using a DVI D cable to connect 1 Be sure to connect the audio cable sold separately as shown above to get normal TV sound 2 See Appendix Display Modes for supported resolutions 3 The screen may have shifted to the right or to the left after con...

Page 17: ...t a video cable between the COMPONENT1 or COMPONENT2 Y PB PR jacks on the TV and the Y PB PR jacks on the DVD player Note For an explanation of Component video see your Set Top Box owner s manual Each external input source device has a different back panel configuration Connecting a Digital TV Set Top Box The connections for a typical set top box are shown below 1 Connect a set of audio cables bet...

Page 18: ...nfiguration on your TV may be different TV Rear panel PC VIDEO CABLE D SUB Not supplied PC AUDIO CABLE Not supplied Connect the D Sub cable to PC PC IN on the rear of your set Connect the stereo audio cable to AUDIO PC IN on the rear of your set and the other end to Audio Out of the sound card on your computer ...

Page 19: ...tton presses Through Anynet One remote control three button presses The Anynet network allows the devices connected to exchange control commands with one another and check the operating status As a result you can use your TV remote control to control your DVD player when you Play DVDs and to control the STB when you watch the STB set top box programs You can switch easily and conveniently between ...

Page 20: ...stem can support only one Home theater 7 Standard Connection means a connection configuration in which no digital optical coaxial cables are connected 8 Advanced Connection means a connection configuration in which digital optical coaxial cables are connected 9 Anynet begins to operate when the Anynet supported AV devices are plugged in and enter Standby mode DVD Player DVD VCR Combo DVD Recorder ...

Page 21: ...ks on the DVD VCR Combo to the AV IN jacks on the TV 4 Component Cable Sold Separately If you have the component connector cable connect Component Video Out jacks DVD only on the DVD VCR Combo to the Component 1 Video Input jacks on the TV 5 Audio Cable After you complete step 4 connect the Component Audio Output jacks DVD only on the DVD VCR Combo and the Component Input 1 L Audio R jacks on the ...

Page 22: ...onnect the Video Output port on the DVD Receiver and the AV IN port on the TV 4 Audio Connector Connect the Left Audio Right port of Monitor Output on the TV and the Audio Input port on the DVD Receiver 5 Component Connector Sold Separately If you have the component connector connect the Color Difference Component Output port on the DVD Receiver and the Component Input 1 YpbPr port on the TV 4 Con...

Page 23: ...he DVD VCR Combo to the AV IN jacks on the TV 5 Component Connector Sold Separately If you have the component connector Connect the Component Video Output jacks DVD only on the DVD VCR Combo and the Component Input 1 Y PB PR jacks on the TV 6 Audio Cable Connect the L Audio R COMPONENT Audio In 1 jacks on the TV to the Analog Audio Output jacks on the DVD VCR Combo 7 Component Cable Sold Separatel...

Page 24: ... to the last channel viewed To quickly switch between two channels that are far apart tune to one channel then use the number button to select the second channel Then use the PRE CH button to quickly alternate between them Adjusting the Volume 1 Press the VOL buttons to increase or decrease the volume 1 Press MUTE and the sound cuts off The word will appear in the lower left corner of the screen 2...

Page 25: ...gs 1 Press the INFO button on the remote control The TV will display the channel the type of sound and the status of certain picture and sound settings 1 With the power on press the MENU button The main menu appears on the screen It s left side has five icons Input Picture Sound Channel Setup The on screen menus disappear from the screen after about two minutes You can also use the MENU CH Up Down...

Page 26: ...s still control your TV s volume 1Turn off your VCR 2 Press the MODE button and make sure that the VCR LED is illuminated 3 Press the SET button on your TV s remote control 4 Using the number buttons on your remote control enter three digits of the VCR code listed on page 26 of this manual for your brand of VCR Make sure you enter three digits of the code even if the first digit is a 0 If more tha...

Page 27: ...ttons on your remote control enter three digits of the cable box code listed on page 26 of this manual for your brand of cable box Make sure you enter three digits of the code even if the first digit is a 0 If there is more than one code listed try the first one 5 Press the Power button on the remote control Your cable box should turn on if your remote is set up correctly If your cable box does no...

Page 28: ...e control enter three digits of the DVD code listed on page 26 of this manual for your brand of DVD Make sure you enter three digits of the code even if the first digit is a 0 If there is more than one code listed try the first one 5 Press the Power button on the remote control Your DVD should turn on if your remote is set up correctly If your DVD does not turn on after set up repeat steps 2 3 and...

Page 29: ...25 039 055 082 001 002 007 024 040 024 017 038 062 065 011 017 023 025 038 039 055 070 016 024 016 024 040 041 011 023 025 039 055 070 073 015 017 062 084 086 014 044 055 017 038 062 065 017 038 014 025 042 059 053 054 061 009 011 017 053 011 015 017 018 021 024 028 036 052 062 kenwood KLH LG Lloyd Logik LXI Magnavox Marantz Marta MEI Memorex MGA Midland Minota Mitsubishi Montgomery ward MTC Multi...

Page 30: ...the UP DOWN buttons Press the ENTER button to confirm your choice The message Antenna Input Check is displayed with OK selected Press the ENTER button 5 Press the MENU button to confirm your setting The message Enjoy your watching is displayed 3 Press the UP DOWN buttons to select Air STD HRC or IRC then press the ENTER button Press the ENTER button to stop 4 Press the LEFT RIGHT buttons to move t...

Page 31: ...efore your television can begin memorizing the available channels you must specify the type of signal source that is connected to the TV i e an antenna or a cable system 1 Press the MENU button to display the menu Press the UP DOWN buttons to select Channel then press the ENTER button 2 Press the ENTER button Repeatedly press the UP DOWN buttons to cycle through these choices Air STD HRC or IRC al...

Page 32: ...o minutes Press ENTER at any time to interrupt the memorization process and return to the Channel menu 2 Press the UP DOWN buttons to select Auto Program Press the ENTER button 1 First select the correct signal source Air STD HRC IRC See steps 1 2 on previous page 4 After all the available channels are stored the Auto program menu reappears Press the EXIT button to exit Ex Press to select channel ...

Page 33: ...he number buttons to directly select the channel that will be added or erased Press the ADD DEL button Repeatedly pressing ENTER will alternate between Add and Delete Press the EXIT button to exit You can view any channel including an erased channel by using the number buttons on the remote control 1 Use the number buttons to directly select the channel to Add or Delete Press the MENU button to di...

Page 34: ...te channel Press the EXIT button when done to exit To Set up Your Channels OPERATION To Select Source Use to select TV or other external input source connected to the TV Use to select the input source of your choice 1 Press the MENU button to display the on screen menu Press the ENTER button 2 Press the ENTER button Press the UP DOWN buttons to select the Input source then press the ENTER button 3...

Page 35: ...ct Input Press the UP DOWN buttons to select Edit Name then press the ENTER button 2 Press the UP DOWN buttons to select AV S Video Component1 Component2 HDMI DVI or PC input jack then press the ENTER button 3 Press the UP DOWN buttons to select VCR DVD Cable STB HD STB Satellite STB AV Receiver DVD Receiver Game Camcorder DVD Combo DHR DVD HDD Recoder or PC input source then press the ENTER butto...

Page 36: ...ss of the picture Choose Standard for the standard factory settings Choose Movie when viewing the Movie Choose Custom if you want to adjust the settings according to personal preference see Customizing the Picture page 34 1 Press the MENU button to display the menu Press the UP DOWN buttons to select Picture then press the ENTER button 2 Press the ENTER button Press the UP DOWN buttons to select t...

Page 37: ... 3 Press the ENTER button to select Contrast Brightness Sharpness Color or Tint 4 Press the LEFT RIGHT buttons to decrease or increase the value of a particular item For example if you select Contrast pressing RIGHT increases it Press the EXIT button to exit 2 Press the UP DOWN buttons to select Custom then press the ENTER button 1 Press the MENU button to display the menu Press the UP DOWN button...

Page 38: ...ect the Standard Music Movie Speech or Custom sound settings Press the EXIT button to exit 1 Press the MENU button to display the menu Press the UP DOWN buttons to select Sound then press the ENTER button Press the ENTER button OPERATION Choose Standard for the standard factory settings Choose Music when watching music videos or concerts Choose Movie when watching movies Choose Speech when watchin...

Page 39: ...ttings can be adjusted to suit your personal preference Alternatively you can use one of the automatic settings See the previous page 3 Press the LEFT RIGHT buttons to select a particular item to be changed Press the UP DOWN buttons to increase or decrease the value of a particular item Press the EXIT button to exit Note The equalizer allows you to adjust frequencies to your preference Note The lo...

Page 40: ...buttons to select Language Press the ENTER button 1 Press the MENU button to display the menu Press the UP DOWN buttons to select Setup then press the ENTER button 3 Press the UP DOWN buttons to select English Français Español or Português Press the EXIT button to exit ...

Page 41: ...ing the poor picture you must set the Blue screen mode to Off 1 Press the MENU button to display the menu Press the UP DOWN buttons to select Setup then press the ENTER button 2 Press the UP DOWN buttons to select Blue Screen then press the ENTER button 3 Press the UP DOWN buttons to set Blue Screen On or Off Press the EXIT button to exit Pressing the UP DOWN buttons will alternate between On and ...

Page 42: ...ss the UP DOWN buttons to selec Fine Tune then press the ENTER button 3 Press the LEFT RIGHT buttons to adjust the fine tuning 4 To store the fine tuning setting in the TV s memory press the ENTER button Press the EXIT button to exit If you do not store the fine tuned channel in memory adjustments are not saved Fine tuned channels that have been saved are marked with an asterisk on the right hand ...

Page 43: ...plifier boosts the incoming signal 1 Press the MENU button to display the menu Press the UP DOWN buttons to select Channel then press the ENTER button 2 Press the UP DOWN buttons to select LNA then press the ENTER button 3 Press the UP DOWN buttons to set LNA On or Off Press the EXIT button to exit Pressing the UP DOWN buttons will alternate between On and Off ...

Page 44: ...n Press the UP DOWN buttons to select PIP then press the ENTER button 2 Press the ENTER button Press the UP DOWN buttons to select On If you turn the TV off while watching and turn it on again the PIP window will disappear Quick way to access the PIP menu Simply press the PIP button on the remote control T V Move Enter Return Mode Custom Custom Color Tone Normal Size Wide DNIe DNIe On PIP MCC Pict...

Page 45: ...ition of the PIP Window 7 Press the UP DOWN buttons to select Size then press the ENTER button Press the EXIT button to exit Changing the Size of the PIP Window When the PC is in energy saving mode you cannot choose the PIPoption You may notice that the picture in the PIPwindow becomes slightly unnatural when you set the main screen to game or karaoke mode Switch the main screen and the PIPwindow ...

Page 46: ... the menu Press the UP DOWN buttons to select Picture then press the ENTER button DNIe On Improved picture mode as demonstrated by DNIe Demo is activated DNIe Off The mode is deactivated and the screen returns to it s original condition DNIe Demo The screen shows the improved image on the left hand side and the original image on the right hand side 3 Press the UP DOWN buttons to select DNIe On DNI...

Page 47: ...ons to select MCC then press the ENTER button 2 Press the UP DOWN buttons to select Easy Control then press the ENTER button MCC My Color Control MCC allows users to adjust colors to their preference by adjusting skin sky and grass tones using the predefined settings Standard Custom Turkish Blue Emerald Green and Indian Pink without affecting other colors on the screen Easy Control This function d...

Page 48: ...button Detail Control 3 Press the UP DOWN buttons to select the desired MCC color and press the ENTER button Press the LEFT RIGHT buttons to increase or decrease the value of a particular item Press the EXIT button to exit This function doesn t work when the Source is in PC mode or DNIe is in off mode You can adjust skin sky and grass tones without using the predefined settings in custom mode The ...

Page 49: ...imum contrast 1 Press the MENU button todisplay the menu Press the UP DOWN buttons to select Picture then press the ENTER button 2 Press the UP DOWN buttons to select I2C then press the ENTER button 3 Press the UP DOWN buttons to select On or Off Press the EXIT button to exit This function doesn t work when the Source is in PC mode or DNIe is in off mode ...

Page 50: ... display the menu Press the UP DOWN buttons to select Picture then press the ENTER button 2 Press the UP DOWN buttons to select IBC then press the ENTER button 3 Press the LEFT RIGHT buttons to select On or Off Press the EXIT button to exit Screen brightness is adjusted automatically depending on the brightness of the surrounding environment This function doesn t work when the Source is in PC mode...

Page 51: ...creen Size 1 Press the P SIZE button to change the screen size Wide Sets the picture to 16 9 wide mode Panorama Use this mode for the wide aspect ratio of a panoramic picture Zoom 1 2 Magnifies the size of the picture on screen 4 3 Sets the picture to 4 3 normal mode This is the standard TV screen size Note Only wide and size of 4 3 can be selected for PC Source ...

Page 52: ...ne then press the ENTER button 1 Press the MENU button to display the menu Press the UP DOWN buttons to select Picture then press the ENTER button 3 Press the UP DOWN buttons to select Cool 2 Cool 1 Normal Warm 1 or Warm 2 Press the EXIT button to exit Choose from the following Color Tone settings Cool 2 Cool 1 Standard Warm 1 Warm 2 according to personal preference ...

Page 53: ...n press the ENTER button 1 Press the MENU button to display the menu Press the UP DOWN buttons to select Sound then press the ENTER button 3 Press the UP DOWN buttons to select Off 3D Mono Stereo then press the ENTER button Press the EXIT button to exit TRADEMARK LABEL LICENSE NOTICE is a trademark of SRS Labs Inc TruSurround XT technology is incorporated under license from SRS labs Inc ...

Page 54: ... broadcasters 2 Press the UP DOWN buttons to select Auto Volume then press the ENTER button 1 Press the MENU button to display the menu Press the UP DOWN buttons to select Sound then press the ENTER button 3 Press the UP DOWN buttons to set Auto Volume On or Off Press the EXIT button to exit ...

Page 55: ...are having difficulty receiving a stereo signal Choose SAP to listen to the Separate Audio Program which is usually a foreign language translation You can also change the MTS setting by pressing the MTS button on the remote control When you change channels MTS is set to Stereo automatically To listen in SAP or Mono change the MTS setting 2 Press the UP DOWN buttons to select MTS then press the ENT...

Page 56: ...ress the ENTER button Note Headphones must be purchased separately 3 Press the UP DOWN buttons to select the particular item to be changed 4 Press the LEFT RIGHT buttons to decrease or increase the value of a particular item Press the EXIT button to exit Adjusting the Headphone Sound The headphone option is especially useful when simultaneously watching the main screen and the PIP window ...

Page 57: ...the UP DOWN buttons to select Sound Select then press the ENTER button 3 Press the UP DOWN buttons to select Main or Sub Select Main to hear the main TV sound and select Sub to hear the PIP window sound Press the EXIT button to exit Selecting the Main or Sub Sound You can select to hear sound from either the Main or Sub picture when PIP is On ...

Page 58: ...ect the particular item to be changed Press the LEFT RIGHT buttons to decrease or increase the value of a particular item Press the EXIT button to exit 2 Press the UP DOWN buttons to select Sub Woofer then press the ENTER button English 55 OPERATION Sub Woofer The TV provides an output for hookup to an active powered subwoofer Note Extra sub woofer speaker is necessary to emphasize low key sound A...

Page 59: ...he UP DOWN buttons until the correct Minute appears Press the LEFT RIGHT buttons to select am pm and adjust with the UP DOWN buttons Press the EXIT button to exit 2 Press the ENTER button to select Time then press the ENTER button to select Clock Note You can also set the time using the numeric buttons on the remote Setting the Clock Setting the clock is necessary in order to use the various timer...

Page 60: ...the timer you must set the TV s clock See Setting the Clock on page 56 When you set the hours make sure the correct time of day am or pm appears to the right of the time 2 Press the UP DOWN buttons to select On Timer then press the ENTER button Press the UP DOWN buttons repeatedly to select the appropriate Hour Press the LEFT RIGHT buttons repeatedly to select the appropriate minute i e the time w...

Page 61: ...Off time press the UP DOWN buttons to select Off Timer Press the ENTER button and set the hours and minutes Follow the same procedure as in steps 2 and 3 above 5 When finished setting the timer press the EXIT button to exit Auto Power Off When you set the timer on your television will be turned off if you do not operate any controls for 3 hours after the TV has been turned on with the Timer On fun...

Page 62: ...button to display the on screen menu Press the UP DOWN buttons to select Setup then press the ENTER button Press the ENTER button to select Time 3 Press the UP DOWN buttons repeatedly until the correct time appears Press the EXIT button to exit 2 Press the UP DOWN buttons to select Sleep Timer then press the ENTER button Sleep timer ...

Page 63: ...ws These captions are usually subtitles for the hearing impaired or foreign language translations All VCRs record the closed caption signal from television programs so home recorded video tapes also provide closed captions Most pre recorded commercial video tapes provide closed captions as well Check for the closed caption symbol in your television schedule and on the tape s packaging 1 Press the ...

Page 64: ...NTER button Press the EXIT button to exit 6 Press the UP DOWN buttons to select Mode then press the ENTER button Press the UP DOWN buttons to set Cation or Text then press the ENTER button 7 Press the UP DOWN buttons to select Channel then press the ENTER button Press the UP DOWN buttons to select 1 or 2 then press the ENTER button OPERATION ...

Page 65: ...en will appear Enter your 4 digit Pin number Note The default Pin number for a new TV set is 0 0 0 0 4 After entering a valid PIN number the V Chip screen will appear Press the UP DOWN buttons to select Change Pin Note If you forget the Pin press the remote control buttons with the unit Off in the following sequence which resets the pin to 0 0 0 0 POWER OFF MUTE 8 2 4 POWER ON OPERATION 5 Press th...

Page 66: ...ns to select V Chip then press the ENTER button 3 The Enter Pin screen will appear Enter your 4 digit Pin number Note The default Pin number for a new TV set is 0 0 0 0 4 The V Chip screen will appear and V Chip Lock will be selected To enable the V Chip feature press the UP DOWN buttons so that the V Chip Lock is set to Yes Pressing the UP DOWN buttons will alternate between On and Off Press the ...

Page 67: ...wo groups work independently If a household includes very young children as well as young adults the TV guidelines must be set up separately for each age group See next step How to Set up Restrictions Using the TV Parental Guidelines First set up a personal identification number PIN and enable the V Chip See previous section Parental restrictions can be set up using either of two methods The TV gu...

Page 68: ...he young adult group will be blocked TV G TV PG TV 14 and TV MA The sub ratings D L S V work together similarly See next section 6 How to set the FV D L S and V sub ratings First select one of these TV Ratings TV Y7 TV PG TV 14 or TV MA See Step 4 on previous page Next while the TV Rating is selected repeatedly press the LEFT or RIGHT buttons This will cycle through the available sub ratings FV L ...

Page 69: ...lock any programs that are coded with objectionable ratings either MPAA or TV Ratings 1 Press the MENU button to display the menu Press the UP DOWN buttons to select Setup then press the ENTER button Press the UP DOWN buttons to select V Chip then press the ENTER button 2 The Enter Pin screen will appear Enter your 4 digit PIN number Note The default Pin number for a new TV set is 0 0 0 0 3 Press ...

Page 70: ...and press the ENTER button to temporarily disable the V Chip Lock 4 Repeatedly press the UP DOWN buttons to select a particular MPAA category When a category is selected its color changes to yellow G General audience no restrictions PG Parental guidance suggested PG 13 PG 13 Parents strongly cautioned R R Restricted Children under 17 should be accompanied by an adult NC 17 No children under age 17...

Page 71: ...P DOWN buttons to select Setup then press the ENTER button 2 Press the UP DOWN buttons to select Color Weakness then press the ENTER button 3 Press the ENTER button and then press the UP DOWN buttons to select On then press the ENTER button 4 Press the UP DOWN buttons to select Red Green Blue Press the LEFT RIGHT buttons to decrease or increase the value of a particular item Press the EXIT button ...

Page 72: ... powered on or off 1 Press the MENU button to display the on screen menu Press the UP DOWN buttons to select Setup then press the ENTER button 3 Press the UP DOWN buttons to select Off or On Press the EXIT button to exit 2 Press the UP DOWN buttons to select Melody then press the ENTER button ...

Page 73: ...ufacturer or Samsung Dealer First click on Settings on the Windows start menu While Settings is highlighted move the cursor so that Control Panel is highlighted When the control panel screen appears click on Display and a display dialog box will appear Navigate to the settings tab on the display dialog box The two key variables that apply the TV PC interface are resolution and colors The correct s...

Page 74: ...ettings and adjusts the frequency values and positions Press the PC button on the remote control to select the PC mode PC DISPLAY 1 Press the MENU button to display the menu Press the UP DOWN buttons to select Setup then press the ENTER button Press the UP DOWN buttons to select PC then press the ENTER button 2 Press the UP DOWN buttons to select Auto Adjust then press the ENTER button ...

Page 75: ...ontrol to select the PC mode Note This function does not work in DVI Digital mode PC DISPLAY 2 Press the ENTER button to select Image Lock 1 Press the MENU button to display the menu Press the UP DOWN buttons to select Setup then press the ENTER button Press the UP DOWN buttons to select PC then press the ENTER button 3 Press the UP DOWN buttons to select Coarse or Fine then press the ENTER button...

Page 76: ...PC then press the ENTER button Press the UP DOWN buttons to select Position then press the ENTER button 1 Press the MENU button to display the menu Press the UP DOWN buttons to select Setup then press the ENTER button 3 Press the UP DOWN buttons to adjust the V Position Press the LEFT RIGHT buttons to adjust the H Position Press the EXIT button to exit ...

Page 77: ...ct the PC mode PC DISPLAY 2 Press the UP DOWN buttons to select Image Reset then press the ENTER button Press the EXIT button to exit 1 Press the MENU button to display the menu Press the UP DOWN buttons to select Setup then press the ENTER button Press the UP DOWN buttons to select PC then press the ENTER button ...

Page 78: ...e antenna Check all wire connections Try another channel Adjust the antenna Try another channel Press the TV VIDEO button Make sure the TV is plugged in Check the antenna connections First check the volume of units connected to your TV digital broadcasting receiver DTV DVD cable broadcasting receiver VCR etc Then adjust the TV volume accordingly Check all wire connections Unplug the TV for 30 seco...

Page 79: ...e Coarse tuning and then adjust the Fine tuning Adjust the Coarse tuning and then adjust the Fine tuning On your computer check Power Signal Cable 24 pin DVI The TV is using its power management system Move the computer s mouse or press a key on the keyboard If the setting is not correct use your computer utility program to change the display settings NOTE Your TV supports multiscan display functi...

Page 80: ...ontrol mode matches the input mode See if you pressed the correct function button Be sure to note that there are buttons on the remote control that are not available depending on the device mode I would like to start the Anynet See if the Anynet devices are connected to the TV according to the connection diagram and make sure the proper Anynet Connection Setting has been selected Press the Mode bu...

Page 81: ...ing the Anynet Watch function and the Anynet device you have been watching is turned off Can t use name of device Check to see if the power code of the device is plugged in properly Check to see if the Anynet devices are connected properly according to the instructions Can t use in the current mode The key is not supported in the current mode Anynet operating You cannot use the keys on the remote ...

Page 82: ...ote control and see if the display works properly If it does not work properly see Troubleshooting for such device Combo Check to see if the device is plugged in properly Then go to Settings in the Anynet menu and select Basic Connection Setting or Advanced Connection Setting Check to see if the cables are connected properly according to the instructions Then go to Settings in the Anynet menu and ...

Page 83: ...l is high Connect the video cables of the VCR properly according to the connection diagram Then go to Anynet Settings in the Anynet menu and select Basic Connection Setting or Advanced Connection Setting After selecting the connection settings make sure that the Anynet device is selected for VCR viewing in the pop up window If the cables are connected properly see if the video cable of the VCR is ...

Page 84: ...ideo connectors to connect the devices Basic Connection Setting A menu item to configure the system setting before using the Anynet System Choose this menu item when you use optical connectors to connect the Anynet devices Advanced Connection Setting Use this menu item to select the port on the TV or the Receiver to which you connected the audio input port of the device during the Anynet system co...

Page 85: ... Users cannot service the TV User maintenance is restricted to cleaning as explained below Unplug the LCD TV from the power outlet before cleaning To clean your flat panel display screen lightly dampen a soft clean cloth with water or mild detergent If possible use a special screen cleaning tissue or solution suitable for the antistatic coating To clean the LCD TV cabinet use a cloth lightly dampe...

Page 86: ... required for further installation Assemble the Wall Mount Bracket and Hinges as illustrated in the direction of arrows and secure the Captive Screws Secure the Wall Mount Bracket on the wall after securing the screws 2 Assemble the Side Brackets and Support Bars as illustrated and secure the screws 12 screws 2 are provided For the safety be sure to secure all 12 screws Wall Mount Bracket Side Hin...

Page 87: ...arrows to adjust the angle Hold onto the middle of the TV s topside for the angle adjustment 2 The angle can be adjusted by 0 20 2 Insert 4 Hangers into the grooves of the Wall Mount Bracket and then push the Hangers downwards to mount the TV set firmly Be sure that the Hangers are firmly fixed onto the Wall Mount Bracket after mounting the TV set Before the installation of the Wall Mount Bracket ...

Page 88: ...ds near or on the TV Liquids that spill into it can cause serious damage Cabinet Never open the cabinet or touch the parts inside Wipe your TV with a clean dry cloth Never use water cleaning fluids wax or chemicals Do not put heavy objects on top of the cabinet Temperature If your TV is suddenly moved from a cold to a warm place unplug the power cord and allow at least two hours for moisture that ...

Page 89: ...ent Video In Audio In 1 0 Vp p 75 ohm 500mVrms Power Supply Input AC 120V 60 Hz Power Consumption Normal Power Saving 180 W 5 0 W Audio Characteristics Audio Input 1 Audio Input 2 Headphone Out Frequency Response RCA Jac R L 0 5Vrms 9dB 3 5ø Stereo Jack 0 5Vrms 9dB Max 10mW Output 3 5ø Stereo Jack 32Ω RF 80Hz 15kHz at 3dB A V 80Hz 20kHz at 3dB Environmental Considerations Operating Temperature Ope...

Page 90: ...ng manufacture APPENDIX Macintosh 640 X 480 35 000 66 667 30 240 832 X 624 49 726 74 551 49 500 IBM 640 X 480 31 496 59 940 25 175 720 X 400 31 469 70 087 28 322 VESA 640 X 480 37 861 72 809 31 500 640 X 480 37 500 75 000 31 500 800 X 600 37 879 60 317 40 000 800 X 600 48 077 72 188 50 000 800 X 600 46 875 75 000 49 500 1024 X 768 48 363 60 004 65 000 1024 X 768 56 476 70 069 75 000 1024 X 768 60 ...

Reviews: