background image

Español - ��

��

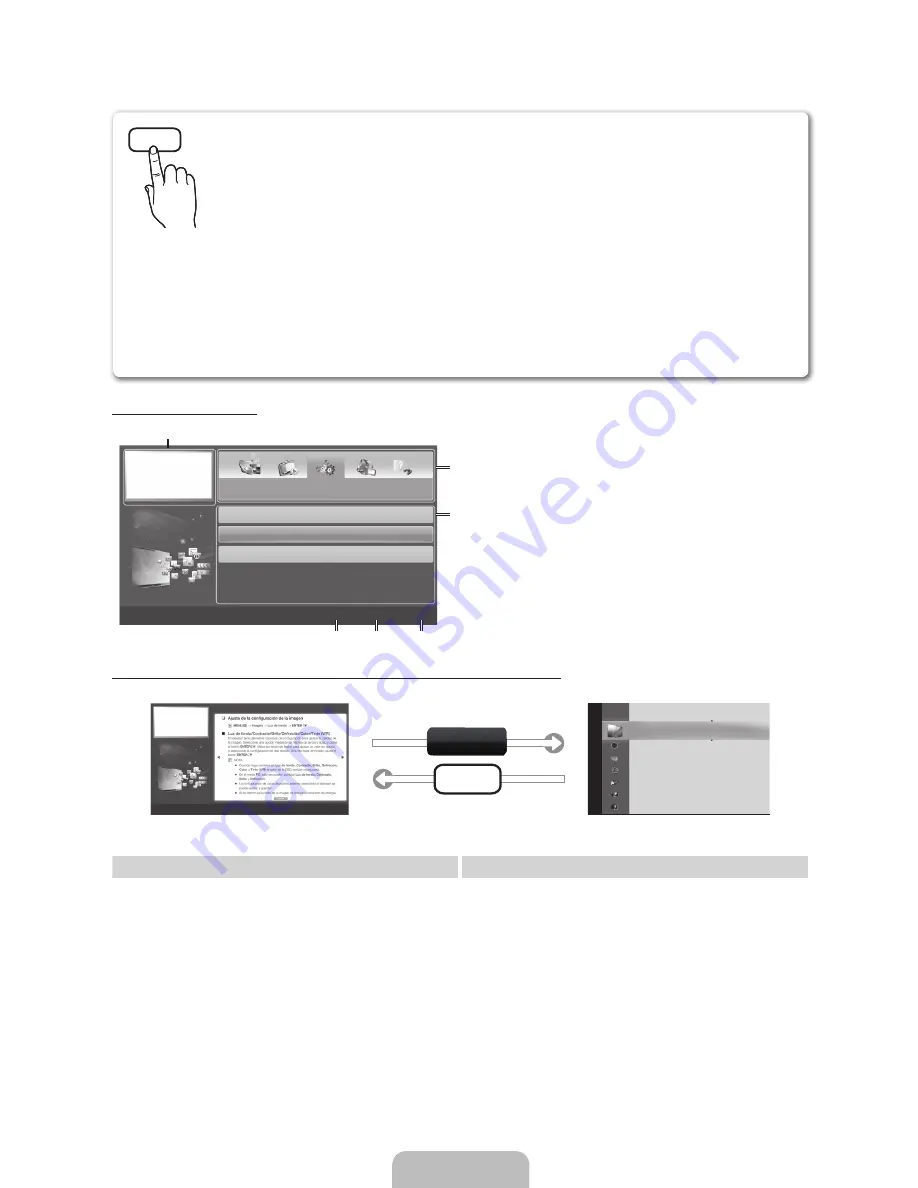
Uso del e-Manual

Pantalla de visualización

1

4

5

6

2

3

Funciones preferidas

Red (para la serie LCD 550) 

Menú del sistema

Menú de soporte técnico

}

 Índice   

E

 Entrar   

e

 Salir 

Vídeo, programa de TV, etc., que se están viendo.

La lista de categorías. Pulse los botones 

 o 


para seleccionar la categoría que desee.

Muestra la lista de menús secundarios. Utilice los 
botones de flecha del mando a distancia para 
mover el cursor. Pulse el botón 

ENTER

E

 para 

seleccionar el menú secundario que desee.

}

 Azul (

Índice

): Muestra la pantalla del índice.

E

 Entrar

: Selecciona una categoría o un menú 

secundario.

6


e

 Salir

: Salir de 

e-Manual

.

Cómo conmutar entre el e-Manual y los menús de la OSD correspondientes.

E-MANUAL

Im

age

n

Modo de Imagen 

: Normal            

Luz de fondo 

: 7                    

Contraste 

: 95

Brillo 

: 45

Definición 

: 50

Color 

: 50

Tinte (V/R) 

: G50/R50

Ajuste de la pantalla

a

 Int. Ahora

Funciones básicas > Menú de la imagen (2/16)

a

 Int. Ahora   

b

 Inicio   

{

 Zoom  

}

 Índice   

L

 Página   

e

 Salir 


Esta función no está habilitada en algunos menús.

Método 1

Método 2

1. 

Si desea utilizar el menú que corresponda a un tema 
del 

e-Manual

, pulse el botón rojo para seleccionar 

Int. 

Ahora

.

2. 

Para volver a la pantalla del 

e-Manual

, pulse el botón 

E-MANUAL

.

1. 

Pulse el botón 

ENTER

E

 en el área de Contents. 

Se muestra el mensaje “

¿Desea ejecutar esto?

”. 

Seleccione 

 y, a continuación, pulse el botón 

ENTER

E

. Aparece la ventana de la OSD.

2. 

Para volver a la pantalla del 

e-Manual

, pulse el botón 

E-MANUAL

.

E-MANUAL

Puede encontrar las instrucciones sobre las funciones del televisor en el 

e-Manual


del televisor. Para ello, pulse el botón 

E-MANUAL

 del mando a distancia. Mueva 

el cursor mediante los botones arriba/abajo/derecha/izquierda para resaltar una 
categoría, luego un tema y pulse el botón 

ENTER

E

. Se muestra la página del 

e-Manual

 que desea ver.

También puede acceder a través del menú:


O

MENU

m


Soporte técnico


e-Manual


ENTER

E


Para volver al menú principal del 

e-Manual

, pulse el botón 

E-MANUAL

.


No podrá utilizar 

Int. Ahora

 directamente si TV está configurada como una fuente de entrada 

externa. 

BN68-03319C-SPA.indd   14

2011-02-17   �� 8:24:42

Summary of Contents for LN46D550

Page 1: ...g to Samsung products please contact the SAMSUNG customer care center Contacte con SAMSUNG WORLD WIDE Si desea formular alguna pregunta o comentario en relación con los productos de Samsung comuníquese con el centro de atención al cliente de SAMSUNG Country Customer Care Center Web Site MEXICO 01 800 SAMSUNG 726 7864 www samsung com IMPORTADO POR SAMSUNG ELECTRONICS MÉXICO S A de C V AV PRESIDENTE...

Page 2: ... and contrast values to the minimum required to achieve the desired picture quality Exceeding the minimum required values may speed up the burn in process Frequently use all TV features designed to reduce image retention and screen burn in Refer to appropriate e Manual sections for details Securing the Installation Space Keep the required distances between the TV the wall and other objects to ensu...

Page 3: ...ds this spot on the TV SOURCEE Toggles between all the available input sources In the on screen menu use this button as you would use the ENTERE button on the remote control MENU Displays an on screen menu the OSD on screen display of your TV s features y Adjusts the volume In the OSD use the y buttons as you would use the and buttons on the remote control z Changes the channels In the OSD use the...

Page 4: ...4EA M4 X L12 32 inch model D E F 1 2 3 32 inch model C B 37 inch model DO NOT USE CHEMICALS DO NOT USE GREASE DO NOT USE OIL ATTENTION Rear Front C A 32 inch model 37 inch model 37 inch model DO NOT USE CHEMICALS DO NOT USE GREASE DO NOT USE OIL ATTENTION Rear B A Front Top View D x4 M4 X L12 Top View F x4 M4 X L12 32 inch model E x4 M4 X L16 37 inch model F x4 M4 X L12 Side View 32 inch model 32 ...

Page 5: ...r wall mount kits are shown in the table below x x Samsung wall mount kits contain a detailed installation manual and all parts necessary for assembly x x Do not use screws that do not comply with the VESA standard screw specifications x x Do not use screws that are longer than the standard length or do not comply with the VESA standard screw specifications Screws that are too long may cause damag...

Page 6: ...ays the e Manual guide SRS Lets you select the SRS TruSurround HD mode P MODE Lets you select the picture mode P SIZE Lets you choose the picture size CC Controls the caption decoder MTS Press to choose stereo mono or Separate Audio Program SAP broadcast Automatically shuts off the TV at a preset time Returns to the previous menu Quickly select frequently used functions Selects the on screen menu ...

Page 7: ...n Display The access steps may differ depending on the selected menu 1 MENU m The main menu options appear on the screen Picture Sound Channel Network System Support 2 Select an icon or option with the or button 3 ENTER E Press ENTERE to access the sub menus 4 Select the desired submenu with the or button 5 Adjust the value of an item with the or button The adjustment in the OSD may differ dependi...

Page 8: ...ou have both connected If you selected Cable you ll go to the Cable System screen Use the or button to select Digital or Analog and then press ENTERE Use the or button to select the correct cable signal format STD HRC or IRC and then press ENTERE Most cable systems use STD Select the correct cable signal format for both the Digital and Analog systems When done select Search and the press ENTERE 5 ...

Page 9: ... manufacturer of the external device about the HDMI version and if out of date request an upgrade x x Be sure to purchase a certified HDMI cable Otherwise the picture may not display or a connection error may occur Using a Component up to 1080p or an Audio Video Cable 480i only Available devices DVD player Blu ray player cable box STB satellite receiver VCR When connecting to AV IN 1 2 the color o...

Page 10: ...l only hear 2 CH audio from the home theater receiver If you want to hear 5 1 CH audio connect the digital audio out jack from your DVD player Blu ray player cable box STB satellite receiver directly to an amplifier or home theater AUDIO OUT Connects to the audio input jacks on your amplifier home theater x x When connecting use the appropriate connector sold separately x x When you connect an aud...

Page 11: ... On Green is not supported EX LINK Connector for service only Changing the Input Source Source List Use to select TV or an external input source such as a DVD player Blu ray player cable box STB satellite receiver 1 Press the SOURCE button on your remote 2 Select a desired external input source TV PC HDMI1 DVI HDMI2 HDMI3 HDMI4 AV1 AV2 Component1 Component2 USB AllShare You can only choose externa...

Page 12: ...tically If your have a Static IP network see your user s manual for configuration instructions To configure your network connection for a network that uses DHCP follow these steps 1 Connect your TV to your network as shown in the illustrations above 2 Turn on your TV press the MENU button on your remote and then select Network Network Settings 3 Select Wireless General and then press ENTERE twice ...

Page 13: ...trations above 2 Turn on your TV press the MENU button on your remote and then select the Network Network Settings 3 Select Wired 4 The network connection screen appears and verifies the network connection When the connection has been verified the Internet is connected successfully message appears If your TV cannot acquire network the connection values automatically or if you want to set up the co...

Page 14: ...ex L Page e Exit This function is not enabled in some menus Method 1 Method 2 1 If you want to use the menu that corresponds to an e Manual topic press the red button to select Try Now 2 To return to the e Manual screen press the E MANUAL button 1 Press the ENTERE button when a topic is displayed Do you want to execute this appears Select Yes and then press the ENTERE button The OSD window appears...

Page 15: ...ns 5 L Page Moves to previous or next page Using the Zoom mode UMove R Return Select Zoom and then press ENTERE to magnify the screen You can scroll through the magnified screen by using the or buttons To return to the screen to normal size press the RETURN button How to search for a topic on the index page 1 To search for a topic press the left or right arrow button to select a letter and then pr...

Page 16: ... on Be sure to select the TV s correct input source by pressing the SOURCE button on the remote control Reboot the connected device by unplugging and then reconnecting the device s power cable The remote control does not work Replace the remote control batteries Make sure the batteries are installed with their correct polarities in the correct direction Clean the transmission window located on the...

Page 17: ...r of the TV put the screws into the clamps and then fasten the screws onto the TV again 3 Connect the clamps fixed onto the TV and the clamps fixed onto the wall with a strong cable and then tie the string tightly Verify all connections are properly secured Periodically check connections for any sign of fatigue for failure If you have any doubt about the security of your connections contact a prof...

Page 18: ...and 31 7 X 3 2 X 20 0 inches 804 7 X 80 3 X 507 4 mm 31 7 X 9 4 X 22 2 inches 804 7 X 240 0 X 563 7 mm 36 4 X 3 1 X 22 6 inches 923 5 X 78 5 X 573 2 mm 36 4 X 10 X 24 8 inches 923 5 X 255 0 X 629 2 mm 39 1 X 3 2 X 24 1 inches 992 1 X 80 4 X 611 0 mm 39 1 X 10 X 26 3 inches 992 1 X 255 0 X 667 2 mm 44 3 X 3 2 X 27 0 inches 1124 1 X 80 4 X 686 1 mm 44 3 X 10 8 X 29 2 inches 1124 1 X 275 0 X 742 8 mm...

Page 19: ...This page is intentionally left blank ...

Page 20: ...idencia Reduzca los valores del brillo y del contraste al mínimo necesario para conseguir la calidad de imagen deseada Superar los valores mínimos puede acelerar la velocidad del proceso de quemado Utilice con frecuencia todas las funciones del televisor diseñadas para reducir la retención de la imagen y el desgaste de la pantalla Consulte las secciones adecuadas del manual electrónico para obtene...

Page 21: ...do a distancia El mando a distancia debe dirigirse hacia este punto del televisor SOURCEE Cambia entre todas las fuentes de entrada disponibles En el menú en pantalla utilice este botón como lo haría con el botón ENTERE del mando a distancia MENU Muestra un menú en pantalla la OSD visualización en pantalla de las funciones del TV y Ajusta el volumen En la OSD utilice estos botones y de igual modo ...

Page 22: ...o de 32 pulgadas C B modelo de 37 pulgadas DO NOT USE CHEMICALS DO NOT USE GREASE DO NOT USE OIL ATTENTION C A modelo de 32 pulgadas modelo de 37 pulgadas modelo de 37 pulgadas DO NOT USE CHEMICALS DO NOT USE GREASE DO NOT USE OIL ATTENTION B A Vista superior D x4 M4 X L12 Vista superior F x4 M4 X L12 modelo de 32 pulgadas E x4 M4 X L16 modelo de 37 pulgadas F x4 M4 X L12 Vista lateral modelo de 3...

Page 23: ...ntaje mural se muestran en la tabla siguiente x x Los equipos de montaje en la pared de Samsung incluyen un manual de instalación detallado y todas las piezas necesarias para la instalación x x No use tornillos que no cumplan las especificaciones de tornillos estándar VESA x x No use tornillos con una longitud superior a la medida estándar o que no cumplan con las especificaciones de tornillos est...

Page 24: ...estra la guía del e Manual SRS Permite seleccionar el modo SRS TruSurround HD P MODE Permite seleccionar el modo de imagen P SIZE Permite seleccionar el tamaño de imagen CC Controla el decodificador de subtítulos MTS Púlselo para elegir estéreo monoaural o un programa de audio independiente emisión SAP Apaga automáticamente el televisor Vuelve al canal anterior Seleccionar rápidamente las funcione...

Page 25: ...talla El paso de acceso puede variar según el menú seleccionado 1 MENU m Las opciones del menú principal se muestran en la pantalla Imagen Sonido Canal Red Sistema Soporte técnico 2 Seleccione un icono de opción con los botones o 3 ENTER E Pulse ENTERE para acceder al menú secundario 4 Seleccione un menú secundario con los botones o 5 Ajuste el valor de un elemento con los botones o El ajuste de l...

Page 26: ...y pulse el botón ENTERE Puede marcar ambos si los dos están conectados Si selecciona Cable deberá ir a la pantalla del sistema del cable Utilice los botones o para seleccionar Digital o Analógico y pulse ENTERE Utilice los botones o para seleccionar el formato de la señal correcta del cable STD HRC o IRC y pulse ENTERE La mayoría de los sistemas de cable utilizan STD Seleccione el formato de la se...

Page 27: ...a versión más antigua del modo HDMI En tales casos consulte al fabricante del dispositivo externo acerca de la versión HDMI y si ésta es antigua solicite una actualización x x Debe adquirir un cable certificado HDMI De lo contrario la imagen puede no mostrarse o producirse un error de conexión Uso de un cable de componentes hasta 1080p o de audio vídeo sólo 480i Dispositivos disponibles Reproducto...

Page 28: ...r a través de HDMI sólo se oye el sonido de 2 canales del receptor del sistema Home Theater Si desea oír el audio de 5 1 canales conecte el terminal de la salida de audio digital del reproductor DVD Blu ray decodificador receptor por satélite STB directamente al amplificador o al sistema Home Cinema AUDIO OUT Permite conectar los terminales de la entrada de audio del amplificador sistema Home Cine...

Page 29: ...t Cambio de la fuente de entrada Lista de fuentes Se utiliza para seleccionar TV u otras fuentes de entrada externas como reproductores de DVD Blu ray receptores de televisión por cable satélite decodificador 1 Pulse el botón SOURCE del mando a distancia 2 Select a desired external input source TV PC HDMI1 DVI HDMI2 HDMI3 HDMI4 AV1 AV2 Componente1 Componente2 USB AllShare Puede elegir solamente di...

Page 30: ...las conexiones de red Si dispone de una red de IP estática consulte en el manual del usuario las instrucciones de configuración Siga estos pasos para configurar la conexión de una red que utiliza DHCP 1 Conecte el televisor a la red tal como se indica en las ilustraciones anteriores 2 Encienda el televisor pulse el botón MENU del mando a distancia y seleccione Red Configuración de red 3 Seleccione...

Page 31: ...nteriores 2 Encienda el televisor pulse el botón MENU del mando a distancia y seleccione Red Configuración de red 3 Seleccione el tipo de red Cable 4 Aparece la pantalla de conexión de red y comprueba la conexión de la red Una vez comprobada la conexión de la red se muestra el mensaje Internet se conectó correctamente Si el televisor no adquiere automáticamente los valores de la conexión de la red...

Page 32: ...o Zoom Índice L Página e Salir Esta función no está habilitada en algunos menús Método 1 Método 2 1 Si desea utilizar el menú que corresponda a un tema del e Manual pulse el botón rojo para seleccionar Int Ahora 2 Para volver a la pantalla del e Manual pulse el botón E MANUAL 1 Pulse el botón ENTERE en el área de Contents Se muestra el mensaje Desea ejecutar esto Seleccione Sí y a continuación pul...

Page 33: ...ones 5 L Página Va a la página anterior o siguiente Uso del modo Zoom UMover RRegresar Seleccione Zoom y pulse ENTERE para agrandar la pantalla Se puede desplazar por la pantalla agrandada con los botones o Para recuperar el tamaño normal de la pantalla pulse el botón RETURN Cómo buscar un tema en la página del índice 1 Para buscar un tema pulse el botón de flecha izquierda o derecha para seleccio...

Page 34: ... el botón SOURCE del mando a distancia Reinicie el dispositivo conectado para ello desenchufe y vuelva a enchufar el cable de alimentación del dispositivo El mando a distancia no funciona Sustituya las pilas del mando a distancia Instale las pilas con las polaridades en la dirección correcta Limpie la ventana de transmisión del sensor del mando a distancia Apunte con el mando a distancia directame...

Page 35: ...ornillos de la parte central posterior del televisor y con ellos monte las grapas en el televisor 3 Monte una cadena fuerte entre las grapas del televisor y de la pared de manera que quede bien tensada Compruebe que todas las conexiones estén bien aseguradas Compruébelas periódicamente para detectar cualquier signo de fatiga o de fallo Si tiene dudas sobre la seguridad de la instalación póngase en...

Page 36: ...n x Pr x Al Cuerpo principal Con el soporte 31 7 X 3 2 X 20 0 pulgadas 804 7 X 80 3 X 507 4 mm 31 7 X 9 4 X 22 2 pulgadas 804 7 X 240 0 X 563 7 mm 36 4 X 3 1 X 22 6 pulgadas 923 5 X 78 5 X 573 2 mm 36 4 X 10 X 24 8 pulgadas 923 5 X 255 0 X 629 2 mm 39 1 X 3 2 X 24 1 pulgadas 992 1 X 80 4 X 611 0 mm 39 1 X 10 X 26 3 pulgadas 992 1 X 255 0 X 667 2 mm 44 3 X 3 2 X 27 0 pulgadas 1124 1 X 80 4 X 686 1 ...

Page 37: ...Esta página se ha dejado en blanco expresamente ...

Reviews: