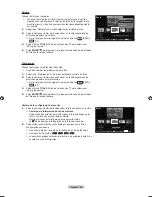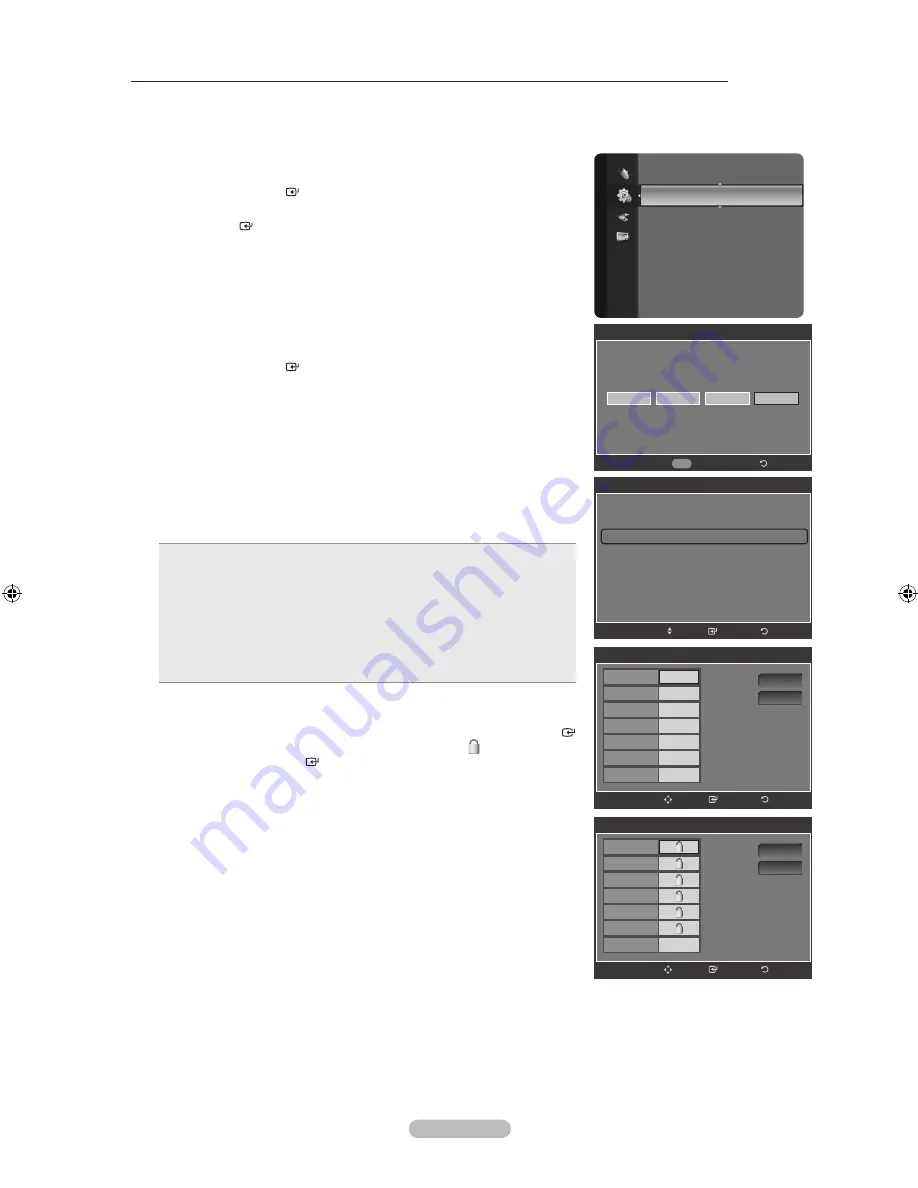
background image

Español - 

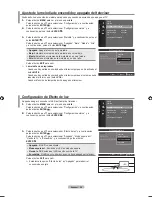
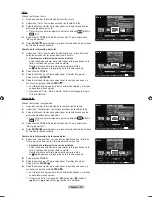
Configuración de las restricciones mediante las clasificaciones MPAA: G, PG, PG-13, r, NC-17, X, Nr 

El sistema de clasificación MPAA utiliza el sistema de la MPAA (Motion Imagen Association of America, Asociación 

americana de cinematografía) que se aplica principalmente en las películas. Si el bloqueo de V-Chip está activado, el 

televisor bloqueará automáticamente programas que estén codificados con clasificaciones rechazables (de la MPAA o de 

televisión).

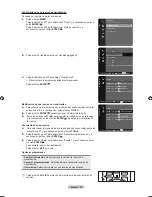
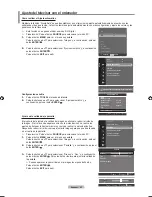
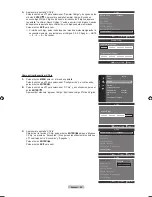
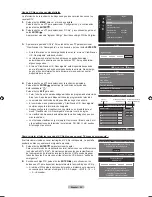
1.

   Pulse el botón 

MENU

 para ver el menú en pantalla.


Pulse los botón ▲ o ▼ para seleccionar “Configuración” y, a continuación, 

pulse el botón 

ENTER


.

2.

   Pulse los botón ▲ o ▼ para seleccionar “V-Chip” y, a continuación, pulse el 

botón 

ENTER


.


Aparecerá el mensaje “Ingresar Código”. Escriba su código PIN de 4 dígitos.

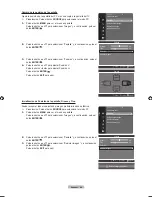
3.

   Aparecerá la pantalla “V-Chip”. 


Pulse los botón ▲ o ▼ para seleccionar “Clas. MPAA” y, a continuación, 

pulse el botón 

ENTER


.

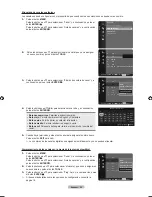
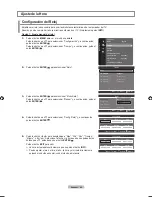
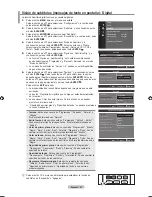
4.

   Aparecerá la pantalla “Clas. MPAA”. 


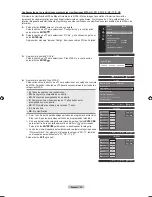
Pulse varias veces los botón ▲ o ▼ para seleccionar una categoría concreta 

de MPAA. Pulsando los botón ▲ o ▼ pasará secuencialmente por todas las 

categorías MPAA:

G

: Todos los públicos (sin restricciones).

PG

: Se sugiere la compañía de un adulto.

PG-

: Menores acompañados de un adulto.

R

: Restringido. Los niños menores de 17 años deben estar 

acompañados por un adulto.

NC-

: Prohibida la entrada a menores de 17 años.

X

: Sólo adultos.

NR

: Sin clasificacion.

Perm. todo: Se pulsa para desbloquear todos los programas de televisión. 


Bloq. todo: Se pulsa para bloquear todos los programas de televisión.
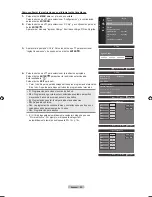
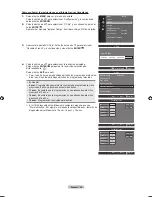
Con una determinada categoría seleccionada, pulse el botón 

ENTER


para activarla. En la pantalla aparecerá un símbolo “   ” seleccionado. 

Pulse el botón 

ENTER


 para bloquear o desbloquear la categoría.

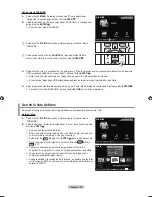
La opción V-chip bloqueará automáticamente cualquier categoría que sea 

“More restrictive”. Por ejemplo, si bloquea la categoría “PG-13”, también 

se bloquearán automáticamente “R”, “NC-17” y “X”.


Pulse el botón 

EXIT

 para salir.

Configuración

Idioma 

: English

Tiempo 

V-Chip 


Subtítulo
Configuración externa
Entretenimiento 

: Apagado

Ahorro energía 

: Apagado

PIP

Actualización del software

V-Chip

*

*

Ingresar Código

*

Regresar

0~9


Ingresar Código

V-Chip

Bloqueo V-Chip  

: Encendido

Guías pater. TV 


Clas. MPAA 


Inglés Canadiense 


Francés Canadiense 


Clasificacion U.S. Descargable 


Cambiar Código 


Regresar

Ingresar

Mover

Clas. MPAA

G
PG
PG-
R
NC-
X
NR

Perm. todo

Bloq. todo

Regresar

Ingresar

Mover

Clas. MPAA

G
PG
PG-
R
NC-
X
NR

Perm. todo

Bloq. todo

Regresar

Ingresar

Mover

BN68-01392J-SPA.indb   52

2008-03-19   ¿ÀÈÄ 2:29:44

Summary of Contents for LN46A540

Page 1: ...ung Electronics Canada Inc Customer Service 55 Standish Court Mississauga Ontario L5R 4B2 Canada Samsung Electronique Canada Inc Service à la Clientèle 55 Standish Court Mississauga Ontario L5R 4B2 Canada U S A 1 800 SAMSUNG 726 7864 www samsung com Samsung Electronics America Inc 105 Challenger Road Ridgefield Park NJ 07660 0511 LCD TV user manual imagine the possibilities Thank you for purchasin...

Page 2: ...60 037 6 023 490 5 878 080 and under US Published Patent Application No 2001 44713 A1 This license is limited to private non commercial use by end user consumers for licensed contents No rights are granted for commercial use The license does not cover any product unit other than this product unit and the license does not extend to any unlicensed product unit or process conforming to ISO IEC 11172 ...

Page 3: ...etting the TV Speakers On Off 32 Listening to the Sound of the Sub PIP Picture 33 Resetting the Sound Settings to the Factory Defaults 33 Connecting Headphones Sold separately 33 Channel Control Managing Channels 34 Clearing Scrambled Channels Digital 40 Fine Tuning Analog Channels 40 Checking the Digital Signal Strength 41 PC Display Using Your TV as a Computer PC Display 42 Display Modes 42 Sett...

Page 4: ... XT SRS TruSurround XT provides a virtual surround system Accessories Please make sure the following items are included with your LCD TV If any items are missing contact your dealer Remote Control Batteries AAA x 2 BN59 00673A Power Cord 3903 000144 Cover Bottom LN40A540P2F BN63 04437B LN46A540P2F BN63 04374B LN52A540P2F BN63 04374B Warranty Card Registration Card Safety Guide Manual Not available...

Page 5: ...DVI HDMI3 USB In the on screen menu use this button as you would use the ENTER button on the remote control 2 MENU Press to see an on screen menu of your TV s features 3 VOL Press to increase or decrease the volume In the on screen menu use the VOL buttons as you would use the and buttons on the remote control 4 CH Press to change channels In the on screen menu use the CH buttons as you would use ...

Page 6: ...ble connection you must use the HDMI IN 2 jack 5 ANT IN Connects to an antenna or cable TV system 6 WISELINK Connect a USB mass storage device to view photo files and play audio files 7 AV IN 2 Video and audio inputs for external devices such as a camcorder or VCR S VIDEO Connects an S Video signal from a camcorder or VCR 8 HEADPHONE Connects a set of external headphones for private listening 9 PO...

Page 7: ...o backlight the buttons on the remote This function is convenient for using at night or when the room is dark Using the remote control with the ON OFF light button set to On will reduce the battery usage time PRE CH Tunes to the previous channel CH CH Press to change channels SOURCE Press to display and select the available video sources W LINK WISELINK This function enables you to view and play p...

Page 8: ...eads that look like the diagram to the right see Antennas with 300 Ω Flat Twin Leads below If your antenna has one lead that looks like the diagram to the right see Antennas with 75 Ω Round Leads If you have two antennas see Separate VHF and UHF Antennas Antennas with 300 Ω Flat Twin Leads If you are using an off air antenna such as a roof antenna or rabbit ears that has 300 Ω twin flat leads foll...

Page 9: ...IN terminal on your cable box This terminal might be labeled ANT IN VHF IN or simply IN 2 Connect this cable to a two way splitter 3 Connect an RF cable between the OUTPUT terminal on the splitter and the IN terminal on the cable box 4 Connect an RF cable between the ANT OUT terminal on the cable box and the B IN terminal on the RF A B switch 5 Connect another cable between the other OUT terminal ...

Page 10: ...O L jacks on the back of the TV If this happens contact the company that provided the DVD player Cable Box Satellite receiver to confirm the HDMI version then request an upgrade HDMI cables that are not 1 3 may cause annoying flicker or no screen display or DVD Player or Cable Box Satellite receiver Set Top Box Rear Panel TV Rear Panel HDMI Cable Not supplied TV Side Panel Connecting a DVD Player ...

Page 11: ...e Box Satellite receiver Set Top Box to your TV 1 Connect a Component Cable between the COMPONENT IN 1 or 2 Y PB PR jacks on the TV and the COMPONENT Y PB PR jacks on the DVD Player or Cable Box Satellite receiver Set Top Box 2 Connect Audio Cables between the COMPONENT IN 1 or 2 R AUDIO L jacks on the TV and the AUDIO OUT jacks on the DVD Player or Cable Box Satellite receiver Set Top Box Compone...

Page 12: ...r Tape to view your VCR tape Each VCR has a different back panel configuration When connecting a VCR match the color of the connection terminal to the cable When connecting to AV IN 1 the color of the AV IN 1 Y VIDEO jack Green does not match the color of the video cable Yellow S Video Connection Your Samsung TV can be connected to an S Video jack on a VCR This connection delivers a better picture...

Page 13: ...les between the AUDIO OUT R AUDIO L jacks on the TV and AUDIO IN R AUDIO L jacks on the Amplifier DVD Home Theater When an audio amplifier is connected to the AUDIO OUT R AUDIO L jacks Decrease the volume of the TV and adjust the volume level with the Amplifier s volume control Each Amplifier DVD Home Theater has a different back panel configuration When connecting an Amplifier DVD Home Theater ma...

Page 14: ...Cable antenna signals In Cable mode you can select the correct signal source among STD HRC and IRC by pressing the or button then press the ENTER button If you have Digital cable select the cable system signal source for both Analog and Digital Contact your local cable company to identify the type of cable system that exists in your particular area 5 The TV will begin memorizing all of the availab...

Page 15: ...ting up options refer to the pages 12 13 The Plug Play feature is only available in the TV mode Changing Channels Using the Channel Buttons 1 Press the CH or CH button to change channels When you press the CH or CH button the TV changes channels in sequence You will see all the channels that the TV has memorized The TV must have memorized at least three channels You will not see channels that were...

Page 16: ...e or button to select one of the icons Then press the ENTER button to access the icon s sub menu 3 Press the EXIT button to exit The on screen menus disappear from the screen after about one minute Using the Button The button is used to select stations that broadcast a digital signal 1 For example for Channel 7 1 press 7 then then 1 HD indicates the TV is receiving a Digital High Definition signal...

Page 17: ...channels selecting a broadcast source memorizing the channels automatic and adding or deleting channels Channel Lists Selecting the Video Signal source Before your television can begin memorizing the available channels you must specify the type of signal source that is connected to the TV i e an Air or a Cable system 1 Press the MENU button to display the menu Press the or button to select Channel...

Page 18: ...area At this point the signal source has been selected 5 The TV begins memorizing all available stations After all the available channels are stored it starts to remove scrambled channels see page 40 The Auto program menu then reappears If you want to stop Auto Programming press the ENTER button The Stop Auto Program message will be displayed Select Yes by pressing the or button then press the ENT...

Page 19: ...ntrol to view an external signal source O To Edit the Input Source Name Name the device connected to the input jacks to make your input source selection easier 1 Press the MENU button to display the menu Press the or button to select Input then press the ENTER button Press the or button to select Edit Name then press the ENTER button 2 Press the or button to select AV1 AV2 S Video Component1 Compo...

Page 20: ...n press the ENTER button 3 Press the or button to decrease or increase the value of a particular item Press the ENTER button Press the EXIT button to exit When you make changes to Backlight Contrast Brightness Sharpness Color or Tint G R the OSD will be adjusted accordingly In PC mode you can only make changes to Backlight Contrast and Brightness Settings can be adjusted and stored for each extern...

Page 21: ...ction Low Sets the black color depth to low Medium Sets the black color depth to medium High Sets the black color depth to high Setting the Dynamic Contrast You can adjust the screen contrast so that the optimal contrast is provided 6 Press the or button to select Dynamic Contrast then press the ENTER button 7 Press the or button to select Off Low Medium or High Press the ENTER button Off Turns of...

Page 22: ...s the or button to decrease or increase the value of a particular item Press the ENTER button In Color you can adjust the RGB values for the selected color To reset the adjusted RGB value select Reset Red Adjusts the red saturation level of the selected color Green Adjusts the green saturation level of the selected color Blue Adjusts the blue saturation level of the selected color Reset Resets the...

Page 23: ...t Flesh Tone then press the ENTER button 21 Press the or button to decrease or increase the value Press the ENTER button Changing the adjustment value will refresh the adjusted screen Setting the Edge Enhancement You can emphasize object boundaries in the picture 22 Press the or button to select Edge Enhancement then press the ENTER button 23 Press the or button to select Off or On Press the ENTER...

Page 24: ... color space when watching movies from an external device ie DVD player connected to the HDMI or Component IN jacks 24 Press the or button to select xvYCC then press the ENTER button 25 Press the or button to select Off or On Press the ENTER button xvYCC is available when the picture mode is set to Movie and the external input is set to HDMI or Component mode Detailed Settings Picture Options Pict...

Page 25: ...reen sizes as well In general though you should view the TV in 16 9 mode as much as possible 1 Follow the Activating Picture Options instructions numbers 1 and 2 2 Press the or button to select Size then press the ENTER button 3 Press the or button to select the screen format you want Press the ENTER button Press the EXIT button to exit 16 9 Sets the picture to 16 9 wide mode Zoom1 Magnifies the s...

Page 26: ...justed and stored for each external device you have connected to an input of the TV Input Source Picture Size ATV Video S Video Component 480i 480p 16 9 Zoom1 Zoom2 4 3 DTV 1080i Component 1080i 1080p HDMI 720p 1080i 1080P 16 9 4 3 Wide Fit Just Scan PC 16 9 4 3 Alternately you can press the P SIZE button on the remote control repeatedly to change the picture size 16 9 Zoom1 U Move Zoom2 U Move 16...

Page 27: ... and white enhancement DNIe is only available in Dynamic mode Setting the HDMI Black Level You can select the black level on the screen to adjust the screen depth 1 Follow the Activating Picture Options instructions numbers 1 and 2 Refer to page 23 2 Press the or button to select HDMI Black Level then press the ENTER button 3 Press the or button to select Normal or Low then press the ENTER button ...

Page 28: ...ues appropriate to the signal level of each video device using the Red Green Blue Cyan Magenta Yellow Color Bar Patterns without using an additional Blue Filter 1 Follow the Activating Picture Options instructions numbers 1 and 2 Refer to page 23 2 Press the or button to select Blue Only Mode then press the ENTER button 3 Press the or button to select Off or On then press the ENTER button Press th...

Page 29: ...re when the main picture is from an external device connected to HDMI 1 HDMI DVI 2 HDMI 3 Component1 2 or PC PIP Settings Main picture Sub picture Component 1 2 HDMI 1 HDMI DVI 2 HDMI 3 PC Analog TV broadcasts only Changing the Size of the PIP Window 3 Press the or button to select Size then press the ENTER button Press the or button to select the required option then press the ENTER button You ma...

Page 30: ...s the EXIT button to exit Easy Setting 1 Press the TOOLS button on the remote control 2 Press the or button to select PIP then press the ENTER button 3 Press the or button to select a particular item 4 Press the or button to select the required option 5 Press the EXIT or TOOLS button to exit PIP PIP On Size Position Air Cable Air Channel Air 11 Return Enter Move Air Cable PIP PIP On Size Position ...

Page 31: ...o suit your personal preference 1 Press the MENU button to display the menu Press the or button to select Sound then press the ENTER button 2 Press the or button to select Equalizer then press the ENTER button 3 Press the ENTER button to select Mode Press the or button to select Standard Music Movie Speech or Custom sound setting then press the ENTER button Mode Custom Equalizer SRS TruSurround XT...

Page 32: ...aker playback system including internal television speakers It is fully compatible with all multichannel formats 1 Press the MENU button to display the menu Press the or button to select Sound then press the ENTER button 2 Press the or button to select SRS TruSurround XT then press the ENTER button 3 Press the or button to select Off or On then press the ENTER button Press the EXIT button to exit ...

Page 33: ... press the ENTER button 3 Press the or button to select a setting you want then press the ENTER button Press the EXIT button to exit Mono Choose for channels that are broadcasting in mono or if you are having difficulty receiving a stereo signal Stereo Choose for channels that are broadcasting in stereo SAP Choose to listen to the Separate Audio Program which is usually a foreign language translat...

Page 34: ...n analog TV mode Sound Select in PIP mode and Sound Reset in Sound menu The VOL VOL and MUTE buttons do not operate when the TV Speaker is set to Off TV s Internal Speakers Audio Out Optical L R Out to Sound System RF AV S Video Component PC HDMI RF AV S Video Component PC HDMI TV Speaker On Speaker Output Speaker Output Speaker Output Sound Output Sound Output Sound Output TV Speaker Off Mute Mut...

Page 35: ...et All Reset Sound Mode or Cancel then press the ENTER button Press the EXIT button to exit Reset All All the sound values return to default settings Reset Sound Mode Current sound values return to defalt settings Cancel Select the sound reset options Connecting Headphones Sold separately You can connect a set of headphones to your set if you wish to watch a TV program without disturbing other peo...

Page 36: ...he channel lists Using the Color buttons on the Remote with the Channel List Red Antenna Switches to Air or Cable Green Zoom Enlarges or shrinks a channel number Yellow Select Selects multiple channel lists TOOLS Option Displays the Add or Delete Add to Favorite or Delete from Favorite Timer Viewing Channel Name Edit and Auto Program menus A gray colored channel indicates the channel has been dele...

Page 37: ...me manner A channel must be deleted before it can be added back to the Added Channels list To Add Restore a channel back to the Added Channel List follow steps 1 3 above press the or button to select a channel to add the press the TOOLS button Press the ENTER button to select Add Press the CH LIST button on the remote control to bring up the channel lists O Channel Auto Program Clear Scrambled Cha...

Page 38: ... is deleted from Favorites and the mark also disappears Press the EXIT button to exit You can also Add or Delete a channel from Favorites in the Added Channels menu in the same manner All favorite channels will be shown on Favorite menu Press the CH LIST button on the remote control to bring up the channel lists To select the favorite channels you have set up press the FAV CH button on the remote ...

Page 39: ...dures For information on how to confirm a viewing reservation refer to page 38 Only memorized channels can be reserved You can set the channel month day year hour and minute directly by pressing the number buttons on the remote control Press the CH LIST button on the remote control to bring up the channel lists Digital Program Guide and Viewing Reservation When a digital channel is selected and yo...

Page 40: ...press the ENTER button 6 Press the or button to select OK then press the ENTER button The viewing reservation has been canceled Press the EXIT button to exit Programmed Option Change Info Select to change a viewing reservation Cancel schedules Select to cancel a viewing reservation Information Select to view a viewing reservation Press the CH LIST button on the remote control to bring up the chann...

Page 41: ...lled Storing Channels in Memory Auto Program 1 Press the MENU button Press the or button to select Channel then press the ENTER button Press the or button to select Channel List then press the ENTER button 2 Press the or button to select the channel to be assigned a new name then press the TOOLS button 3 Press the or button to select Auto Program then press the ENTER button For further details on ...

Page 42: ...nnel for optimal reception 1 Press the MENU button to display the menu Press the or button to select Channel then press the ENTER button 2 Press the or button to select Fine Tune then press the ENTER button 3 Press the or button to adjust the fine tuning To store the fine tuning setting in the TV s memory press the ENTER button If you do not store the fine tuned channel in memory adjustments are n...

Page 43: ...tion of available digital channels 1 Press the MENU button to display the menu Press the or button to select Channel then press the ENTER button 2 Press the or button to select Signal Strength then press the ENTER button If the signal strength meter indicates that the signal is weak physically adjust your antenna to increase the signal strength Continue to adjust the antenna until you find the bes...

Page 44: ...mode the screen is adjusted automatically If the signal from the system doesn t equal the standard signal mode adjust the mode by referring to your videocard user guide otherwise there may be no video For the display modes listed below the screen image has been optimized during manufacturing D Sub Input Mode Resolution Horizontal Frequency kHz Vertical Frequency Hz Pixel Clock Frequency MHz Sync P...

Page 45: ...tments on your PC and fine tune again After the noise has been reduced re adjust the picture so that it is aligned on the center of the screen Preset Press the SOURCE button to select PC mode 1 Press the MENU button to display the menu Press the or button to select Picture then press the ENTER button 2 Press the or button to select Screen then press the ENTER button 3 Press the or button to select...

Page 46: ...ion Coarse and Fine You can replace all image settings with the factory default values Preset Press the SOURCE button to select PC mode 1 Press the MENU button to display the menu Press the or button to select Picture then press the ENTER button 2 Press the or button to select Screen then press the ENTER button 3 Press the or button to select Image Reset then press the ENTER button Press the EXIT ...

Page 47: ... the or button to move to Month Day Year Hour Minute or am pm Set the date and time you want by pressing the or button then press the ENTER button Press the EXIT button to exit The current time will appear every time you press the INFO button You can set the month day year hour and minute directly by pressing the number buttons on the remote control Time Setting Setup Plug Play Language English Ti...

Page 48: ...e or button to select DST Daylight Saving Time then press the ENTER button Press the or button to select Off or On then press the ENTER button Press the EXIT button to exit Depending on the broadcast station and signal the auto time may not be set correctly If this occurs set the time manually The Antenna or cable must be connected in order to set the time automatically Setup Plug Play Language En...

Page 49: ...ress the or button to select Off then press the ENTER button 4 Press the EXIT button to exit Easy Setting 1 Press the TOOLS button on the remote control 2 Press the or button to select Sleep Timer 3 Press the or button to select the minute 4 Press the EXIT or TOOLS button to exit Setup Plug Play Language English Time V Chip Caption External Settings Entertainment Off Energy Saving Off PIP SW Upgra...

Page 50: ...ontaining MP3 files on the USB device Photo Select the folder containing JPEG files on the USB device Repeat Select Once Everyday Mon Fri Mon Sat Sat Sun or Manual When Manual is selected press the button to select the desired day of the week Press the ENTER button over the desired day and the mark will appear Press the EXIT button to exit You can set the hour minute and channel by pressing the nu...

Page 51: ...C mode U S A Only This product is covered by the following U S patents US4 930 158 US4 930 160 Setting Up Your Personal ID Number PIN 1 Press the MENU button to display the menu Press the or button to select Setup then press the ENTER button 2 Press the or button to select V Chip then press the ENTER button The message Enter PIN will appear Enter your 4 digit PIN number The default PIN number of a...

Page 52: ...e message Enter PIN will appear Enter your 4 digit PIN number 3 The V Chip screen will appear To enable the V Chip feature press the ENTER button so that the V Chip Lock field is On Pressing the or button will alternate between On and Off Press the ENTER button Press the EXIT button to exit Change PIN Enter new PIN Return 0 9 Enter PIN Confirm new PIN V Chip V Chip Lock Off TV Parental Guidelines ...

Page 53: ...ategories in the young adult group will be blocked TV G TV PG TV 14 and TV MA The sub ratings D L S V work together similarly See next section 6 How to set the FV D L S and V sub ratings First select one of these TV Ratings TV Y TV Y7 TV G TV PG TV 14 or TV MA See Step 4 and press the button The symbol will be displayed for each sub rating While is selected press the ENTER button to go to a sub ra...

Page 54: ...strictions PG Parental guidance suggested PG 13 Parents strongly cautioned R Restricted Children under 17 should be accompanied by an adult NC 17 No children under age 17 X Adults only NR Not rated Allow all Press to unlock all TV ratings Block all Press to lock all TV ratings While a particular category is selected press the ENTER button to activate it The symbol will be displayed Press the ENTER...

Page 55: ... under age 8 C8 Programming generally considered acceptable for children 8 years and over to watch on their own G General programming suitable for all audiences PG Parental Guidance 14 Programming contains themes or content which may not be suitable for viewers under the age of 14 18 Adult programming The V Chip will automatically block any category that is More restrictive For example if you bloc...

Page 56: ...rally considered acceptable for children 8 years and over to watch on their own 13 ans Programming may not be suitable for children under the age of 13 16 ans Programming is not suitable for children under the age of 16 18 ans Programming restricted to adults The V Chip will automatically block any category that is More restrictive For example if you block 8 ans category then 13 ans 16 ans and 18 ...

Page 57: ...tically block certain categories that are more restrictive The rating titles For example Humor Level etc and TV ratings For example DH MH H etc may differ depending on the broadcasting station How to Reset the TV after the V Chip Blocks a Channel Emergency Escape If the TV is tuned to a restricted channel the V Chip will block it The screen will go blank and the following message will appear 1 Pre...

Page 58: ...specific frame CC2 The Special Non Synchronous Use Captions This channel carries data that is intended to augment information carried in the program CC3 Secondary Synchronous Caption Service Alternate program related caption data typically second language captions CC4 Special Non Synchronous Use Captions Similar to CC2 Text1 First Text Service This may be various non program related data Text2 Sec...

Page 59: ...is option consists of Default Small Standard and Large The default is Standard Font Style This option consists of Default Style0 Style 7 You can change the font you want The default is Style 0 Foreground Color This option consists of Default White Black Red Green Blue Yellow Magenta and Cyan You can change the color of the letter The default is White Background Color This option consists of Defaul...

Page 60: ...Effect You can turn the LED on the front of TV on off 1 Press the MENU button to display the menu Press the or button to select Setup then press the ENTER button 2 Press the or button to select External Settings then press the ENTER button 3 Press the or button to select Light Effect then press the ENTER button Press the or button to select Off In Standby When Watching TV or Always then press the ...

Page 61: ...le The Entertainment settings are saved for each input source You can press the E MODE button on the remote control repeatedly to change the Entertainment setting O Using the Energy Saving Feature This feature adjusts the brightness of the TV in order to reduce power consumption When watching TV at night set the Energy Saving mode option to High to reduce eye fatigue as well as power consumption 1...

Page 62: ...is displayed 5 The message Upgrade version XXXX to version XXXX The system will be reset after upgrade is displayed Press the or to select the OK then press the ENTER button Please be careful to not disconnect the power or remove the USB drive while upgrades are being applied The TV will turn off and turn on automatically after completing the firmware upgrade Please check the firmware version afte...

Page 63: ...our device to the TV please back up your files to prevent them from damage or loss of data SAMSUNG is not responsible for any data file damage or data loss Do not disconnect the USB device while it is loading MSC supports MP3 and JPEG files while a PTP device supports JPEG files only The sequential jpeg format is supported Photo and audio files must be named in English French or Spanish If not the...

Page 64: ...iles saved on an USB memory device Photo List 1 Press the W LINK button on the remote control to display the WISELINK menu 2 Press the or button to select Photo then press the ENTER button Photo files are displayed This menu only shows files whose file extension is jpg Files of other formats such as bmp or tiff will not be displayed Press the Play ENTER button to start the Slide Show To move to th...

Page 65: ...View Groups Shows the sorting groups The sorting group including the currently selected photo is highlighted 5 Current Device Shows the currently selected device name Press the Red button to select a device 6 Item Selection Information Shows the number of photos that are selected by pressing the Yellow button 7 Help Items Red Device button Selects a connected device Green Favorites Setting button ...

Page 66: ...es grouped by Month To move to the previous next group press the REW or FF button 3 Press the TOOLS button Press the or button to select Play Current Group 4 Press ENTER to play the selected group of photo files from the sublist Timeline Sorts photos by time It sorts and shows photos by date It sorts by year and month from the earliest photo 1 Select Timeline as the sorting standard in the Photo L...

Page 67: ...ton to select Play Current Group 4 Press ENTER to play the selected group of photo files from the sublist Changing the composition information 1 Select Composition as the sorting standard in the Photo List and press the or button to select a photo Changing the information of multiple files Press the or button to select the desired photo in the Photo list Then press the yellow button Repeat the abo...

Page 68: ...button Press the or button to select Play Current Group 4 Press ENTER to play the selected group of photo files from the sublist Changing the Favorites setting 1 Press the or button to select the desired photo in the Photo list Changing the information of multiple files Press the or button to select the desired photo in the Photo list Then press the yellow button Repeat the above operation to sele...

Page 69: ...move the read only files from the selected ones You cannot recover a deleted photo file Viewing the Photo Information The photo file information including the order of the file in the current directory the name the size the resolution the date modified and the path is displayed 1 Press the or button to select the desired photo in the Photo list 2 Press the TOOLS button 3 Press the or button to sel...

Page 70: ...es will be used for the Slide Show Playing current group 1 Press the or button to select a sorting standard Monthly Timeline Color Composition Folder Preference 2 Press the or button to select the desired photo in the Photo list To move to the previous next group press the REW or FF button 3 Press the TOOLS button 4 Press the or button to select Play Current Group then press the ENTER button Only ...

Page 71: ...TER button Rotate You can rotate images in full screen mode Press the or button to select Rotate then press the ENTER button Press the or button repeatedly to rotate the photo by the desired amount Whenever you press the button it rotates by 270 180 90 and 0 Whenever you press the button it rotates by 90 180 270 and 0 If you have select Rotate the Zoom deactivated The rotated file is not saved The...

Page 72: ...show speed Press the or button to select Slide Show Speed Press the or button to select the desired option Fast Slow Normal You can select the SlideShow speed only during a slide show You can also change the speed of the Slide Show by pressing the REW or FF key during the Slide Show Background Music If you set Background Music to On the background music will be played when viewing photos one by on...

Page 73: ...ired BGM mood Press the ENTER button BGM mode option Energetic Rhythmical Sad Exciting Calm WISELINK identifies the mood of the music files and groups them accordingly by analyzing the music files on the USB device Picture Mode You can set the Picture mode Refer to page 18 Sound Mode You can set the Sound mode Refer to page 29 Information The photo file information including the order of the file ...

Page 74: ... 3 2005 Pop Better than yesterday G H I J L P S T V 1File s Selected 1 6 4 5 2 3 1 Currently selected music Shows the currently selected music 2 Current Sort Standard Press the or button to change the standard for sorting music files Title Artist Mood Genre Folder Preference 3 View Groups Shows the sorting groups The sorting group including the currently selected music file is highlighted 4 Curren...

Page 75: ...the TOOLS button 4 Press the or button to select Play Current Group 5 Press ENTER to play the selected group of music files from the sublist 5 Item Selection Information Shows the number of music files that are selected by pressing the Yellow button 6 Help Items Red Device button Selects a connected device Green Favorites Setting button Changes the favorites setting for the selected music Press th...

Page 76: ...es and groups them accordingly by analyzing the music files on the USB device Mood information extracted from a music file may not always match the Mood option For example a file you think is Energetic may be extracted to the Exciting mood option 4 Press the or button to select the desired option then press the ENTER button The group information of the current file is updated and the file is moved...

Page 77: ... or button to select Play Current Group 5 Press ENTER to play the selected group of music files from the sublist Changing the Favorites setting 1 Press the or button to select the desired music in the music list Changing the information of multiple files Press the or button to select the desired music in the music list Then press the yellow button Repeat the above operation to select multiple musi...

Page 78: ...music files Viewing the Information The music file information including the order of the file in the current directory the name the size the date modified and the path is displayed 1 Press the or button to select the desired music in the music list 2 Press the TOOLS button 3 Press the or button to select Information then press the ENTER button The information on the selected file appears Press th...

Page 79: ...t of the file 4 To exit WISELINK mode press the W LINK button on the remote control Playing the music group 1 Press the W LINK button on the remote control to display the WISELINK menu 2 Press the or button to select Music then press the ENTER button To move to the previous next group press the REW or FF button 3 Press the or button to select the desired music file 4 Press the TOOLS button 5 Press...

Page 80: ...peat Mode is On Music Once When all music files in the folder or the selected file are played once Repeat Mode is Off Music Play Pause When pressing the Play Pause ENTER button on the remote control while music is playing Repeating Music Play 1 While a Music file is playing press the TOOLS button 2 Press the or button to select Repeat Mode 3 Press the or button to select On or Off On Plays back al...

Page 81: ...before the screen saver appears Press the or button to select Screen Saver Run Time Press the or button to select 1 min 3 min or 5 min Information Select to viewing the information of the connected device Press the or button to select Information then press the ENTER button Safe Remove You can remove the device safely from the TV Refer to page 71 To exit WISELINK mode press the W LINK button on th...

Page 82: ...and the HDMI OUT jack of the corresponding Anynet device using an HDMI cable 2 Connect the HDMI IN jack of the home theater and the HDMI OUT jack of the corresponding Anynet device using an HDMI cable Connect the Optical cable between the Digital Audio Out Optical jack on your TV and the Digital Audio Input on the Home Theater When following the connection above the Optical jack only outputs 2 cha...

Page 83: ...ss the TOOLS button Press the or button to select Device List then press the ENTER button Anynet devices connected to the TV are listed If you cannot find a device you want press the red button to scan for devices 2 Press the or button to select to a particular device and press the ENTER button It is switched to the selected device Only when you set Anynet HDMI CEC to On in the Application menu th...

Page 84: ...OL MUTE button The Anynet function only works when the active source on the TV remote control is set to TV The button works only while in the recordable state You cannot control Anynet devices using the buttons on the TV You can control Anynet devices only using the TV remote control The TV remote control may not work under certain conditions In this case reselect the Anynet device The Anynet func...

Page 85: ...nnels Operating WISELINK Plug Play etc When connecting or removing the HDMI 1 3 cable please make sure to search devices again or turn your TV off and on again Check if the Anynet Function of Anynet device is set on I want to start Anynet Check if the Anynet device is properly connected to the TV and check if the Anynet HDMI CEC is set to On in the Anynet Setup menu Press the TV button on the TV r...

Page 86: ... s Video frequency Compare these values with the data in the Display Modes Digital broadcasting screen problem Please check the digital signal strength and input antenna The image is too light or too dark Adjust the Brightness and Contrast Adjust the Fine tuning Black bars on the screen Make sure the broadcast you re receiving is High Definition HD HD channels sometimes broadcast Standard Definiti...

Page 87: ...ust be adjusted on the output source i e STB with a digital signal The picture appears distorted in the corner of the screen If Just Scan is selected with some external devices the picture may appear distorted in the corner of the screen This symptom is caused by the external devices not TV The Resets all settings to the default values message appears This appears when you press and hold the EXIT ...

Page 88: ...o not apply excess downward pressure to the upper left of right sides of the TV 2 Fasten two screws at position 1 and then fasten two screws at position 2 Stand the product up and fasten the screws If you fasten the screws with the LCD TV placed down it may lean to one side Disconnecting the Stand 1 Remove four screws from the back of the TV 2 Separate the stand from the TV Two or more people shou...

Page 89: ...NTER button to save When Position1 is selected the message Current position saved as Position1 is displayed 5 Press the ENTER button The saved Position appears on the left side of the OSD Moving to the remembered position 1 Complete Step 1 of Entering the menu 2 Pressing a Color Red Green Yellow button moves the auto wall mount to the saved position You can move the wall mount to one of the 3 pre ...

Page 90: ...imension as they may cause damage to the inside of the TV set For wall mounts that do not comply with the VESA standard screw specifications the length of the screws may differ depending on their specifications Do not use screws that do not comply with the VESA standard screw specifications Do not fasten the screws too strongly this may damage the product or cause the product to fall leading to pe...

Page 91: ...er to the manual provided with the Kensington Lock for proper use The locking device has to be purchased separately Optional Figure 2 Figure 1 Cable The location of the Kensington Lock may be different depending on its model 1 Insert the locking device into the Kensington slot on the LCD TV Figure 1 and turn it in the locking direction Figure 2 2 Connect the Kensington Lock cable 3 Fix the Kensing...

Page 92: ...9 X 4 1 X 31 7 inches 1 268 5 X 10³ 5 X 805 5 mm 49 9 X 12 8 X 33 7 inches 1 268 5 X 326 0 X 856 5 mm Weight With Stand Without Stand 46 7 lbs 21 2 kg 39 7 lbs 18 0 kg 60 8 lbs 27 6 kg 51 4 lbs 23 3 kg 71 2 lbs 32 3 kg 59 3 lbs 26 9 kg Environmental Considerations Operating Temperature Operating Humidity Storage Temperature Storage Humidity 50 F to 104 F 10 C to 40 C 10 to 80 non condensing 4 F to...

Page 93: ...FRONT VIEW SIDE VIEW 7 9 200 mm 7 9 200 mm REAR VIEW NOTE All drawings are not necessarily to scale Some dimensions are subject to change without prior notice Refer to the dimensions prior to performing installation of your TV Not responsible for typographical or printed errors 2008 Samsung Electronics America Inc ...

Page 94: ...RONT VIEW SIDE VIEW 23 6 600 mm 15 7 400 mm REAR VIEW NOTE All drawings are not necessarily to scale Some dimensions are subject to change without prior notice Refer to the dimensions prior to performing installation of your TV Not responsible for typographical or printed errors 2008 Samsung Electronics America Inc ...

Page 95: ...RONT VIEW SIDE VIEW 23 6 600 mm 15 7 400 mm REAR VIEW NOTE All drawings are not necessarily to scale Some dimensions are subject to change without prior notice Refer to the dimensions prior to performing installation of your TV Not responsible for typographical or printed errors 2008 Samsung Electronics America Inc ...

Page 96: ...nditions for copying distribution and modification follow TERMS AND CONDITIONS FOR COPYING DISTRIBUTION AND MODIFICATION 0 This License applies to any program or other work which contains a notice placed by the copyright holder saying it may be distributed under the terms of this General Public License The Program below refers to any such program or work and a work based on the Program means eithe...

Page 97: ...t otherwise to copy modify sublicense or distribute the Program is void and will automatically terminate your rights under this License However parties who have received copies or rights from you under this License will not have their licenses terminated so long as such parties remain in full compliance 5 You are not required to accept this License since you have not signed it However nothing else...

Page 98: ... Your New Programs If you develop a new program and you want it to be of the greatest possible use to the public the best way to achieve this is to make it free software which everyone can redistribute and change under these terms To do so attach the following notices to the program It is safest to attach them to the start of each source file to most effectively convey the exclusion of warranty an...

Page 99: ...problems that might be introduced by others Finally software patents pose a constant threat to the existence of any free program We wish to make sure that a company cannot effectively restrict the users of a free program by obtaining a restrictive license from a patent holder Therefore we insist that any patent license obtained for a version of the library must be consistent with the full freedom ...

Page 100: ...acility other than as an argument passed when the facility is invoked then you must make a good faith effort to ensure that in the event an application does not supply such function or table the facility still operates and performs whatever part of its purpose remains meaningful For example a function in a library to compute square roots has a purpose that is entirely well defined independent of t...

Page 101: ...linking with the Library A suitable mechanism is one that 1 uses at run time a copy of the library already present on the user s computer system rather than copying library functions into the executable and 2 will operate properly with a modified version of the library if the user installs one as long as the modified version is interface compatible with the version that the work was made with c Ac...

Page 102: ... distribution limitation excluding those countries so that distribution is permitted only in or among countries not thus excluded In such case this License incorporates the limitation as if written in the body of this License 13 The Free Software Foundation may publish revised and or new versions of the Lesser General Public License from time to time Such new versions will be similar in spirit to ...

Page 103: ... of the GNU Lesser General Public License as published by the Free Software Foundation either version 2 1 of the License or at your option any later version This library is distributed in the hope that it will be useful but WITHOUT ANY WARRANTY without even the implied warranty of MERCHANTABILITY or FITNESS FOR A PARTICULAR PURPOSE See the GNU Lesser General Public License for more details You sho...

Page 104: ...mágenes y sobre todo visualice imágenes en movimiento a toda pantalla no gráficos estáticos ni barras oscuras En modelos de LCD que ofrezcan opciones para el tamaño de la imagen utilice estos controles para ver los distintos formatos como imagen a toda pantalla Tenga cuidado en la selección y duración de los formatos de televisión utilizados para la visualización La garantía limitada de Samsung no...

Page 105: ...sor 32 Escuchar el sonido de la sub imagen del PIP 33 Reajuste de valores de sonido a los valores predefinidos de fábrica 33 Conexión de los auriculares se vende por separado 33 Control de los Canales Gestión de los canales 34 Supresión de los canales codificados digitales 40 Sintonización fina de los canales analógicos 40 Comprobación de la potencia de la señal digital 41 Pantalla de PC Uso del T...

Page 106: ...completamente reales SRS TruSurround XT SRS TruSurround XT proporciona un sistema surround virtual Accesorios Compruebe que las opciones siguientes se incluyen con su TV LCD Si falta alguna opción póngase en contacto con el proveedor Mando A Distancia y Pilas AAA x 2 BN59 00673A Cable de alimentación 3903 000144 Cubierta inferior LN40A540P2F BN63 04437B LN46A540P2F BN63 04374B LN52A540P2F BN63 043...

Page 107: ...En el menú de la pantalla utilice este botón del mismo modo que el botón ENTER del mando a distancia 2 MENU Pulse para ver en pantalla un menú con las características del TV 3 VOL Pulse para aumentar o reducir el volumen En el menú de la pantalla utilice los botónes VOL del mismo modo que los botónes y del mando a distancia 4 CH Pulse para cambiar de canal En el menú de la pantalla utilice estos b...

Page 108: ...en el terminal HDMI IN 2 5 ANT IN Permite conectar a una antena o un sistema de TV por cable 6 WISELINK Se usa para conectar un dispositivo de almacenamiento masivo USB para ver archivos de fotos y reproducir archivos de audio 7 AV IN 2 Entradas de vídeo y audio para dispositivos externos como una videocámara o un reproductor de vídeo S VIDEO Permite conectar la señal de S Vídeo de una cámara o de...

Page 109: ...l mando a distancia Esta función es útil cuando se usa de noche o en una sala a oscuras El uso del mando a distancia con los botones de iluminación ON OFF activados reduce el tiempo de uso de las pilas PRE CH Sintoniza el canal anterior CH CH Permiten cambiar de canal SOURCE Pulse este botón para ver y seleccionar las fuentes de vídeo disponibles W LINK WISELINK Esta función permite ver y reproduc...

Page 110: ...cto consulte Antenas de par de cables planos de 300 Ω a continuación Si la antena tiene un cable como el que se muestra en el diagrama de la derecha consulte Antenas con cables coaxiales de 75 ohmios Si dispone de dos antenas consulte Antenas de VHF y UHF independientes Antenas de par de cables planos de 300 Ω Si utiliza una antena externa de techo o de orejas de conejo de par de cables planos de ...

Page 111: ...rminal ANT IN entrada de antena del decodificador Este terminal puede estar indicado como ANT IN VHF IN o IN 2 Conecte este cable al divisor de dos vías 3 Conecte el cable RF entre un terminal OUTPUT salida del divisor y el terminal IN entrada del decodificador 4 Conecte el cable RF entre el terminal ANT OUT del decodificador y el terminal B IN del conmutador A B 5 Conecte otro cable RF entre el o...

Page 112: ...positivo externo para confirmar la versión HDMI y solicitar una actualización Si ocurriera esto póngase en contacto con la empresa que suministró el reproductor de DVD o receptor de televisión por cable o satélite para confirmar la versión HDMI y solicite una actualización Los cables HDMI que no son 1 3 pueden causar un molesto parpadeo o que no se muestre la pantalla Conexión de un reproductor de...

Page 113: ...televisión por cable satélite decodificador al TV 1 Conecte un cable de componentes entre las tomas COMPONENT IN 1 o 2 Y PB PR del televisor y las tomas COMPONENT Y PB PR del reproductor de DVD o receptor de televisión por cable satélite decodificador 2 Conecte cables de audio entre las tomas COMPONENT IN 1 o 2 R AUDIO L del televisor y las tomas AUDIO OUT del reproductor de DVD o receptor de tele...

Page 114: ...onfiguración distinta en el panel posterior Cuando conecte un reproductor de video debe hacer coincidir los colores del terminal de conexión y del cable Cuando se conecta a AV IN 1 el color verde del terminal AV IN 1 Y VIDEO no coincide con el color amarillo del cable de vídeo Conexión de S Vídeo Este televisor Samsung se puede conectar a un terminal S Video de un aparato de vídeo Esta conexión pr...

Page 115: ...plificador DVD para cine en casa 1 Conecte un cable de audio entre las tomas AUDIO OUT R AUDIO L del televisor y las tomas AUDIO IN R AUDIO L del amplificador DVD para cine en casa Cuando un amplificador de audio se conecta a los terminales AUDIO OUT R AUDIO L Reduzca la ganancia volumen del TV y ajuste el volumen con el control del amplificador Cada Amplificador DVD para cine en casa tiene una co...

Page 116: ...puede seleccionar el origen de señal correcto entre STD HRC e IRC pulsando los botón o a continuación pulse el botón ENTER Si tiene cable digital seleccione la fuente de la señal del sistema de cable para analógica y para digital Póngase en contacto con su proveedor de cable para saber el tipo de sistema de cable existente en su zona 5 El televisor empezará a memorizar todos los canales disponible...

Page 117: ...tá disponible sólo en el modo TV Cambio de canales Mediante los botónes de canal 1 Pulse los botónes CH o CH para cambiar los canales Cuando pulse los botónes CH o CH el TV cambiará los canales por orden Verá todos los canales que ha memorizado el TV El TV deberá haber memorizado como mínimo tres canales No verá los canales borrados o no memorizados Consulte las páginas 16 para la memorización de ...

Page 118: ...onar uno de los iconos A continuación pulse ENTER para acceder al submenú del icono 3 Pulse el botón EXIT para salir Pasado aproximadamente un minuto los menús de la pantalla desaparecen de ésta Uso del botón El botón se utiliza para seleccionar emisoras que emitan con señal digital 1 Por ejemplo para seleccionar el canal 7 1 pulse 7 y 1 HD indica que el televisor está recibiendo una señal digital...

Page 119: ...misora de origen memorizar los canales automático y agregar o borrar canales manual Selección del origen de la señal de vídeo Antes de empezar a memorizar los canales disponibles debe indicar el tipo de origen de la señal conectada al TV es decir antena o sistema de cable 1 Pulse el botón MENU para visualizar el menú Pulse los botón o para seleccionar Canal y después pulse el botón ENTER 2 Pulse e...

Page 120: ...ha seleccionado el origen de la señal 5 El televisor empieza a memorizar todas las emisoras disponibles Una vez guardados todos los canales disponibles se inicia la eliminación de los canales codificados ver página 40 Vuelve a mostrarse el menú Auto Program Si desea detener la programación automática pulse el botón ENTER Aparece el mensaje Detener programación automática Seleccione Sí con los boto...

Page 121: ... señal externa O Edición del Nombre de la Fuente de entrada Nombre al dispositivo de entrada de información conectado con las tomas de entrada para facilitar la selección de fuente de entrada 1 Pulse el botón MENU para ver el menú en pantalla Pulse los botón o para seleccionar Entrada y después pulse el botón ENTER Pulse los botón o para seleccionar Editar Nombre y pulse el botón ENTER 2 Pulse los...

Page 122: ... R después pulse el botón ENTER 3 Pulse los botón o para aumentar o reducir el valor de una opción concreta Pulse el botón ENTER Pulse el botón EXIT para salir Cuando haga cambios en Luz de fondo Contraste Brillo Definición Color y Tinte V R el color del OSD también se ajustará En el modo PC sólo se pueden realizar cambios en las opciones Luz de fondo Contraste y Brillo La configuración de cada di...

Page 123: ...en un nivel bajo Medio Establece la profundidad del color negro en un nivel medio Alto Establece la profundidad del color negro en un nivel alto Ajuste del contraste dinámico Se puede ajustar el contraste de la pantalla para conseguir un contraste óptimo 6 Pulse los botón o para seleccionar Contraste dinám y pulse el botón ENTER 7 Pulse los botón o para seleccionar Apagado Bajo Medio o Alto Pulse ...

Page 124: ... reducir o aumentar el valor de un elemento concreto Pulse el botón ENTER En Color se pueden ajustar los valores RGB del color seleccionado Para restablecer el valor RGB ajustado seleccione Reiniciar Rojo Ajusta el nivel de saturación del rojo del color seleccionado Verde Ajusta el nivel de saturación del verde del color seleccionado Azul Ajusta el nivel de saturación del azul del color selecciona...

Page 125: ...tones o para disminuir o aumentar el valor Pulse el botón ENTER El cambio del valor de ajuste actualizará la pantalla ajustada Configuración de la mejora de los bordes Permite acentuar los bordes de los objetos en las imágenes 22 Pulse los botón o para seleccionar Mejora de perfiles y a continuación pulse el botón ENTER 23 Pulse los botón o para seleccionar Apagado o Encendido Pulse el botón ENTER...

Page 126: ...culas desde un dispositivo externo es decir un reproductor DVD conectado en las tomas HDMI o Component IN 24 Pulse los botón o para seleccionar xvYCC y a continuación pulse el botón ENTER 25 Pulse los botón o para seleccionar Apagado o Encendido Pulse el botón ENTER xvYCC está disponible cuando el modo de imagen está configurado en Película y la entrada externa está establecida en los modos HDMI o...

Page 127: ...n su propia gama de tamaños de pantalla Sin embargo en general debe ver el televisor en el modo 16 9 tanto como sea posible 1 Sigas las instrucciones 1 y 2 de Activación de las opciones de la imagen 2 Pulse los botón o para seleccionar Tamaño y a continuación pulse el botón ENTER 3 Pulse los botón o para seleccionar el formato de pantalla que desee Pulse el botón ENTER Pulse el botón EXIT para sal...

Page 128: ...e cada dispositivo externo conectado a la entrada del televisor se puede ajustar y guardar Fuente entrada Tamaño imagen ATV Video S Video Componente 480i 480p 16 9 Zoom1 Zoom2 4 3 DTV 1080i Componente 1080i 1080p HDMI 720p 1080i 1080P 16 9 4 3 Ajuste ancho Sólo buscar PC 16 9 4 3 Alternativo pulse el botón P SIZE del mando a distancia de forma repetida para seleccionar uno de los ajustes de tamaño...

Page 129: ...lles mejora del contraste y de los blancos DNIe sólo está disponible en el modo Dinámico Configuración del nivel de negro HDMI Se puede seleccionar el nivel de negro en la pantalla para ajustar la profundidad de ésta 1 Sigas las instrucciones 1 y 2 de Activación de las opciones de la imagen Consulte la página 23 2 Pulse los botón o para seleccionar N neg HDMI y a continuación pulse el botón ENTER ...

Page 130: ...referidos adecuados al nivel de la señal de cada dispositivo de vídeo mediante los patrones de barras de colores rojo verde azul cián magenta amarillo sin usar un filtro azul adicional 1 Sigas las instrucciones 1 y 2 de Activación de las opciones de la imagen Consulte la página 23 2 Pulse los botón o para seleccionar Sólo modo azul y a continuación pulse el botón ENTER 3 Pulse los botón o para sel...

Page 131: ...principal proviene de un dispositivo externo conectado a los modos HDMI 1 HDMI DVI 2 HDMI 3 Componente 1 2 o PC Configuración de PIP Imagen principal Imagen Secundaria Componente 1 2 HDMI 1 HDMI DVI 2 HDMI 3 PC Sólo emisiones de televisión analógicasMover Cambio del tamaño de la ventana PIP 3 Pulse los botón o para seleccionar Tamaño y a continuación pulse el botón ENTER Pulse los botones o para s...

Page 132: ...a salir Configuración sencilla 1 Pulse el botón TOOLS del mando a distancia 2 Pulse los botones o para seleccionar PIP y a continuación pulse el botón ENTER 3 Pulse los botones o para seleccionar una opción concreta 4 Pulse los botones o para seleccionar la opción deseada 5 Pulse los botones EXIT o TOOLS para salir PIP PIP Encendido Tamaño Posición Aire Cable Aire Canal Aire 11 Regresar Ingresar M...

Page 133: ...n sus preferencias personales 1 Pulse el botón MENU para ver el menú en pantalla Pulse los botón o para seleccionar Sonido y a continuación pulse el botón ENTER 2 Pulse los botón o para seleccionar Ecualizador y a continuación pulse el botón ENTER 3 Pulse el botón ENTER para seleccionar Modo Pulse los botón o para seleccionar el ajuste de sonido Normal Música Película Diálogo o Favorito y pulse el...

Page 134: ...a de reproducción con dos altavoces Es totalmente compatible con todos los formatos multicanal 1 Pulse el botón MENU para ver el menú en pantalla Pulse los botón o para seleccionar Sonido y a continuación pulse el botón ENTER 2 Pulse los botón o para seleccionar SRS TruSurround XT y a continuación pulse el botón ENTER 3 Pulse los botón o para seleccionar Apagado o Encendido y a continuación pulse ...

Page 135: ... los botón o para seleccionar una configuración que desee pulse después el botón ENTER Pulse el botón EXIT para salir Mono Elija para canales que emiten en monoaural o si tiene dificultades con la recepción de señales estéreo Estéreo Elija para canales que emiten en estéreo SAP Elija esta opción para escuchar el programa de audio independiente que normalmente es una traducción de otro idioma Sonid...

Page 136: ...ca Sel Sonido en el modo PIP y Reinicio del sonido en el menú Sonido Los botónes VOL VOL y MUTE no funcionan si TV Speaker está establecido en Apagado Altavoces internos del televisor Audio Out Optical R L Out para el sistema de sonido RF AV S Video Component PC HDMI RF AV S Video Component PC HDMI TV Speaker Encendido Salida de altavoces Salida de altavoces Salida de altavoces Salida de sonido Sa...

Page 137: ...ción pulse el botón ENTER Pulse el botón EXIT para salir Reiniciar todo Todos los valores del sonido regresan a los predeterminados Reiniciar modo del sonido Los valores del sonido actual regresan a los predeterminados Cancelar Seleccionar las opciones de reinicio del sonido Conexión de los auriculares se vende por separado Puede conectar unos auriculares al equipo si desea ver un programa de tele...

Page 138: ...l mando a distancia para mostrar las listas de canales Uso de los botones de colores del mando a distancia con la lista de canales Rojo Antena Cambia a aérea o por cable Verde Zoom Amplía o disminuye el número del canal Amarillo Selección Selecciona varias listas de canales TOOLS Opción Muestra los menús Agregar o Borrar Agregar a Favoritos o Borrar de Favoritos Visualización con temporizador Edic...

Page 139: ...os de la misma manera Para agregar de nuevo un canal a la lista Canales agregados primero hay que borrarlo Para volver a añadir restablecer un canal a la lista de canales agregados siga los pasos 1 3 anteriores pulse los botones o para seleccionar el canal y pulse el botón TOOLS Pulse el botón ENTER para seleccionar Agregar Pulse el botón CH LIST del mando a distancia para mostrar las listas de ca...

Page 140: ...rra de la lista Favorites y la marca también desaparece Pulse el botón EXIT para salir Puede añadir o borrar un canal en la lista de favoritos en el menú Canales agregados siguiendo el mismo procedimiento Todos los canales seleccionados se mostrarán en Favoritos Pulse el botón CH LIST del mando a distancia para mostrar las listas de canales Si desea seleccionar los canales favoritos que ha configu...

Page 141: ...ocedimiento Para obtener información sobre cómo confirmar una reserva de visualización consulte la página 38 Sólo se pueden reservar los canales memorizados Puede ajustar el canal el mes el día el año la hora y el minuto directamente pulsando los botones numéricos del mando a distancia Pulse el botón CH LIST del mando a distancia para mostrar las listas de canales Guía de programas digitales y res...

Page 142: ...r programaciones y a continuación pulse el botón ENTER 6 Pulse los botón o para seleccionar Aceptar y a continuación pulse el botón ENTER Se cancela la reserva de visualización Pulse el botón EXIT para salir Opciones programadas Cambiar información Selecciónelo para cambiar la reserva de visualización Cancelar programaciones Selecciónelo para cancelar la reserva de visualización Información Selecc...

Page 143: ...es en la memoria programa automático 1 Pulse el botón MENU Pulse los botón o para seleccionar Canal y a continuación pulse el botón ENTER Pulse los botón o para seleccionar Lista de canales y a continuación pulse el botón ENTER 2 Pulse los botones o para seleccionar el canal al que se va a asignar un nuevo nombre y pulse el botón TOOLS 3 Pulse los botón o para seleccionar Prog Auto y a continuació...

Page 144: ...ara ver el menú en pantalla Pulse los botón o para seleccionar Canal y a continuación pulse el botón ENTER 2 Pulse los botón o para seleccionar Sintonia Fina y a continuación pulse el botón ENTER 3 Pulse los botón o para ajustar la sintonía con precisión Para memorizar la sintonía fina en la memoria del televisor pulse el botón ENTER Si no almacena en la memoria el canal que ha ajustado de manera ...

Page 145: ...e los canales digitales disponibles 1 Pulse el botón MENU para ver el menú en pantalla Pulse los botón o para seleccionar Canal y a continuación pulse el botón ENTER 2 Pulse los botón o para seleccionar Intensidad señal y a continuación pulse el botón ENTER Si el medidor de potencia de señal indica que la señal es débil ajuste físicamente su antena para incrementar la potencia de la señal Continúe...

Page 146: ...l del sistema es igual al modo de señal estándar la pantalla se ajusta automáticamente Si la señal del sistema no es igual al modo de señal estándar ajuste el modo consultando la guía del usuario de la tarjeta de vídeo de lo contrario puede no haber señal de vídeo La imagen de pantalla se ha optimizado durante la fabricación para los modos de visualización enumerados a continuación D Sub Entrada M...

Page 147: ...ta el máximo y vuelva a realizar la sintonización fina Después de reducir el ruido vuelva a ajustar la imagen para que quede alineada en el centro de la pantalla Preselección Pulse el botón SOURCE para seleccionar el modo PC 1 Pulse el botón MENU para ver el menú en pantalla Pulse los botón o para seleccionar Imagen y a continuación pulse el botón ENTER 2 Pulse los botón o para seleccionar Pantall...

Page 148: ...todos los ajustes de imagen predeterminados de fábrica Preselección Pulse el botón SOURCE para seleccionar el modo PC 1 Pulse el botón MENU para ver el menú en pantalla Pulse los botón o para seleccionar Imagen y a continuación pulse el botón ENTER 2 Pulse los botón o para seleccionar Pantalla y a continuación pulse el botón ENTER 3 Pulse los botón o para seleccionar Reiniciar Imagen y a continuac...

Page 149: ...ara desplazarse a Mes Día Año Tiempo Minuto o am pm Seleccione la fecha y la hora que desee pulsando los botónes o pulse después el botón ENTER Pulse el botón EXIT para salir La hora actual aparecerá siempre que se pulse el botón INFO Puede ajustar el mes el día el año la hora y el minuto directamente pulsando los botónes numéricos del mando a distancia Ajuste de la Hora Configuración Plug Play Id...

Page 150: ...spués pulse el botón ENTER Pulse los botón o para seleccionar Apagado o Encendido y después pulse el botón ENTER Pulse el botón EXIT para salir Según la estación emisora y la señal puede que el ajuste automático de la hora no se realice correctamente En este caso ajuste la hora manualmente La antena o el cable debe estar conectado para que se ajuste la hora automáticamente Configuración Plug Play ...

Page 151: ...s botón o para seleccionar Apagado y a continuación pulse el botón ENTER 4 Pulse el botón EXIT para salir Configuración sencilla 1 Pulse el botón TOOLS del mando a distancia 2 Pulse los botones o para seleccionar Temporizador 3 Pulse los botones o para seleccionar los minutos 4 Pulse los botones EXIT o TOOLS para salir Configuración Plug Play Idioma English Tiempo V Chip Subtítulo Configuración ex...

Page 152: ...l deseado Música Permite seleccionar la carpeta del dispositivo USB con archivos MP3 Fotos Permite seleccionar la carpeta del dispositivo USB con archivos JPEG Repetir Seleccione Una vez Cada día Lun Vie Lun Sáb Sáb Dom o Manual Con Manual seleccionado pulse el botón para seleccionar el día de la semana Pulse el botón ENTER sobre el día deseado aparecerá la marca Pulse el botón EXIT para salir Pue...

Page 153: ...siguientes patentes de EE UU US4 930 158 US4 930 160 Ajuste del número de identificación personal código PIN 1 Pulse el botón MENU para ver el menú en pantalla Pulse los botón o para seleccionar Configuración y a continuación pulse el botón ENTER 2 Pulse los botón o para seleccionar V Chip y a continuación pulse el botón ENTER Aparecerá el mensaje Ingresar Código Escriba su código PIN de 4 dígitos...

Page 154: ...ódigo PIN de 4 dígitos 3 Aparecerá la pantalla V Chip Para activar la función V Chip pulse el botón ENTER para que Bloqueo V Chip se ajuste en Encendido Si se pulsan repetidamente los botón o se alterna entre Encendido y Apagado Pulse el botón ENTER Pulse el botón EXIT para salir Cambiar Código Ingresar Nuevo Código Regresar 0 9 Ingresar Código Confirmar Nuevo Código V Chip Bloqueo V Chip Apagado ...

Page 155: ...s en el grupo adolescente quedarán bloqueadas TV G TV PG TV 14 y TV MA Las subclasificaciones D L S V funcionan de manera similar Consulte la sección siguiente 6 Cómo establecer las subclasificaciones FV D L S y V Primero seleccione una de las clasificaciones de TV TV Y TV Y7 TV G TV PG TV 14 o TV MA consulte el paso 4 y pulse el botón Por cada subclasificación aparecerá un símbolo Con el seleccio...

Page 156: ...ugiere la compañía de un adulto PG 13 Menores acompañados de un adulto R Restringido Los niños menores de 17 años deben estar acompañados por un adulto NC 17 Prohibida la entrada a menores de 17 años X Sólo adultos NR Sin clasificacion Perm todo Se pulsa para desbloquear todos los programas de televisión Bloq todo Se pulsa para bloquear todos los programas de televisión Con una determinada categor...

Page 157: ...res de 8 años C8 Programación generalmente considerada aceptable para niños mayores de 8 años sin acompañamiento de adultos G Programación general ideal para todas las audiencias PG Supervisión paterna 14 La programación contiene temas y contenidos que puede que no sean adecuados para menores de 14 años 18 Programación para adultos El V Chip bloqueará automáticamente cualquier categoría que sea Mo...

Page 158: ...eralmente considerada aceptable para niños mayores de 8 años sin acompañamiento de adultos 13 ans Es posible que la programación no sea adecuada para niños menores de 13 años 16 ans Es posible que la programación no sea adecuada para niños menores de 16 años 18 ans Programación restringida para adultos El V Chip bloqueará automáticamente cualquier categoría que sea More restrictive Por ejemplo si ...

Page 159: ...on más restrictivas Los títulos de clasificación por ejemplo Humor Level Nivel humor etc y las clasificaciones de televisión por ejemplo DH MH H etc pueden diferir según la emisora Cómo reiniciar el televisor cuando el V Chip bloquea un canal Escape de emergencia Si el televisor sintoniza un canal restringido el V Chip lo bloqueará La pantalla quedará en blanco y aparecerá el siguiente mensaje 1 P...

Page 160: ...ado Este canal transporta datos que están destinados a ampliar la información del programa CC3 Servicio de subtítulos secundarios sincronizados Datos alternativos de subtítulos relacionados con el programa típicamente subtítulos del segundo idioma CC4 Subtítulos especiales de uso no sincronizado Similar a CC2 Texto1 Primer servicio de texto Se puede tratar de varios datos no relacionados con progr...

Page 161: ...ta opción consta de Programado Pequeño Normal y Grande El valor predeterminado es Normal Estilo fuente Esta opción consta de Programado Estilo 0 Estilo 7 Puede cambiar el tipo de letra que desee El valor predeterminado es Estilo 0 Color de primer plano Esta opción consta de Programado Blanco Negro Rojo Verde Azul Amarillo Magenta y Cyan Puede cambiar el color del texto El valor predeterminado es B...

Page 162: ...agar o encender el LED del frontal del televisor 1 Pulse el botón MENU para ver el menú en pantalla Pulse los botón o para seleccionar Configuración y a continuación pulse el botón ENTER 2 Pulse los botón o para seleccionar Configuración externa y a continuación pulse el botón ENTER 3 Pulse los botón o para seleccionar Efecto de luz y a continuación pulse el botón ENTER Pulse los botón o para sele...

Page 163: ...s veces el botón E MODE del mando a distancia para cambiar la configuración de Entretenimiento O Uso de la función de ahorro de energía Esta función ajusta el brillo del televisor lo cual reduce el consumo de energía Si desea ver la televisión por la noche ajuste la opción del modo Ahorro energía en Alto sus ojos se lo agradecerán y además reducirá el consumo de energía 1 Pulse el botón MENU para ...

Page 164: ...sta 30 segundos 5 Aparece el mensaje Actualizar la versión XXXX a la versión XXXX Después de la actualización el sistema se debe reiniciar Pulse los botón o para seleccionar Aceptar y a continuación pulse el botón ENTER No desconecte la alimentación ni retire la unidad USB mientras se aplican las actualizaciones El televisor se apagará y se encenderá automáticamente después de completar la actuali...

Page 165: ...nectar el dispositivo al televisor haga una copia de seguridad de sus archivos para evitar daños o pérdidas de datos SAMSUNG no se hace responsable por cualquier daño en los archivos o pérdida de datos No desconecte el dispositivo USB mientras se esté cargando MSC admite archivos MP3 y JPEG mientras que un dispositivo PTP sólo admite archivos JPEG Se admite el formato jpeg secuencial Los archivos ...

Page 166: ...s de las fotos guardadas en un dispositivo de memoria USB Lista de fotos 1 Pulse el botón W LINK del mando a distancia para mostrar el menú WISELINK 2 Pulse los botones o para seleccionar Photo a continuación pulse el botón ENTER Se muestran los archivos de fotos Este menú sólo muestra los archivos con extensión jpg Los archivos con otro formato como bmp o tiff no se muestran Pulse el botón Reprod...

Page 167: ...ficación El grupo de clasificación que incluye la foto seleccionada se resalta 5 Dispositivo actual Muestra el nombre del dispositivo actualmente seleccionado Pulse el botón rojo para seleccionar un dispositivo 6 Información de selección del elemento Muestra el número de fotos seleccionadas cuando se pulsa el botón amarillo 7 Elementos de ayuda Botón rojo Dispositivo Selecciona un dispositivo cone...

Page 168: ...aria de archivos agrupados por mes Para ir al grupo anterior siguiente pulse los botones REW o FF 3 Pulse el botón TOOLS Pulse los botones o para seleccionar Repr grupo actual 4 Pulse ENTER para reproducir el grupo seleccionado de los archivos de fotos de la lista secundaria Fecha Ordena las fotos por fecha Ordena y muestra las fotos por fechas Ordena por años y meses empezando por las más antigua...

Page 169: ...botón TOOLS Pulse los botones o para seleccionar Repr grupo actual 4 Pulse ENTER para reproducir el grupo seleccionado de los archivos de fotos de la lista secundaria Cambio de la información de la composición 1 Seleccione Composición como norma de clasificación en la lista de fotos y pulse los botones o para seleccionar una foto Cambio de la información de varios archivos Pulse los botones o para...

Page 170: ...e los botones o para seleccionar Repr grupo actual 4 Pulse ENTER para reproducir el grupo seleccionado de los archivos de fotos de la lista secundaria Cambio de la configuración de favorito 1 Pulse los botones o para seleccionar la foto que desee en la lista Cambio de la información de varios archivos Pulse los botones o para seleccionar la foto que desee en la lista A continuación pulse el botón ...

Page 171: ...n W LINK en el mando a distancia No se pueden borrar los archivos de solo lectura No se puede restaurar un archivo de fotos suprimido Visualización de la información de las fotos Se muestra la información del archivo de fotografía incluidos el orden del archivo en el directorio actual el nombre el tamaño la resolución la fecha de modificación y la ruta 1 Pulse los botones o para seleccionar la fot...

Page 172: ...eleccionado varios archivos sólo los archivos seleccionados se usarán en la presentación Reproducción Repr grupo actual 1 Pulse los botones o para seleccionar una norma de clasificación Mensual Fecha Color Composición Carpeta Preferencias 2 Pulse los botones o para seleccionar la foto que desee en la lista Para ir al grupo anterior siguiente pulse los botones REW o FF 3 Pulse el botón TOOLS 4 Puls...

Page 173: ...isionado automático o Detener visionado automático a continuación pulse el botón ENTER Giro de imágenes Puede girar las imágenes en el modo de pantalla completa Pulse los botones o para seleccionar Girar a continuación pulse el botón ENTER Pulse los botones o varias veces para girar la foto los grados deseados Con cada pulsación del botón la imagen gira 270 180 90 y 0 Con cada pulsación del botón ...

Page 174: ...da Velocidad de presentación Se puede seleccionar la velocidad de la presentación Pulse los botones o para seleccionar Velocidad visionado automático Pulse los botones o para seleccionar la opción deseada Rápido Lento Normal Sólo durante la presentación se puede seleccionar la velocidad de ésta Durante la presentación también se puede cambiar la visualización de ésta con los botones REW o FF Músic...

Page 175: ...M deseado Pulse el botón ENTER Opciones del modo BGM Dinámico Rítmico Triste Excitante Tranquilo WISELINK identifica el estado de ánimo de los archivos de música y los agrupa en consecuencia analizando los archivos de música del dispositivo USB Imagen Modo Se puede configurar el Imagen Modo Consulte la página 18 Modo de sonido Se puede configurar el modo de sonido Consulte la página 29 Información...

Page 176: ... Better than yesterday G H I J L P S T V 1archivos selecc 1 6 4 5 2 3 1 Música actualmente seleccionada Muestra la música actualmente seleccionada 2 Norma de clasificación actual Pulse los botones o para cambiar la norma de clasificación de los archivos de música Título Artista Ánimo Género Carpeta Preferencias 3 Ver grupos Muestra los grupos de clasificación El grupo de clasificación que incluye ...

Page 177: ...ulse el botón TOOLS Pulse los botones o para seleccionar Repr grupo actual 4 Pulse ENTER para reproducir el grupo seleccionado de los archivos de música de la lista secundaria 5 Información de selección del elemento Muestra el número de archivos de música seleccionados cuando se pulsa el botón amarillo 6 Elementos de ayuda Botón rojo Dispositivo Selecciona el dispositivo conectado Botón verde Conf...

Page 178: ...tifica el estado de ánimo de los archivos de música y los agrupa en consecuencia analizando los archivos de música del dispositivo USB La información de Ánimo extraída del archivo de música no siempre coincide con la opción de ánimo Por ejemplo un archivo que usted considera Dinámico puede haber sido extraído en la opción de ánimo Excitante 4 Pulse los botones o para seleccionar la opción que dese...

Page 179: ...se el botón TOOLS Pulse los botones o para seleccionar Repr grupo actual 4 Pulse ENTER para reproducir el grupo seleccionado de los archivos de música de la lista secundaria Cambio de la configuración de favorito 1 Pulse los botones o para seleccionar la música que desee en la lista Cambio de la información de varios archivos Pulse los botones o para seleccionar la música que desee en la lista A c...

Page 180: ...lo lectura No se pueden restaurar los archivos de música eliminados Visualización de la información Se muestra la información del archivo de música incluidos el orden del archivo en el directorio actual el nombre el tamaño la fecha de modificación y la ruta 1 Pulse los botones o para seleccionar la música que desee en la lista 2 Pulse el botón TOOLS 3 Pulse los botones o para seleccionar Informaci...

Page 181: ...a información del tiempo de reproducción no se encuentra al inicio del archivo 4 Para salir del modo WISELINK pulse el botón W LINK en el mando a distancia Reproducción de un grupo de música 1 Pulse el botón W LINK del mando a distancia para mostrar el menú WISELINK 2 Pulse los botones o para seleccionar Music a continuación pulse el botón ENTER Para ir al grupo anterior siguiente pulse los botone...

Page 182: ...ncendido Música Una vez Cuando todos los archivos de música de la carpeta o el archivo seleccionado se reproducen una vez Modo rep está configurado como Apagado Música Reproducir Pausa Cuando se pulsa el botón Reproducir Pausa ENTER del mando a distancia mientras se está reproduciendo música Repetición de la reproducción de música 1 Durante la reproducción del archivo de música pulse el botón TOOL...

Page 183: ...o de espera necesario para que se ejecute el salvapantallas Pulse los botones o para seleccionar Tiemp ejec protect pant Pulse los botones o para seleccionar 1 min 3 min o 5 min Información Puede configurar que se muestre la información del dispositivo conectado Pulse los botones o para seleccionar Información a continuación pulse el botón ENTER Extracción segura Se puede quitar el dispositivo del...

Page 184: ...I 3 del televisor y la toma HDMI OUT del dispositivo Anynet correspondiente mediante el cable HDMI 2 Conecte la toma HDMI IN del sistema cine en casa y la toma HDMI OUT del dispositivo Anynet correspondiente mediante el cable HDMI Conecte el cable óptico entre la toma Digital Audio Out Optical del televisor y la toma Digital Audio Entrada del sistema de cine en casa Si se sigue la conexión anterio...

Page 185: ...se los botón o para seleccionar Lista Disp y a continuación pulse el botón ENTER Se muestran todos los dispositivos Anynet conectados al televisor Si no encuentra el dispositivo que desea pulse el botón rojo para buscar los dispositivos 2 Pulse los botones o para seleccionar el dispositivo que desee y pulse el botón ENTER Se cambia al dispositivo seleccionado El menú Lista Disp sólo aparece si la ...

Page 186: ...ado Botónes VOL VOL MUTE La función Anynet sólo es operativa cuando la fuente activa del mando a distancia del televisor está ajustada en TV El botón sólo funciona en el estado Watch TV Ver TV Los dispositivos Anynet no se pueden controlar con los botones del TV Los dispositivos Anynet sólo se pueden controlar mediante el mando a distancia del televisor El mando a distancia del televisor puede no ...

Page 187: ...amiento de WISELINK Plug Play etc Cuando se conecta o se desconecta el cable HDMI 1 3 se han de buscar de nuevo los dispositivos o volver a apagar y encender el televisor Compruebe si la función Anynet del dispositivo Anynet está activada Deseo iniciar Anynet Compruebe si el dispositivo Anynet está debidamente conectado al TV y si la opción Control HDMI del menú Configuración está establecida en A...

Page 188: ...rmemente con las fuentes del PC Mensaje Modo no compatible Compruebe la resolución máxima y la frecuencia de vídeo del dispositivo conectado Compare estos valores con los datos de los modos de Pantalla Problema en pantalla con la emisión digital Compruebe la potencia de la señal digital y la antena de entrada La imagen es demasiado clara o demasiado oscura Ajuste Luminos y Contraste Ajuste la func...

Page 189: ...ción horizontal y vertical La posición de la pantalla se debe ajustar respecto a la fuente de salida por ejemplo STB con una señal digital La imagen aparece distorsionada en la esquina de la pantalla Si Sólo buscar está seleccionado en algún dispositivo externo la imagen puede aparecer distorsionada en la esquina de la pantalla Este síntoma se origina en los dispositivos externos no en el televiso...

Page 190: ...ue una presión excesiva en la parte superior izquierda y derecha del televisor 2 Apriete dos tornillos en la posición 1 y a continuación apriete dos en la posición 2 Levante el producto y apriete los tornillos Si aprieta los tornillos con el TV LCD tumbado éste se puede inclinar hacia un lado Desconexión del soporte 1 Desmonte los 4 tornillos de la parte posterior del TV 2 Separe el soporte del TV...

Page 191: ... colores 4 Pulse el botón ENTER para guardar Cuando se selecciona la Posición 1 se muestra el mensaje Posición actual guardada como Posición1 5 Pulse el botón ENTER La posición guardada se muestra en la parte izquierda de la OSD Desplazamiento a la posición memorizada 1 Complete el paso 1 de Acceso al menú 2 Pulse un botón de color rojo verde amarillo para mover el montaje mural a la posición guar...

Page 192: ...ndar ya que pueden causar daños en el interior del televisor Para montajes murales que no cumplen las especificaciones de tornillos estándar VESA la longitud de éstos puede variar dependiendo de las especificaciones No use tornillos que no cumplan las especificaciones de tornillos estándar VESA No apriete excesivamente los tornillos ya que podría dañar el producto o provocar la caída de éste con r...

Page 193: ...l manual que acompaña al bloqueo Kensington para utilizarlo correctamente El dispositivo de bloqueo debe adquirirse por separado Opcional Figura 2 Figura 1 Cable La ubicación del Bloqueo Kensington puede variar según el modelo 1 Inserte el dispositivo de bloqueo en la ranura Kensington del TV LCD Figura 1 y gírelo en el sentido del bloqueo Figura 2 2 Conecte el cable del bloqueo Kensington 3 Fije ...

Page 194: ...mm 49 9 X 12 8 X 33 7 pulg 1 268 5 X 326 0 X 856 5 mm Peso Con el soporte Después sw plegar la base 46 7 lbs 21 2 kg 39 7 lbs 18 0 kg 60 8 lbs 27 6 kg 51 4 lbs 23 3 kg 71 2 lbs 32 3 kg 59 3 lbs 26 9 kg Factores medioambientales Temperatura de funcionamiento Humedad de funcionamiento Temperatura de almacenamiento Humedad de almacenamiento Entre 10 C y 40 C 50 F a 104 F Del 10 al 80 sin condensación...

Page 195: ...AT ERAL 7 9 200 mm 7 9 200 mm VISTA POSTERIOR NOTA No todos los dibujos están necesariamente a escala Algunas dimensiones están sujetas a cambio sin previo aviso Consulte las dimensiones antes de ejecutar la instalación del televisor La empresa no se responsabiliza de cualquier error tipográfico o de impresión 2008 Samsung Electronics America Inc ...

Page 196: ...T ERAL 23 6 600 mm 15 7 400 mm VISTA POSTERIOR NOTA No todos los dibujos están necesariamente a escala Algunas dimensiones están sujetas a cambio sin previo aviso Consulte las dimensiones antes de ejecutar la instalación del televisor La empresa no se responsabiliza de cualquier error tipográfico o de impresión 2008 Samsung Electronics America Inc ...

Page 197: ...T ERAL 23 6 600 mm 15 7 400 mm VISTA POSTERIOR NOTA No todos los dibujos están necesariamente a escala Algunas dimensiones están sujetas a cambio sin previo aviso Consulte las dimensiones antes de ejecutar la instalación del televisor La empresa no se responsabiliza de cualquier error tipográfico o de impresión 2008 Samsung Electronics America Inc ...

Reviews: