background image

English-46

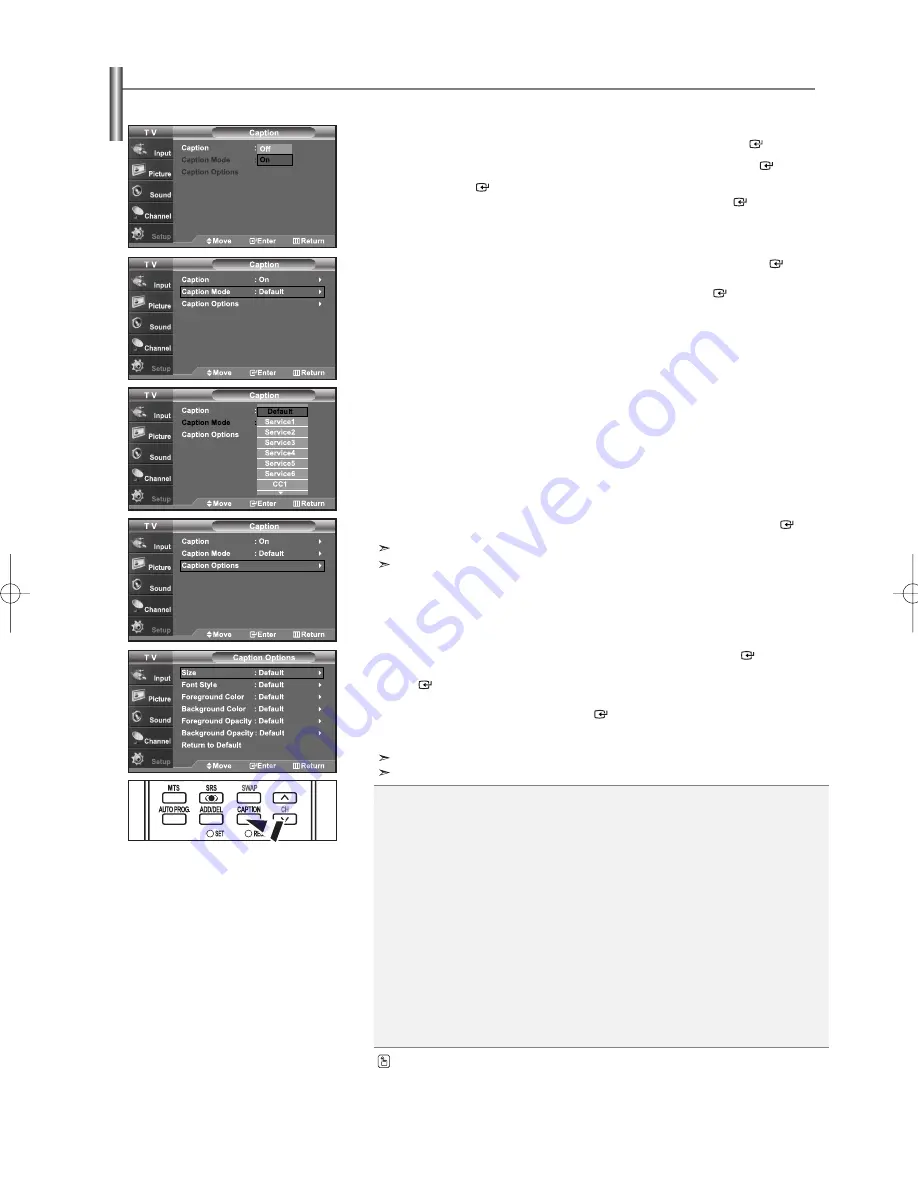
Viewing Closed Captions (On-Screen Text Messages) - Digital

The Digital Captions function operates on digital channels.

1.

Press the 

MENU 

button to display the menu.

Press the 

or 

buttons to select “Setup”, then press the 

ENTER

button.

2.

Press the 

or 

buttons to select “Caption”, then press the 

ENTER

button.

3.

Press the 

ENTER

button to select “Caption”.

Press the 

or 

buttons to select “On”, then press the 

ENTER

button.

4.

Press the 

or 

buttons to select “Caption Mode”, then press the 

ENTER

button.

Press the 

or 

buttons to select submenu (Default, Service1~Service6, 

CC1~CC4, or Text1~Text4) you want, then press the 

ENTER

button.

5.

Press the 

or 

buttons to select “Caption Options”, then press the 

ENTER

button.

“Caption Options” are available only when “Service1~Service6” can be selected in “Caption Mode”.

Service1~6 in digital caption mode may not be available depending on the broadcast.

6.

Press the 

or 

buttons to select “Size”, then press the 

ENTER

button.

Press the 

or 

buttons to select the desired Caption option, then press the 

ENTER

button.

Press the 

or 

button to select the desired sub-menu options

(see options below), then press 

ENTER

.

Press the 

EXIT 

button to exit.

The availability of captions depends on the program being broadcast.
“Default” means to follow the standard set by the broadcaster.

• 

Size:

This option consists of “Default”, “Small”, “Standard”, and “Large”. The default is “Standard”.

• 

Font Style:

This option consists of “Default”, “Style0 ~ Style 7”. You can change the font you want. 
The default is “Style 0”.

• 

Foreground Color:  

This option consists of “Default”, “White”, “Black”, “Red”, “Green”, “Blue”,
“Yellow”, “Magenta”, and “Cyan”. You can change the color of the letter. 
The default is “White”.

• 

Background Color: 

This option consists of “Default”, “White”, “Black”, “Red”, “Green”, “Blue”,
“Yellow”, “Magenta”, and “Cyan”. You can change the background color 
of the caption. The default is “Black”.

• 

Foreground Opacity: 

This option consists of “Default”, “Transparent”, “Translucent”, “Solid”, 
and “Flashing”. You can change the opacity of the letter.

• 

Background Opacity: 

This option consists of “Default”, “Transparent”, “Translucent”, “Solid”, 
and “Flashing”. You can change the background opacity of the caption.

• 

Return to Default:

This option sets each of “Size”, “Font Style”, “Foreground Color”, “Background
color”, “Foreground Opacity”, and “Background Opacity” to its default.

Press the 

CAPTION 

button repeatedly to select “On” or “Off”.

BN68-00998H-01Eng.qxd  7/11/06 11:42 AM  Page 46

Summary of Contents for LN26R71WD

Page 1: ...GUATEMALA JAMAICA MEXICO PANAMA PUERTO RICO REP DOMINICA TRINIDAD TOBAGO VENEZUELA Customer Care Center 0800 333 3733 0800 124 421 800 726 7864 SAMSUNG 0 800 507 7267 1 800 10 7267 800 6225 1 800 299...

Page 2: ...la una imagen fija La imagen fija puede causar da os permanentes en la pantalla del televisor No deje una imagen fija en la pantalla LCD durante m s de dos horas ya que se podr a producir una retenci...

Page 3: ...Using Automatic Sound Settings 28 Setting the TruSurround XT 28 Choosing a Multi Channel Sound MTS track Digital 29 Choosing a Multi Channel Sound MTS track Analog 29 Selecting the Internal Mute 30 A...

Page 4: ...et top boxes Cable Boxes and VCRs Excellent Picture Quality DNIe technology provides life like clear images SRS TruSurround XT SRS TruSurround XT provides a virtual Dolby surround system Accessories P...

Page 5: ...you would use the and buttons on the remote control Press to change channels In the on screen menu use the buttons as you would use the and buttons on the remote control SPEAKERS POWER Press to turn...

Page 6: ...C No sound connection is needed for an HDMI to HDMI connection HEADPHONE LN 26R71BD Connect a set of external headphones for private listening ANT 1 IN ANT 2 IN Connect to an antenna or cable TV syste...

Page 7: ...or external devices with an S Video output HEADPHONE Connect a set of external headphones for private listening Side Panel Jacks LN32R71BD LN40R71BD LN32R71WD Use the left side panel jacks to connect...

Page 8: ...Cable channels ADD DEL Use to store and delete channels to from memory SET Sets the remote to control your TV VCR Cable DVD or Set Top Box TV DVD STB CABLE VCR Press to operate your TV DVD STB CABLE b...

Page 9: ...UHF Antennas If you have two separate antennas for your TV one VHF and one UHF you must combine the two antenna signals before connecting the antennas to the TV This procedure requires an optional com...

Page 10: ...r Cable Box Incoming cable Connecting to a Cable Box that Descrambles Some Channels If your cable box descrambles only some channels such as premium channels follow the instructions below You will nee...

Page 11: ...ferent back panel configuration When connecting an external device match the color of the connection terminal to the cable For 40 inch model use the cables with the ferrite core VCR Rear Panel TV Rear...

Page 12: ...etween the AV IN2 R AUDIO L jacks on the TV and the AUDIO OUT jacks on the camcorder Audio Cable Not supplied Video Cable Not supplied or S Video Cable Not supplied Connecting a DVD Player The rear pa...

Page 13: ...core Connecting a Digital Audio System The rear panel jacks on your TV make it easy to connect a Digital Audio System to your TV 1 Connect an Optical Cable between the DIGITAL AUDIO OUT OPTICAL jacks...

Page 14: ...ute Component PC HDMI Speaker Output Mute Mute RF Sound Output Sound Output Mute AV S Video Sound Output Sound Output Mute Component PC HDMI Sound Output Sound Output Mute When Internal mute is set to...

Page 15: ...button to select Start If the antenna is connected to ANT 1 AIR select Air and if it is connected to ANT 2 CABLE select Cable If both ANT 1 AIR and ANT 2 CABLE are connected select the Air Cable In Ca...

Page 16: ...Plug Play Press the ENTER button For further details on setting up options refer to the previous page Plug Play can only be accessed in the TV mode If you want to reset this feature Changing Channels...

Page 17: ...ay the channel the type of sound and the status of certain picture and sound settings The screen displays disappear after about ten seconds The display identifies the current channel and the status of...

Page 18: ...ton to display the menu Press the or buttons to select Channel then press the ENTER button 2 Press the ENTER button select Antenna Press the or buttons to select Air or Cable then press the ENTER butt...

Page 19: ...es TV VCR Cable DVD or Set Top Box Pressing the corresponding button on the remote control allows you to switch between these modes and control whichever piece of equipment you choose The remote contr...

Page 20: ...ol Modes DVD When your remote control is in DVD mode the volume buttons still control your TV s volume Setting Up the Remote to Operate Your Set Top Box 1 Turn off your STB 2 Press the STB button on y...

Page 21: ...7 070 036 006 007 008 009 010 025 038 025 021 056 059 007 008 018 021 026 037 062 006 021 006 021 024 025 034 005 019 041 075 019 034 041 046 VCR Brand MONTGOMERY WARD MTC MULTITECH NEC OPTIMUS ORION...

Page 22: ...3 051 108 109 073 059 100 106 107 074 075 025 031 057 058 054 055 056 076 093 074 094 073 048 049 050 052 053 144 074 105 072 076 092 119 044 045 046 047 023 Brand SAMSUNG GI HAMLIN HITACHI JERROLD MA...

Page 23: ...6 049 050 063 058 059 061 062 016 065 066 051 052 053 065 066 064 057 026 020 027 031 005 006 007 064 064 054 060 015 017 028 029 030 072 060 066 016 021 037 055 056 057 024 031 068 Brand PANASONIC PH...

Page 24: ...Receiver DVD Receiver Game Camcorder DVD Combo PC VOD STB or TV input source then press the ENTER button Press the EXIT button to exit Use to select TV or other external input sources connected to th...

Page 25: ...eeds to be adjusted separately for each input 3 Press the or buttons to select Contrast Brightness Sharpness Color or Tint then press the ENTER button 4 Press the or buttons to decrease or increase th...

Page 26: ...set DNIe Demo Digital Natural Image engine Samsung s new technology brings you more detailed images with contrast white enhancement and 3D noise reduction You can see how DNIe improves the picture by...

Page 27: ...be selected 16 9 Zoom1 Zoom2 4 3 In TV DTV DVI PC HDMI COMPONENT 720p 1080i modes only 16 9 4 3 modes can be selected You must select Zoom with P Size button on the remote not in the OSD menu if you w...

Page 28: ...in Picture 1 Press the MENU button to display the menu Press the or buttons to select Picture then press the ENTER button Press the or buttons to select PIP then press the ENTER button 2 Press the ENT...

Page 29: ...he PIP window Press the ENTER buttons MAIN AV 1 2 S Video 1 2 Component PIP TV Digital MAIN PC HDMI 1 2 PIP TV Analog The channel can be active when the sub picture is set to TV Changing the Position...

Page 30: ...NTER button to select Mode Press the or buttons to select Standard Music Movie Speech or Custom sound setting then press the ENTER button Press the EXIT button to exit Choose Standard for the standard...

Page 31: ...ttons to select Sound then press the ENTER button Quick way to access the MTS menu Just press the MTS button on the remote control You can listen in a language other than your chosen language by press...

Page 32: ...press the ENTER button Press the EXIT button to exit Sound output from the TV speakers is muted Automatic Volume Control 1 Press the MENU button to display the menu Press the or buttons to select Soun...

Page 33: ...button Press the EXIT button to exit When the PIP feature is activated you can listen to the sound of the sub PIP picture English 31 Setting the On Off Melody 1 Press the MENU button to display the m...

Page 34: ...elete the channel You can add or delete a channel so only channels you want are displayed Selecting the Antenna 1 Press the MENU button to display the menu Press the or buttons to select Channel then...

Page 35: ...our Favorite channel selection press the ENTER button until the symbol is no longer highlighted Press the EXIT button to exit Only memorized channels can be set as favorite channels All favorite chann...

Page 36: ...ress CH MGR button on the remote Choose All Added or Favorite Viewing the Channel Lists 1 Press the MENU button to display the menu Press the or buttons to select Channel then press the ENTER button 2...

Page 37: ...optimal reception Labeling Channels 1 Press the MENU button to display the menu Press the or buttons to select Channel then press the ENTER button Press the or buttons to select Name then press the E...

Page 38: ...ifier boosts the incoming signal 1 Press the MENU button to display the menu Press the or buttons to select Channel then press the ENTER button 2 Press the or buttons to select Signal Strength then pr...

Page 39: ...on exists on your display settings dialog box the correct value is 60 or 60 Hz Otherwise just click OK and exit the dialog box Display Modes If the signal from the system equals the standard signal mo...

Page 40: ...ur PC 1 Press the MENU button to display the menu Press the or buttons to select Setup then press the ENTER button Press the or buttons to select PC then press the ENTER button Change to the PC mode f...

Page 41: ...tton 3 Press the or buttons to adjust the V Position Press the or buttons to adjust the H Position Press the ENTER button Press the EXIT button to exit Initializing the Screen Position or Color Settin...

Page 42: ...2 Press the ENTER button to select Clock 3 Press the ENTER button to select Clock Mode Press the or buttons to select Manual then press the ENTER button 4 Press the or buttons to select Clock Set the...

Page 43: ...ct Time Zone then press the ENTER button 5 Press the or buttons to highlight the time zone for your local area and to move the highlight to the appropriate time zone on the map of the United States th...

Page 44: ...ess the MENU button to display the menu Press the or buttons to select Setup then press the ENTER button Press the or buttons to select Time then press the ENTER button 2 Press the or buttons to selec...

Page 45: ...e If no signal is being received or the signal is very weak a blue screen automatically replaces the noisy picture background If you wish to continue viewing the poor picture you must set the Blue Scr...

Page 46: ...up then press the ENTER button 2 Press the or buttons to select Game Mode then press the ENTER button 3 Select On or Off by pressing the or buttons then press the ENTER button 4 Press the EXIT button...

Page 47: ...to exit The default is CC1 CC1 The Primary Synchronous Caption Service These are captions in the primary language that must be in sync with the sound preferably matched to a specific frame CC2 The Spe...

Page 48: ...he desired sub menu options see options below then press ENTER Press the EXIT button to exit The availability of captions depends on the program being broadcast Default means to follow the standard se...

Page 49: ...then press the ENTER button Select the required option Off Low Medium High by pressing or button Press the ENTER button Press the EXIT button to exit Menu Transparency Level Adjusts the transparency o...

Page 50: ...e or buttons to select Change PIN then press the ENTER button The Change PIN screen will appear Choose any 4 digits for your PIN and enter them As soon as the 4 digits are entered the Confirm new PIN...

Page 51: ...ing the or buttons will alternate between On and Off Press the ENTER button Press the EXIT button to exit How to Set up Restrictions Using the TV Parental Guidelines First set up a personal identifica...

Page 52: ...l be blocked TV G TV PG TV 14 and TV MA The sub ratings D L S V work together similarly See next section 6 How to set the FV D L S and V sub ratings First select one of these TV Ratings TV Y TV Y7 TV...

Page 53: ...hen press the ENTER button 4 The MPAA Rating screen will appear Repeatedly press the or buttons to select a particular MPAA category Pressing the or buttons will cycle through the MPAA categories Pres...

Page 54: ...n Press the ENTER button to activate the restriction selected The symbol is indicated Press the EXIT button to exit Allow all Press to unlock all TV ratings Block all Press to lock all TV ratings E Ex...

Page 55: ...ss the or buttons to select a appropriate restriction Press the ENTER button to activate the restriction selected The symbol is indicated Press the EXIT button to exit Allow all Press to unlock all TV...

Page 56: ...downloaded from the broadcasting station However depending on the information from the broadcasting station it may not be available for use 4 Press the or buttons to select a appropriate restriction P...

Page 57: ...nected to the TV you can navigate the iPod using the buttons on the remote using the On Screen Display OSD When connected to the TV the controls on the front of the iPod are disabled If the TV and the...

Page 58: ...wall outlet is working Replace the remote control batteries Clean the upper edge of the remote control transmission window Check the battery terminals Ensure that the signal cable is firmly connected...

Page 59: ...stand into the hole at the bottom of the TV 3 Insert screw into the hole indicated and tighten 2 3 Disconnecting the Stand 1 Place the TV faced down on a soft cloth or cushion on a table 2 Remove four...

Page 60: ...ble Attach the set bracket onto the rear side of the TV set and secure the screws 3 Insert three Hangers of the set bracket into the grooves of the wall bracket Fix set bracket and wall bracket with s...

Page 61: ...the set bracket onto the rear side of the TV set and secure the screws 3 Insert three Hangers of the set bracket into the grooves of the wall bracket Fix set bracket and wall bracket with screws Note...

Page 62: ...ature Operating Humidity Storage Temperature Storage Humidity LN26R71BD LN26R71WD 26 inch AC100 240V 10 60 50Hz 133 W 1360 x 768 60 Hz 5W X 2 26 57 X 2 95 X 18 72 inches 675 X 75 X 475 5 mm 26 57 X 8...

Page 63: ...This page is intentionally left blank...

Page 64: ...n del TruSurround XT SRS TSXT 28 Selecci n de una pista de sonido multicanal MTS Digital 29 Selecci n de una pista de sonido multicanal MTS Analogo 29 Selecci n del silencio interno 30 Control autom t...

Page 65: ...trolar el televisor la mayor a de reproductores de DVD los receptores de televisi n digital y de cable y los aparatos de v deo Calidad excelente de la imagen La tecnolog a DNIe proporciona im genes co...

Page 66: ...o que los botones y del mando a distancia Pulse para cambiar de canal En el men de la pantalla utilice estos botones del mismo modo que los botones y del mando a distancia ALTAVOCES ENCENDIDO Pulse pa...

Page 67: ...de HDMI a HDMI TOMA DE AURICULARES LN 26R71BD Efectuar una conexi n de un conjunto de auriculares exteriores para la audici n individual ANT 1 IN ANT 2 IN Efectuar una conexi n con una antena o con un...

Page 68: ...da S Video TOMA DE AURICULARES Efectuar una conexi n de un conjunto de auriculares exteriores para la audici n individual Tomas del panel lateral LN32R71BD LN40R71BD LN32R71WD Use las tomas del panel...

Page 69: ...rar el mando a distancia para controlar el televisor el aparato de v deo el reproductor de DVD y el receptor de televisi n digital o de cable TV DVD STB CABLE VCR P lselo para controlar el televisor e...

Page 70: ...as de VHF y UHF independientes Si dispone de dos antenas independientes para el TV una de VHF y otra de UHF debe combinar ambas se ales de la antena antes de conectarlas al TV Este procedimiento preci...

Page 71: ...odificador que decodifica algunos canales Si su decodificador s lo decodifica algunos canales como los canales de pago siga las instrucciones siguientes Necesitar un divisor de dos v as un conmutador...

Page 72: ...spositivo externo debe hacer coincidir los colores del terminal de conexi n y del cable Para el modelo de 40 pulgadas utilice los cables con el n cleo de ferrita Panel posterior del VCR Panel posterio...

Page 73: ...s AV IN 2 R AUDIO L del televisor y las tomas AUDIO OUT Salida de audio de la videoc mara Cable de Audio No incluido Cable de Video No incluido o Cable de S Video No incluido Conexi n de un reproducto...

Page 74: ...udio digital Las tomas del panel posterior del televisor facilitan la conexi n de un sistema de audio digital al televisor 1 Conecte un cable ptico entre las tomas DIGITAL AUDIO OUT OPTICAL Salida de...

Page 75: ...el sonido Salida del sonido Silencio Silencio Silencio Salida del sonido Salida del sonido Salida del sonido Silencio Silencio Silencio Silencio Silencio Silencio Silencio interno desactivado Silencio...

Page 76: ...ciar Si la antena est conectada a ANT 2 CABLE seleccione Cable si est conectada a ANT 1 AIR seleccione Aire Si ANT 1 AIR y ANT 2 CABLE est n conectadas seleccione Aire Cable En el modo de cable puede...

Page 77: ...Play despu s pulse el bot n ENTER Si desea m s detalles sobre las opciones de configuraci n consulte la p gina anterior S lo se puede acceder a Plug Play en el modo TV Si desea reiniciar esta funci n...

Page 78: ...El TV visualizar el canal el tipo de sonido y el estado de determinados ajustes de sonido e imagen La informaci n en pantalla desaparece pasados unos diez segundos La pantalla identifica el canal act...

Page 79: ...e los botones o para seleccionar Canal y despu s pulse el bot n ENTER 2 Pulse el bot n ENTER para seleccionar Antena Pulse los botones o para seleccionar Aire o Cable despu s pulse el bot n ENTER Puls...

Page 80: ...Top Box receptor TV digital Pulsando el bot n correspondiente del mando a distancia podr cambiar de un modo a otro y controlar cualquiera de estos equipos El mando a distancia quiz no sea compatible c...

Page 81: ...mando a distancia est en el modo DVD los botones de volumen seguir n controlando el volumen del televisor Configuraci n del mando a distancia para controlar el STB 1 Apague el STB 2 Pulse el bot n ST...

Page 82: ...070 036 006 007 008 009 010 025 038 025 021 056 059 007 008 018 021 026 037 062 006 021 006 021 024 025 034 005 019 041 075 019 034 041 046 C digos de v deo Marca MONTGOMERY WARD MTC MULTITECH NEC OPT...

Page 83: ...8 109 073 059 100 106 107 074 075 025 031 057 058 054 055 056 076 093 074 094 073 048 049 050 052 053 144 074 105 072 076 092 119 044 045 046 047 023 Marca SAMSUNG GI HAMLIN HITACHI JERROLD MACOM MAGN...

Page 84: ...063 058 059 061 062 016 065 066 051 052 053 065 066 064 057 026 020 027 031 005 006 007 064 064 054 060 015 017 028 029 030 072 060 066 016 021 037 055 056 057 024 031 068 Marca PANASONIC PHILIPS ROT...

Page 85: ...TB Receptor AV Receptor DVD Juego Filmadora DVD Combo PC STB VOD o TV y a continuaci n pulse el bot n ENTER Pulse el bot n EXIT para salir Siga este procedimiento para seleccionar el televisor u otra...

Page 86: ...se almacenar por separado seg n su modo de entrada 3 Pulse los botones o para seleccionar Contraste Luminos Definici n Color y Tinte despu s pulse el bot n ENTER 4 Pulse los botones o para aumentar o...

Page 87: ...tor de imagen natural digital La nueva tecnolog a de Samsung brinda im genes con m s detalles m s contraste mejora de los blancos y una reducci n de ruidos 3D Puede ver c mo DNIe mejora la imagen acti...

Page 88: ...s los modos de pantalla 16 9 Zoom1 Zoom2 4 3 En los modos TV DTV DVI PC HDMI y COMPONENTE 720P 1080i s lo pueden seleccionar los modos 16 9 y 4 3 En Zoom1 y Zoom2 se puede ajustar el tama o por medio...

Page 89: ...er el men en pantalla Pulse los botones o para seleccionar Imagen y despu s pulse el bot n ENTER Pulse los botones o para seleccionar PIP y despu s pulse el bot n ENTER 2 Pulse de nuevo el bot n ENTER...

Page 90: ...AV 1 2 S Video 1 2 Componente PIP TV Digital IMAGEN PRINCIPAL PC HDMI 1 2 PIP TV Anal gica El canal puede estar activo cuando la imagen secundaria est configurada como TV Cambio de la posici n de la v...

Page 91: ...bot n ENTER para seleccionar Modo Pulse los botones o para seleccionar el ajuste de sonido Normal M sica Cine Di logo o Favorito y pulse el bot n ENTER Pulse el bot n EXIT para salir Elija Normal si...

Page 92: ...pantalla Pulse los botones o para seleccionar Sonido y despu s pulse el bot n ENTER Forma r pida de acceder al men MTS Pulse el bot n MTS del mando a distancia Puede escuchar en un idioma distinto del...

Page 93: ...ot n ENTER Pulse el bot n EXIT para salir Se silencia la salida de sonido desde los altavoces del televisor Control autom tico de volumen 1 Pulse el bot n MENU para ver el men en pantalla Pulse los bo...

Page 94: ...el bot n EXIT para salir Cuando la opci n PIP esta activada usted puede escuchar el sonido de la sub imagen del PIP Espa ol 31 Ajuste de la melod a de encendido apagado 1 Pulse el bot n MENU para ver...

Page 95: ...ra suprimir el canal Puede agregar o suprimir un canal para que se muestren s lo los canales que desee Selecci n de la antena 1 Pulse el bot n MENU para ver el men en pantalla Pulse los botones o para...

Page 96: ...ito Para cancelar su selecci n de canales Favoritos presione el bot n ENTER hasta que el simbolo no este mas sobreindicado Pulse el bot n EXIT para salir S lo pueden seleccionarse como favoritos los c...

Page 97: ...distancia se muestran todos los canales Agregado Cuando se pulsa el bot n CH MGR del mando a distancia se muestran los canales agregados Favoritos Cuando se pulsa el bot n CH MGR del mando a distanci...

Page 98: ...ajustar manualmente un determinado canal a fin de que la recepci n sea ptima Etiquetado de canales 1 Pulse el bot n MENU para ver el men en pantalla Pulse los botones o para seleccionar Canal y despu...

Page 99: ...previo de bajo ruido refuerza la se al entrante 1 Pulse el bot n MENU para ver el men en pantalla Pulse los botones o para seleccionar Canal y despu s pulse el bot n ENTER 2 Pulse los botones o para...

Page 100: ...e una opci n de frecuencia vertical en el cuadro de di logo de configuraci n de la pantalla el valor correcto es 60 o 60 Hz Si no haga clic en Aceptar y salga del cuadro de di logo Modos de visualizac...

Page 101: ...n MENU para ver el men en pantalla Pulse los botones o para seleccionar Configuraci n y despu s pulse el bot n ENTER Pulse los botones o para seleccionar PC y despu s pulse el bot n ENTER En primer lu...

Page 102: ...3 Pulse los botones o para ajustar Posici n V Pulse los botones o para ajustar Posici n H Pulse el bot n ENTER Pulse el bot n EXIT para salir Inicio de la configuraci n de Posici n de la pantalla o d...

Page 103: ...2 Pulse el bot n ENTER para seleccionar Reloj 3 Pulse el bot n ENTER para seleccionar Modo Reloj Pulse los botones o para seleccionar Manual y despu s pulse el bot n ENTER 4 Pulse los botones o para...

Page 104: ...leccionar Zona Tiempo y despu s pulse el bot n ENTER 5 Pulse los botones o para resaltar la zona horaria del rea local y para mover la selecci n a la zona horaria apropiada en el mapa de Estados Unido...

Page 105: ...ot n MENU para ver el men en pantalla Pulse los botones o para seleccionar Configuraci n y despu s pulse el bot n ENTER Pulse los botones o para seleccionar Tiempo y despu s pulse el bot n ENTER 2 Pul...

Page 106: ...o se recibe ninguna se al o sta es muy d bil una pantalla azul sustituye de forma autom tica la imagen con interferencias Si desea continuar viendo la imagen deficiente debe definir el modo Pantalla A...

Page 107: ...e el bot n ENTER 2 Pulse los botones o para seleccionar Modo Juego y despu s pulse el bot n ENTER 3 Pulse los botones o para seleccionar Enc o Apag y despu s pulse el bot n ENTER 4 Pulse el bot n EXIT...

Page 108: ...ubt tulos sincronizados Son subt tulos en el idioma principal que debe estar sincronizado con el sonido preferiblemente que coincida con la secuencia espec fica CC2 Subt tulos especiales de uso no sin...

Page 109: ...men que desee vea las opciones en la pagina siguiente y pulse el bot n ENTER Pulse el bot n EXIT para salir La disponibilidad de los subt tulos depende del programa que se est emitiendo La opci n Prog...

Page 110: ...y despu s pulse el bot n ENTER Seleccione la opci n deseada Apag Bajo Medio Alto pulsando los botones o Pulse el bot n ENTER Pulse el bot n EXIT para salir Nivel Transparencia del men Ajusta la trans...

Page 111: ...botones o para seleccionar Cambiar C digo y despu s pulse el bot n ENTER Aparecer la pantalla Cambiar C digo Escriba un nuevo c digo PIN de 4 d gitos En cuanto introduzca los 4 d gitos aparece la pant...

Page 112: ...otones o se alterna entre Enc y Apag Pulse el bot n ENTER Pulse el bot n EXIT para salir Configuraci n de Restricciones usando la secci n Gu as pater TV Primero establezca un n mero de identificaci n...

Page 113: ...s TV G TV PG TV 14 y TV MA Las subclasificaciones D L S V funcionan de manera similar Consulte la secci n siguiente 6 C mo establecer las subclasificaciones FV D L S y V Primero seleccione una de las...

Page 114: ...PAA y despu s pulse el bot n ENTER 4 Aparecer la pantalla Clas MPAA Pulse varias veces los botones o para seleccionar una categor a concreta de MPAA Pulsando los botones o pasar secuencialmente por to...

Page 115: ...var la restricci n seleccionada Est resaltada la Pulse el bot n EXIT para salir Perm todo Se pulsa para desbloquear todos los programas de televisi n Bloq todo Se pulsa para bloquear todos los program...

Page 116: ...restricci n apropiada Pulse el bot n ENTER para activar la restricci n seleccionada Est resaltada la Pulse el bot n EXIT para salir Perm todo Se pulsa para desbloquear todos los programas de televisi...

Page 117: ...su uso 4 Pulse los botones o para seleccionar la restricci n apropiada Pulse el bot n ENTER para activar la restricci n seleccionada Est resaltada la Pulse el bot n EXIT para salir Allow All Perm Todo...

Page 118: ...al S lo puede activar el iPod mediante el men en pantalla del televisor Si el televisor y el conector de patillas del iPod no est n conectados durante el funcionamiento y se han terminado bruscamente...

Page 119: ...ue funcione otra vez Compruebe que la toma de la pared funciona Remplace las pilas del mando a distancia Limpie el borde superior del mando a distancia ventana de transmisi n Compruebe los terminales...

Page 120: ...orificio de la parte inferior del televisor 3 Inserte el tornillo en el orificio indicado y apri telo 2 3 Desconexi n del soporte 1 Coloque hacia abajo el TV sobre un pa o suave o un almohad n sobre...

Page 121: ...na mesa Acople el soporte del aparato sobre la parte posterior del televisor y apriete los tornillos 3 Inserte los 3 Colgadores del soporte del aparato en los surcos del soporte de pared Fije el sopor...

Page 122: ...le el soporte del aparato sobre la parte posterior del televisor y apriete los tornillos 3 Inserte los 3 Colgadores del soporte del aparato en los surcos del soporte de pared Fije el soporte del apara...

Page 123: ...cionamiento Humedad de funcionamiento Temperatura de almacenamiento Humedad de almacenamiento LN26R71BD LN26R71WD 26 pulg CA100 240V 10 60 50Hz 133 W 1360 x 768 60 Hz 5W X 2 675 X 75 X 475 5 mm 26 57...

Page 124: ...Esta pagina se ha dejado en blanco expresamente...

Reviews: