background image

English - 50

Setting the Sleep Timer

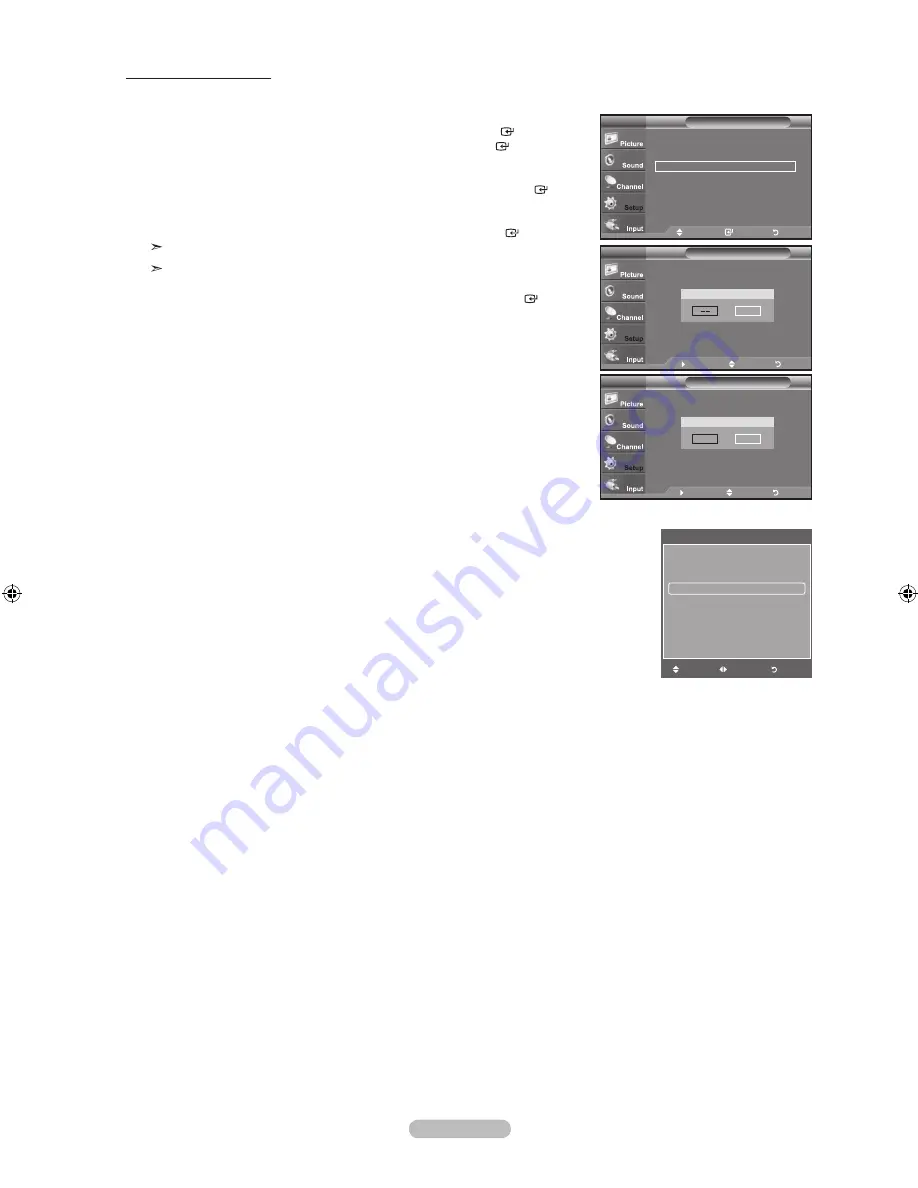
The sleep timer automatically shuts off the TV after a preset time (30, 60, 90, 120, 150 and 180 minutes).

1. 

Press the 

MENU 

button to display the menu. 

    Press the ▲ or ▼ button to select "Setup", then press the 

ENTER   

button. 

    Press the ▲ or ▼ button to select "Time", then press the 

ENTER   

button.

2. 

Press the ▲ or ▼ button to select "Sleep Timer", then press the 

ENTER


button.

3. 

Press the ▲ or ▼ button to adjust “Minute”, then press the 

ENTER


button.


Setting the Timer sets the “Activation” to “On” automatically.


To cancel the set sleep timer :


Press the ◄ or ► button to select “Activation”.


Press the ▲ or ▼ button to select “Off”, then press the 

ENTER


button.

    Press the 

ExIT

 button to exit.

Time

Clock 


Sleep Timer 

: Off 


Timer 1 

: Inactivated   

Timer 2 

: Inactivated   

Timer 3 

: Inactivated   

TV


Move  


Enter 

Return

1/   1/2008  12 : 00 am

Sleep Timer

Sets the Sleep Timer options.

TV


Move  


Adjust 

Return

Sleep Timer

Sets the Sleep Timer options.

TV


Move  


Adjust 

Return

Minute

Activation

Off

Minute

Activation

30

On

Tools

(HDMI-CEC)
Picture Mode 

:   Standard

Sound Mode 

:   Custom

Sleep Timer 

◄       Off       ►

Add to Favorite
Switch to Air


Move  

Adjust    

Exit

Easy Setting
1.


Press the 

TOOLS

 button on the remote control.

2.

   Press the ▲ or ▼ button to select “Sleep Timer”.

3.

   Press the ◄ or ► button to select the minute.

4. 

Press the 

ExIT

 or 

TOOLS

 button to exit.

BN68-01395A-Eng-0202.indd   50

2008-02-20   ¿ÀÀü 6:12:54

Summary of Contents for LN26A450

Page 1: ...m ca Samsung Electronics Canada Inc Customer Service 55 Standish Court Mississauga Ontario L5R 4B2 Canada Samsung Electronique Canada Inc Service la Client le 55 Standish Court Mississauga Ontario L5R...

Page 2: ...60 037 6 023 490 5 878 080 and under US Published Patent Application No 2001 44713 A1 This license is limited to private non commercial use by end user consumers for licensed contents No rights are gr...

Page 3: ...ngs 27 Adjusting the Detailed Settings 28 Configuring Picture Options 31 Resetting the Picture Settings to the Factory Defaults 34 Sound Control Changing the Sound Standard 35 Customizing the Sound 35...

Page 4: ...1D BN96 07182A Stand Screw M4 X L16 6002 001294 Stand Screw M4 X L14 LN32A450C1D 6003 001334 LN37A450C1D 6003 001334 LN40A450C1D 6003 001334 The items color and shape may vary depending on the model G...

Page 5: ...ontrol 2 MENU Press to see an on screen menu of your TV s features 3 VOL Press to increase or decrease the volume In the on screen menu use the VOL buttons as you would use the and buttons on the remo...

Page 6: ...ts that will be connected continuously such as DVD players or a VCR For more information on connecting equipment see pages 7 20 The product color and shape may vary depending on the model TV Side Pane...

Page 7: ...dio No sound connection is needed for an HDMI to HDMI connection When using an HDMI DVI cable connection you must use the HDMI IN 1 jack 6 ANT IN Connects to an antenna or cable TV system 7 AV IN 2 Vi...

Page 8: ...Press to select the preset display and sound modes for sports cinema and games Use these buttons in the DMA and Anynet modes This remote can be used to control recording on Samsung recorders with the...

Page 9: ...s with 300 Flat Twin Leads below If your antenna has one lead that looks like the diagram to the right see Antennas with 75 Round Leads If you have two antennas see Separate VHF and UHF Antennas 1 Pla...

Page 10: ...ANT OUT terminal on the cable box and the B IN terminal on the RF A B switch 5 Connect another cable between the other OUT terminal on the splitter and the A IN terminal on the RF A B switch 6 Connect...

Page 11: ...Set Top Box 1 Connect a DVI to HDMI Cable or DVI HDMI Adapter between the HDMI IN 2 jack on the TV and the DVI jack on the DVD Player or Cable Box Satellite receiver Set Top Box 2 Connect Audio Cables...

Page 12: ...OMPONENT IN 1 also Each DVD Player or Cable Box Satellite receiver Set Top Box has a different back panel configuration When connecting a DVD Player or Cable Box Satellite receiver Set Top Box match t...

Page 13: ...panel configuration When connecting a VCR match the color of the connection terminal to the cable When connecting to AV IN 1 the color of the AV IN 1 Y VIDEO jack Green does not match the color of the...

Page 14: ...nected to the DIGITAL AUDIO OUT OPTICAL jack Decrease the volume of the TV and adjust the volume level with the system s volume control Digital Audio System TV Rear Panel Optical Cable Not supplied 5...

Page 15: ...V and the PC output jack on your computer 2 Connect a 3 5 mm Stereo mini plug 2RCA Cable between the DVI IN HDMI2 R AUDIO L jack on the TV and the Audio Out jack of the sound card on your computer PC...

Page 16: ...IN Antennas with 300 Flat Twin Leads If you are using an off air antenna such as a roof antenna or rabbit ears that has 300 twin flat leads follow the directions below 1 Plug the antenna lead into the...

Page 17: ...ANT OUT terminal on the cable box and the B IN terminal on the RF A B switch 5 Connect another cable between the other OUT terminal on the splitter and the A IN terminal on the RF A B switch 6 Connec...

Page 18: ...r Set Top Box 1 Connect a DVI to HDMI Cable or DVI HDMI Adapter between the HDMI IN 1 jack on the TV and the DVI jack on the DVD Player or Cable Box Satellite receiver Set Top Box 2 Connect Audio Cabl...

Page 19: ...OMPONENT IN 1 also Each DVD Player or Cable Box Satellite receiver Set Top Box has a different back panel configuration When connecting a DVD Player or Cable Box Satellite receiver Set Top Box match t...

Page 20: ...panel configuration When connecting a VCR match the color of the connection terminal to the cable When connecting to AV IN 1 the color of the AV IN 1 Y VIDEO jack Green does not match the color of the...

Page 21: ...nected to the DIGITAL AUDIO OUT OPTICAL jack Decrease the volume of the TV and adjust the volume level with the system s volume control Digital Audio System TV Rear Panel Optical Cable Not supplied 5...

Page 22: ...V and the PC output jack on your computer 2 Connect a 3 5 mm Stereo mini plug 2RCA Cable between the DVI IN HDMI1 R AUDIO L jack on the TV and the Audio Out jack of the sound card on your computer Eac...

Page 23: ...le antenna signal Auto Air and Cable antenna signals In Cable mode you can select the correct signal source among STD HRC and IRC by pressing the or button then press the ENTER button If you have Digi...

Page 24: ...available in the TV mode Changing Channels Using the Channel Buttons 1 Press the CH or CH button to change channels When you press the CH or CH button the TV changes channels in sequence You will see...

Page 25: ...E CH button The TV will switch to the last channel viewed To quickly switch between two channels that are far apart tune to one channel then use the number button to select the second channel Then use...

Page 26: ...utton to select Switch to Air or Switch to Cable then press the ENTER button Antenna Air Auto Program Clear Scrambled Channel Channel List Name Fine Tune Signal Strength Channel Move Enter Return TV C...

Page 27: ...5 The TV begins memorizing all available stations After all the available channels are stored it start to remove scrambled channels see page 39 If you want to stop Auto Programming press the ENTER but...

Page 28: ...election easier 1 Press the MENU button to display the menu Press the or button to select Input then press the ENTER button Press the or button to select Edit Name then press the ENTER button 2 Press...

Page 29: ...pness Color or Tint then press the ENTER button 3 Press the or button to decrease or increase the value of a particular item Press the ENTER button Press the EXIT button to exit When you make changes...

Page 30: ...ic Contrast You can adjust the screen contrast so that the optimal contrast is provided 6 Press the or button to select Dynamic Contrast then press the ENTER button 7 Press the or button to select Off...

Page 31: ...button to decrease or increase the value of a particular item Press the ENTER button In Color you can adjust the RGB values for the selected color To reset the adjusted RGB value select Reset Red Adju...

Page 32: ...cture colors 17 Press the or button to select White Balance then press the ENTER button 18 Select the required option by pressing the or button then press the ENTER button 19 Press the or button to de...

Page 33: ...9 Digital NR Auto DNle On HDMI Black Level Normal Film Mode Off Blue Only Mode Off Picture Options TV Cool2 Cool1 Normal Warm1 Warm2 Setting the Screen Size Occasionally you may want to change the siz...

Page 34: ...al device you have connected to an input of the TV Input Source Picture Size TV Video S Video Component 480i 480p 16 9 Zoom1 Zoom2 4 3 DTV 1080i Component 1080i HDMI 720p 1080i 16 9 4 3 Wide Fit Just...

Page 35: ...nd reduces screen noise Press the EXIT button to exit Move Enter Return Color Tone Normal Size 16 9 Digital NR Auto DNle Off HDMI Black Level Normal Film Mode Off Blue Only Mode Off Picture Options TV...

Page 36: ...Home Theaters etc Using this function you can adjust the Color and Tint to preferred values appropriate to the signal level of each video device using the Red Green Blue Cyan Magenta Yellow Color Bar...

Page 37: ...utton to select Mode Press the or button to select Standard Music Movie Speech or Custom sound setting then press the ENTER button Press the EXIT button to exit Standard selects the normal sound mode...

Page 38: ...referred Language 1 Press the MENU button to display the menu Press the or button to select Sound then press the ENTER button Quick way to access the MTS menu Just press the MTS button on the remote c...

Page 39: ...at are broadcasting in mono or if you are having difficulty receiving a stereo signal Stereo Choose for channels that are broadcasting in stereo SAP Choose to listen to the Separate Audio Program whic...

Page 40: ...Volume Off TV Speaker On Sound TV TV s Internal Speakers Audio Out Optical L R Out to Sound System RF AV S Video Component PC HDMI RF AV S Video Component PC HDMI TV Speaker On Speaker Output Speaker...

Page 41: ...top Press the button to select Yes then press the ENTER button 3 When the scrambled channel searching is completed press the ENTER button Press the EXIT button to exit This function is only available...

Page 42: ...8 Air 9 Air 10 DTV Air 10 1 DTV Air 10 2 DTV Air 10 3 DTV Air 10 1 DTV Air 10 2 DTV Air 10 3 DTV Air 10 1 DTV Air 10 2 DTV Air 10 3 Air 12 DTV Air 13 1 DTV Air 13 2 DTV Air 13 3 DTV Air 13 4 Air 5 1...

Page 43: ...ault List Mode All Channel List Move Enter Return TV Channel List Added DTV Air 2 1 Air3 Air4 Air 5 Air 6 Air 7 DTV Air 7 1 Air 8 Air 9 Air 10 DTV Air 10 1 DTV Air 10 2 DTV Air 10 3 DTV Air 10 1 DTV A...

Page 44: ...ss the or button to select All Added or Favorite then press the ENTER button 4 Press the or button to select Channel then press the ENTER button To toggle between your all channels add channels or fav...

Page 45: ...e Repeat the process to select the last three digits When you have finished press the ENTER button to assign the new name To erase the assigned new name select Clear by pressing the or button then pre...

Page 46: ...ss the or button to select Signal Strength then press the ENTER button If the signal strength meter indicates that the signal is weak physically adjust your antenna to increase the signal strength Con...

Page 47: ...60 Hz Otherwise just click OK and exit the dialog box PC Display Display Modes If the signal from the system equals the standard signal mode the screen is adjusted automatically If the signal from th...

Page 48: ...noise has been reduced re adjust the picture so that it is aligned on the center of the screen Preset Press the SOURCE button to select PC mode 1 Press the MENU button to display the menu Press the o...

Page 49: ...nd Fine You can replace all image settings with the factory default values Preset Press the SOURCE button to select PC mode 1 Press the MENU button to display the menu Press the or button to select Pi...

Page 50: ...he date and time you want by pressing the or button then press the ENTER button Press the EXIT button to exit The current time will appear every time you press the INFO button You can set the month da...

Page 51: ...en press the ENTER button Press the EXIT button to exit Depending on the broadcast station and signal the auto time may not be set correctly If this occurs set the time manually The Antenna or cable m...

Page 52: ...the or button to select Activation Press the or button to select Off then press the ENTER button Press the EXIT button to exit Time Clock Sleep Timer Off Timer 1 Inactivated Timer 2 Inactivated Timer...

Page 53: ...y pressing the number buttons on the remote control Auto Power Off When you set the timer On the television will eventually turn off if no controls are operated for 3 hours after the TV was turned on...

Page 54: ...e which resets the pin to 0 0 0 0 Power Off Mute 8 2 4 Power On Using the V Chip The V Chip feature automatically locks out programs that are deemed inappropriate for children The user must enter a PI...

Page 55: ...V Parental Guidelines First set up a personal identification number PIN and enable the V Chip See previous section Parental restrictions can be set up using either of two methods The TV guidelines or...

Page 56: ...ction 6 How to set the FV D L S and V sub ratings First select one of these TV Ratings TV Y TV Y7 TV G TV PG TV 14 or TV MA See Step 4 and press the button The symbol will be displayed for each sub ra...

Page 57: ...Parental guidance suggested PG 13 Parents strongly cautioned R Restricted Children under 17 should be accompanied by an adult NC 17 No children under age 17 X Adults only NR Not rated Allow all Press...

Page 58: ...C8 Programming generally considered acceptable for children 8 years and over to watch on their own G General programming suitable for all audiences PG Parental Guidance 14 Programming contains themes...

Page 59: ...red acceptable for children 8 years and over to watch on their own 13 ans Programming may not be suitable for children under the age of 13 16 ans Programming is not suitable for children under the age...

Page 60: ...tion Using the V Chip for Digital channels Parental restriction information can be used while watching DTV channels Move Enter Return Downloadable U S Rating TV DH MH H VH EH Humor Level Allow All Blo...

Page 61: ...nt information carried in the program CC3 Secondary Synchronous Caption Service Alternate program related caption data typically second language captions CC4 Special Non Synchronous Use Captions Simil...

Page 62: ...d Large The default is Standard Font Style This option consists of Default Style0 Style 7 You can change the font you want The default is Style 0 Foreground Color This option consists of Default White...

Page 63: ...e E MODE button on the remote control repeatedly to change the Entertainment setting O Setup Plug Play Language English Time V Chip Caption External Settings Entertainment Off More TV Move Enter Retur...

Page 64: ...information about downloading upgrades and using a USB drive Upgrades will be possible by connecting a USB drive to the USB port located on your TV SW Upgrade Scanning for USB It may take up to 30 se...

Page 65: ...n the Digital Audio Out Optical jack on your TV and the Digital Audio Input on the Home Theater When following the connection above the Optical jack only outputs 2 channel audio You will only hear sou...

Page 66: ...t devices connected to the TV are listed 2 Press the or button to select to a particular device and press the ENTER button It is switched to the selected device 3 If you cannot find a device you want...

Page 67: ...ing a file Backward search Forward search Stop Play Pause Device with built in Tuner After switching to the device when you are watching a TV program CH button Audio Device When Receiver is activated...

Page 68: ...e control Anynet doesn t work in certain situations Searching channels Plug Play etc When connecting or removing the HDMI cable please make sure to search devices again or turn your TV off and on agai...

Page 69: ...rol transmission window Check the battery terminals Check signal cable message Ensure that the signal cable is firmly connected to the PC source Not Supported Mode message Check the maximum resolution...

Page 70: ...frequency domain Horizontal frequency kHz 30 60 Vertical frequency Hz 60 75 PC Maximum refresh rate at 60 Hz 1360 X 768 Image is not centered on the screen Adjust the horizontal and vertical position...

Page 71: ...ot apply excess downward pressure to the upper left of right sides of the TV 2 Fasten two screws at position 1 and then fasten two screws at position 2 Stand the product up and fasten the screws If yo...

Page 72: ...mbering the Position 2 Adjust to the desired position using the buttons If you press an arrow button when no OSD is displayed on the TV screen the Adjustment screen appears Press the INFO button to re...

Page 73: ...mbly are provided Do not use screws longer than the standard dimension as they may cause damage to the inside of the TV set For wall mounts that do not comply with the VESA standard screw specificatio...

Page 74: ...i Theft Kensington Lock The Kensington Lock is a device used to physically fix the system when using it in a public place The appearance and lock ing method may differ from the illustration depending...

Page 75: ...0 0 20 20 Model Name LN37A450C1D LN40A450C1D Screen Size Diagonal 37 inches 40 inches PC Resolution 1360 x 768 60 Hz 1360 x 768 60 Hz Sound Output 10W x 2 10W x 2 Dimensions WxDxH Body With stand 36 1...

Page 76: ...prior notice Refer to the dimensions prior to performing installation of your TV Not responsible for typographical or printed errors 2008 Samsung Electronics America Inc LN26A450C1D TOP VIEW JACK PAN...

Page 77: ...prior notice Refer to the dimensions prior to performing installation of your TV Not responsible for typographical or printed errors 2008 Samsung Electronics America Inc LN32A450C1D TOP VIEW JACK PAN...

Page 78: ...prior notice Refer to the dimensions prior to performing installation of your TV Not responsible for typographical or printed errors 2008 Samsung Electronics America Inc LN37A450C1D TOP VIEW JACK PANE...

Page 79: ...prior notice Refer to the dimensions prior to performing installation of your TV Not responsible for typographical or printed errors 2008 Samsung Electronics America Inc LN40A450C1D TOP VIEW JACK PANE...

Page 80: ...This page is intentionally left blank...

Page 81: ...ACL Guide de l utilisateur Imaginez les possibilit s Merci d avoir achet un produit Samsung Pour obtenir un service complet veuillez enregistrer votre produit www samsung com global register Mod le N...

Page 82: ...777 992 6 289 308 5 610 985 5 481 643 5 544 247 5 960 037 6 023 490 5 878 080 et en vertu de la demande de brevet n 2001 44713 A1 publi e aux tats Unis Cette licence permet aux consommateurs d utilise...

Page 83: ...8 Configuration des options d image 31 R tablir les param tres de r glage de l image d usine 34 Contr le du Son Changement du format normal du son 35 Personnalisation du son 35 Param trage de la techn...

Page 84: ...ie SRS TruSurround XT offre une qualit de son ambiophonique V rifiez que les l ments suivants sont inclus avec votre t l vision LCD S il manque des l ments contactez votre revendeur T l commande et pi...

Page 85: ...de canal Dans le menu l cran utilisez les boutons CH de la m me mani re que les boutons et de la t l commande 5 Alimentation Appuyez sur ce bouton pour allumer et teindre la t l vision 6 Capteur de la...

Page 86: ...par exemple un lecteur DVD ou un magn toscope Pour plus d informations sur le branchement des appareils voir pages 7 20 La couleur et la forme du produit peuvent varier en fonction du mod le Panneau l...

Page 87: ...r une antenne ou un t l viseur par c ble 7 AV IN 2 Entr e audio et vid o pour p riph riques externes tels qu un cam scope ou un magn toscope S VIDEO Connectez un signal S Vid o provenant d un cam scop...

Page 88: ...nores pour les sports le cin ma et les jeux Utiliser ces touches pour les modes DMA et Anynet Cette t l commande peut servir commander l enregistrement sur des enregistreurs Samsung avec la fonction A...

Page 89: ...ntenne est dot e d un c ble semblable au sch ma de droite reportez vous la section Antenne quip e de c bles ronds 75 Si vous avez deux antennes voir Antennes VHF et UHF s par es 1 Placez les fils de v...

Page 90: ...te de jonction Cette prise peut s appeler ANT IN VHF IN ou simplement IN 5 Branchez un autre c ble entre l autre prise OUT du s parateur et la prise A IN de l interrupteur RF A B 6 Connectez le derni...

Page 91: ...d un d codeur c ble r cepteur satellite bo tier d codeur via DVI Ceci n est r alisable que si le p riph rique externe dispose d un connecteur de sortie DVI 1 Branchez un c ble DVI vers HDMI ou un ada...

Page 92: ...alement La configuration du panneau arri re de chaque lecteur DVD ou de chaque d codeur c ble r cepteur satellite bo tier d codeur diff re Lorsque vous branchez un lecteur DVD ou un d codeur c ble r c...

Page 93: ...pe est diff rente suivant les appareils Lorsque vous connectez un magn toscope faites correspondre les couleurs de la borne et du c ble La couleur de la prise d entr e AV IN 1 Y VID O vert ne correspo...

Page 94: ...Baissez le gain volume du t l viseur et r glez le volume l aide de la commande de volume du syst me La diffusion audio en 5 1 canaux est possible lorsque le t l viseur est raccord un appareil externe...

Page 95: ...z un PC faites correspondre les couleurs de la borne et du c ble La prise d entr e HDMI IN 2 doit tre utilis e pour un branchement de c ble HDMI DVI PC Pannear arri re de la t l vision C ble D Sub non...

Page 96: ...ble bipolaire plat de 300 Si vous utilisez une antenne hertzienne comme une antenne de toit ou une antenne en oreilles de lapin munie d un c ble bipolaire plat de 300 proc dez comme suit 1 Branchez le...

Page 97: ...o te de jonction Cette prise peut s appeler ANT IN VHF IN ou simplement IN 5 Branchez un autre c ble entre l autre prise OUT du s parateur et la prise A IN de l interrupteur RF A B 6 Connectez le dern...

Page 98: ...u d un d codeur c ble r cepteur satellite bo tier d codeur via DVI Ceci n est r alisable que si le p riph rique externe dispose d un connecteur de sortie DVI 1 Branchez un c ble DVI vers HDMI ou un ad...

Page 99: ...alement La configuration du panneau arri re de chaque lecteur DVD ou de chaque d codeur c ble r cepteur satellite bo tier d codeur diff re Lorsque vous branchez un lecteur DVD ou un d codeur c ble r c...

Page 100: ...ope est diff rente suivant les appareils Lorsque vous connectez un magn toscope faites correspondre les couleurs de la borne et du c ble La couleur de la prise d entr e AV IN 1 Y VID O vert ne corresp...

Page 101: ...Baissez le gain volume du t l viseur et r glez le volume l aide de la commande de volume du syst me La diffusion audio en 5 1 canaux est possible lorsque le t l viseur est raccord un appareil externe...

Page 102: ...z un PC faites correspondre les couleurs de la borne et du c ble La prise d entr e HDMI IN 1 doit tre utilis e pour un branchement de c ble HDMI DVI Utilisation d un c ble HDMI DVI 1 Connectez le c bl...

Page 103: ...r Air Signal d antenne de type Air C ble Signal d antenne de type C ble Auto Signaux d antenne de type Air et C ble En mode C ble vous pouvez s lectionner la source de signal qui vous convient parmi S...

Page 104: ...es qui n ont pas t m moris es Reportez vous aux pages 24 pour m moriser des cha nes Si vous souhaitez r initialiser ce param tre 1 Appuyez sur la touche MENU Appuyez sur les bouton ou pour s lectionne...

Page 105: ...s utilisez les boutons num riques pour s lectionner la seconde canal Puis utilisez le bouton PRE CH pour passer rapidement de l une l autre Utilisation du bouton Utilisez le bouton pour s lectionner l...

Page 106: ...pour choisir Commuter sur Air ou Commuter sur C ble puis appuyez sur le bouton ENTER Utilisation de la touche TOOLS La touche TOOLS peut servir s lectionner rapidement et ais ment les fonctions utili...

Page 107: ...la source de diffusion est maintenant termin e 5 Le t l viseur commence alors m moriser tous les canaux disponibles Une fois tous les canaux m moris s le t l viseur commence liminer les canaux brouil...

Page 108: ...our s lectionner Entr e puis appuyez sur le bouton ENTER Appuyez sur les bouton ou pour s lectionner Entrer le nom puis appuyez sur le bouton ENTER 2 Appuyer sur la touche ou pour s lectionner la pris...

Page 109: ...inte puis appuyez sur le bouton ENTER 3 Appuyer sur la touche ou pour augmenter ou r duire la valeur d un l ment particulier Appuyez sur le bouton ENTER Appuyez sur le bouton EXIT pour quitter Apr s l...

Page 110: ...e Utilise une profondeur de noir lev e R glage du contraste dynamique Vous pouvez r gler l cran de fa on obtenir un contraste optimal 6 Appuyez sur les bouton ou pour s lectionner Contraste dynam puis...

Page 111: ...Appuyez sur le bouton ENTER 16 Appuyer sur la touche ou pour augmenter ou r duire la valeur d un l ment particulier Appuyez sur le bouton ENTER Dans le param tre Couleur il est possible de r gler les...

Page 112: ...ter la valeur Appuyez sur le bouton ENTER La modification de la valeur de r glage permet de rafra chir l cran r gl R glage de l am lioration des bords de l image Vous pouvez accentuer le bord des obje...

Page 113: ...llite peut galement disposer de ses propres tailles d cran Toutefois il est conseill d utiliser le mode 16 9 autant que possible 1 Suivre les instructions 1 et 2 de Activation des options d image Cons...

Page 114: ...rnes branch s une entr e sur le t l viseur Source de l entr e Format de l image TV Video S Vid o Composante 480i 480p 16 9 Zoom1 Zoom2 4 3 DTV 1080i Composante 1080i HDMI 720p 1080i 16 9 4 3 Format la...

Page 115: ...tomatiquement le niveau de brillance de l cran afin de l adapter aux sc nes Appuyez sur le bouton EXIT pour quitter R glage du niveau de noir HDMI Il est possible de s lectionner le niveau de noir de...

Page 116: ...ire 1 Suivre les instructions 1 et 2 de Activation des options d image Consulter la page 31 2 Appuyez sur les boutons ou pour s lectionner Mode bleu seu puis appuyez sur le bouton ENTER 3 Appuyez sur...

Page 117: ...s 1 Appuyez sur le bouton MENU pour afficher le menu Appuyez sur les bouton ou pour s lectionner Son puis appuyez sur le bouton ENTER 2 Appuyez sur les bouton ou pour s lectionner galiseur puis appuye...

Page 118: ...bouton MTS 2 Appuyez sur les bouton ou pour s lectionner Options multi pistes puis appuyez sur le bouton ENTER 3 Appuyez sur les boutons ENTER pour s lectionner Langue privil gi e Appuyez sur les bou...

Page 119: ...ur quitter Mono choisir ce r glage pour les canaux diffus s en monophonie ou si la r ception d un signal st r o s av re difficile St r o choisir ce r glage pour les canaux diffus s en st r ophonie SAP...

Page 120: ...ur Sortie de haut parleur Sortie de haut parleur Sortie audio Sortie audio Sortie audio Haut parleur TV Off Mute Mute Mute Sortie audio Sortie audio Sortie audio Aucun signal vid o Mute Mute Mute Mute...

Page 121: ...ER pour s lectionner Arr t Appuyez sur les bouton pour s lectionner Oui puis appuyez sur le bouton ENTER 3 Lorsque la recherche de canaux brouill s est termin e appuyez sur ENTER Appuyez sur la touche...

Page 122: ...ste des canaux D pl Intro Retour TV Antenna C ble Prog auto Effacer les canaux brouill s Liste des canaux Nom Syn Pr cise Puissance signal Cha ne D pl Intro Retour TV Liste des canaux Tout DTV Air 2 1...

Page 123: ...ouche TOOLS de la t l commande 2 Appuyez sur les bouton ou pour s lectionner Ajouter aux favoris ou Effacer des Favori puis appuyez sur le bouton ENTER Le canal s lectionn est ajout la liste des favor...

Page 124: ...ctionner Tout Ajoute ou Favori puis appuyez sur le bouton ENTER 4 Appuyez sur les bouton ou pour s lectionner Cha ne puis appuyez sur le bouton ENTER Pour basculer entre toutes les cha nes les cha nes...

Page 125: ...cette op ration pour s lectionner les trois derniers chiffres Lorsque vous avez termin appuyez sur le bouton ENTER pour valider le nouveau nom Pour effacer le nouveau nom assign s lectionnez Effacer e...

Page 126: ...ner Cha ne puis appuyez sur le bouton ENTER 2 Appuyez sur les bouton ou pour s lectionner Puissance signal puis appuyez sur le bouton ENTER Si l indicateur de puissance indique que le signal num rique...

Page 127: ...ogue des param tres d affichage comporte une option de fr quence verticale la valeur correcte est 60 ou 60Hz Sinon cliquez sur OK et quittez la bo te de dialogue Modes d affichage Si le signal du syst...

Page 128: ...s fine Une fois le bruit r duit r ajustez l image pour la centrer sur l cran Pr r glage Appuyer sur la touche SOURCE pour s lectionner PC 1 Appuyez sur le bouton MENU pour afficher le menu Appuyez sur...

Page 129: ...us pouvez remplacer tous les param tres d image par les valeurs par d faut Pr r glage Appuyer sur la touche SOURCE pour s lectionner PC 1 Appuyez sur le bouton MENU pour afficher le menu Appuyez sur l...

Page 130: ...s param tres Mois Jour Ann e Heure Minute ou am pm D finissez la date et l heure souhait es en utilisant les bouton ou puis appuyez sur ENTER Appuyez sur le bouton EXIT pour quitter L heure s affiche...

Page 131: ...ppuyez sur le bouton ENTER Appuyez sur le bouton EXIT pour quitter En fonction de la station mettrice et du signal il est possible que la fonction de r glage automatique de l heure ne fonctionne pas c...

Page 132: ...outon ou pour s lectionner Activation Appuyer sur la touche ou pour s lectionner Off suivie de la touche ENTER Appuyez sur le bouton EXIT pour quitter R glage facile 1 Appuyer sur la touche TOOLS de l...

Page 133: ...aide du pav num rique de la t l commande Arr t automatique Quand la minuterie est activ e le t l viseur s teint automatiquement au bout de trois heures si aucune commande n est utilis e Cette fonctio...

Page 134: ...e suivant afin de remettre le code NIP 0 0 0 0 Power Off hors tension MUTE 8 2 4 Power On sous tension Utilisation de la fonction puce V Chip La fonction puce V exclut automatiquement les programmes q...

Page 135: ...s l aide de l une de ces deux m thodes Les guides TV ou la Classification MPAA 1 Appuyez sur le bouton MENU pour afficher le menu Appuyez sur les bouton ou pour s lectionner Configuration puis appuyez...

Page 136: ...e fa on voir section suivante 6 Comment r gler les valuations secondaires FV D L S et V Pour commencer s lectionnez l une des cat gories TV Y TV Y7 TV G TV PG TV 14 ou TV MA voir tape 4 et appuyez sur...

Page 137: ...boutons ou pour parcourir les cat gories MPAA G Tout public aucune restriction PG Accord parental souhait PG 13 Parents vivement mis en garde R Les enfants de moins de 17ans doivent tre accompag n s d...

Page 138: ...es aux enfants de moins de 8 ans C8 missions convenant g n ralement aux enfants de 8 ans et plus sans surveillance G missions grand public convenant tous les auditoires PG missions surveillance parent...

Page 139: ...l viseur G G n ral 8 ans missions non recommand es pour les jeunes enfants 13 ans missions pouvant ne pas convenir aux enfants de moins de 13 ans 16 ans missions ne convenant pas aux enfants de moins...

Page 140: ...usion Utilisation de la fonction V Chip pour les canaux num riques Il est possible d utiliser de l information sur le contr le parental tout en regardant des canaux num riques Cat g am ricaine t l cha...

Page 141: ...ournies par le programme CC3 Sous titres secondaires synchronis s Donn es de sous titres alternatives associ es au programme Il s agit g n ralement de la langue secondaire CC4 Sous titres sp ciaux non...

Page 142: ...t Standard et Grand La valeur par d faut est Standard Style des polices Cette option peut prendre les valeurs suivantes Par d faut Style0 Style7 Vous pouvez modifier la police La valeur par d faut est...

Page 143: ...bouton ou pour s lectionner Divertissement puis appuyez sur le bouton ENTER 3 Appuyez sur les bouton ou pour s lectionner Off Sports Cin ma ou Jeu puis appuyez sur le bouton ENTER Off d sactive la fon...

Page 144: ...ation d une cl USB Les mises jour sont accessibles par le branchement d une cl USB dans le port USB situ sur le t l viseur Fonction conomiseur d nergie Cette option permet de r gler la luminosit de l...

Page 145: ...l viseur et l entr e Audio num rique de votre syst me home cin ma En suivant les instructions de connexion ci avant la prise optique alimente uniquement les p riph riques audio 2 canaux Vous entendrez...

Page 146: ...net HDMI CEC La liste des appareils Anynet branch s au t l viseur s affiche 2 Appuyer sur la touche ou pour s lectionner un appareil particulier suivie de la touche ENTER Le syst me commande l apparei...

Page 147: ...ri re Recherche vers l avant Arr t Lecture Pause Appareil avec syntoniseur int gr Apr s la permutation vers l appareil pendant l coute d une mission t l vis e CH Touche Appareil audio Lorsque le r cep...

Page 148: ...de est en mode TV V rifier s il s agit de la t l commande exclusive Anynet Anynet ne fonctionne pas dans certaines conditions recherche de canaux Pr t l emploi etc Au moment du branchement ou du d bra...

Page 149: ...yez la partie sup rieure de la t l commande fen tre de transmission V rifiez les bornes de la batterie Message V rifier signal c ble Assurez vous que le c ble d interface est solidement branch aux sou...

Page 150: ...rend en charge les fonctions d affichage multiscan dans le domaine de fr quence suivant Fr quence horizontale kHz 30 60 Fr quence verticale Hz 60 75 Taux de rafra chissement maxi 60 Hz 1360 X 768 L im...

Page 151: ...ercer de pression excessive sur les c t s sup rieurs droit et gauche du t l viseur 2 Resserrer les deux vis la position 1 puis resserrer les deux 2 vis la position 2 Placer l appareil la verticale pui...

Page 152: ...lors Appuyez sur la touche INFO pour r initialiser Appuyez sur la touche ou pour s lectionner Oui puis sur ENTER La position est initialis e au r glage par d faut 3 Appuyez sur la touche bleue Appuyez...

Page 153: ...nt endommager l int rieur du t l viseur En ce qui a trait aux supports muraux qui ne sont pas conformes aux sp cifications de vis standard VESA la longueur des vis peut diff rer selon leurs sp cificat...

Page 154: ...gton antivol en fonction du mod le Le verrouillage Kensington est un dispositif utilis pour fixer physiquement le syst me dans le cas d une utilisation dans un endroit public Le dispositif de verrouil...

Page 155: ...Mod le LN37A450C1D LN40A450C1D Taille de l cran diagonale 37 pouces 40 pouces R solution PC 1360 x 768 60 Hz 1360 x 768 60 Hz Son Sortie 10W x 2 10W x 2 Dimensions WxDxH TV Avec support 916 4 X 81 7 X...

Page 156: ...nsultez les dimensions avant d installer votre t l viseur Aucune responsabilit ne saurait tre accept e en cas d erreur typo graphique ou d impression 2008 Samsung Electronics America Inc LN26A450C1D V...

Page 157: ...nsultez les dimensions avant d installer votre t l viseur Aucune responsabilit ne saurait tre accept e en cas d erreur typo graphique ou d impression 2008 Samsung Electronics America Inc LN32A450C1D V...

Page 158: ...nsultez les dimensions avant d installer votre t l viseur Aucune responsabilit ne saurait tre accept e en cas d erreur typo graphique ou d impression 2008 Samsung Electronics America Inc LN37A450C1D V...

Page 159: ...nsultez les dimensions avant d installer votre t l viseur Aucune responsabilit ne saurait tre accept e en cas d erreur typo graphique ou d impression 2008 Samsung Electronics America Inc LN40A450C1D V...

Page 160: ...Cette page est laiss e intentionnellement en blanc...

Reviews: