background image

English-10

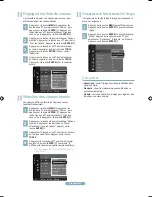
Mode 

: Standard

Backlight 

:  

Contrast 

: 95

Brightness 

: 45

Sharpness 

: 50

Color 

: 50

Tint (G/R) 

: G50/R50

Advanced Settings
Picture Option 

Picture

8

Backlight

Enter

Return

Adjust

Move

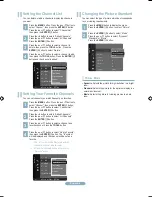
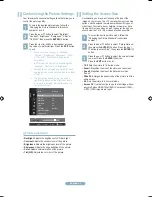
Customizing the Picture Settings

Your television has several setting options that allow you to 

control the picture quality.

1

To select the desired picture mode, follow the 

“Changing the Picture Standard” instructions 

numbers 1 and 2.

Press the ▲ or ▼ button to select “Backlight”, 

“Contrast”, “Brightness”, “Sharpness”, “Color” or 

“Tint(G/R)”, then press the 

ENTER

E

 button.

 Press the ◄ or ► button to decrease or increase 

the value of a particular item. Press the 

EXIT

 button 

to exit.

 When you make changes to “Backlight”, 

“Contrast”, “Brightness”, “Sharpness”, “Color” 

or “Tint (G/R)”, the OSD will be adjusted 

accordingly.
In PC mode, you can only make changes to 

“Backlight”, “Contrast” and “Brightness”.
Settings can be adjusted and stored for each 

external device you have connected to an input 

of the TV.
The energy consumed during use can be 

significantly reduced if the brightness level of 

the picture is lowered, which will reduce the 

overall running cost.

 Picture Adjustment

•  

Backlight

: Adjusts the brightness of LCD back light.

•  

Contrast

: Adjusts the contrast level of the picture.

•  

Brightness

: Adjusts the brightness level of the picture.

•  

Sharpness

: Adjusts the edge definition of the picture.

•  

Color

: Adjusts color saturation of the picture.

•  

Tint(G/R)

: Adjusts the color tint of the picture.

Setting the Screen Size

Occasionally, you may want to change the size of the 

image on your screen. Your TV comes with six screen size 

options, each designed to work best with specific types of 

video input. Your cable box or satellite receiver may have 

its own set of screen sizes as well. In general, though, you 

should view the TV in 16:9 mode as much as possible.

1

To select the desired picture mode, follow the 

“Changing the Picture Standard” instructions 

number 1.

Press the ▲ or ▼ button to select “Picture Options”, 

then press the 

ENTER

E

 button. Press the ▲ or 

▼ button to select “Size”, then press the 

ENTER

E


button.

Press the ▲ or ▼ button to select the screen format 

you want. Press the 

ENTER

E

 button. 

Press the 

EXIT

 button to exit.

•  

1:

: Sets the picture to 16:9 wide mode.

• 

Zoom1

: Magnifies the size of the picture on the screen.

•  

Zoom

: Magnifies the size of the picture more than 

“Zoom1”.

•  

Wide Fit

: Enlarges the aspect ratio of the picture to fit the 

entire screen.

• 

:

: Sets the picture to 4:3 normal mode.

•  

Screen Fit

: Use the function to see the full image without 

any cutoff when HDMI (720p/1080i), Component (1080i) 

or DTV (1080i) signals are input.

QSG_650_BN68-02150A_00L02.indb   10

2009-03-25   �� 7:37:53

Summary of Contents for LN19B650 - 19" LCD TV

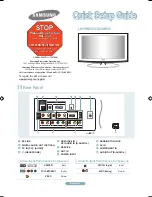
Page 1: ...2 1 3 4 5 6 7 1 EX LINK 2 DIGITAL AUDIO OUT OPTICAL 3 PC IN PC AUDIO 4 H HEADPHONE 5 HDMI DVI IN DVI AUDIO IN R AUDIO L 6 SERVICE 7 ANT IN 8 POWER INPUT 9 KENSINGTON LOCK 0 AV IN COMPONENT IN AUDIO O...

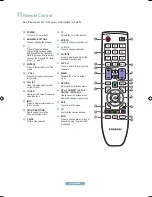
Page 2: ...frequently used functions 8 INFO Press to display information on the TV screen 9 COLOR BUTTONS Use these buttons in the Channel list menus etc 0 P SIZE Picture size selection TV Selects the TV mode di...

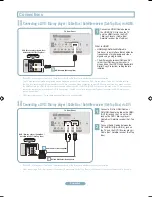
Page 3: ...r Cable Box Satellite receiver Set Top Box DVD Blu ray player Cable Box Satellite receiver Set Top Box Each DVD Blu ray player Cable Box Satellite receiver Set Top Box has a different back panel confi...

Page 4: ...Component video cable to COMPONENT IN connect the audio cable to COMPONENT IN also Each DVD Blu ray player Cable Box Satellite receiver Set Top Box has a different back panel configuration When connec...

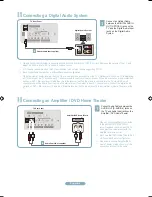
Page 5: ...ver When the source is a digital component such as a DVD Blu ray player Cable Box Satellite receiver Set Top Box and is connected to the TV via HDMI only 2 channel sound will be heard from the Home Th...

Page 6: ...en the HDMI DVI IN jack on the TV and the HDMI OUT jack on the camcorder HD Camcorder TV Rear Panel 1 HDMI Cable Not supplied 2 Audio Cable Not supplied 1 Video Cable Not supplied 2 Connect Audio Cabl...

Page 7: ...pplied 2 3 5 mm Stereo mini plug 2RCA Cable Not supplied Using an HDMI DVI Cable 1 Connect a D Sub Cable between PC IN PC connector on the TV and the PC output connector on your computer 2 Connect a P...

Page 8: ...ss the or button to select Start then press the ENTERE button If you have Digital cable TV select the cable system signal source for both Analog and Digital Viewing the Menus 5 The TV begins memorizin...

Page 9: ...ent Movie Selects the picture for viewing movies in a dark room Setting Your Favorite Channels You can set channels you watch frequently as favorites 1 Press the MENU button Press the or button to sel...

Page 10: ...ast Adjusts the contrast level of the picture Brightness Adjusts the brightness level of the picture Sharpness Adjusts the edge definition of the picture Color Adjusts color saturation of the picture...

Page 11: ...this button to choose an input source that you would like to watch Available signal sources TV AV Component PC HDMI DVI You can choose only those external devices that are connected to the TV In the...

Page 12: ...too light or too dark Adjust the Brightness and Contrast Adjust the Fine tuning Black bars on the screen Make sure the broadcast you re receiving is High Definition HD HD channels sometimes broadcast...

Page 13: ...6 SERVICE 7 ANT IN 8 PUISSANCE CONSOMM E 9 VERROU KENSINGTON 0 AV IN COMPONENT IN AUDIO OUT R AUDIO L Guide d installation rapide STOP Veuillez SVP ne pas retourner cet appareil En cas de probl mes de...

Page 14: ...our afficher de l information l cran 9 TOUCHES DE COULEUR Utiliser ces touches dans les menus de liste de canaux etc 0 P SIZE Permet de choisir le format de l image TV Permet de s lectionner directeme...

Page 15: ...ur Panneau arri re d un lecteur DVD Blu ray c blos lecteur ou r cepteur satellite bo tier d codeur La configuration du panneau arri re de chaque lecteur DVD Blu ray c blos lecteur ou r cepteur satelli...

Page 16: ...branch COMPONENT IN galement La configuration du panneau arri re de chaque lecteur DVD Blu ray c blos lecteur ou r cepteur satellite bo tier d codeur diff re Lorsque vous branchez un lecteur DVD Blu r...

Page 17: ...cteur ou un r cepteur satellite bo tier d codeur et que ce dernier est branch au t l viseur l aide d un c ble HDMI le r cepteur de la cha ne de cin ma maison ne fera entendre qu un son en deux canaux...

Page 18: ...e HDMI DVI IN du t l viseur et la prise HDMI OUT du cam scop Cam scope HD Panneau arri re du t l viseur 1 C ble HDMI non fourni 2 C ble audio non fourni 1 C ble vid o non fourni 2 Branchez les c bles...

Page 19: ...mini prise st r o 3 5 mm 2RCA non fourni Utilisation d un c ble HDMI DVI 1 Branchez un c ble secondaire D entre le connecteur PC IN PC du t l viseur et le connecteur de sortie PC de votre ordinateur 2...

Page 20: ...ppropri e STD HRC ou IRC Appuyer sur la touche ou pour s lectionner D marrer puis sur ENTERE Si le C ble est num rique s lectionner la source de signal pour une diffusion analogique et num rique Visua...

Page 21: ...leure image possible dans un environnement normal Cin ma choisit une d finition d image pour regarder des films dans une pi ce sombre S lection des canaux favoris Vous pouvez d finir en favoris les ch...

Page 22: ...traste de l image Luminosit r gle le niveau de luminosit de l image Nettet r gle la d finition du bord de l image Couleur r gle la saturation des couleurs de l image Teinte V R r gle la teinte de coul...

Page 23: ...Cette touche permet de choisir la source d entr e d sir e Sources de signal accessibles TV AV Composante PC HDMI DVI Vous pouvez s lectionner uniquement les appareils externes d j branch s sur le t l...

Page 24: ...uminosit et le contraste Utilisez la fonction de r glage fin Barres noires l cran Assurez vous que votre r ception est en haute d finition HD Les stations des canaux haute d finition mettent parfois e...

Page 25: ...Cette page est laiss e intentionnellement en blanc...

Page 26: ...le Service Consommateurs Samsung Country Customer Care Center Web Site Address CANADA 1 800 SAMSUNG 726 7864 www samsung com ca Samsung Electronics Canada Inc Customer Service 55 Standish Court Missi...

Reviews: