background image

English - 26

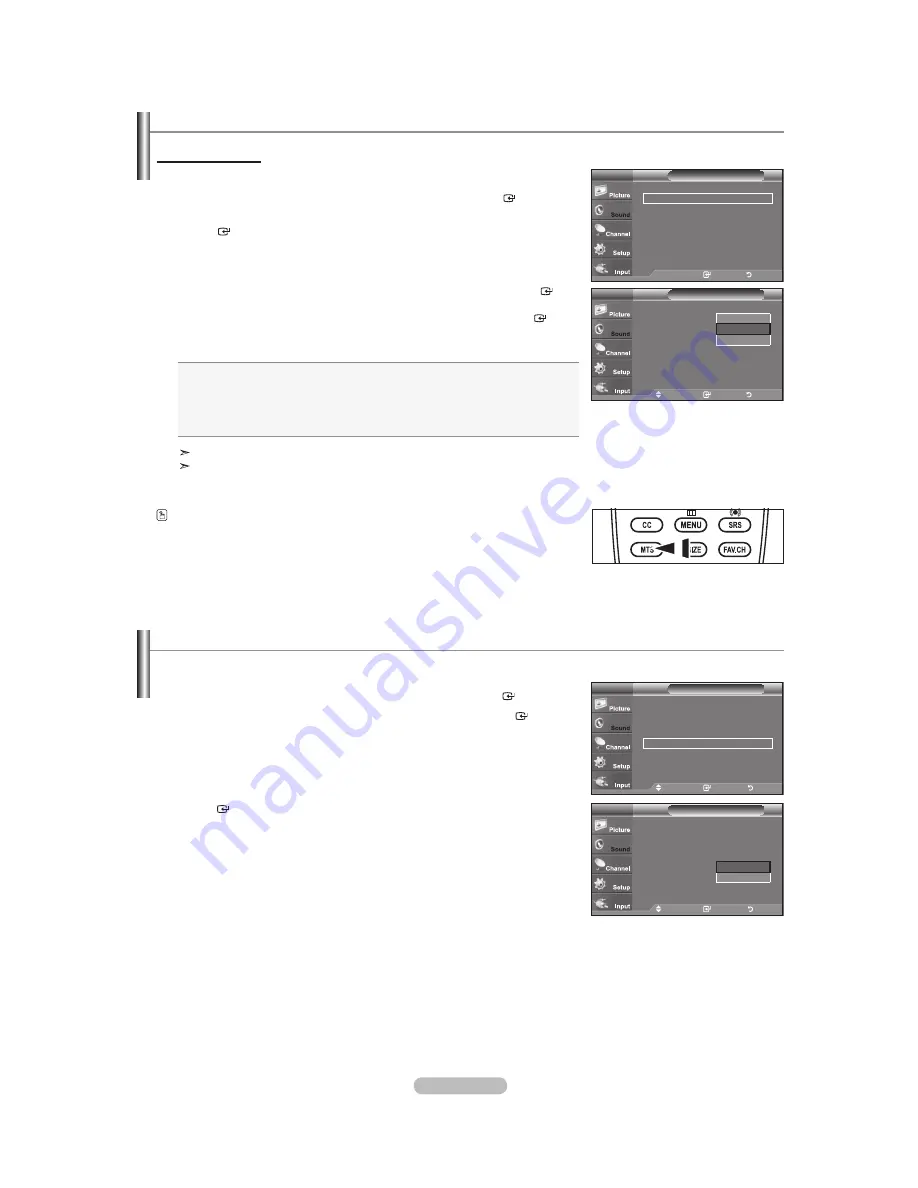
Automatic Volume Control

1. 

Press the 

MENU 

button to display the menu. 

    Press the  or  button to select "Sound", then press the 

ENTER 


button.

2. 

Press the  or  button to select "Auto Volume", then press the 

ENTER 


button.

3. 

Press the  or  button to set Auto Volume "Off" or "On" then press the  


ENTER 


button.

   Press the 

EXIT 

button to exit.

Reduces the differences in volume level among broadcasters.

1. 

Press the 

MENU 

button to display the menu. 

    Press the  or  button to select "Sound", then press the 

ENTER 


button.

2. 

Press the  or  button to select "Multi-Track Options", then press the 


ENTER 


button.

3.  

Press the  or  button to select “Multi-Track Sound”, then press the

 ENTER


button. 
Press the  or  button to select a setting you want, then press the 

ENTER


button. 
Press the 

EXIT

 button to exit.

• 

Mono

:  Choose for channels that are broadcasting in mono or if you are having 

difficulty receiving a stereo signal.

• 

Stereo

: Choose for channels that are broadcasting in stereo.

• 

SAP

:  Choose to listen to the Separate Audio Program, which is usually a 

foreign-language translation.


“Multi-Track Sound” is available only in Analog TV mode. 


 Depending on the particular program being broadcast, you can listen to “Mono”, 
“Stereo” or “SAP”.


  Press the 

MTS

 buttons on the remote control repeatedly to select “Mono”,  

 “Stereo” 

or 

“SAP”.

Multi-Track Sound

Choosing a Multi-Channel Sound (MTS) track - Analog 


Enter 

Return

Preferred Language : 

English 


Multi-Track Sound 

: Stereo 

Multi-Track Options

TV

Move  


Enter 

Return

Mode : 

Custom 


Equalizer  


SRS TruSurround XT : Off  


Multi-Track Options     

Auto Volume  

: Off 

TV Speaker : 

On 

Sound

TV

Move  


Enter 

Return

Mode : 

Custom 


Equalizer  


SRS TruSurround XT : Off  


Multi-Track Options     

Auto Volume  

:

 Off

TV Speaker 

: On

Sound

TV

Move  


Enter 

Return

Preferred Language : 

English

Multi-Track Sound 

Stereo

Multi-Track Options

TV

Mono

Stereo

SAP

Off

On

Summary of Contents for LN19A450C1D

Page 1: ...LCD TV user manual imagine the possibilities Thank you for purchasing a Samsung product To receive a more complete service please register your product at www samsung com global register Model Serial No ...

Page 2: ...960 037 6 023 490 5 878 080 and under US Published Patent Application No 2001 44713 A1 This license is limited to private non commercial use by end user consumers for licensed contents No rights are granted for commercial use The license does not cover any product unit other than this product unit and the license does not extend to any unlicensed product unit or process conforming to ISO IEC 11172...

Page 3: ...oosing a Multi Channel Sound MTS track Digital 25 Choosing a Multi Channel Sound MTS track Analog 26 Automatic Volume Control 26 Setting the TV Speakers On Off 27 Connecting Headphones Sold separately 27 CHANNEL CONTROL Clearing Scrambled Channels Digital 28 Adding and Erasing Channels 29 To Set Up Your Favorite Channels 30 Viewing the Channel Lists 31 Labeling Channels 32 Fine Tuning Analog Chann...

Page 4: ... Stand Screw M4XL16 LN22A450C1D 6002 001294 LN22A451C1D 6003 001324 Wall Mount kit LN19A450C1D BN96 04960A LN19A451C1D BN96 04960A Decoration Cover LN19A450C1D Right BN63 04242A Left BN63 04254A LN19A451C1D Right BN63 04242B Left BN63 04254B The items color and shape may vary depending on the model General Information List of Features Adjustable picture settings that can be stored in the TV s memo...

Page 5: ... you would use the ENTER button on the remote control 2 MENU Press to see an on screen menu of your TV s features 3 VOL Press to increase or decrease the volume In the on screen menu use the VOL buttons as you would use the and buttons on the remote control 4 CH Press to change channels In the on screen menu use the CH buttons as you would use the and buttons on the remote control 5 POWER Press to...

Page 6: ...for audio No sound connection is needed for an HDMI to HDMI connection When using an HDMI DVI cable connection you must use the HDMI DVI IN jack 5 SERVICE EX LINK Connector for SERVICE only 6 ANT IN Connects to an antenna or cable TV system 7 KENSINGTON LOCK The Kensington Lock optional is a device used to physically fix the system when used in a public place If you want to use a locking device co...

Page 7: ...ease the volume 7 TOOLS Use to quickly select frequently used functions 8 UP DOWN LEFT RIGHT ENTER Use to select on screen menu items and change menu values 9 INFO Press to display information on the TV screen 0 COLOR BUTTONS Use these buttons in the Channel list etc CC Controls the caption decoder MTS Press to choose stereo mono or Separate Audio Program SAP broadcast SOURCE Press to display and ...

Page 8: ...ght see Antennas with 300 Flat Twin Leads below If your antenna has one lead that looks like the diagram to the right see Antennas with 75 Round Leads If you have two antennas see Separate VHF and UHF Antennas 1 Place the wires from the twin leads under the screws on a 300 75 adapter not supplied Use a screwdriver to tighten the screws 2 Plug the adaptor into the ANT IN terminal on the back of the...

Page 9: ...e ANT OUT terminal on the cable box and the B IN terminal on the RF A B switch 5 Connect another cable between the other OUT terminal on the splitter and the A IN terminal on the RF A B switch 6 Connect the last RF cable between the OUT terminal on the RF A B switch and the ANT IN terminal on the rear of the TV Splitter Incoming cable Splitter Cable Box Incoming cable Splitter Cable Box RF A B Swi...

Page 10: ...te receiver Set Top Box 1 Connect a DVI to HDMI Cable or DVI HDMI Adapter between the HDMI DVI IN jack on the TV and the DVI jack on the DVD Player or Cable Box Satellite receiver Set Top Box 2 Connect Audio Cables between the DVI IN R AUDIO L jack on the TV and the DVD Player or Cable Box Satellite receiver Set Top Box What is HDMI HDMI High Definition Multimedia Interface is an interface that en...

Page 11: ...ENT IN connect the audio cable to COMPONENT IN also Each DVD Player or Cable Box Satellite receiver Set Top Box has a different back panel configuration When connecting a DVD Player or Cable Box Satellite receiver Set Top Box match the color of the connection terminal to the cable Connecting a Camcorder They allow you to view the camcorder tapes without using a VCR 1 Connect a Video Cable or S Vid...

Page 12: ...der Tape to view your VCR tape Each VCR has a different back panel configuration When connecting a VCR match the color of the connection terminal to the cable Your Samsung TV can be connected to an S Video jack on a VCR This connection delivers a better picture when compared to the regular Video connection above 1 To begin follow steps 1 3 in the previous section to connect the antenna or cable to...

Page 13: ...of the TV and adjust the volume level with the system s volume control 5 1CH audio is possible when the TV is connected to an external device supporting 5 1CH Each Digital Audio System has a different back panel configuration When the receiver home theater is set to On you can hear sound output from the TV s Optical jack When the TV is displaying a DTV air signal the TV will send out 5 1 chan nel ...

Page 14: ...he TV and the PC output jack on your computer 2 Connect a 3 5 mm Stereo mini plug 2RCA Cable between the DVI IN R AUDIO L jack on the TV and the Audio Out jack of the sound card on your computer PC TV Rear Panel D Sub Cable Not supplied 1 PC Audio Cable Not supplied 2 Each PC has a different back panel configuration When connecting a PC match the color of the connection terminal to the cable When ...

Page 15: ...ble antenna signal Auto Air and Cable antenna signals In Cable mode you can select the correct signal source among STD HRC and IRC by pressing the or button then press the ENTER button If you have Digital cable select the cable system signal source for both Analog and Digital Contact your local cable company to identify the type of cable system that exists in your particular area 5 The TV will beg...

Page 16: ...available in the TV mode Changing Channels Using the Channel Buttons 1 Press the CH or CH button to change channels When you press the CH or CH button the TV changes channels in sequence You will see all the channels that the TV has memorized The TV must have memorized at least three channels You will not see channels that were either erased or not memorized See page 16 to memorize channels Using ...

Page 17: ...t a digital signal 1 For example for Channel 7 1 press 7 then then 1 HD indicates the TV is receiving a Digital High Definition signal SD indicates the TV is receiving a Standard Definition signal For quick channel change press the number buttons then press the ENTER button Using the PRE CH Button to select the Previous Channel 1 Press the PRE CH button The TV will switch to the last channel viewe...

Page 18: ...remote control 2 Press the or button to select Switch to Air or Switch to Cable then press the ENTER button Antenna Air Auto Program Clear Scrambled Channel Channel List Name Fine Tune Signal Strength Channel Move Enter Return TV Channel Move Enter Return TV Antenna Air Auto Program Clear Scrambled Channel Channel List Name Fine Tune Signal Strength Air Cable Using the TOOLS Button You can use the...

Page 19: ...lected 5 The TV begins memorizing all available stations After all the available channels are stored it start to remove scrambled channels see page 28 If you want to stop Auto Programming press the ENTER button The Stop Auto Program message will be displayed Select Yes by pressing the or button then press the ENTER button Press the EXIT button to exit Move Enter Return Selects the antenna to execu...

Page 20: ...d to the input jacks to make your input source selection easier 1 Press the MENU button to display the menu Press the or button to select Input then press the ENTER button Press the or button to select Edit Name then press the ENTER button 2 Press the or button to select AV S Video Component PC HDMI input jack then press the ENTER button 3 Press the or button to select VCR DVD Cable STB Satellite ...

Page 21: ...7 Contrast 95 Brightness 45 Sharpness 50 Color 50 Tint G 50 R 50 More Picture TV Customizing the Picture Settings Your television has several setting options that allow you to control the picture quality 1 To select the desired picture mode follow the Changing the Picture Standard instructions numbers 1 and 2 2 Press the or button to select Backlight Contrast Brightness Sharpness Color or Tint the...

Page 22: ...rmal Film Mode Off Picture Options TV Cool2 Cool1 Normal Warm1 Warm2 Setting the Screen Size Occasionally you may want to change the size of the image on your screen Your TV comes with six screen size options each designed to work best with specific types of video input Your cable box or satellite receiver may have its own set of screen sizes as well In general though you should view the TV in 16 ...

Page 23: ...connected to an input of the TV Input Source Picture Size TV Video S Video Component 480i 480p Wide 16 9 Zoom1 Zoom2 4 3 DTV 1080i Component 1080i HDMI 720p 1080i Wide 16 9 4 3 Wide Fit Just Scan PC Wide 16 9 4 3 Alternately you can press the P SIZE button on the remote control repeatedly to change the picture size Wide 16 9 Zoom1 U Move Wide Adjusts the picture size to Wide appropriate for DVDs o...

Page 24: ...Press the or button to select HDMI Black Level then press the ENTER button 3 Press the or button to select Normal or Low then press the ENTER button Normal The screen gets brighter Low The screen gets darker This function is active only when an external device is connected to the TV via HDMI HDMI Black Level function may not be compatible with all external devices Press the EXIT button to exit Pic...

Page 25: ... menu Press the ENTER button to select Picture 2 Press the or button to select Reset then press the ENTER button Press the or button to select OK or Cancel then press the ENTER button Press the EXIT button to exit Each mode can be reset Move Enter Return More Picture Options Reset OK Picture TV OK Cancel ...

Page 26: ...e ENTER button to select Mode Press the or button to select Standard Music Movie Speech or Custom sound setting then press the ENTER button Press the EXIT button to exit Standard selects the normal sound mode Music emphasizes music over voices Movie provides the best sound for movies Speech emphasizes voice over other sounds Custom recalls your customized sound settings see Customizing the Sound E...

Page 27: ...Preferred Language 1 Press the MENU button to display the menu Press the or button to select Sound then press the ENTER button Quick way to access the MTS menu Just press the MTS button on the remote control You can listen in a language other than your chosen language by pressing the MTS button 2 Press the or button to select Multi Track Options then press the ENTER button 3 Press the ENTER button...

Page 28: ...hat are broadcasting in mono or if you are having difficulty receiving a stereo signal Stereo Choose for channels that are broadcasting in stereo SAP Choose to listen to the Separate Audio Program which is usually a foreign language translation Multi Track Sound is available only in Analog TV mode Depending on the particular program being broadcast you can listen to Mono Stereo or SAP Press the MT...

Page 29: ...o Volume Off TV Speaker On Sound TV TV s Internal Speakers Audio Out Optical L R Out to Sound System RF AV S Video Component PC HDMI RF AV S Video Component PC HDMI TV Speaker On Speaker Output Speaker Output Speaker Output Sound Output Sound Output Sound Output TV Speaker Off Mute Mute Mute Sound Output Sound Output Sound Output Video No Signal Mute Mute Mute Mute Mute Mute Manufactured under lic...

Page 30: ...select Stop Press the button to select Yes then press the ENTER button 3 When the scrambled channel searching is completed press the ENTER button Press the EXIT button to exit This function is only available in Cable mode The Clear Scrambled Channel function is used to lter out scrambled channels after Auto Program is completed This process may take up to 20 30 minutes Antenna Cable Auto Program C...

Page 31: ...r 10 DTV Air 10 1 DTV Air 10 2 DTV Air 10 3 DTV Air 10 1 DTV Air 10 2 DTV Air 10 3 DTV Air 10 1 DTV Air 10 2 DTV Air 10 3 Air 12 DTV Air 13 1 DTV Air 13 2 DTV Air 13 3 DTV Air 13 4 Air 5 1 2 Watch Add Delete Favorite 1 Press the MENU button to display the menu Press the or button to select Channel then press the ENTER button 2 Press the or button to select Channel List then press the ENTER button ...

Page 32: ...l Added Favorite Channel List Move Enter Return TV Channel List Added DTV Air 2 1 Air3 Air4 Air 5 Air 6 Air 7 DTV Air 7 1 Air 8 Air 9 Air 10 DTV Air 10 1 DTV Air 10 2 DTV Air 10 3 DTV Air 10 1 DTV Air 10 2 DTV Air 10 3 DTV Air 10 1 DTV Air 10 2 DTV Air 10 3 Air 12 DTV Air 13 1 DTV Air 13 2 DTV Air 13 3 DTV Air 13 4 Air 5 1 2 Channel List Added DTV Air 2 1 Air3 Air4 Air 5 Air 6 Air 7 DTV Air 7 1 Ai...

Page 33: ... the remote control Red button Press repeatedly to select All Added or Favorite You can display a list of all channels added channels or your favorite channels All Added Favorite Channel List Move Enter Return TV Channel List All DTV Air 2 1 Air3 Air4 Air 5 Air 6 Air 7 DTV Air 7 1 Air 8 Air 9 Air 10 DTV Air 10 1 DTV Air 10 2 DTV Air 10 3 DTV Air 10 1 DTV Air 10 2 DTV Air 10 3 DTV Air 10 1 DTV Air ...

Page 34: ...ve Repeat the process to select the last three digits When you have finished press the ENTER button to assign the new name To erase the assigned new name select Clear by pressing the or button then press the ENTER button Press the EXIT button to exit The names of digital broadcasting channels are automatically assigned and cannot be labelled Name Move Enter Return TV Name Move Adjust Return TV Cha...

Page 35: ...ess the or button to select Signal Strength then press the ENTER button If the signal strength meter indicates that the signal is weak physically adjust your antenna to increase the signal strength Continue to adjust the antenna until you find the best position with the strongest signal Press the EXIT button to exit Unlike analog channels which can vary in reception quality from snowy to clear dig...

Page 36: ...m the system doesn t equal the standard signal mode adjust the mode by referring to your videocard user guide otherwise there may be no video For the display modes listed below the screen image has been optimized during manufacturing Mode Resolution Horizontal Frequency kHz Vertical Frequency Hz Pixel Clock Frequency MHz Sync Polarity H V IBM 640 x 350 720 x 400 31 469 31 469 70 086 70 087 25 175 ...

Page 37: ...fter the noise has been reduced re adjust the picture so that it is aligned on the center of the screen Preset Press the SOURCE button to select PC mode 1 Press the MENU button to display the menu Press the or button to select Picture then press the ENTER button Press the or button to select Screen then press the ENTER button 2 Press the ENTER button to select Image Lock 3 Press the or button to s...

Page 38: ...and Fine You can replace all image settings with the factory default values Preset Press the SOURCE button to select PC mode 1 Press the MENU button to display the menu Press the or button to select Picture then press the ENTER button Press the or button to select Screen then press the ENTER button 2 Press the or button to select Image Reset then press the ENTER button Press the EXIT button to exi...

Page 39: ...he date and time you want by pressing the or button then press the ENTER button Press the EXIT button to exit The current time will appear every time you press the INFO button You can set the month day year hour and minute directly by pressing the number buttons on the remote control Time Setting Time Clock Sleep Timer Off Timer 1 Inactivated Timer 2 Inactivated Timer 3 Inactivated TV Move Enter R...

Page 40: ...en press the ENTER button Press the EXIT button to exit Depending on the broadcast station and signal the auto time may not be set correctly If this occurs set the time manually The Antenna or cable must be connected in order to set the time automatically Time Clock Sleep Timer Off Timer 1 Inactivated Timer 2 Inactivated Timer 3 Inactivated TV Move Enter Return Clock Clock Mode Manual Clock Set Ti...

Page 41: ...mer Press the or button to select Activation Press the or button to select Off then press the ENTER button Press the EXIT button to exit Time Clock Sleep Timer Off Timer 1 Inactivated Timer 2 Inactivated Timer 3 Inactivated TV Move Enter Return 1 1 2008 12 00 am Sleep Timer Sets the Seelp Timer options TV Move Adjust Return Sleep Timer Sets the Seelp Timer options TV Move Adjust Return Minute Acti...

Page 42: ... pressing the number buttons on the remote control Auto Power Off When you set the timer On the television will eventually turn off if no controls are operated for 3 hours after the TV was turned on by the timer This function is only available in timer On mode and prevents overheating which may occur if a TV is on for too long time Setting the On Off Timer Time Clock Sleep Timer Off Timer 1 Inacti...

Page 43: ...hich resets the pin to 0 0 0 0 Power Off Mute 8 2 4 Power On Using the V Chip The V Chip feature automatically locks out programs that are deemed inappropriate for children The user must enter a PIN personal ID number before any of the V Chip restrictions are set up or changed V Chip function is not available in HDMI component or PC mode The Screen Saver is activated if there is no remote control ...

Page 44: ...rental Guidelines First set up a personal identification number PIN and enable the V Chip See previous section Parental restrictions can be set up using either of two methods The TV guidelines or the MPAA rating 1 Press the MENU button to display the menu Press the or button to select Setup then press the ENTER button 2 Press the or button to select V Chip then press the ENTER button The message E...

Page 45: ...ection 6 How to set the FV D L S and V sub ratings First select one of these TV Ratings TV Y TV Y7 TV G TV PG TV 14 or TV MA See Step 4 and press the button The symbol will be displayed for each sub rating While is selected press the ENTER button to go to a sub rating Press ENTER to block the sub rating To select a different TV Rating press the or button and then repeat the process ALL Lock all TV...

Page 46: ...rental guidance suggested PG 13 Parents strongly cautioned R Restricted Children under 17 should be accompanied by an adult NC 17 No children under age 17 X Adults only NR Not rated Allow all Press to unlock all TV ratings Block all Press to lock all TV ratings While a particular category is selected press the ENTER button to activate it The symbol will be displayed Press the ENTER button to block...

Page 47: ...8 Programming generally considered acceptable for children 8 years and over to watch on their own G General programming suitable for all audiences PG Parental Guidance 14 Programming contains themes or content which may not be suitable for viewers under the age of 14 18 Adult programming The V Chip will automatically block any category that is more restrictive For example if you block G category t...

Page 48: ...d acceptable for children 8 years and over to watch on their own 13 ans Programming may not be suitable for children under the age of 13 16 ans Programming is not suitable for children under the age of 16 18 ans Programming restricted to adults The V Chip will automatically block any category that is more restrictive For example if you block 8 ans category then 13 ans 16 ans and 18 ans will automa...

Page 49: ...ion Using the V Chip for Digital channels Parental restriction information can be used while watching DTV channels Move Enter Return Downloadable U S Rating TV DH MH H VH EH Humor Level Allow All Block All 1 2 Rating title The number of current rating title The number of all rating title Setup Plug Play Language English Time V Chip Caption Melody Medium Energy Saving Off SW Upgrade TV Move Enter R...

Page 50: ...t information carried in the program CC3 Secondary Synchronous Caption Service Alternate program related caption data typically second language captions CC4 Special Non Synchronous Use Captions Similar to CC2 Text1 First Text Service This may be various non program related data Text2 Second Text Service Additional data usually not program related Text3 Text4 Third and Fourth Text Services These da...

Page 51: ...nd Large The default is Standard Font Style This option consists of Default Style0 Style 7 You can change the font you want The default is Style 0 Foreground Color This option consists of Default White Black Red Green Blue Yellow Magenta and Cyan You can change the color of the letter The default is White Background Color This option consists of Default White Black Red Green Blue Yellow Magenta an...

Page 52: ...p Plug Play Language English Time V Chip Caption Melody Medium Energy Saving Off SW Upgrade TV Move Enter Return Off Low Medium High Using the Energy Saving Feature This feature adjusts the brightness of the TV in order to reduce power consumption When watching TV at night set the Energy Saving mode option to High to reduce eye fatigue as well as power consumption 1 Press the MENU button to displa...

Page 53: ...g the firmware upgrade Please check the firmware version after the upgrades are complete When software is upgraded video and audio settings you have made will return to their default factory settings We recommend you write down your settings so that you can easily reset them after the upgrade Upgrading the Software Samsung may offer upgrades for TV s firmware in the future Please contact the Samsu...

Page 54: ... transmission window Check the battery terminals Check signal cable message Ensure that the signal cable is firmly connected to the PC source Not Supported Mode message Check the maximum resolution and connected device s Video frequency Compare these values with the data in the Display Modes Digital broadcasting screen problem Please check the digital signal strength and input antenna The image is...

Page 55: ...frequency Hz 60 75 PC Maximum refresh rate at 60 Hz LN19A450C1D LN19A451C1D 1440 X 900 LN22A450C1D LN22A451C1D 1680 X1050 Image is not centered on the screen Adjust the horizontal and vertical position The screen position must be adjusted on the output source i e STB with a digital signal The picture appears distorted in the corner of the screen If Just Scan is selected with some external devices ...

Page 56: ...0 when you mount the LCD TV to a wall You will hear a Click sound when changing the angle from 1 to 2 or 3 to 2 Wall mount items sold separately allow you to mount the TV on the wall For the detailed information on installing the Wall Mount see the instruction in the Wall Mount items Contact a technician for installing the wall bracket Samsung Electronics is not responsible for any damage to the p...

Page 57: ...do not apply excess downward pressure to the upper left of right sides of the TV 2 Fasten two screws at position 1 and then fasten two screw at position 2 Stand the product up and fasten the screws If you fasten the screws with the LCD TV placed down it may lean to one side Disconnecting the Stand 1 Remove four screws from the back of the TV 2 Separate the stand from the TV Two or more people shou...

Page 58: ...mbly are provided Do not use screws longer than the standard dimension as they may cause damage to the inside of the TV set For wall mounts that do not comply with the VESA standard screw specifications the length of the screws may differ depending on their specifications Do not use screws that do not comply with the VESA standard screw specifications Do not use fasten the screws too strongly this...

Page 59: ... The Kensington Lock is a device used to physically x the system when using it in a public place The locking device has to be purchased separately The appearance and locking method may differ from the illustration depending on the manufacturer Refer to the manual provided with the Kensington Lock for proper use The locking device has to be purchased separately Figure 2 Figure 1 Cable Optional The ...

Page 60: ... Weight With Stand Without stand 11 5lbs 5 2 kg 10 4lbs 4 7 kg 16 1lbs 7 3 kg 13 0lbs 5 9 kg Environmental Considerations Operating Temperature Operating Humidity Storage Temperature Storage Humidity 50 F to 104 F 10 C to 40 C 10 to 80 non condensing 4 F to 113 F 20 C to 45 C 5 to 95 non condensing 50 F to 104 F 10 C to 40 C 10 to 80 non condensing 4 F to 113 F 20 C to 45 C 5 to 95 non condensing ...

Page 61: ...This page is intentionally left blank ...

Page 62: ...rvicio de Atención al Cliente Country Customer Care Center Web Site Address CANADA 1 800 SAMSUNG 726 7864 www samsung com ca Samsung Electronics Canada Inc Customer Service 55 Standish Court Mississauga Ontario L5R 4B2 Canada Samsung Electronique Canada Inc Service à la Clientèle 55 Standish Court Mississauga Ontario L5R 4B2 Canada U S A 1 800 SAMSUNG 726 7864 www samsung com Samsung Electronics A...

Page 63: ...ct please visit www samsung com global register LN19A450C1D LN19A451C1D LN22A450C1D LN22A451C1D Rear Panel Side Panel Jacks 1 AUDIO OUT 2 DIGITAL AUDIO OUT OPTICAL 3 PC IN PC AUDIO 4 DVI IN R AUDIO L HDMI DVI IN 5 SERVICE EX LINK 6 ANT IN 7 KENSINGTON LOCK 8 HEADPHONE 9 AV IN S VIDEO 0 COMPONENT IN POWER INPUT Audio Output Performance Comparison OPTICAL Digital AUDIO Analog Best Normal Video Input...

Page 64: ...t frequently used functions 8 UP DOWN LEFT RIGHT ENTER Use to select on screen menu items and change menu values 9 INFO Press to display information on the TV screen 0 COLOR BUTTONS Use these buttons in the Channel list etc CC Controls the caption decoder MTS Press to choose stereo mono or Separate Audio Program SAP broadcast SOURCE Press to display and select the available video sources PRE CH Tu...

Page 65: ... single cable The difference between HDMI and DVI is that the HDMI device is smaller in size and has the HDCP High Bandwidth Digital Copy Protection coding feature installed Connect an HDMI Cable between the HDMI DVI IN jack on the TV and the HDMI jack on the DVD Player or Cable Box Satellite receiver Set Top Box DVD Player or Cable Box Satellite receiver Set Top Box Each DVD Player or Cable Box S...

Page 66: ...component video and audio connections For example if connecting a Component video cable to COMPONENT IN connect the audio cable to COMPONENT IN also Each DVD Player or Cable Box Satellite receiver Set Top Box has a different back panel configuration When connecting a DVD Player or Cable Box Satellite receiver Set Top Box match the color of the connection terminal to the cable Connecting a Camcorde...

Page 67: ...tenna from the back of the TV Connect Audio Cables between the AUDIO OUT jacks on the VCR and the AV IN R AUDIO L jacks on the TV Video Connection S Video Connection TV Rear Panel 1 RF Cable Not supplied 3 Audio Cable Not supplied VCR Rear Panel 1 2 Connect an S Video Cable between the S VIDEO OUT jack on the VCR and the AV IN S VIDEO jack on the TV 3 Connect Audio Cables between the AUDIO OUT jac...

Page 68: ...el sound to the Home theater receiver When the source is a digital component such as a DVD and is connected to the TV via HDMI only 2 channel sound will be heard from the Home Theater receiver If you want to hear 5 1 channel audio connect the DIGITAL AUDIO OUT OPTICAL jack on the DVD player or Cable Satellite Box directly to an Amplifier or Home Theater not the TV Connecting an Amplifier DVD Home ...

Page 69: ...l configuration When connecting a PC match the color of the connection terminal to the cable When using an HDMI DVI cable connection you must use the HDMI DVI IN jack Using the D Sub Cable 1 Connect a HDMI DVI cable between the HDMI DVI IN jack on the TV and the PC output jack on your computer 2 Connect a 3 5 mm Stereo mini plug 2RCA Cable between the DVI IN R AUDIO L jack on the TV and the Audio ...

Page 70: ...Press the ENTER button If you have Digital cable TV select the cable system signal source for both Analog and Digital Viewing the Menus 5 The TV begins memorizing all available stations After all the available channels are stored it start to remove scrambled channels Press the EXIT button to exit To Stop the Auto Program Function Press the MENU button while the Auto Program function is being execu...

Page 71: ...tton Picture Mode Dynamic Selects the picture for high definition in a bright room Standard Selects the picture for the optimum display in a normal environment Movie Selects the picture for viewing movies in a dark room 3 Press the or button to decrease or increase the value of a particular item Press the EXIT button to exit When you make changes to Backlight Contrast Brightness Sharpness Color or...

Page 72: ...or an input source connected to the TV set Use this button to choose an input source that you would like to watch Available signal sources TV AV S Video Component PC HDMI You can choose only those external devices that are connected to the TV Source List TV Move Enter Return TV AV S Video Component PC HDMI ...

Page 73: ...reen Make sure the broadcast you re receiving is High De nition HD HD channels sometimes broadcast Standard De nition SD programming which can cause black bars Set your cable satellite box to stretch or widescreen mode to eliminate the bars Picture has a Red Green or Pink tint Make sure the Component cables are connected to the correct jacks Closed Captioning not working If you are using a Cable S...

Page 74: ...rvicio de Atención al Cliente Country Customer Care Center Web Site Address CANADA 1 800 SAMSUNG 726 7864 www samsung com ca Samsung Electronics Canada Inc Customer Service 55 Standish Court Mississauga Ontario L5R 4B2 Canada Samsung Electronique Canada Inc Service à la Clientèle 55 Standish Court Mississauga Ontario L5R 4B2 Canada U S A 1 800 SAMSUNG 726 7864 www samsung com Samsung Electronics A...

Page 75: ...tors and the point where they exit from the appliance To protect this apparatus from a lightning stoml or when it is left unattended and unused for long periods of time unplug it from the wall outlet and disconnect the antenna or cable system This will prevent damage to the set due to lightning and power line surges Before connecting the AC power cord to the DC adaptor outlet make sure the voltage...

Page 76: ...c electrique ou un incendie Appareils de CLASSE I uniquement Pour deconnecter Itappareil du secteur la prise doil etre dcbranehee de la prise electrique du seeteur Par consequent la prise du secteur doit etre en ctat de marche Utiliser uniquement des prises corrcctement relices it la terre Rangez les accessoires batterie etc dans un endroit sur hors de la portee des enfants N installez pas Ie prod...

Page 77: ...nde se utilizem substancias quimicas e locais onde 0 monitor esteja a funcionar 24 haras por dia como em aerop0rlos esta oes de comboio etc Se nao 0 fizer pode provocar serios danos no produto Utilize uma ficha e uma tomada devidamente Iigadas a terra Uma Iiga ao de terra deficiente pode causar choque electrico ou danos no equipamento 56 equipamento de classe 1 Deve puxar a ficha da tomada para de...

Page 78: ... outlet consult an electrician for replacement of the obsolete oUllet 10 Protect the power cord from being walked on or pinched particularly at plugs convenience receptacles and the point where they exit from the apparatus II Only use attachments accessories specitied by the manufacturer 12 Use only with cart stand tripod bracket or table specified by the manufacturer or sold with the apparatus Wh...

Page 79: ...Printed in Mexico AA68 03242L 01 ...

Page 80: ...limited to damage which occurs in shipment delivery and installation applications and uses for which this product was not intended altered product or serial numbers cosmetic damage or exterior finish accidents abuse neglect fire water lightning or other acts of nature use of products equipment systems utilities services parts supplies accessories applications installations repairs external wiring ...

Page 81: ...rk side bars on non expanded standard format television video and programming should be limited to no more than 15 of the total television viewing per week Additionally viewing other stationary images and text such as stock market reports video game displays station logos web sites or computer graphics and patterns should be limited as described above for all televisions Displaying any stationary ...

Reviews: