background image

English - 1

Not available in DTV or external input mode.

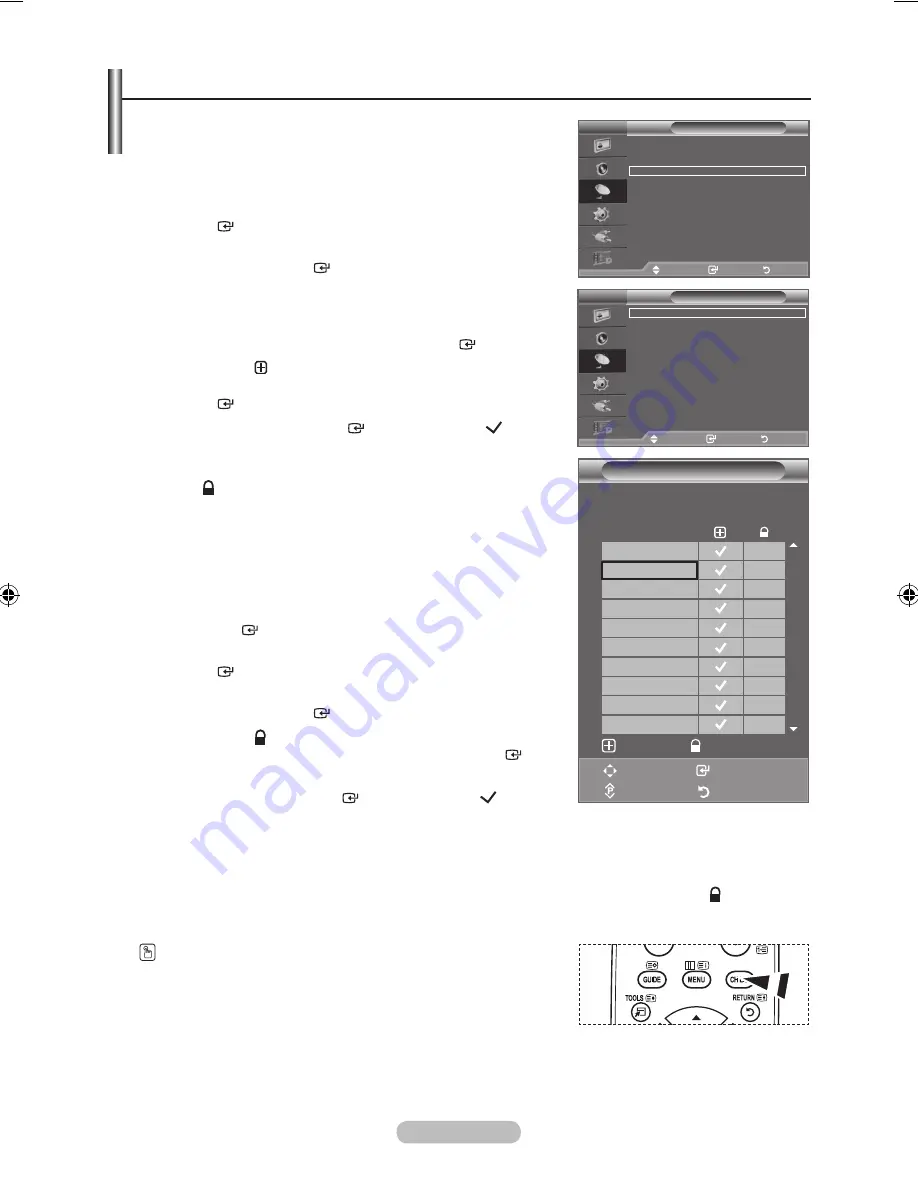
Using the Channel Manager, you can conveniently lock or add 

channels.
1.

  Press the 

MENU

 button to display the menu.   


 Press the 

 or 

 button to select "Channel", then press the 

ENtER  

button.

.

  Press the 

 or 

 button to select "Channel Manager",  


then press the 

ENtER  

button.

♦    Adding channels


  Using the Channel List, you can add channels.

.

  Select "Channel List" by pressing the 

ENtER  

button.

.

   Move to the (

) field by pressing the ▲, ▼, ◄ or ► 


button, select a channel to be added, and press the  

ENtER  

button to add the channel.

If you press the 

ENtER  

button again, the ( ) symbol 

next to the channel disappears and the channel is not 

added.
" " is active when "Child Lock" is selected to "On".

♦    Locking channels


   This feature allows you to prevent unauthorized users, such 

as children, from watching unsuitable programmes by muting 

out video and audio.

.

  Press the 

 or 

 button to select "Child Lock", then press  


the 

ENtER  

button.

.

   Select "On" by pressing the ▲ or ▼ button, then press the 

ENtER  

button.

.

  Press the 

 or 

 button to select "Channel List",  


then press the 

ENtER  

button.

.

   Move to the " "

 field by pressing the ▲, ▼, ◄ or ► button, 

select a channel to be locked, and press the 

ENtER  


button.

If you press the 

ENtER  

button again, the ( ) symbol 

next to the channel disappears and the channel lock is 

cancelled.

A blue screen is displayed when "Child Lock" is activated.

9.

  Press the 

EXIt

 button to exit.

 Select "On" or "Off" in "Child Lock" to easily turn the channels which selected on " " to be active 

or inactive. 

   You can select these options by simply pressing the 

Ch LISt


button on the remote control.

Adding / Locking Channels

P   1   C

Channel List

Move 

             Enter

Page 

             Return

Add 

           Lock

1 / 10

Prog.

0    C--
1    C
    bbC 1
   C
   C
   C
   S
   S
   S
9   S

Channel

Country 

: United Kingdom 


Auto Store 


Manual Store 


Channel Manager 


Sort 


Name 


Fine tune 


LNA 

: Off 


Move    

Enter 

Return

tV

tV

Channel Manager

Channel List 


Child Lock 

: Off 


Move    

Enter 

Return

BN68-01464G-Eng.indd   13

2008-09-17   �� 3:11:52

Summary of Contents for LE40A536T1F

Page 1: ...MSUNG 7267864 0 14 Min www samsung de HUNGARY 06 80 SAMSUNG 7267864 www samsung com hu ITALIA 800 SAMSUNG 7267864 www samsung com it LUXEMBURG 02 261 03 710 www samsung com lu NETHERLANDS 0900 SAMSUNG...

Page 2: ...riod of time may leave traces of borders displayed on the left right and center of the screen caused by the difference of light emission on the screen Playing a DVD or a game console may cause a simil...

Page 3: ...l List Automatically 29 Updating the Channel List Manually 29 Editing Your Favourite Channels 30 Selecting Channel List 32 Displaying Programme Information 32 Viewing the EPG Electronic Programme Guid...

Page 4: ...t Samsung Electronics is not responsible for any damage to the product or injury to yourself or others if you elect to install the TV on your own Do not install your Wall Mount Kit while your TV is tu...

Page 5: ...use the buttons as you use the and buttons on the remote control 4 Press to change channels In the on screen menu use the buttons as you use the and buttons on the remote control Without the Remote Co...

Page 6: ...ENT IN Connect component video cables optional to component connector PR PB Y on the rear of your set and the other ends to corresponding component video out connectors on the DTV or DVD If you wish t...

Page 7: ...r of your set and the other ends to corresponding audio in connectors on the Amplifier or DVD Home Theatre 5 ANT IN To view television channels correctly a signal must be received by the set from one...

Page 8: ...in a public place If you want to use a locking device contact the dealer where you purchased the TV The location of the kensington lock may be different depending on its model DIGITAL AUDIO OUT OPTIC...

Page 9: ...n menu Displays the Channel List on screen Returns to the previous menu Control the cursor in the menu a Exit the on screen menu b Use this when connecting a SAMSUNG DMA Digital Media Adapter device t...

Page 10: ...also can press the POWER button or the TV DTV button on the remote control to turn the TV on The channel that you were watching last is reselected automatically 3 Press the numeric button 0 9 or chann...

Page 11: ...26 Dual l ll see page 22 Auto Adjustment see page 45 1 With the power on press the MENU button The main menu appears on the screen The menu s left side has icons Picture Sound Channel Setup Input Digi...

Page 12: ...cable is connected correctly 5 Select the appropriate country by pressing the or button Press the ENTER button to confirm your choice 6 The message Some DTV functions may not be available Digital Sca...

Page 13: ...l or desired programme numbers However you can sort numbers manually and clear any channels you do not wish to watch 1 Press the MENU button to display the menu Press the or button to select Channel t...

Page 14: ...to be stored Press the or button to select C Air channel or S Cable channel Press the button then press the or button to select the required number You can also select the channel number directly by...

Page 15: ...d audio 5 Press the or button to select Child Lock then press the ENTER button 6 Select On by pressing the or button then press the ENTER button 7 Press the or button to select Channel List then press...

Page 16: ...ign new names Not available in DTV or external input mode 1 Press the MENU button to display the menu Press the or button to select Channel then press the ENTER button 2 Press the or button to select...

Page 17: ...press the ENTER button Fine Tuning Channel Reception Channel Country United Kingdom Auto Store Manual Store Channel Manager Sort Name Fine Tune LNA Off TV Move Enter Return Fine Tune P 1 0 Reset Adju...

Page 18: ...st be adjusted separately for each input source Changing the Picture Standard Picture Mode Standard Backlight 7 Contrast 95 Brightness 45 Sharpness 50 Colour 50 Tint G 50 R 50 Detailed Settings Pictur...

Page 19: ...on page 18 The energy consumed during use can be significantly reduced if the level of brightness of the picture is reduced and then this will reduce the overall running cost Adjusting the Custom Pict...

Page 20: ...a particular item Press the ENTER button Reset Resets the colour space to the default values White Balance R Offset G Offset B Offset R Gain G Gain B Gain Reset You can adjust the colour temperature...

Page 21: ...ion to see the full image without any cutoff when HDMI 720p 1080i 1080p or Component 1080i 1080p signals are input Auto Wide function is available only in TV DTV Ext 1 Ext 2 AV and S Video mode In PC...

Page 22: ...u can view the applied DNIe and normal pictures on the screen for demonstration purposes Using this function you can view the difference in the visual quality DNIe Digital Natural Image engine This fe...

Page 23: ...d SRS technology that solves the problem of playing 5 1 multichannel content over two speakers TruSurround delivers a compelling virtual surround sound experience through any two speaker playback syst...

Page 24: ...MONO STEREO Dual MONO DUAL 1 DUAL 2 DUAL 1 If the stereo signal is weak and an automatic switching occurs then switch to the Mono This function is only activated in stereo sound signal It is deactiva...

Page 25: ...u wish to use the automatic On Off timers 1 Press the MENU button to display the menu Press the or button to select Setup then press the ENTER button 2 Press the or button to select Time then press th...

Page 26: ...er Settings can be made You must set the clock first 4 Press the or button to select the required item below Press the or button to adjust to the setting satisfied On Time Select hour minute and On Of...

Page 27: ...orts Provides the optimal picture and sound quality for sports You can enjoy more thrilling Colour and sound Cinema Provides the optimal picture and sound quality for cinema You can experience a riche...

Page 28: ...t Tools You can select among external sources connected to your TV s input jacks 1 Press the MENU button to display the menu Press the or button to select Input then press the ENTER button 2 Press the...

Page 29: ...to edit Press the ENTER button 4 Press the or button to select the required device Press the ENTER button 5 Press the EXIT button to exit When a PC with a resolution of 1280 x 1024 60Hz is connected t...

Page 30: ...vourite Channels Channel List Setup Menu Transparency Change PIN Parental Lock Subtitle Subtitle Mode Audio Format Audio Description Digital Text Time Zone Common Interface System Product Information...

Page 31: ...n message is displayed Updating the Channel List Manually You can specify the channel for a fast channel search 1 Press the MENU button to display the menu Press the or button to select Digital Menu t...

Page 32: ...tton to display the menu Press the or button to select Digital Menu then press the ENTER button 2 Press the or button to select Digital Channel then press the ENTER button 3 Press the or button to sel...

Page 33: ...signed to the other channel That is the two numbers are exchanged The Favourite Channels are automatically sorted in ascending order of channel numbers 7 Press the EXIT button to exit Preview 1 In the...

Page 34: ...nd all channels Your favourite channels are only displayed if they were previously set in the Editing Your Favourite Channels menu refer to page 30 6 Press the red or green button to display the previ...

Page 35: ...s cancelled with the clock icon gone For details about scheduling programmes refer to the next page View programme information Select a programme of your choice by pressing the button Press the INFO b...

Page 36: ...ed button The channel will be switched to the scheduled programme 5 Press the ENTER button to select an item and adjust with the or button You can also set hour and minute by pressing the number butto...

Page 37: ...e list of channels that have been scanned by the channel list update All channels are displayed in the all channel mode Favourites favourite channels is the list of channels that has been set in the E...

Page 38: ...u then press the ENTER button 2 Press the or button to select Setup then press the ENTER button 3 Press the or button to select Change PIN then press the ENTER button The Enter PIN is displayed 4 Ente...

Page 39: ...h Hard of hearing mode is selected Selecting the Audio Format You can only hear Dolby Digital sound through the audio receiver connected through an optical cable You can only hear PCM sound through th...

Page 40: ...ription This is an auxiliary audio function that provides an additional audio track for visually challenged persons This function handles the Audio Stream for the AD Audio Description when it is sent...

Page 41: ...information For service or repair please contact a Samsung approved dealer 1 Press the MENU button to display the menu Press the or button to select Digital Menu then press the ENTER button 2 Press t...

Page 42: ...rrently broadcasting channels Standby Mode Upgrade On Off Press the ENTER button To continue software upgrade with master power on Select On by pressing the or button 45 minutes after entering standby...

Page 43: ...ommon interface slot Insert the CAM in the direction of the arrow right up to the end so that it is parallel with the slot 4 Check if you can see a picture on a scrambled signal channel Selecting the...

Page 44: ...erences returning all values to their default factory state 1 Press the MENU button to display the menu Press the or button to select Digital Menu then press the ENTER button 2 Press the or button to...

Page 45: ...ns of the selected menu are displayed Select the appropriate language by pressing the or button Press the ENTER button to confirm your choice If you change the language setting the Subtitle Language A...

Page 46: ...n the type of PC monitor and its resolution The resolutions in the table are recommended D Sub Input Mode Resolution Horizontal Frequency kHz Vertical Frequency Hz Pixel Clock Frequency MHz Sync Polar...

Page 47: ...tune again After the noise has been reduced re adjust the picture so that it is aligned on the center of screen Press the or button to select Coarse or Fine then press the ENTER button Press the or b...

Page 48: ...listen to 2 channel stereo sound in other cases Make sure to connect the Digital Audio IN Optical of the home theatre and the TV correctly to listen to TV sound through the home theatre However you c...

Page 49: ...ss the ENTER button 2 Press the or button to select Yes then press the ENTER button The Auto turn off function is enabled If you select No the Auto turn off function is cancelled Press the EXIT button...

Page 50: ...s may take up to 2 minutes You cannot cancel the operation during the switching operation The time required to scan for devices is determined by the number of connected devices When the device scan is...

Page 51: ...rating Status Available Buttons Anynet Device After switching to the device when the menu of the corresponding device is displayed on the screen Numeric buttons ENTER buttons Colour buttons EXIT butto...

Page 52: ...Anynet HDMI CEC Press the or button to select Receiver then press the ENTER button 2 Press the or button to select to On then press the ENTER button Now you can listen to sound through the receiver 3...

Page 53: ...CE button on the TV remote control and select a device other than Anynet devices Press any of P PRE CH and such to change to the TV mode Note that the channel button operates only when a tuner embedde...

Page 54: ...it twice to overlap the teletext with the current broadcasting screen 7 0 mode Press to select the teletext mode LIST FLOF If you press it in the LIST mode it switches into the List save mode In the L...

Page 55: ...ge number or search status D Date and time E Text F Status information FASTEXT information Teletext information is often divided between several pages displayed in sequence which can be accessed by En...

Page 56: ...w button when no OSD is displayed on the TV screen the Adjustment screen appears Press the INFO button to reset Press the or button to select Yes then press the ENTER button The position is initialize...

Page 57: ...ls please contact your nearest dealer The auto wall mount will not work when Anynet is operating 40 inch model are not compatible with the old electrically powered wall mount model WMN5090A Wall Mount...

Page 58: ...ase these additionally 2 Remove the screws from the center back of the TV put the screws into the clamps and then fasten the screws onto the TV again Screws may not be supplied with the product In thi...

Page 59: ...s interference is often due to the use of an indoor aerial Remote control malfunctions Replace the remote control batteries Clean the upper edge of the remote control transmission window Check the bat...

Page 60: ...e product Model Name LE40A536 Screen Size Diagonal 40 inch PC Resolution 1280 x 1024 60 Hz Sound Output 10W x 2 Dimensions WxDxH Body With stand 971 X 87 X 628 mm 971 X 300 X 687 mm Weight With stand...

Reviews: