background image

English - 5

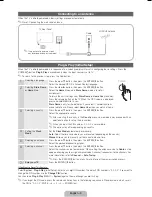
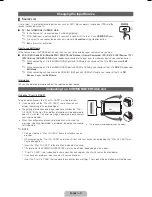
Connecting to an Antenna

When the TV is initially powered on, basic settings proceed automatically.


Preset: Connecting the mains and antenna. 

Plug & Play (Initial Setup)

When the TV is initially powered on, a sequence of on-screen prompts will assist in configuring basic settings. Press the 

POWER

P

 button. 

Plug & Play

 is available only when the Input source is set to TV.


To return to the previous step, press the Red button.

1

Selecting a language

Press the 

 or 

 button, then press the 

ENTER

E

 button. 

Select the desired OSD (On Screen Display) language.

P

POWER

2

Selecting 

Store Demo


or 

Home Use

Press the 

 or 

 button, then press the 

ENTER

E

 button.

Select the 

Home Use

 mode. 

Store Demo

 mode is for retail 

environments.
To return the unit’s settings from 

Store Demo

 to 

Home Use

 (standard): 

Press the volume button on the TV. When the OSD volume is displayed, 
press and hold 

MENU

 for 5 sec.

Store Demo

 is only for shop display. If you select it, several functions 

are not able to use. Please select 

Home Use

 when you watch at home.

3

Selecting a country

Press the 

 or 

 button, then press the 

ENTER

E

 button. 

Select the appropriate country.


After selecting the country in the 

Country

 menu, some models may proceed with an 

additional option to setup the pin number.


When you input the PIN number, 0-0-0-0 is not available. 


The option may differ depending on country.

4

Setting the 

Clock 

Mode

Set the 

Clock Mode

 automatically or manually.

Auto

: Select the time zone where you are located. (depending on the country)

Manual

: Allows you to manually set the current date and time. 

5

Selecting an antenna

Press the 

 or 

 button, then press the 

ENTER

E

 button. 

Select the desired broadcasting signal.

6

Selecting a channel

Press the 

 or 

 button, then press the 

ENTER

E

 button. 

Select the channel source to memorise. When setting the antenna source to 

Cable

, a step 

appears allowing you to assign numerical values (channel frequencies) to the channels. For 
more information, refer to 

Channel


Auto Tuning

.


Press the 

ENTER

E

 button at any time to interrupt the memorisation process.

7

Enjoy your TV. 

Press the 

ENTER

E

 button.

If You Want to Reset This Feature...

Select 

System

 - 

Plug & Play

 (Initial Setup). Enter your 4 digit PIN number. The default PIN number is “0-0-0-0”. If you want to 

change the PIN number, use the 

Change PIN

 function.

You should do 

Plug & Play

 (

MENU

 →


System

) again at home although you did in shop.


If you forget the PIN code, press the remote control buttons in the following sequence in Standby mode, which resets 
the PIN to “0-0-0-0”: 

MUTE


 8 

 2 

 4 


POWER

 (on).

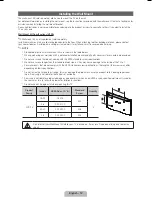
VHF/UHF Antenna

Cable

or

TV Rear Panel


The position of power input port 
may differ depending on the model.

[LCD-ZG ZT]BN68-03717C-L04.indb   5

2011-04-29   �� 10:12:38

Summary of Contents for LE32D400

Page 1: ...11 SAMSUNG 80111 7267864 αστική χρέωση Από κινητό 210 6897691 2 Για φωτογραφικές μηχανές βιντεοκάμερες τηλεοράσεις οικιακές συσκευές Από κινητό και σταθερό 2106293100 www samsung com HUNGARY 06 80 SAMSUNG 726 7864 www samsung com ITALIA 800 SAMSUNG 726 7864 www samsung com KOSOVO 381 0113216899 LUXEMBURG 261 03 710 www samsung com MACEDONIA 023 207 777 MONTENEGRO 020 405 888 NETHERLANDS 0900 SAMSU...

Page 2: ...desired picture quality exceeded values may speed up the burnout process Frequently use all TV features designed to reduce image retention and screen burnout refer to proper user manual section for details Securing the Installation Space Keep the required distances between the product and other objects e g walls to ensure proper ventilation Failing to do so may result in fire or a problem with the...

Page 3: ...ng the Control Panel The product colour and shape may vary depending on the model Control Panel Remote control sensor Aim the remote control towards this spot on the TV Power Indicator Blinks and turns off when the power is on and lights up in standby mode SOURCEE Toggles between all the available input sources In the on screen menu use this button as you would use the ENTERE button on the remote ...

Page 4: ...y select Teletext ON Double Mix or OFF Displays the main on screen menu Quickly select frequently used functions Displays the My Downloads Watch TV and Source Returns to the previous menu Selects the on screen menu items and changes the values seen on the menu Buttons used in the Channel List Channel Manager My Downloads menu etc E MANUAL Displays the e Manual guide P SIZE Selects the picture size...

Page 5: ...itional option to setup the pin number When you input the PIN number 0 0 0 0 is not available The option may differ depending on country 4 Setting the Clock Mode Set the Clock Mode automatically or manually Auto Select the time zone where you are located depending on the country Manual Allows you to manually set the current date and time 5 Selecting an antenna Press the or button then press the EN...

Page 6: ... if an external device that uses an older version of HDMI mode is connected to the TV If such a problem occurs ask the manufacturer of the external device about the HDMI version and if out of date request an upgrade x x Be sure to purchase a certified HDMI cable Otherwise the picture may not display or a connection error may occur x x A basic high speed HDMI cable or one with ethernet is recommend...

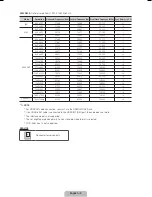
Page 7: ...nding on the PC An HDMI cable supports digital video and audio signals and does not require an audio cable Display Modes HDMI DVI Input LE32D400 LE32D403 Optimal resolution is 1360 x 768 60Hz Mode Resolution Horizontal Frequency KHz Vertical Frequency Hz Pixel Clock Frequency MHz Sync Polarity H V IBM 640 x 350 31 469 70 086 25 175 720 x 400 31 469 70 087 28 322 MAC 640 x 480 35 000 66 667 30 240 ...

Page 8: ...69 75 000 1024 x 768 60 023 75 029 78 750 1152 x 864 67 500 75 000 108 000 1280 x 1024 63 981 60 020 108 000 1280 x 1024 79 976 75 025 135 000 1280 x 800 49 702 59 810 83 500 1280 x 800 62 795 74 934 106 500 1280 x 960 60 000 60 000 108 000 1360 x 768 47 712 60 015 85 500 1440 x 900 55 935 59 887 106 500 1440 x 900 70 635 74 984 136 750 1680 x 1050 65 290 59 954 146 250 VESA DMT DTV CEA 1920 x 108...

Page 9: ...rmation You can see detailed information about the selected external device Connecting to a COMMON INTERFACE slot Using the CI or CI CARD To watch paid channels the CI or CI CARD must be inserted y y If you do not insert the CI or CI CARD some channels will display the message Scrambled Signal y y The pairing information containing a telephone number the CI or CI CARD ID the Host ID and other info...

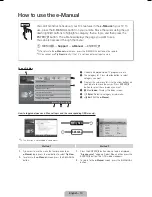
Page 10: ...ging the Preset Picture Mode 1 1 a Try Now b Home Zoom Index L Page e Exit This function is not enabled in some menus Method 1 Method 2 1 If you want to use the menu that corresponds to an e Manual topic press the red button to select Try Now 2 To return to the e Manual screen press the E MANUAL button 1 Press the ENTERE button when a topic is displayed Are you sure appears Select Yes and then pre...

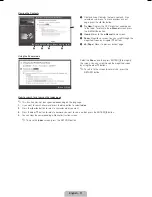
Page 11: ... 5 L Page Moves to previous or next page Using the Zoom mode UMove R Return Select the Zoom and then press ENTERE to magnify the screen You can scroll through the magnified screen by using the or buttons To return to the screen to normal size press the RETURN button How to search for a topic on the index page This function may not be supported depending on the language 1 If you want to search a ke...

Page 12: ...nstallation manual and all parts necessary for assembly are provided x x Do not use screws that do not comply with the VESA standard screw specifications x x Do not use screws longer than the standard dimension as they may cause damage to the inside of the TV set x x For wall mounts that do not comply with the VESA standard screw specifications the length of the screws may differ depending on thei...

Page 13: ... sure to select the TV s correct source by pressing the SOURCE button on the remote control Reboot the connected device by reconnecting the device s power cable The remote control does not work Replace the remote control batteries with the poles in the right direction Clean the sensor s transmission window on the remote Try pointing the remote directly at the TV from 5 6 feet away The cable set to...

Page 14: ...gain Screws may not be supplied with the product In this case please purchase the screws of the following specifications Screw Specifications x x For a 32 40 inch TV M6 3 Connect the clamps fixed onto the TV and the clamps fixed onto the wall with a strong string and then tie the string tightly NOTE x x Install the TV near to the wall so that it does not fall backwards x x It is safe to connect th...

Page 15: ...Ch Linear PCM 32 44 1 48kHz 16 20 24bits Model Name LE32D400 LE32D403 Display Resolution 1360 x 768 Screen Size 32 inches 32 inches Sound Output 10 W X 2 Dimensions WxDxH Body With stand 784 4 X 88 8 X 502 9 mm 784 4 X 182 4 X 545 3 mm 784 4 X 98 1 X 502 9 mm 784 4 X 182 4 X 545 3 mm Weight Without Stand With Stand 8 1 kg 9 2 kg 7 7 kg 8 7 kg Model Name LE40D503 Display Resolution 1920 x 1080 Scre...

Page 16: ...u finden Reduzieren Sie die Helligkeits und Kontrastwerte soweit wie möglich um immer noch die gewünschte Bildqualität zu erreichen Zu hohe Werte können das Ausbrennen beschleunigen Verwenden Sie regelmäßig alle Funktionen Ihres Fernsehgeräts die dazu dienen das Einbrennen von Bildern und das Ausbrennen des Bildschirms zu reduzieren Weitere Informationen hierzu finden Sie in den entsprechenden Abs...

Page 17: ... je nach Modell unterscheiden Systemsteuerung Fernbedienungssensor Richten Sie die Fernbedienung auf diesen Sensor am Fernsehgerät Netzanzeige Beim Einschalten des Fernsehgeräts blinkt die Netzleuchte kurz und erlischt anschließend Im Standby Modus leuchtet die Anzeige permanent SOURCEE Umschalten zwischen allen verfügbaren Signalquellen Im Bildschirmmenü können Sie diese Schaltfläche genauso wie ...

Page 18: ...von Eigene Inhalte Fernsehen und Quelle Zurück zum vorherigen Menü Auswählen von Optionen im Bildschirmmenü und Ändern von Menüwerten Tasten die in den Menüs Senderliste Kanal Manager Eigene Inhalte usw E MANUAL Anzeigen des e Manuals P SIZE Hiermit wählen Sie das Bildformat AD SUBT Auswahl der Audio Beschreibung nicht überall verfügbar Digitale Untertitel anzeigen Anzeigen und Auswählen der verfü...

Page 19: ...Land im Menü Land eingestellt haben werden Sie bei manchen Modellen aufgefordert die PIN Nummer einzurichten Die Ziffernkombination 0 0 0 0 dürfen Sie als PIN Nummer nicht eingeben Diese Option kann je nach Land unterschiedlich sein 4 Einstellen des Uhrmodus Stellen Sie den Uhrmodus automatisch oder manuell ein Auto Wählen Sie die Zeitzone für Ihre Region je nach Land Manuell Hiermit können Sie da...

Page 20: ...eschlossen wird das eine ältere HDMI Version verwendet Wenn solch ein Problem auftritt erfragen Sie die HDMI Version beim Hersteller des externen Geräts und bitten Sie wenn veraltet um ein Upgrade x x Achten Sie darauf nur ein zertifiziertes HDMI Kabel zu kaufen Andernfalls kann es passieren dass kein Bild angezeigt wird oder ein Verbindungsfehler auftritt x x Es wird ein einfaches Hochgeschwindig...

Page 21: ...d je nach PC möglicherweise nicht unterstützt HDMI Kabel unterstützen digitale Video und Audiosignale und Sie benötigen dann kein Audiokabel mehr Anzeigemodi HDMI DVI Eingang LE32D400 LE32D403 Die optimale Auflösung beträgt 1360 x 768 bei 60Hz Modus Auflösung Horizontalfrequenz kHz Vertikalfrequenz Hz Pixeltakt MHz Synchronisationspolarität H V IBM 640 x 350 31 469 70 086 25 175 720 x 400 31 469 7...

Page 22: ...50 1152 x 864 67 500 75 000 108 000 1280 x 1024 63 981 60 020 108 000 1280 x 1024 79 976 75 025 135 000 1280 x 800 49 702 59 810 83 500 1280 x 800 62 795 74 934 106 500 1280 x 960 60 000 60 000 108 000 1360 x 768 47 712 60 015 85 500 1440 x 900 55 935 59 887 106 500 1440 x 900 70 635 74 984 136 750 1680 x 1050 65 290 59 954 146 250 VESA DMT DTV CEA 1920 x 1080p 67 500 60 000 148 500 HINWEIS x x Be...

Page 23: ...bearb den DVI Geräte Modus des Fernsehgeräts aktivieren Informationen Sie können detaillierte Informationen zum gewälten externen Gerät anzeigen Anschließen an den COMMON INTERFACE Steckplatz Verwenden der CI oder CI Karte Um Bezahlsender zu sehen müssen Sie eine CI oder CI Karte einsetzen y y Wenn Sie keine CI oder CI Karte einsetzen wird bei einigen Kanälen die Meldung Gestörtes Signal angezeigt...

Page 24: ...rt Zoom Index L Seite e Beenden Diese Funktion ist in manchen Menüs nicht verfügbar Methode 1 Methode 2 1 Wenn Sie das entsprechende Menü zu einem Thema im e Manual ausführen möchten drücken Sie die rote Taste um Jetzt test auszuwählen 2 Drücken Sie die Taste E MANUAL um zum Fenster des e Manual zurückzukehren 1 Drücken Sie die Taste ENTERE wenn ein Thema angezeigt wird Die Meldung Sicher wird ang...

Page 25: ...er zur nächsten Seite Verwenden des Zoommodus UVersch R Zurück Wählen Sie Zoom und drücken Sie dann die Taste ENTERE um das Fenster zu vergrößern Mit der Taste oder können Sie durch das vergrößerte Fenster blättern Drücken Sie die Taste RETURN um das Fenster auf die normale Größe zurückzusetzen So suchen Sie auf der Indexseite nach einem Thema Diese Funktion wird je nach Sprache möglicherweise nic...

Page 26: ...ntage erforderlichen Teile x x Verwenden Sie keine Schrauben die nicht der VESA Standardspezifikation für Schrauben entsprechen x x Verwenden Sie keine Schrauben die länger sind als hier angegeben da damit innen liegende Bauteile des Fernsehers beschädigt werden können x x Bei Wandhalterungen die nicht der VESA Standardspezifikation für Schrauben entsprechen kann die Länge der Schrauben je nach Sp...

Page 27: ...te eingeschaltet sind Vergewissern Sie sich dass die richtige Signalquelle für den Fernseher eingestellt ist Drücken Sie dazu die Taste SOURCE auf der Fernbedienung Schließen Sie das Netzkabel an um das angeschlossene Gerät neu zu starten Die Fernbedienung funktioniert nicht Ersetzen Sie die Batterien der Fernbedienung und achten Sie dabei auf die richtige Polung Reinigen Sie das Sendefenster der ...

Page 28: ...erät Die Schrauben werden möglicherweise nicht zusammen mit dem Gerät geliefert Kaufen Sie in diesem Fall Schrauben entsprechend den folgenden Angaben Daten der Schrauben x x Für Fernseher von 32 bis 40 Zoll M6 3 Verbinden Sie die Halterungen an der Wand und die Halterungen am Fernsehgerät mit einem festen Band und ziehen Sie das Band dann fest HINWEIS x x Stellen Sie das Fernsehgerät in der Nähe ...

Page 29: ... 480p Audio 2 Kanal Linear PCM 32 44 1 48 kHz 16 20 24 Bit Modellname LE32D400 LE32D403 Anzeigeauflösung 1360 x 768 Bildschirmgröße 32 zoll 32 zoll Ton Ausgang 10 W X 2 Abmessungen BxTxH Gehäuse Mit Fuß 784 4 x 88 8 x 502 9 mm 784 4 x 182 4 x 545 3 mm 784 4 x 98 1 x 502 9 mm 784 4 x 182 4 x 545 3 mm Gewicht Ohne Fuß Mit Fuß 8 1 kg 9 2 kg 7 7 kg 8 7 kg Modellname LE40D503 Anzeigeauflösung 1920 x 10...

Page 30: ...eurs de luminosité et de contraste sur le minimum requis pour obtenir la qualité d image souhaitée L utilisation de valeurs trop élevées risque d accélérer le processus de brûlure Utilisez fréquemment toutes les fonctions du téléviseur conçues pour réduire le phénomène de rémanence et la brûlure d écran Pour plus d informations à ce sujet consultez la section appropriée du mode d emploi Sécurisati...

Page 31: ...ommande La couleur et la forme du produit peuvent varier en fonction du modèle Panneau de configuration Capteur de la télécommande Dirigez la télécommande vers ce point du téléviseur Témoin d alimentation Clignote puis s arrête lorsque le téléviseur est allumé S allume en mode Veille SOURCEE Bascule entre toutes les sources d entrée disponibles Dans le menu à l écran utilisez ce bouton de la même ...

Page 32: ...é Double Mix ou ARRET Permet d afficher le menu principal à l écran Permet de sélectionner rapidement les fonctions fréquemment utilisées Affiche les fonctions Mon contenu Regarder TV et Source Permet de revenir au menu précédent Permettent de sélectionner des éléments de menu à l écran et de modifier les valeurs des menus Boutons utilisés dans les menus Liste des chaînes Gestion chaînes Mon conte...

Page 33: ...dèles peuvent demander en plus le code PIN Lors de l entrée du code PIN 0 0 0 0 n est pas disponible L option peut varier en fonction du pays 4 Réglage du Mode Horloge Réglez le Mode Horloge automatiquement ou manuellement Auto Sélectionnez le fuseau horaire dans lequel vous vous trouvez en fonction du pays Manuel vous permet de définir manuellement la date et l heure actuelles 5 Sélection d une a...

Page 34: ...DMI d une ancienne version Dans ce cas demandez au fabricant du périphérique externe de vous communiquer la version HDMI et dans l hypothèse où elle serait obsolète demandez lui une mise à niveau x x Veillez également à acheter un câble HDMI certifié Dans le cas contraire il se peut que l écran n affiche aucune image ou qu une erreur de connexion se produise x x Il est recommandé d employer un câb...

Page 35: ... prise en charge Un câble HDMI prend en charge les signaux vidéo et audio numériques et ne nécessite aucun câble audio Modes d affichage entrée HDMI DVI LE32D400 LE32D403 La résolution optimale est de 1360 x 768 à 60 Hz Mode Résolution Fréquence horizontale kHz Fréquence verticale Hz Fréquence d horloge pixels MHz Polarité de synchronisation H V IBM 640 x 350 31 469 70 086 25 175 720 x 400 31 469 ...

Page 36: ...8 60 023 75 029 78 750 1152 x 864 67 500 75 000 108 000 1280 x 1024 63 981 60 020 108 000 1280 x 1024 79 976 75 025 135 000 1280 x 800 49 702 59 810 83 500 1280 x 800 62 795 74 934 106 500 1280 x 960 60 000 60 000 108 000 1360 x 768 47 712 60 015 85 500 1440 x 900 55 935 59 887 106 500 1440 x 900 70 635 74 984 136 750 1680 x 1050 65 290 59 954 146 250 VESA DMT DTV CEA 1920 x 1080p 67 500 60 000 14...

Page 37: ...rs DVI vous devez définir le téléviseur en mode Périph DVI sous Modif Nom Informations Vous pouvez afficher des informations détaillées sur le périphérique externe sélectionné Connexion à un port COMMON INTERFACE Utilisation de la CARTE CI ou CI Pour regarder les chaînes payantes la carte CI ou CI doit être insérée y y Si vous ne l insérez pas certaines chaînes afficheront le message Signal brouil...

Page 38: ... a Essayer bAccueil Zoom Index L Page e Quitter Cette fonction n est pas disponible dans certains menus Méthode 1 Méthode 2 1 Si vous souhaitez utiliser le menu correspondant à une rubrique du e Manual appuyez sur le bouton rouge afin de sélectionner l option Essayer 2 Pour revenir à l écran du e Manual appuyez sur le bouton E MANUAL 1 Appuyez sur le bouton ENTERE lorsqu une rubrique s affiche Le ...

Page 39: ...récédente ou suivante Utilisation du mode Zoom UDépl R Retour Sélectionnez l option Zoom souhaitée puis appuyez sur ENTERE pour agrandir l écran Pour parcourir l écran agrandi utilisez le bouton ou Pour revenir à un affichage normal de l écran appuyez sur le bouton RETURN Recherche d une rubrique dans la page d index Cette fonction n est peut être pas prise en charge dans cette langue 1 Si vous so...

Page 40: ...s le tableau ci dessous x x Le kit de fixation murale s accompagne d un manuel d installation détaillé et de toutes les pièces nécessaires au montage x x N utilisez pas de vis plus longues que la dimension standard car elles pourraient endommager l intérieur du téléviseur x x N utilisez pas de vis non conformes aux spécifications des vis VESA standard x x Pour les fixations murales non conformes a...

Page 41: ...à sélectionner la source appropriée du téléviseur en appuyant sur la touche SOURCE de la télécommande Redémarrez le périphérique connecté en rebranchant le câble d alimentation du périphérique La télécommande ne fonctionne pas Vérifiez que la polarité des piles de la télécommande est respectée Nettoyez la lentille de la télécommande Essayez de diriger directement la télécommande vers le téléviseur...

Page 42: ... soient pas fournies avec le produit Dans ce cas achetez des vis présentant les caractéristiques suivantes Caractéristiques des vis x x Pour un téléviseur de 32 40 pouces M6 3 Reliez les colliers fixés au téléviseur et ceux fixés sur le mur à l aide de chaînettes puis attachez les fermement REMARQUE x x Placez le téléviseur à proximité du mur afin qu il ne bascule pas vers l arrière x x Il est rec...

Page 43: ...voies 32 44 1 48kHz 16 20 24bits Nom du modèle LE32D400 LE32D403 Résolution de l affichage 1360 x 768 Taille de l écran 32 pouces 32 pouces Son Sortie 10 W X 2 Dimensions L x P x H Corps Avec socle 784 4 X 88 8 X 502 9 mm 784 4 X 182 4 X 545 3 mm 784 4 X 98 1 X 502 9 mm 784 4 X 182 4 X 545 3 mm Poids Sans socle Avec socle 8 1 kg 9 2 kg 7 7 kg 8 7 kg Nom du modèle LE40D503 Résolution de l affichage...

Page 44: ...valori troppo elevati possono accelerare il processo di bruciatura dello schermo Usare frequentemente tutte le funzioni TV progettate per ridurre la ritenzione delle immagini e la bruciatura dello schermo Per maggiori informazioni consultare la relativa sezione del manuale dell utente Messa in sicurezza della posizione di installazione Mantenere le distanze indicate tra il prodotto e gli altri ele...

Page 45: ...zione Vista del Pannello di controllo La forma e il colore del prodotto possono variare in base al modello Pannello di controllo Sensore del telecomando Puntare il telecomando in direzione di questo punto sul televisore Indicatore di alimentazione Lampeggia e si spegne quando l alimentazione è attiva si accende in modalità standby SOURCEE Alterna tutte le sorgenti d ingresso disponibili Nel menu O...

Page 46: ...Teletext ON Doppia Mista o OFF Visualizza il menu OSD principale Scelta rapida delle funzioni usate più di frequente Visualizza le opzioni Cont personali Guarda TV e Sorgente Ritorna al menu precedente Seleziona le voci del menu OSD e cambia i valori visualizzati sul menu Tasti funzione utilizzati nei menu Elenco canali Gestione canali Cont personali ecc E MANUAL Visualizza la Guida e Manual P SIZ...

Page 47: ...edere un opzione aggiuntiva per l impostazione del pin All inserimento del codice PIN 0 0 0 0 non è disponibile L opzione può differire a seconda del paese 4 Impostazione della Modalità orologio Impostare la Modalità orologio automaticamente o manualmente Auto E possibile selezionare il fuso orario della propria località in base alla nazione Manuale Consente di impostare manualmente la data e l or...

Page 48: ...isturbata o non essere visualizzata del tutto oppure l audio potrebbe non essere riprodotto In questo caso chiedere al produttore del dispositivo esterno informazioni sulla versione HDMI supportata e se obsoleta richiedere un aggiornamento x x Acquistare un cavo HDMI certificato In caso contrario l immagine potrebbe non apparire sullo schermo oppure potrebbe verificarsi un errore di connessione x ...

Page 49: ...a a seconda del modello di PC in uso I cavi HDMI supportano i segnali video e audio e non richiedono un canale audio Modalità di visualizzazione ingresso HDMI DVI LE32D400 LE32D403 La risoluzione ottimale è 1360 X 768 a 60Hz Modalità Risoluzione Frequenza orizzontale kHz Frequenza verticale Hz Frequenza di clock dei pixel MHz Polarità sync O V IBM 640 x 350 31 469 70 086 25 175 720 x 400 31 469 70...

Page 50: ...5 029 78 750 1152 x 864 67 500 75 000 108 000 1280 x 1024 63 981 60 020 108 000 1280 x 1024 79 976 75 025 135 000 1280 x 800 49 702 59 810 83 500 1280 x 800 62 795 74 934 106 500 1280 x 960 60 000 60 000 108 000 1360 x 768 47 712 60 015 85 500 1440 x 900 55 935 59 887 106 500 1440 x 900 70 635 74 984 136 750 1680 x 1050 65 290 59 954 146 250 VESA DMT DTV CEA 1920 x 1080p 67 500 60 000 148 500 NOTA...

Page 51: ...l menu Modifica Nome Informazioni E possibile visualizzare informazioni dettagliate sul dispositivo esterno selezionato Connessione a uno slot COMMON INTERFACE Uso della SCHEDA CI o CI Per la visione di canali a pagamento è necessario inserire una SCHEDA CI o CI y y Non inserendo una SCHEDA CI o CI alcuni canali visualizzeranno il messaggio Segnale criptato y y Le informazioni di pairing che conte...

Page 52: ...à Immagine preimpostata 1 1 a Prova ora b Home Zoom Indice L Pagina e Esci Questa funzione non è disponibile in alcuni menu Metodo 1 Metodo 2 1 Per utilizzare il menu corrispondente a un argomento trattato nel e Manual premere il tasto rosso per selezionare Prova ora 2 Per tornare alla schermata e Manual premere E MANUAL 1 Premere ENTERE alla visualizzazione di un argomento Continuare viene visual...

Page 53: ...ti 5 L Pagina Passa alla pagina precedente o successiva Uso della modalità Zoom USposta R Ritorna Selezionare Zoom quindi premere ENTERE per ingrandire la pagina E possibile scorrere la pagina ingrandita utilizzando i tasti o Per tornare alle dimensioni normali della pagina premere RETURN Ricerca di un argomento sulla pagina dell Indice Questa funzione potrebbe non essere supportata a seconda dell...

Page 54: ...a parete verrà fornita la guida all installazione e tutte le parti necessarie per il montaggio x x Non utilizzare viti non conformi agli standard VESA x x Non utilizzare viti di dimensioni diverse da quelle standard poiché potrebbero danneggiare l interno del televisore x x Per i montaggi a parete non conformi alle specifiche delle viti standard VESA la lunghezza delle viti potrebbe differire in b...

Page 55: ... televisore premendo il tasto SOURCE sul telecomando Riavviare il dispositivo dopo aver scollegato e ricollegato il cavo di alimentazione Il telecomando non funziona Sostituire le batterie prestando attenzione a rispettare le polarità Pulire la finestra di trasmissione del sensore sul telecomando Puntare il telecomando direttamente sul televisore a una distanza di 150 180 cm Il telecomando del ric...

Page 56: ...bero non essere fornite insieme al prodotto In questo caso acquistare le viti separatamente in base alle specifiche qui riportate Specifiche delle viti x x Per TV da 32 40 pollici M6 3 Collegare i ganci fissati al televisore a quelli fissati alla parete utilizzando un cavo resistente quindi legarlo strettamente NOTA x x Installare il televisore il più vicino possibile alla parete in modo che non p...

Page 57: ...i 32 pollici Suono Uscita 10 W X 2 Dimensioni Lar x Pro x Alt Corpo Con piedistallo 784 4 X 88 8 X 502 9 mm 784 4 X 182 4 X 545 3 mm 784 4 X 98 1 X 502 9 mm 784 4 X 182 4 X 545 3 mm Peso Senza piedistallo Con piedistallo 8 1 kg 9 2 kg 7 7 kg 8 7 kg Nome modello LE40D503 Risoluzione del display 1920 x 1080 Dimensione schermo 40 pollici Suono Uscita 10 W X 2 Dimensioni Lar x Pro x Alt Corpo Con pied...

Page 58: ...ENAND_ADD 6 0 TS0_DATA 7 0 CH_DATA 7 0 DDR2 I F EEPROM 24C256 DDR3 1333 128MB EEPROM 24C02 I2C UART debug DVB IF USB2 0 UART TUNER_CVBS HDMIx_RX HDMI 1 DVI 2 EU SCART AU USA Asia COMP IR Key INPUT SC_CVBS_IN SC_COMP2_RGB_IN LVDS_FHD_50Hz SC_CVBS_OUT SOUND AMP AMP DRV604 SC_L R_OUT_SX CH_I2S SC COMP2 L R IN SC_L R_OUT T U O _ R L _ P H X S _ T U O _ R L _ P H SOUND AMP NTP7300 I2S I2S SC_COMP2_L R_...

Reviews: