background image

4 Troubleshooting

4-4

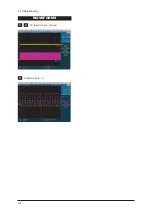
WAVEFORMS

1

2

PC Input (V-Sync, H-Sync)

3

LVDS Out (CLK +/-)

Summary of Contents for LE26S81BHX

Page 1: ...HX GJA32TSA LE32S81BHX GJA37TSA LE37S81BHX GJA40TSA LE40S81BHX GJA46TSA LE46S81BHX Manual SERVICE TFT LCD TV Fashion Feature Luxurious Slim Design Supreme Picture Quality Supreme Sound Quality Supreme...

Page 2: ...ectronics Co Ltd LE26S81BH LE32S81BH LE37S81BH LE40S81BH LE46S81BH Service Manual First edition Oct 2007 Printed in Korea Trademarks Samsung is the registered trademark of Samsung Electronics Co Ltd L...

Page 3: ...Contents...

Page 4: ...Contents...

Page 5: ...can be punished under applicable International and or domestic law Area GSPN Global Service Partner Network North America Latin America CIS Europe China Asia Mideast Africa http service samsungportal...

Page 6: ...eck Figure 1 1 WARNING Do not use an isolation transformer during this test Use a leakage current tester or a metering system that complies with American National Standards Institute ANSI C101 1 Leaka...

Page 7: ...rd from the AC source and turn the power switch ON Connect an insulation resistance meter 500 V to the blades of the AC plug The insulation resistance between each blade of the AC plug and accessible...

Page 8: ...t may cause a fire or electric shock 5 Make sure to turn the power off and unplug the power cord from the outlet before repositioning the product Also check the antenna cable or the external connector...

Page 9: ...Memo 1 Precautions 1 4...

Page 10: ...provides simple access with a single remote control Excellent Picture Quality DNIe technology provides life like clear images Dynamic Contrast Automatically detects the input visual signal and adjust...

Page 11: ...2 Product Specifications 2 2 Item Description 2 2 LE26S81BH Specifications...

Page 12: ...68 mm 392 26 mm AC power voltage Frequency AC 220 240V 50 60 Hz Power Consumption 150 W Dimensions W x D x H Set 874 3 x 291 3 x 577 2 mm 34 42 x 11 47 x 22 72 inches After installation Stand 874 3 x...

Page 13: ...40V 50 60 Hz Power Consumption 170 W Dimensions W x D x H Set 1012 8 x 300 0 x 651 7 mm 39 90 x 11 81 x 25 65 inches After installation Stand 1012 8 x 92 9 x 602 3 mm 39 90 x 3 65 x 23 71 inches Witho...

Page 14: ...0 240V 50 60 Hz Power Consumption 190 W Dimensions W x D x H Set 1083 8 x 300 0 x 690 0 mm 42 66 x 11 81 x 27 16 inches After installation Stand 1083 8 x 94 9 x 638 5 mm 42 66 x 3 73 x 25 13 inches Wi...

Page 15: ...220 240V 50 60 Hz Power Consumption 260 W Dimensions W x D x H Set 1220 2 x 326 0 x 776 0 mm 48 03 x 12 83 x 30 55 inches After installation Stand 1220 2 x 110 9 x 709 0 mm 48 03 x 4 36 x 27 91 inches...

Page 16: ...olors 30 61 kHz 60 75 Hz 16 777 216 colors PC Resolution Maximum mode Input Signal Sync Signal Video Signal Power Consumption Normal Power Saving 140W 184W 285W 1W 120W 150W 170W 190W 260W 1W H V Sepa...

Page 17: ...er Cord Cleaning Cloth Stand Cover Bottom BN59 00609A 3903 000145 BN63 001798A 26 BN90 01212A 32 BN90 01175A 37 BN90 01214A 40 BN90 01213A 46 BN90 01215A Stand Screw x 4 26 6002 001294 32 6002 001294...

Page 18: ...ing is essential 4 Avoid overload Excessive signal from a sweep generator might overload the front end of the TV When inserting signal markers do not allow the marker generator to distort test result...

Page 19: ...all Check the label rating 1 Label Rating File If Panel Mark is A Set the factory mode indicating as follows Panel BOM Bill of material BN07 00421A Connector between Panel and Power Unit BN39 00603L 2...

Page 20: ...n 7 Sound 8 YC Delay 9 Adjust 10 Bus Stop 11 Password 70 80 75 88 12 Checksum XXXX 13 Dynamic Contrast 14 Spread Spectrum 15 Reset HDCP Write Success or Failure T_JSMMPEU 1017 Main Micom Ver Month Day...

Page 21: ...MO 40AUO 37CPT 46AMLCD 26CMOTN 26AUO 23AUOTN 32AMLCD 40AMLCD 32CPT 32AUO 37AUO off 0 85 0 90 0 92 0 94 0 98 1 07 1 10 S1 S2 S3 S4 S5 S6 S7 Off On Off On Off On Off On Off On Off On Flof List UserOSD W...

Page 22: ...MO BN07 00348A V315B1 L01 5V SMVA72 32 CMO_INT 32CMO off On Off Off Off Off On Flof UserOSD Off On Small LCD 10W Side English Active High On Off Debug DL Off Off 32 AUO V9 BN07 00421A T315XW02 V9 8bit...

Page 23: ...0393A T370XW02 12V AMVA 72 37 AUO_EXT_P 37 AUO off On Off Off Off Off On Flof UserOSD Off On Small LCD 10W Side English Active High On Off Debug DL Off Off item Panel Inch Panel Vender Panel Type Gamm...

Page 24: ...INT 40 AMLCD off On Off Off Off Off On Flof UserOSD Off On Small LCD 10W Side English Active High On Off Debug DL Off Off 40 AMLCD VE BN07 00451A 12V SMVA 72 40 AMLCD INT 40 AMLCDV 0 9 On Off Off Off...

Page 25: ...7 00452A LTA460WT L12 12V SMVA 72 46 AMLCD_INT 46AMLCDV 0 9 On Off Off Off Off On Flof UserOSD Off On Small LCD 10W Side English Active High On Off Debug DL Off Off item Panel Inch Panel Vender Panel...

Page 26: ...e P Mode Service Color Tone MSub Brightness MSub Contrast Warm1 Red Gain Warm1 Blue Gain Warm1 Red Offset Warm1 Blue Offset Warm2 Red Gain Warm2 Blue Gain Warm2 Red Offset Warm2 Blue Offset Normal Red...

Page 27: ...VBS Offset CVBS Gain CVBS U CVBS V HDMI R_Gain Ref HDMI G_Gain Ref HDMI B_Gain Ref HDMI R_Offset Ref HDMI G_Offset Ref HDMI B_Offset Ref 2nd Cal Error AV 2nd Cal Error DTV LVDS Control value 30 32 23...

Page 28: ...Cut Off Upper Center L Lmt Center R Lmt Ugain Max Lgain Max value on on on 14 26 36 4 28 6 26 16 8 5 Picture enhance 2 NO 1 2 3 4 5 6 7 8 9 10 11 12 13 14 item PreLGain_Main PreMGain_Main PreHGain_Mai...

Page 29: ...lope gain B Tilt min B Tilt max B Tilt slpe Lfunc Basis Hfunc Basis Mean Offset1 Mean Offset2 Mean Slope Input Offset Input gain ACR Offset ACR Th1 ACR Th2 Skin Enable Skin Tu Skin Tv M Skin Tu M Skin...

Page 30: ...mute Th_Low Correct Threshold Sync Loop Error Threshold Parity Error Thrd Every Num Frames Num of Check Num of Double Chk Mono Weight Stereo Weight Dual Weight M2S Threshold S2M Threshold NICAM FINE V...

Page 31: ...C 3 58 AV NTSC4 43 AV PAL60 TV AV S_Video 6 5 5 5 7 5 5 5 5 6 3 7 6 6 5 9 Adjust NO 1 2 3 4 5 6 7 8 9 10 11 12 13 14 15 16 item TTX PWM Dyn Contrast Dyn Brightness Dyn Color Dyn Sharpness Std Contrast...

Page 32: ...64 16 32 32 32 2 LNA PLUS NO 1 2 3 4 5 6 item Power On Channel Power On Band Power On Volume Max Volume Local Key Lock Power On Source value 1 Air 10 100 OFF TV 3 Hotel Option NO 1 2 3 item Hot Plug...

Page 33: ...15 16 17 input resolution Spread Spectrum Step_480I 576I Range_480I 576I Step_480P 576P Range_480P 576P Step_720P Range_720P Step_1080I Range_1080I Step_640_480 Range_640_480 Step_800_600 Range_800_6...

Page 34: ...lance Adjustment If picture color is wrong check White Balance condition Equipment CA210 Patten Flat W B Pattern Adjust W B in Factory Mode Sub brightness and R G B Offset controls low light region Su...

Page 35: ...the mode in which the adjustment will be made RF DTV PC DVI Input signal VIDEO Mode Model 2 744 484 Mode Pattern 92 DTV DVI Mode Model 6 1280 720 Mode Pattern 92 HDMI Mode Model 6 1280 720 Mode Patte...

Page 36: ...st the high light Refer to table 1 2 in adjustment position by mode Adjust red gain x and blue gain y to the color coordinates Do not adjust the green gain and sub contrast Y data Picture 4 3 Toshiba...

Page 37: ...grade 3 5 1 How to Update Flash ROM 1 Installthe Flash Downloader ConnectSet Service Jack and Jig Cable to execute Program Update 2 Flash Downloader program update Before Turning on the set Click conn...

Page 38: ...burnt or damaged cable Check to see if there is a disconnected cable connection or a connection is too loose Check to see if the cables are connected according to the connection diagram 2 Check the po...

Page 39: ...proper DC 5V 3 3V 1 8V appear at C811 C853 C833 Check IC101 IC105 IC106 Change the Main Ass y Yes Does proper DC B3 3FB B1 2FB B1 8VD appear at C179_FBE C182_FBE C159 Check IC110_FBE IC111_FBE IC109...

Page 40: ...of IC602 Check JA306 PC cable Change the PC cable Change the main PCB Ass y Yes Power Indicator is off Lamp on no video No No 1 Does the digital data appear at output of R916_FBE R921FBE Check IC602 C...

Page 41: ...4 Troubleshooting 4 4 WAVEFORMS 1 2 PC Input V Sync H Sync 3 LVDS Out CLK...

Page 42: ...able Change the main PCB Ass y Yes Does the digital data appear at output of R738 R745 Check IC405 Change the main PCB Ass y Yes Does the digital data appear at output of R916_FBE R921FBE Check IC601...

Page 43: ...4 Troubleshooting 4 6 4 5 HDMI Input CLK WAVEFORMS...

Page 44: ...utput of R916_FBE R921FBE Check IC601 Change the main PCB Ass y Yes Does the digital data appearat output of R1001_FBE R1017_FBE Check IC 901_FBE Change the main PCB Ass y Yes Check the RF source and...

Page 45: ...4 Troubleshooting 4 8 WAVEFORMS 6 Tuner CVBS Out Pattern Grey Bar...

Page 46: ...ppear at output of R916_FBE R921FBE Check IC601 Change the main PCB Ass y Yes Check the RF source and check the connection of RF cable No Input a RF signal check the connected cable No No Yes Does the...

Page 47: ...4 Troubleshooting 4 10 WAVEFORMS 7 TS DATA Out CLK DATA 0 8 Eagle Out CLK H Sync...

Page 48: ...t of R916_FBE R921FBE Check IC602 Change the main PCB Ass y Yes Check the video source and check the connection of video cable No Input a video signal check the connected cable No No Yes Does the digi...

Page 49: ...connection of s video cable No Input a s video signal check the connected cable No Does the digital data appear at output of R916_FBE R921FBE Check IC602 Change the main PCB Ass y No Yes Does the dig...

Page 50: ...4 Troubleshooting 4 13 WAVEFORMS 9 S VIDEO Input Y C...

Page 51: ...rce and check the connection of component cable No Input a component signal check the connected cable No Does the digital data appear at output of R916_FBE R921FBE Check IC602 Change the main PCB Ass...

Page 52: ...4 Troubleshooting 4 15 WAVEFORMS 10 Component Input Y Pb...

Page 53: ...ta appear at R8028 R8029 Check IC8002 Change the main PCB Ass y Yes No Does the signal appear at BD8003 BD8008 BD8010 BD8011 Check IC8005 Change the main PCB Ass y Yes Replace the speaker Ass y No Ple...

Page 54: ...4 Troubleshooting 4 17 WAVEFORMS 11 Audio Input Sign Wave 12 12S Input CLK DATA 13 Audio Amp Out Sign Wave...

Page 55: ...4 Troubleshooting 4 18 Memo...

Page 56: ...s List 5 1 5 Exploded View and Parts List You can search for updated part codes through ITSELF web site URL http itself sec samsung co kr 5 1 LE26S81BH Exploded View T0175 T0003 M0146 M0215 T0447 M001...

Page 57: ...S A M0215 BN07 00364A LCD PANEL V260B1 L04 6bit FRC 26inch 16 1 S A T0447 BN96 04682F ASSY BRACKET P PANEL 26S81 AUO SEH 1 S N A M0146 BN61 02205B BRACKET PANEL TOP Bordeaux 26 SECC T1 2 1 S N A M0115...

Page 58: ...5 3 LE32S81BH Exploded View 5 Exploded View Parts List 5 3 T0003 T0764 M0013 M0027 T0531 T0175 M0215 T0447 M0146 M0115 M0014...

Page 59: ...16 7M 16 9 0 51075 H 0 51075 W 0 to 50 5V SMVA 72 32 inch CPT EMVA BN07 00460A CLAA320WF01SC 8bit 32inch 16 7M 16 9 0 51075 H 0 51075 0 to 50 12V EMVA 75 ZBD 32 inch HD T0447 BN96 04681A ASSY BRACKET...

Page 60: ...5 Exploded View Parts List 5 5 5 5 LE37S81BH Exploded View T0003 T0175 M0215 T0447 M0014 T0764 T0531 M0013 M0027 M0115 M0146 M0146 M0107...

Page 61: ...04680E ASSY BRACKET P PANEL 37S86 EO 1 S N A M0146 BN61 02241A BRACKET PANEL SIDE Bordeaux 37 SECC T1 2 1 S N A M0146 BN61 02242A BRACKET PANEL SIDE Bordeaux 37 SECC T1 2 1 S N A T0764 BN44 00157A SMP...

Page 62: ...5 Exploded View Parts List 5 7 5 7 LE40S81BH Exploded View T0003 M0215 M0146 M0146 T0175 T0447 M0115 M0014 M0013 M0027 T0531...

Page 63: ...7M 16 9 0 648 H 0 648 W 0 to 50 5V AMVA 72 40 inch AMVA AMLCD VE BN07 00451A LTA400WT L07 8bit 40inch 16 7M 16 9 0 648 H 0 648 W 0 to 50 12V SMVA 72 40 inch T0447 BN96 04679A ASSY BRACKET P PANEL BOR...

Page 64: ...5 Exploded View Parts List 5 9 5 9 LE46S81BH Exploded View T0003 M0215 M0014 T0531 M0013 M0027 T0175 M0115...

Page 65: ...00389A LCD PANEL LTA460WT L11 8bit 46inch 16 7 1 S A AMLCD VE BN07 00452A LTA460WT L12 8bit 46inch 16 7M 16 9 0 7455 H 0 7455 W 0 to 50 12V SMVA 72 46 inch T0447 BN96 05214D ASSY BRACKET P PANEL 46S81...

Page 66: ...H GLOSS SF 0505 K21294 ABS HB P 0 58 S N A 4 T0132 BN73 00052A RUBBER FOOT ARES 17 CR Rubber Gray T1 5 8 S N A 3 T0524 6902 000520 BAG PE HDPE NITRON DOUBLE T0 015 T0 5 D 1 S N A 0 1 M0019 BN91 01180F...

Page 67: ...28x28XT6 1 S N A 3 CCMM1 BN73 00151A SILICON RUBBER GP1500 380MIL 20X20X9 5T 1 S N A 3 T0510 BN97 01736L ASSY SMD MAIN BN94 01429D 1 S N A 4 SUB05 0202 001477 SOLDER CREAM LST309 M D20 45 96 5Sn 3 77...

Page 68: ...S A 4 D1456 0401 001099 DIODE SWITCHING 1N4148WS 75V 150mA SOD 3 1 S A 4 D1457 0401 001099 DIODE SWITCHING 1N4148WS 75V 150mA SOD 3 1 S A 4 D1458 0401 001099 DIODE SWITCHING 1N4148WS 75V 150mA SOD 3...

Page 69: ...0123 DIODE ARRAY DAN202K 80V 100mA CA2 3 SOT 1 S A 4 D1801 0407 000123 DIODE ARRAY DAN202K 80V 100mA CA2 3 SOT 1 S A 4 D1802 0407 000123 DIODE ARRAY DAN202K 80V 100mA CA2 3 SOT 1 S A 4 D1803_NSID 0407...

Page 70: ...T0170 1203 003059 IC SWITCH VOL REG MP1583 SOIC 8P 4 9x3 1 S A 4 T0087 1203 003696 IC POSI FIXED REG NCP1117DT18T5G DPAK 3 1 S A 4 IC1809 1203 004363 IC VOL DETECTOR RT9818C 29PV SOT 23 3P 1 S A 4 IC1...

Page 71: ...P 1608 1 S A 4 R110 2007 000070 R CHIP 0ohm 5 1 10W TP 1608 1 S A 4 R110 2007 000070 R CHIP 0ohm 5 1 10W TP 1608 1 S A 4 R110 2007 000070 R CHIP 0ohm 5 1 10W TP 1608 1 S A 4 R110 2007 000070 R CHIP 0o...

Page 72: ...A 4 R110 2007 000070 R CHIP 0ohm 5 1 10W TP 1608 1 S A 4 R110 2007 000070 R CHIP 0ohm 5 1 10W TP 1608 1 S A 4 R110 2007 000070 R CHIP 0ohm 5 1 10W TP 1608 1 S A 4 R110 2007 000070 R CHIP 0ohm 5 1 10W...

Page 73: ...A 4 R110 2007 000074 R CHIP 100ohm 5 1 10W TP 1608 1 S A 4 R110 2007 000074 R CHIP 100ohm 5 1 10W TP 1608 1 S A 4 R110 2007 000074 R CHIP 100ohm 5 1 10W TP 1608 1 S A 4 R110 2007 000074 R CHIP 100ohm...

Page 74: ...10W TP 1608 1 S A 4 R110 2007 000077 R CHIP 470ohm 5 1 10W TP 1608 1 S A 4 R110 2007 000077 R CHIP 470ohm 5 1 10W TP 1608 1 S A 4 R110 2007 000077 R CHIP 470ohm 5 1 10W TP 1608 1 S A 4 R110 2007 00007...

Page 75: ...8 1 S A 4 R110 2007 000084 R CHIP 4 7Kohm 5 1 10W TP 1608 1 S A 4 R110 2007 000084 R CHIP 4 7Kohm 5 1 10W TP 1608 1 S A 4 R110 2007 000084 R CHIP 4 7Kohm 5 1 10W TP 1608 1 S A 4 R110 2007 000084 R CHI...

Page 76: ...1 S A 4 R110 2007 000090 R CHIP 10Kohm 5 1 10W TP 1608 1 S A 4 R110 2007 000090 R CHIP 10Kohm 5 1 10W TP 1608 1 S A 4 R110 2007 000090 R CHIP 10Kohm 5 1 10W TP 1608 1 S A 4 R110 2007 000090 R CHIP 10...

Page 77: ...1 10W TP 1608 1 S A 4 R110 2007 000309 R CHIP 10ohm 5 1 10W TP 1608 1 S A 4 R110 2007 000309 R CHIP 10ohm 5 1 10W TP 1608 1 S A 4 R110 2007 000309 R CHIP 10ohm 5 1 10W TP 1608 1 S A 4 R110 2007 00030...

Page 78: ...1 4W TP 3216 1 S A 4 R110 2007 000950 R CHIP 47ohm 5 1 4W TP 3216 1 S A 4 R110 2007 000950 R CHIP 47ohm 5 1 4W TP 3216 1 S A 4 R110 2007 000950 R CHIP 47ohm 5 1 4W TP 3216 1 S A 4 R110 2007 000950 R...

Page 79: ...R NETWORK 100ohm 5 1 16W L CHIP 8P TP 3 1 S A 4 RA1810 2011 001093 R NETWORK 100ohm 5 1 16W L CHIP 8P TP 3 1 S A 4 RA1812 2011 001093 R NETWORK 100ohm 5 1 16W L CHIP 8P TP 3 1 S A 4 RA1813 2011 00109...

Page 80: ...20 25V Y5V 1608 1 S A 4 C120 2203 000189 C CER CHIP 100nF 80 20 25V Y5V 1608 1 S A 4 C120 2203 000189 C CER CHIP 100nF 80 20 25V Y5V 1608 1 S A 4 C120 2203 000189 C CER CHIP 100nF 80 20 25V Y5V 1608 1...

Page 81: ...257 C CER CHIP 10nF 10 50V X7R TP 1608 1 S A 4 C120 2203 000257 C CER CHIP 10nF 10 50V X7R TP 1608 1 S A 4 C120 2203 000257 C CER CHIP 10nF 10 50V X7R TP 1608 1 S A 4 C120 2203 000257 C CER CHIP 10nF...

Page 82: ...0 C CER CHIP 1nF 10 50V X7R 1608 1 S A 4 C120 2203 000440 C CER CHIP 1nF 10 50V X7R 1608 1 S A 4 C120 2203 000491 C CER CHIP 2 2nF 10 50V X7R 1608 1 S A 4 C120 2203 000531 C CER CHIP 2 7nF 10 50V X7R...

Page 83: ...005005 C CER CHIP 100nF 10 16V X7R 1608 1 S A 4 C120 2203 005005 C CER CHIP 100nF 10 16V X7R 1608 1 S A 4 C120 2203 005005 C CER CHIP 100nF 10 16V X7R 1608 1 S A 4 C120 2203 005005 C CER CHIP 100nF 1...

Page 84: ...100nF 10 50V X7R 1608 1 S A 4 C120 2203 005249 C CER CHIP 100nF 10 50V X7R 1608 1 S A 4 C120 2203 005249 C CER CHIP 100nF 10 50V X7R 1608 1 S A 4 C120 2203 005249 C CER CHIP 100nF 10 50V X7R 1608 1 S...

Page 85: ...2 1 S A 4 C120 2203 006361 C CER CHIP 10000nF 10 10V X5R 2012 1 S A 4 C120 2203 006361 C CER CHIP 10000nF 10 10V X5R 2012 1 S A 4 C120 2203 006361 C CER CHIP 10000nF 10 10V X5R 2012 1 S A 4 C120 2203...

Page 86: ...568 3301 001145 BEAD SMD 60ohm 4516 TP 70ohm 45MHz 82ohm 1 S N A 4 T0568 3301 001145 BEAD SMD 60ohm 4516 TP 70ohm 45MHz 82ohm 1 S N A 4 T0568 3301 001145 BEAD SMD 60ohm 4516 TP 70ohm 45MHz 82ohm 1 S N...

Page 87: ...Bordeaux Plus HOT 1 S A 3 T0511 BN68 01166B MANUAL USERS COMM SAMSUNG E F G I S Rus 1 S N A 3 M0045 BN96 01800A ASSY ACCESSORY ROME32 SCREW 1 S A 4 T0081 6002 001294 SCREW TAPPING BH M4 L16 ZPC BLK 4...

Page 88: ...7 Block Diagrams 7 1 7 Block Diagram This Document can not be used without Samsung s authorization...

Page 89: ...7 Block Diagrams 7 2 Memo...

Page 90: ...SERVICE_ANY_TX SERVICE_ANY_TX SERVICE_ANY_RX SERVICE_ANY_RX JA205 1 2 3 4 5 6 GND ANY_SL_OUT ANY_SL_OUT GND ANY_SR_OUT ANY_SR_OUT CN302_L 1 2 3 4 5 6 7 8 9 10 11 GND GND GND SVIDEO_C SVIDEO_Y NC GND I...

Page 91: ...8 Wiring Diagrams 8 2 8 2 Main Board Layout PANEL CONTROL CONTROL SPEAKER JACK MT8202 BLOCK LVDS JACK MT8293 TUNER BLOCK...

Page 92: ...CN8001 SPEAKER CONNECTOR PIN NAME PIN NAME PIN NAME 1 SOUND_L _OUT 2 SOUND_L _OUT 3 SOUND_R _OUT 4 SOUND_R _OUT 1 NC 13 B5V 2 SIGNAL 14 B5V 3 GND 15 B5V 4 A5V 16 B5V 5 GND 17 GND 6 GND 18 GND 7 B12V 1...

Page 93: ...ignal LED_RED Control the timing and stand by LED color CN501 panel control Function Define SW_inverter panel inverter control about 5V Ana_dimming panel dimming control PWM_dimming panel PWM control...

Page 94: ...NAME 1 TXOUT0 7 TXCLKOUT 13 TXOUT5 19 NC 25 GND 2 TXOUT0 8 TXCLKOUT 14 TXOUT5 20 NC 26 NC 3 TXOUT1 9 TXOUT3 15 NC 21 LVDS_FORMAL 27 VCC_PANEL 4 TXOUT1 10 TXOUT3 16 NC 22 DDC_CTRL 28 NC 5 TXOUT2 11 TXO...

Page 95: ...8 Wiring Diagrams 8 6 8 4 Power Board Layout...

Page 96: ...1 2 3 4 5 6 7 8 9 10 11 12 13 14 15 16 NAME 13V GND 5 4V 5 4V 5 4V GND GND GND 12V 12V 12V GND GND GND ST7V PWR Functing Define ST7V Stand By Output PWR Power On Off Control Refer to CN801 function de...

Page 97: ...MLCD Panel Inverter Power 24V LAMP INVERTER Voltage B L Brightness sensor power A_D ANA_DIMMING P_D PWM_DIMMING CN803 Inverter power supply PIN 1 2 3 4 5 6 7 8 9 10 11 12 13 14 NAME 24V 24V 24V 24V 24...

Page 98: ...8 9 8 Wiring Diagrams...

Page 99: ...8 Wiring Diagrams 8 10...

Page 100: ...8 11 8 Wiring Diagrams...

Page 101: ...8 Wiring Diagrams 8 12 Memo...

Page 102: ...9 Schematic Diagrams 9 1 9 Schematic Diagrams This Document can not be used without Samsung s authorization 9 1 Power_Function Schematic Diagram...

Page 103: ...9 Schematic Diagrams 9 2 This Document can not be used without Samsung s authorization 9 2 Schematic Diagram...

Page 104: ...9 Schematic Diagrams 9 3 This Document can not be used without Samsung s authorization 9 3 SIDE_AV Schematic Diagram...

Page 105: ...9 Schematic Diagrams 9 4 This Document can not be used without Samsung s authorization 9 4 HDMI_INPUT Schematic Diagram...

Page 106: ...9 Schematic Diagrams 9 5 This Document can not be used without Samsung s authorization 9 5 Scart Option Schematic Diagram...

Page 107: ...9 Schematic Diagrams 9 6 This Document can not be used without Samsung s authorization 9 6 Application Schematic Diagram...

Page 108: ...9 Schematic Diagrams 9 7 This Document can not be used without Samsung s authorization 9 7 Application Schematic Diagram...

Page 109: ...9 Schematic Diagrams 9 8 This Document can not be used without Samsung s authorization 9 8 Application Schematic Diagram...

Page 110: ...9 Schematic Diagrams 9 9 This Document can not be used without Samsung s authorization 9 9 Application Schematic Diagram...

Page 111: ...9 Schematic Diagrams 9 10 This Document can not be used without Samsung s authorization 9 10 Application Schematic Diagram...

Page 112: ...9 Schematic Diagrams 9 11 This Document can not be used without Samsung s authorization 9 11 DIMMING BOARD Schematic Diagram...

Page 113: ...Memo 9 Schematic Diagrams 9 12...

Page 114: ...volume In the on screen menu use the buttons as you use the and buttons on the remote control 4 C P Press to change channels In the on screen menu use the C P buttons as you use the and buttons on the...

Page 115: ...rned off When connecting an external device match the colour of the connection terminal to the cable 1 Connecting Set Top Box VCR or DVD Inputs or outputs for external devices such as VCR DVD video ga...

Page 116: ...S VIDEO cable to an appropriate external A V device such as VCR DVD or Camcorder Connect RCA audio cables to R AUDIO L on the rear of your set and the other ends to corresponding audio out connectors...

Page 117: ...ess to save energy 13 Sound effect selection 14 SRS TSXT selection 15 Available source selection 16 Previous channel 17 Selects the HDMI mode directly 18 omatic Power off 19 P Next channel P Previous...

Page 118: ...Installing the Wall Mount Kit Wall mount items sold separately allow you to mount the TV on the wall For detailed information on installing the wall mount see the instructions provided with the Wall...

Page 119: ...Memo 10 Operating Instructions and Installation 10 6...

Page 120: ...electrostatically sensitive devices Use caution when handling these components 11 1 Disassembly Cautions 1 Disconnect the monitor from the power source before disassembly 2 Follow these directions ca...

Page 121: ...11 Disassembly and Reassembly 11 2 3 Remove Screws from the stand BRKT and lift up the stand BRKT Description Picture Description 2 Lift up the rear cover and remove the stand...

Page 122: ...11 Disassembly and Reassembly 11 3 5 Remove screws from the boards and lift up the boards Description Picture Description 4 Disonnect cable from the boards...

Page 123: ...11 Disassembly and Reassembly 11 4 7 Remove 5 secews from the BRKT Lift up the BRKT Description Description Picture 6 Remove screws and Lift up the Lcd panel...

Page 124: ...11 Disassembly and Reassembly 11 5 Description Description Picture 11 2 Reassembly Reassembly procedures are in the reverse order of disassembly procedures...

Page 125: ...11 Disassembly and Reassembly 11 6 Memo...

Page 126: ...12 PCB Diagram 12 1 12 PCB Diagram 12 1 26 32 37 40 46 Main PCB Diagram...

Page 127: ...12 PCB Diagram 12 2 12 2 26 32 37 40 46 Main PCB Diagram...

Page 128: ...12 PCB Diagram 12 3 12 3 26 32 37 40 46 Main PCB Diagram CIS...

Page 129: ...12 PCB Diagram 12 4 12 4 26 32 SMPS...

Page 130: ...12 PCB Diagram 12 5 12 5 32 SMPS VE...

Page 131: ...12 PCB Diagram 12 6 12 6 37 SMPS...

Page 132: ...12 PCB Diagram 12 7 12 7 40 SMPS...

Page 133: ...12 PCB Diagram 12 8 12 8 46 SMPS...

Page 134: ...12 PCB Diagram 12 9 12 9 DIMMING BOARD...

Page 135: ...12 PCB Diagram 12 10 Memo...

Page 136: ...scription RF IN Scart 1 2 A V S Video Component HDMI 1 2 PC Main Board Panel T con Board Speaker IR LED Signal Power Bordeaux consists of three main blocks 1 Main board Video signal processing 2 IP bo...

Page 137: ...onsists of three main blocks 1 Main board Video signal processing 2 SMPS Power supply 3 T con board LCD Panel control SMPS INVERTER RF IN Scart 1 2 A V S Video Component HDMI 1 2 Main Board Panel T co...

Page 138: ...13 Circuit Descriptions 13 3 13 2 Main Block...

Page 139: ...2V Regulator KA278R12 Resonance Controller MC33067 PFC Controler FAN7530 Stand By Controller FSQ0165R AC Input 90Vac 264Vac AC Rectifier PFC Rectifier On Off Control On Off EMI FILTER AC Input 90V 264...

Page 140: ...1V 0 01V 0 1V 4 0V 5 0V 0 5V 1 1V 0 6V Pulsating Main B D Drive Sound Stand by Drive Logic Buffer Image Digital Image Analog Main B D Main B D Main B D Main B D Constant Constant Constant Constant 3 0...

Page 141: ...KA278R12 Resonance Controller F9222L PFC Controler TDA4863 Stand By Controller Viper22A AC Input 90Vac 264Vac AC Rectifier PFC Rectifier On Off Control On Off EMI FILTER AC Input 90V 264V INPUT Rectif...

Page 142: ...LER Stand by CONTROLLER Switch FWM CONTROLLER VCC On Off Opto coupler 13 0V 0 4A 12 0V 2 5A 5 4V 43 5A 6 2V 0 4A Rectifier Rectifier Rectifier SWITCHING TRANSFORMER TRANSFORMER RFC switching Inductor...

Page 143: ...13 Circuit Descriptions 13 8 Memo...

Page 144: ...Auto Configuration Auto adjustment This is an algorithm to adjust monitor to optimum condition by pushing one key OSD On Screen Display On screen display customer can control the screen easily with t...

Page 145: ...Hz Interlace and Non Interlace Methods Showing the horizontal lines of the screen from the top to the bottom in order is called the Non Interlace method while showing odd lines and then even lines in...

Page 146: ...VHF or UHF broadcasting by terrestrial broadcasters The CATV programs may include movies entertain ment and educational programs Different from cable TV CATV can be viewed only within the area in whi...

Page 147: ...Assignments NC DDC Input power 5V IDENT DVI Output Signal HDCP Control Rx0 Rx0 GND NC NC GND RxC RxC 13 14 15 16 17 18 19 20 21 22 23 24 1 2 3 4 5 6 7 8 9 10 11 12 Rx2 Rx2 GND NC NC DDC SCL DDC SDA NC...

Page 148: ...3 4 5 6 7 8 9 10 11 12 13 14 15 Red Green Blue GND GND GND Red GND Green GND Blue DDC Input power 5V IDENT PC GND DDC Data SDA H SYNC V SYNC DDC Clock SCL 14 2 5 D SUB 14 2 2 Component RCA White RCA...

Page 149: ...input 16 Fast Blanking signal RGB switching 17 Video output GND 18 Video input GND 19 Video output CVBS out 20 Video input CVBS in 21 Common GND Pin Signal 1 Audio output R 2 Audio input R 3 Audio ou...

Page 150: ...r L R Data time Front porch Sync width Back porch Sync polarity VERTICAL Frequency Total time Active time Blank time Border L R Data time Front porch Sync width Back porch Sync polarity Dot Clock Bord...

Page 151: ...58 5 720 0 318 25 422 0 318 3 813 1 589 Negative IBM VGA3 640 x 480 3 59 940kHz 16 683ms 15 761ms 0 922ms 0 254ms 15 253ms 0 064ms 0 064ms 0 794ms Negative 31 500MHz Separate N I 37 861kHz 26 413 20 8...

Page 152: ...I 37 879kHz 26 400 20 000 6 400 0 000 20 000 1 000 3 200 3 200 Positive VESA 800 60Hz 800 x 600 13 60 317kHz 16 579ms 15 840ms 0 739ms 0 000ms 15 840ms 0 026ms 0 106ms 0 607ms Positive 50 000MHz Sepa...

Page 153: ...004kHz 16 666ms 15 880ms 0 786ms 0 000ms 15 880ms 0 062ms 0 124ms 0 600ms Negative 75 000MHz Separate N I 56 476kHz 17 707 13 653 4 053 0 000 13 653 0 320 1 813 1 920 Negative VESA 1024 70Hz 1024 x 76...

Page 154: ...0057A EE DELL 1900 FP SEC LTM181E5 L01 BN07 00061A EF 18 narrow bezel GH18PS SEC LTM150XP L01 BN07 00065A EG AMLCD PVA PANEL SEC LTM240W1 L02 BN07 00062A EH Panel for 15 Wide TV SEC LTM170EU L01 BN07...

Page 155: ...01 BN07 00158A E19 ZPD code derivation SEC LTM170EX L01 BN07 00159A E20 ZPD code derivation SEC LTM190E1 L03 BN07 00151B E21 Creat new panel code for AMLCD 19 Panel only for TCO03 SEC LTA460H1 L01 BN0...

Page 156: ...PD code derivation GOYA PJT CPT CLAA150XP01 BN07 00173A PTH CPT 15 PSWG code derivation CPT CLAA150XP01 BN07 00173B PTZ CPT 15 PSWG panel ZPD code CPT CLAA170EA07 BN07 00174A PTH CPT 17 PSWG panel cod...

Page 157: ...I TX54D11VC0CAB BN07 00123A HE 21 3 NARROW HITACHI TX80D12VC0CAB BN07 00169A HIZ Development new panel for Hitachi 32 TV ZPD HITACHI TX54D11VC0CAB BN07 00123B HIZ Hitachi 21 3 ZPD panel IBM ITSX94S BN...

Page 158: ...e CHIMEI V296W1 L01 BN07 00120A CH MVA CHIMEI M170E6 L02 BN07 00126A CJ HIGHLAND 17 LOW PANEL CHIMEI M190E2 L01 BN07 00131A CK GH19AS BS CHIMEI PANEL CHIMEI M150X4 L06 BN07 00137A CL 15 Narrow Slim pa...

Page 159: ...Memo 14 Reference Infomation 14 16...

Reviews: