background image

English - 3

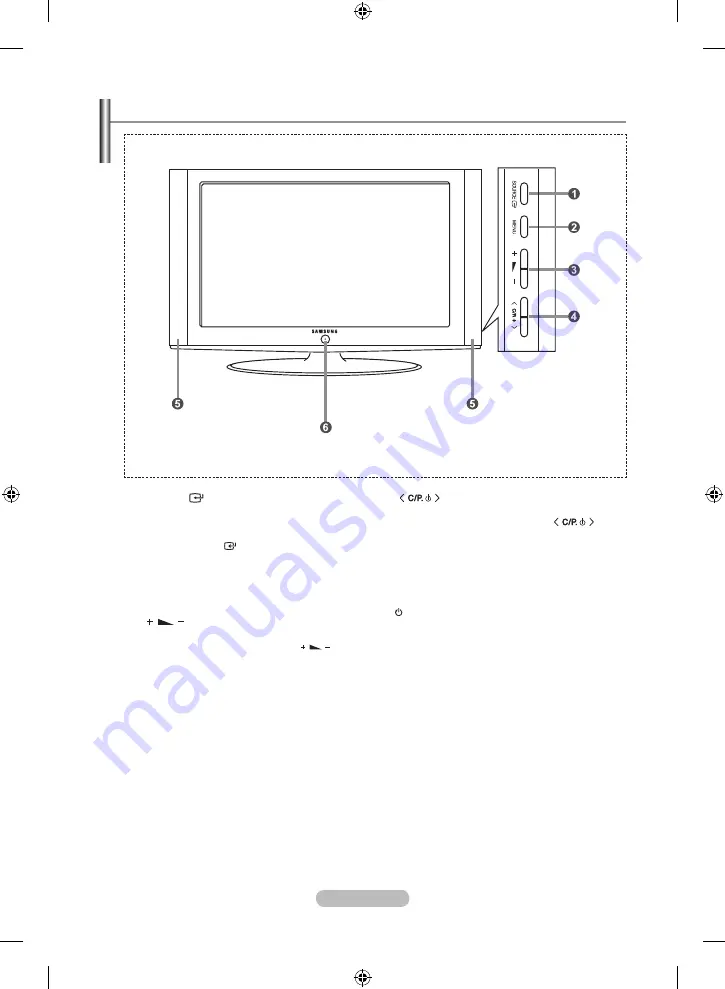
Viewing the Control Panel

SourCE 


 Toggles between all the available input 

sources (TV - Ext. - AV - S-Video - PC). In 

the on-screen menu, use this button as you 

use the 

EntEr

 button on the remote 

control.

MEnu


 Press to see an on-screen menu of your TV’s 

features.


 Press to decrease or increase the volume. 

In the on-screen menu, use the 

 buttons 

as you use the 

 and 

 buttons on the 

remote control.


 Press to change channels.  

In the on-screen menu, use the 

buttons  as you use the 

 and 

 buttons on 

the remote control. 

(Without the Remote Control, you can turn on 

the TV by using the Channel buttons.)

Speakers 

(Power)


 Press to turn the TV on and off.


Power Indicator


 Blinks and turns off when the power is on and 

lights up in stand-by mode.


 remote Control Sensor 


Aim the remote control towards this spot on 

the TV.

The product colour and shape may vary depending on the model.

BN68-01177S,T-00Eng-1010.indd   3

2007-10-18   �� 8:53:17

Summary of Contents for LE20S81B

Page 1: ...tact SAMSUNG WORLDWIDE If you have any questions or comments relating to Samsung products please contact the SAMSUNG customer care centre Связывайтесь с SAMSUNG по всему миру Если у вас есть предложения или вопросы по продуктам Samsung связывайтесь с информационным центром Samsung Country Customer Care Centre Web Site ESTONIA 800 7267 www samsung ee LATVIA 800 7267 www samsung com lv LITHUANIA 8 8...

Page 2: ...ng a still image Watching the LCD TV in 4 3 format for a long period of time may leave traces of borders displayed on the left right and center of the screen caused by the difference of light emission on the screen Playing a DVD or a game console may cause a similar effect to the screen Damages caused by the above effect are not covered by the Warranty Displaying still images from Video games and ...

Page 3: ...Sound Standard 13 Adjusting the Volume Automatically 13 Connecting headphones 13 SETTING THE TIME Setting and Displaying the Current Time 14 Setting the Sleep Timer 14 Switching the Television On and Off Automatically 15 Setting the Others Choosing Your Language 15 Setting the Blue Screen Mode 16 Selecting the Source 16 Editing the Input Source Names 16 Using the Teletext Feature Teletext Decoder ...

Page 4: ...o the hole at the bottom of the TV 3 Insert screw into the hole indicated and tighten Wall mount items sold separately allow you to mount the TV on the wall For detailed information on installing the wall mount see the instructions provided with the Wall Mount items Contact a technician for assistance when installing the wall mounted bracket Samsung Electronics is not responsible for any damage to...

Page 5: ...he and buttons on the remote control 4 Press to change channels In the on screen menu use the buttons as you use the and buttons on the remote control Without the Remote Control you can turn on the TV by using the Channel buttons 5 Speakers 6 Power Press to turn the TV on and off Power Indicator Blinks and turns off when the power is on and lights up in stand by mode Remote Control Sensor Aim the ...

Page 6: ... connected to the headphone output 2 on the rear of your set While the head phone is connected the sound from the built in speakers will be disabled 4 Connecting Set Top Box VCR or DVD Connect the VCR or DVD SCART cable optional to the SCART connector of the VCR or DVD If you wish to connect both the Set Top Box and VCR or DVD you should connect the Set Top Box to the VCR or DVD and connect the VC...

Page 7: ...direct channel access 3 One Two digit channel selection 4 Volume increase Volume decrease 5 Temporary sound switch off 6 Selects the TV mode directly 7 Displays the main on screen menu 8 Sound effect selection Previous channel P Next channel P Previous channel Available source selection Use to see information on the current broadcast Exit the on screen menu Control the cursor in the menu Automatic...

Page 8: ...ing Your Television in Standby Mode When the TV is initially powered on several basic settings proceed automatically and subsequently The following settings are available 1 Press the POWER button on the remote control The message Запуск Plug Play is displayed with OK selected Press the ENTER button 2 Select the appropriate language by pressing the or button Press the ENTER button to confirm your c...

Page 9: ...ENTER button 3 This message Start Plug Play is displayed Refer to page 6 Setting the Channels 40MHz P1 C VHF L 0 You can scan for the frequency ranges available to you and availability depends on your country Automatically allocated programme numbers may not correspond to actual or desired programme numbers However you can sort numbers manually and clear any channels you do not wish to watch 1 Pre...

Page 10: ...w the number of the channel to be stored press the or button to select Channel Press the ENTER button Select C Air channel or S Cable channel by pressing the or button Press the button to select channel Select the required number by pressing the or button and then press the ENTER button Channel mode P Programme mode C Air channel mode S Cable channel mode You can also set a channel number by press...

Page 11: ...he numeric order in which the channels have been automatically stored Give easily remembered numbers to the channels that you watch most often 1 Press the MENU button to display the menu Press the or button to select Channel then press the ENTER button 2 Press the or button to select Sort then press the ENTER button 3 Press the ENTER button to select From Press the or button until the channel numb...

Page 12: ...assigned to a new name 6 Press the EXIT button to exit P1 Assigning Channels Names Use fine tuning to manually adjust a particular channel for optimal reception 1 Use the number buttons to directly select the channel that you want to fine tune 2 Press the MENU button to display the menu Press the or button to select Channel then press the ENTER button 3 Press the or button to select Fine Tune then...

Page 13: ...ustom appears You can also press the P MODE button on the remote control to select one of the picture settings Changing the Picture Standard Your set has several settings which allow you to control picture quality 1 Press the MENU button to display the menu Press the or button to select Picture then press the ENTER button 2 Press the or button to select Custom then press the ENTER button 3 Press t...

Page 14: ...der than Warm1 menu In the PC mode Cool Normal Warm Custom appears Changing the Colour Tone Move Enter Return Colour Tone Cool 2 Cool 1 Normal Warm1 Warm2 Adjust the individual R G B Colour Controls 1 Press the MENU button to display the menu Press the or button to select Picture then press the ENTER button 2 Press the or button to select Colour Control then press the ENTER button 3 Press the or b...

Page 15: ...f the special sound effect to be used when watching a given broadcast 1 Press the MENU button to display the menu Press the or button to select Sound then press the ENTER button 2 Press the ENTER button to select Mode 3 Press the or button to select the desired sound effect Press the ENTER button 4 Press the EXIT button to exit Standard Selects the normal sound mode Speech Emphasizes voices over o...

Page 16: ...rrent Time You can select a time period of between 30 and 180 minutes after which the television automatically switches to standby mode 1 Press the MENU button to display the menu Press the or button to select Setup then press the ENTER button 2 Press the ENTER button to select Time 3 Press the or button to select Sleep Timer then press the ENTER button 4 Press the or button repeatedly until the d...

Page 17: ...levision s clock refer to Setting and Displaying the Current Time on page 14 You can also set hour and minute by pressing the number buttons on the remote control The Activation setting must be set to On in order for the timers to work Switching the Television On and Off Automatically Setting the Others When you start using your set for the first time you must select the language which will be use...

Page 18: ... ENTER button Press the SOURCE button on the remote control to toggel between all the available source TV mode can be selected by pressing the TV or P button on the remote control but you cannot select it by pressing the SOURCE button Selecting the Source Name the device connected to the input jacks to make your input source selection easier 1 Press the MENU button to display the menu Press the EN...

Page 19: ...t be displayed To activate the teletext mode and display the contents page 1 Using the P or P button select the channel providing the teletext service 2 Press the TTX MIX button to activate the teletext mode The contents page is displayed It can be redisplayed at any time by pressing the MENU button 3 Press the TTX MIX button again The actual broadcast will be displayed simultaneously with the tel...

Page 20: ...text pages are colour coded and can be selected by pressing the coloured buttons on the remote control 1 Display the teletext contents page by pressing the TTX MIX button 2 Press the coloured button corresponding to the topic that you wish to select The available topics are listed on the status information line 3 Press the Red button to display the previous page Press the Green button to display t...

Page 21: ...vigate to the Settings tab on the display dialog box The correct size setting resolution Optimum 640 X 480 If a vertical frequency option exists on your display settings dialog box the correct value is 60 or 60 Hz Otherwise just click OK and exit the dialog box Setting up Your PC Software Based on Windows XP Display Modes Both screen position and size will vary depending on the type of PC monitor ...

Page 22: ... of the Image Image Lock instructions number 1 to 3 2 Press the or button to select Position then press the ENTER button 3 Press the or button to adjusting the Vertical Position Press the or button to adjust the Horizontal Position Press the ENTER button 4 Press the EXIT button to exit Initializing the Image Settings Image Reset You can replace all image settings with the factory default values 1 ...

Page 23: ...he colour settings Check that the broadcast system selected is correct Sound and picture interference Try to identify the electrical appliance that is affecting the set and move it further away Plug your set into a different mains socket Blurred or snowy picture distorted sound Check the direction location and connections of your aerial This interference is often due to the use of an indoor aerial...

Page 24: ...ора с ЖК экраном в формате 4 3 на протяжении долгого времени слева справа и в центре экрана могут появиться следы границ формата вызванные разницей излучения света в разных областях экрана Использование телевизора для воспроизведения DVD дисков или подключение игровой приставки может оказать подобное воздействие на экран Повреждения вызванные вышеуказанным эффектом не подлежат гарантийному ремонту...

Page 25: ...АНОВКА ВРЕМЕНИ Установка и отображение текущего времени 14 Установка таймера переключения в режим ожидания 14 Автоматическое включение и выключение телевизора 15 ДРУГИЕ НАСТРОЙКИ Выбор языка 15 Настройка режима синего экрана 16 Выбор источника 16 Редактирование названий источников входного сигнала 16 ИСПОЛЬЗОВАНИЕ ФУНКЦИИ ТЕЛЕТЕКСТА Декодер телетекста 17 Отображение информации телетекста 17 Выбор ...

Page 26: ...овите подставку в отверстие в нижней части телевизора 3 Установите винты в обозначенное отверстие и затяните их С помощью деталей для настенного крепления продаются отдельно можно крепить телевизор на стене Для получения дополнительной информации относительно установки настенного крепления см инструкции прилагаемые к деталям для настенного крепления Для получения помощи при установке настенного кр...

Page 27: ...е дистанционного управления 4 Выбор каналов Кнопки в экранном меню выполняют те же функции что и кнопки и на пульте дистанционного управления Не используя пульт дистанционного управления вы можете включить телевизор нажав на кнопку переключения каналов 5 Громкоговорители 6 Питание Используется для включения и выключения питания Индикатор питания Мигает и отключается при включенном питании и загора...

Page 28: ...визора При подключении наушников звук через встроенные громкоговорители выводиться не будет 4 Подключение видеоприставки видеомагнитофона или проигрывателя DVD Присоедините кабель VCR или DVD SCART дополнительно к разъему SCART видеомагнитофона или DVD Если требуется подключить к телевизору одновременно видеоприставку и видеомагнитофон или проигрыватель DVD необходимо подключить видеоприставку к в...

Page 29: ...вые кнопки для прямого выбора каналов 3 Выбор одно двухцифрового канала 4 Увеличение громкости Уменьшение громкости 5 Временное выключение звука 6 Прямой выбор режима телевизора 7 Воспроизводит главное экранное меню 8 Выбор звукового эффекта Предыдущий канал P Следующий канал P Предыдущий канал Выбор имеющихся источников сигнала Отображение информации о настройках Выход из экранного меню Управлени...

Page 30: ...левизор от сетевой розетки и от антенны Перевод телевизора в режим ожидания При включении телевизора несколько основных установленных параметров восстанавливаются автоматически и поочередно 1 Нажмите кнопку POWER на пульте ДУ Отобразится сообщение Запуск Plug Play с выбранным пунктом OK Нажмите кнопку ENTER 2 С помощью кнопки или выберите необходимый язык Нажмите кнопку ENTER чтобы подтвердить ваш...

Page 31: ...просьбой включить функцию Запуск Plug Play См стр 6 НАСТРОЙКА КАНАЛОВ 40MHz P1 C VHF L 0 Для автоматического сохранения каналов можно выполнить поиск каналов в доступных частотных диапазонах доступность конкретных диапазонов зависит от страны в которой вы находитесь Автоматически назначаемые при этом номера программ могут не соответствовать фактическим или желаемым номерам программ Однако вы может...

Page 32: ...м известен номер канала который необходимо охранить нажмите кнопку или чтобы выбрать Канал Нажмите кнопку ENTER С помощью кнопки или выберите C Радиоканал или S Кабельный канал Выберите канал с помощью кнопки Нажимая кнопку или выберите нужный номер а затем нажмите кнопку ENTER Режимы каналов P Режим программы C Режим радиоканалов S Режим кабельных каналов можно также выбрать номер канала с помощь...

Page 33: ...воить легко запоминаемые номера программ каналам которые вы смотрите наиболее часто 1 Чтобы открыть меню нажмите кнопку MENU Нажимая кнопку или выберите пункт Канал а затем нажмите кнопку ENTER 2 Нажимая кнопку или выберите пункт Сортировка а затем нажмите кнопку ENTER 3 Нажимая кнопку ENTER выберите пункт Oт Нажимайте кнопку или пока не появится номер канала который Вы желаете изменить Нажмите кн...

Page 34: ...я 6 Чтобы выйти нажмите кнопку EXIT P1 Присвоение каналам названий С помощью точной настройки можно вручную отрегулировать отдельный канал для оптимального приема сигнала 1 Выберите канал для точной настройки с помощью цифровых кнопок 2 Чтобы открыть меню нажмите кнопку MENU Нажимая кнопку или выберите пункт Канал а затем нажмите кнопку ENTER 3 Нажимая кнопку или выберите пункт Точнaя настрoйкa а ...

Page 35: ...же нажать кнопку P MODE Режим ображения на пульте ДУ чтобы ыбрать параметры изображения Изменение стандарта изображения Изображение отображаемое на экране телевизора можно настроить изменяя описанные ниже параметры 1 Чтобы открыть меню нажмите кнопку MENU Нажимая кнопку или выберите пункт Изображение а затем нажмите кнопку ENTER 2 Нажимая кнопку или выберите пункт Польз а затем нажмите кнопку ENTE...

Page 36: ... гамме более насыщенный красноватый оттенок чем в меню Тепл 1 В режиме ПК возможна настройка только параметров Хол Норм Тепл и Польз Изменение цветового оттенка Пepeм Вxод Возврат Оттенок Хол 2 Хол 1 Норм Тепл 1 Тепл 2 Можно о отдельно н настраивать с составляющие ц цветов R G B 1 Нажмите кнопку MENU для отображения меню Нажмите кнопку или для выбора Изображение и нажмите кнопку ENTER 2 Нажмите кн...

Page 37: ...х режимов звука который будет использоваться во время просмотра определенной программы 1 Чтобы открыть меню нажмите кнопку MENU Нажимая кнопку или выберите пункт Звук а затем нажмите кнопку ENTER 2 Нажмите кнопку ENTER чтобы выбрать Peжим 3 Чтобы выбрать необходимый звуковой эффект нажмите кнопку или Нажмите кнопку ENTER 4 Чтобы выйти нажмите кнопку EXIT Стандарт Выбирает нормальный звуковой режим...

Page 38: ...ажение текущего времени Вы можете установить период времени в диапазоне от 30 до 180 минут по истечении которого телевизор автоматически перейдет в режим ожидания 1 Чтобы открыть меню нажмите кнопку MENU Нажимая кнопку или выберите пункт Установка а затем нажмите кнопку ENTER 2 Нажмите кнопку ENTER чтобы выбрать Время 3 Нажимая кнопку или выберите пункт Таймер сна а затем нажмите кнопку ENTER 4 На...

Page 39: ...зад 7 Чтобы выйти нажмите кнопку EXIT Первый этап это установка часов телевизора См раздел Установка и отображение текущего времени на стр 14 Можно также установить значение времени часы и минуты с помощью цифровых кнопок на пульте дистанционного управления Чтобы включить таймеры необходимо выбрать значение Вкл для параметра Активация Автоматическое включение и выключение телевизора ДРУГИЕ НАСТРОЙ...

Page 40: ...е кнопку ENTER Нажмите кнопку SOURCE на пульте ДУ для переключения между доступными источниками Режим телепрограмм можно выбрать используя кнопку TV или P на пульте дистанционного управления С помощью кнопки SOURCE этот режим включить невозможно Выбор источника Назовите устройства подсоединенные к входным разъемам чтобы облегчить выбор источника 1 Чтобы открыть экранное меню нажмите кнопку MENU На...

Page 41: ...гут присутствовать пропуски Некоторые страницы могут не отображаться Чтобы включить режим телетекста и отобразить страницу с содержанием 1 При помощи кнопки P или P выберите канал телевизионной станции которая предоставляет услуги телетекста 2 Активизируйте режим телетекста нажатием кнопки TTX MIX Отображается страница с содержанием Эта страница может быть вызвана в любое время нажатием кнопки MEN...

Page 42: ...екста Различные разделы которые содержатся на страницах телетекста маркируются цветом и могут быть выбраны нажатием цветных кнопок на пульте ДУ 1 Выведите на экран страницу содержания телетекста нажатием кнопки TTX MIX 2 Нажмите цветную кнопку соответствующую разделу который вы хотите просмотреть доступные разделы указаны в строке состояния 3 Нажмите красную кнопку чтобы вернуться к предыдущей стр...

Page 43: ...те ко вкладке Параметры в диалоговом окне Экран Установка правильного размера разрешение Оптимальное 640 X 480 Если в диалоговом окне установки параметров монитора имеется опция частота обновления экрана то в нем должно быть установлено значение 60 или 60 Гц В противном случае закройте это диалоговое окно выбрав опцию OK Настройка свойств экрана компьютера в среде Windows XP Экранные режимы Положе...

Page 44: ...зображения Подстройка изобр пункт 1 3 2 Нажимая кнопку или выберите пункт Позиция а затем нажмите кнопку ENTER 3 Нажмите кнопку или для регулировки положения изображения по вертикали Нажмите кнопку или для регулировки положения изображения по горизонтали Нажмите кнопку ENTER 4 Чтобы выйти нажмите кнопку EXIT Восстановление исходных параметров изображения Сброс настр Можно восстановить значения пар...

Page 45: ...ражение черно белое Настройте параметры цвета Убедитесь что система цветного телевидения выбрана правильно Помехи в звуке и изображении Попытайтесь найти электрическое устройство которое влияет на телевизор и переставьте это устройство в другое место Подсоедините телевизор к другой розетке сети питания Размытое или рябящее изображение и искаженный звук Проверьте направление месторасположение и над...

Page 46: ... цветности Поддерживаемые режимы звука Вес в кг Моно стерео Мощность встроенных динамиков ЅCART S VIDEO RCA Вход D Sub для ПК HDMI DVI IN Аудиовход DVI RCA выход Головные телефоны наушник Пульт ДУ Батарейки Переходник для подключения комнатной антенны Инструкция пользователя 8 Стерео 3 Вт X 2 574 196 468 есть есть есть есть есть есть нет есть есть есть нет есть 4X3 20 дюймов 51 PAL SECAM NTSC 4 43...

Page 47: ...Этастраницанамереннооставлена пустой BN68 01177S T 00Rus 1010 indd 23 2007 10 18 8 54 12 ...

Reviews: