background image

English-59

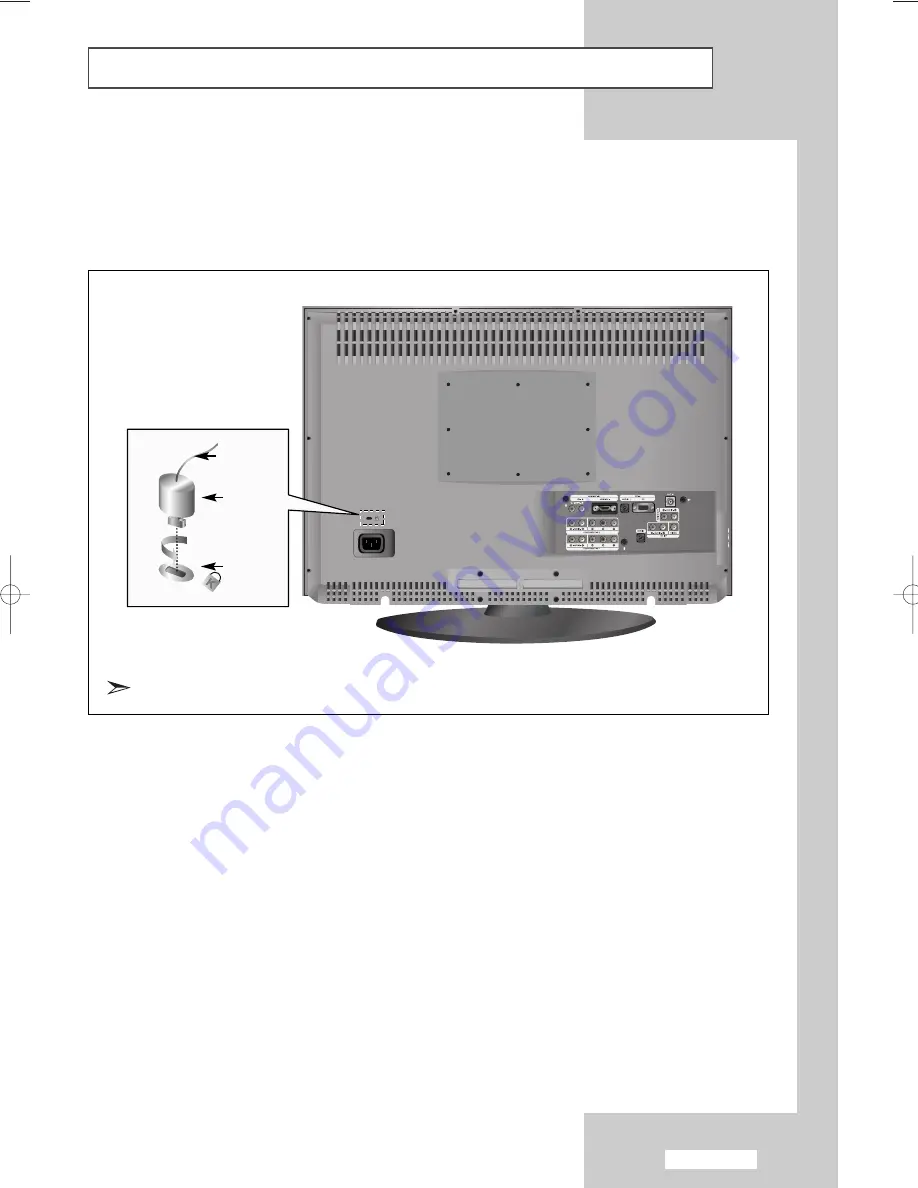
Using the Anti-Theft Kensington Lock

1.  

Insert the locking device into the Kensington slot on the LCD TV (Figure 1), and turn it in the locking direction
(Figure 2).

2.  

Connect the Kensington lock cable.

3.  

Fix the Kensington lock to a desk or a heavy stationary object.

The Kensington lock is a device used to physically fix the system when using it in a public place.
The locking device has to be purchased separately.
The appearance and locking method may differ from the illustration depending on the manufacturer.
Please refer to the manual provided with the Kensington lock for proper use.

Cable

Figure 1

Figure 2

<Option>

The place of the Kensington Lock may be different depending on its model.

BN68-00956G-01Eng.qxd  2/3/06  5:46 AM  Page 59

Summary of Contents for LA32M61B

Page 1: ...ore operating the unit please read this manual thoroughly and retain it for future reference ON SCREEN MENUS PC DISPLAY PICTURE IN PICTURE PIP TELETEXT This device is a Class B digital apparatus Register your product at www samsung com global register ...

Page 2: ...ixed for an extended period of time the amount of light transmission will also remain varied and as a result the borders may leave traces Digital Ready TV When you select the wide screen 16 9 mode to watch an SD grade digital broadcast and the set top box output is 1080i Digital Ready TV When the TV receives HD grade signals and the set top box output is 1080i When you watch a digital HD grade bro...

Page 3: ...borders at the left right and the center of the screen remain fixed for an extended period of time the amount of light transmission will also remain varied and as a result the borders may leave traces When you watch a DVD CD or a video in wide screen 21 9 format on a wide screen 16 9 TV When you connect a computer or a game console to the TV and select the 4 3 screen mode If you connect a DVD play...

Page 4: ...ng Your Language 14 SETTING THE CHANNELS Storing Channels Automatically 15 Storing Channels Manually 16 Editing the Channels 18 Sorting the Stored Channels 19 Assigning Channels Names 20 Fine Tuning Channel Reception 21 SETTING THE PICTURE Changing the Picture Standard 22 Adjusting the Custom Picture 23 Changing the Colour Tone 24 Resetting the Picture Settings to the Factory Defaults 24 Changing ...

Page 5: ... from External Sources 46 SETTING THE PC Setting up Your PC Software Based on Windows XP 47 Adjusting the PC Screen Automatically 48 Coarse and Fine Tuning of the Image 49 Changing the Image Position 50 Initializing the Image Settings 51 USING THE TELETEXT FEATURE Teletext Decoder 52 Displaying the Teletext Information 52 Selecting a Specific Teletext Page 53 Using Fastext to Select a Teletext Pag...

Page 6: ... CH Press to change channels Also press to highlight various items on the on screen menu Without the Remote Control You can turn on TV by using the Channel buttons Power Press to turn the TV on and off Power Indicator Blinks and turns off when the power is on and lights up in stand by mode Light Detecting Sensor Adjusts brightness of screen automatically by detecting brightness of surrounding envi...

Page 7: ...l Whenever you connect an audio or video system to your set ensure that all elements are switched off When connecting an external device match the colour of the connection terminal to the cable Power Input Side Panel Jacks Rear Panel Jacks ...

Page 8: ...es DTV DVD Connect component video cables to component connector PR PB Y on the rear of your set and the other ends to corresponding component video out connectors on the DTV or DVD If you wish to connect both the Set Top Box and DTV or DVD you should connect the Set Top Box to the DTV or DVD and connect the DTV or DVD to component connector PR PB Y on your set The Y PB and PR connectors on your c...

Page 9: ...ou should use the DVI to HDMI cable or DVI HDMI Adapter for the connection and the R AUDIO L terminal on DVI for sound output Connecting Computer Connect the D Sub cable to PC PC IN on the rear of your set and the other end to the Video Card of your computer Connect the stereo audio cable to AUDIO PC IN on the rear of your set and the other end to Audio Out of the sound card on your computer Conne...

Page 10: ...lected TV cable channels Refer to page 15 Sound mode selection Refer to page 34 Sound effect selection Refer to page 35 Selects the TV mode directly Volume increase Volume decrease Refer to page 33 Viewing the Remote Control All Functions Except Teletext PIP FUNCTIONS Refer to pages 31 32 SOURCE Input source selection SWAP Interchange the main and sub picture SIZE PIP size selection POSITION PIP p...

Page 11: ...t page P Teletext previous page Teletext Function Refer to pages 52 54 for details Teletext display mix both teletext information and the normal broadcast Teletext sub page Teletext cancel Teletext hold Teletext mode selection LIST FLOF Teletext reveal Teletext index Teletext size selection Teletext store ...

Page 12: ...ool dry place if you won t be using the remote control for a long time The remote control can be used up to about 23 feet from the TV Assuming typical TV usage the batteries last for about one year If the remote control doesn t work Check the following 1 Is the TV power on 2 Are the plus and minus ends of the batteries reversed 3 Are the batteries drained 4 Is there a power cut or is the power cor...

Page 13: ...o unplug the set from the mains and aerial The mains lead is attached to the rear of your set 1 Plug the mains lead into an appropriate socket Result The standby indicator lights up on the front panel The main voltage is indicated on the rear of your set and the frequency is 50 or 60 Hz 2 Press the POWER button on the front of the panel Result The programme that you were watching last is reselecte...

Page 14: ...d digit must be pushed immediately after the first Failure to do this will result in a single digit channel being displayed Used to increase the volume Used to decrease the volume MUTE Used to switch the sound off temporarily To turn the sound back on press this button again or press the button MENU Used to display the Used to return to the on screen menu system previous menu or normal viewing EXI...

Page 15: ...reas are available Asia W Europe CIS E Europe China Hong Kong UK Australia NZL Indonesia South Africa America 5 Select your Area by pressing the or button Press the ENTER button Result The Auto Store menu is displayed with the Start selected 6 Press the ENTER button Result The channel search will start and end automatically To stop the search before it has finished press the ENTER button with Stop...

Page 16: ...Your Language When you start using your set for the first time you must select the language which will be used for displaying menus and indications 1 Press the MENU button Result The main menu is displayed 2 Press the or button to select Setup Result The options available in the Setup group are displayed 3 Press the ENTER button 4 Press the or button to select Language Press the ENTER button Resul...

Page 17: ...nu is displayed with the Start selected 7 Press the ENTER button to search the channels The sub menu is changed from Start to Stop with channel search started Result The search will end automatically Channels are sorted and stored in an order which reflects their position in the frequency range with lowest first and highest last The programme originally selected is then displayed To return to the ...

Page 18: ...e ENTER button again To assign a programme number to a channel find the correct number by pressing the or button and then press the ENTER button You can also set a programme number by pressing number buttons on the remote control 6 Press the or button to select Colour System and then press the ENTER button Select the colour standard required by pressing the or button repeatedly and then press the ...

Page 19: ...ge until the first channel or the channel that you selected is received on your screen 10 Press the or button to select Store Select OK by pressing the ENTER button Result The channel and associated programme number are stored 11 Repeat steps 8 to 10 for each channel to be stored 12 Press the MENU button to return to the previous menu or press the EXIT button to return to normal viewing Channel mo...

Page 20: ... the ENTER button Result The state of the current channel is displayed 4 Press the button to select channel that you wish to add or delete Result If the channel that you wish to edit is not in memory the Add is selected and displayed Otherwise if the channel that you wish to edit is in memory the Delete is selected and displayed 5 Press the ENTER button to add or delete channel 6 Repeat steps 4 an...

Page 21: ...e or button to select Sort Press the ENTER button Result The Prog Ch and Name are displayed 4 Select the channel number that you wish to change by pressing the or button repeatedly Press the ENTER button Result The selected the channel number and name are moved to right side 5 Press the or button to move to the position in which you would like to change and then press the ENTER button Result The s...

Page 22: ...d 4 If necessary select the channel to be assigned to a new name by pressing the or button Press the ENTER button Result The selection bar is displayed around the name box 5 To Then Select a letter number or symbol Press the or button Move on the next letter Press the button Move back the previous letter Press the button Confirm the name Press the ENTER button The characters available are Letters ...

Page 23: ...the or button to select Fine Tune Press the ENTER button Result The horizontal bar is displayed 4 Press the or button to reach the required setting Press the ENTER button Result An asterisk appears on the right hand side of the channel number The channel number turns red To reset the fine tuning select Reset by pressing the or button and then press the ENTER button 5 When you are satisfied with th...

Page 24: ...ENTER button again Result The options available in the Mode group are displayed 5 Press the ENTER button Result The Mode is selected 6 Select the required picture effect by pressing the or button repeatedly Press the ENTER button Result The following picture effects are available Dynamic Standard Movie Custom 7 When you are satisfied with the setting press the MENU button to return to the previous...

Page 25: ...R button Result The horizontal bar is displayed In PC mode only Contrast and Brightness can be adjusted 6 Press the or button to reach the required setting Press the ENTER button 7 When you are satisfied with the setting press the MENU button to return to the previous menu or press the EXIT button to return to normal viewing The adjusted values are stored according to the selected Picture mode Eac...

Page 26: ... button repeatedly Press the ENTER button Result The following options are available Cool2 Cool1 Normal Warm1 Warm2 6 When you are satisfied with your choice press the EXIT button to return to normal viewing The Colour Tone will be set each picture mode You can return to the factory defaults picture settings 1 Press the MENU button Result The main menu is displayed 2 Press the or button to select ...

Page 27: ...djusts 16 9 to 4 3 in a natural way as for normal broadcasting Zoom Magnifies the 16 9 wide picture in the vertical direction to fit the screen size Select by pressing the or button Use the or button to move the picture up and down After selecting use the or button to magnify or reduce the picture size in the vertical direction 4 3 This is the default setting for a video movie or normal broadcasti...

Page 28: ... may appear on the screen 1 Press the MENU button Result The main menu is displayed 2 Press the or button to select Picture Result The options available in the Picture group are displayed 3 Press the ENTER button 4 Press the or button to select Digital NR Press the ENTER button 5 Press the or button to select On Press the ENTER button 6 Press the EXIT button to return to normal viewing ...

Page 29: ...played 3 Press the ENTER button 4 Press the or button to select DNIe Demo and then press the ENTER button Press the or button to select On Press the ENTER button DNIe Demo Off DNIe Demo mode is deactivated DNIe Demo On The right hand side of the screen shows improved DNle image The left hand side of the screen shows the original image You can also select these options by simply pressing the DNIe b...

Page 30: ...ENTER button Result The sources are displayed in the following order Blue Green Pink Standard Custom 6 Press the or button to select Detail Control and press the ENTER button Select a source of the sub picture by pressing the or button and press the ENTER button Result The sources are displayed in the following order Pink Green Blue Reset 7 Press the or button to reach the required setting Press t...

Page 31: ... options available in the Picture group are displayed 3 Press the ENTER button 4 Press the or button to select Dynamic Contrast Press the ENTER button Result The Dynamic Contrast menu is displayed 5 Select On by pressing the or button Press the ENTER button 6 When it has finished press the EXIT button to return to normal viewing This function doesn t work when source is in PC mode or PIP is set to...

Page 32: ...roup are displayed 3 Press the ENTER button 4 Press the or button to select Brightness Sensor Press the ENTER button Result The Brightness Sensor menu is displayed 5 Select On by pressing the or button Press the ENTER button Result Brightness on the screen is adjusted automatically according to brightness of surrounding environment 6 When it has finished press the ENTER button to return to the pre...

Page 33: ...pressing the or button and press the ENTER button Result When the main picture is set to TV AV1 AV2 S Video Component1 Component2 only HDMI can be selected and when the main picture is set to PC HDMI only TV AV1 AV2 S Video Component1 Component2 can be selected You can choose only those external devices that are connected to the TV 7 Press the or button to select Swap To interchange the main pictu...

Page 34: ...le PIP is On Features Description PIP Used to operate On Off function of PIP directly SOURCE Used to select a source of the sub picture SWAP Used to interchange the main picture and the sub picture When the main picture is in the video mode and the sub picture is in the TV mode you might not hear the sound of the main picture when pressing the SWAP button after changing the sub picture channel At ...

Page 35: ...e increases until you release the button The cursor moves to the right to indicate the volume Press the button to decrease the volume Result A horizontal bar is displayed and the volume decreases until you release the button The cursor moves to the left to indicate the volume Additional sound adjustments are available on your set For further details refer to pages 34 to 39 ...

Page 36: ...as before and the Mute indication disappears Selecting the Sound Mode You can set the sound mode by pressing the DUAL button When you press it the current sound mode is displayed on the screen If the receiving conditions deteriorate listening will be easier if the mode is set to Mono If the stereo signal is weak and automatic switching occurs switch to Mono Default Automatic change DUAL l Automati...

Page 37: ...ect these options by simply pressing the S MODE Sound Mode button on the remote control The sound settings can be adjusted to suit your personal preferences 1 Press the MENU button Result The main menu is displayed 2 Press the or button to select Sound Result The options available in the Sound group are displayed 3 Press the ENTER button 4 Select Equalizer by pressing the or button and then press ...

Page 38: ... the or button to select Sound Result The options available in the Sound group are displayed 3 Press the ENTER button 4 Press the or button to select SRS TSXT and then press the ENTER button 5 Select the required option by pressing the or button Press the ENTER button Result The sources are displayed in the following order Off 3D Mono Stereo 6 Press the EXIT button to return to normal viewing You ...

Page 39: ... output when the modulation signal is high or by raising the sound output when the modulation signal is low 1 Press the MENU button Result The main menu is displayed 2 Press the or button to select Sound Press the ENTER button Result The options available in the Sound group are displayed 3 Press the or button to select Auto Volume Press the ENTER button 4 Press the or button to select On Press the...

Page 40: ...u Prolonged use of headphones at a high volume may damage your hearing You will not receive sound from the speakers when you connect headphones to the system Selecting the Internal Mute If you want to hear the sound through separate speakers cancel the internal amplifier 1 Press the MENU button Result The main menu is displayed 2 Press the or button to select Sound Result The options available in ...

Page 41: ...und Result The options available in the Sound group are displayed 3 Press the ENTER button 4 Press the or button to select Sound Select and then press the ENTER button Result Main and Sub are displayed You can select this option when the PIP is in On 5 Select the Sub by pressing the or button Press the ENTER button Result You can listen to the sound of the sub picture To listen the sound of the cu...

Page 42: ...vailable in the Setup group are displayed 3 Press the or button to select Time Press the ENTER button Result The Time menu is displayed with Clock Set selected 4 Press the ENTER button 5 To Press the Move to Hour Minute or am pm or button Set the Hour Minute or am pm or button Press the ENTER button 6 When you are satisfied with the setting press the MENU button to return to the previous menu or p...

Page 43: ...ess the or button repeatedly and cycle through the preset time intervals Off 30 60 90 120 150 180 Press the ENTER button Result The TV automatically switches to standby mode when the timer reaches 0 6 To cancel the sleep timer function select Off by pressing the or button and then press the ENTER button 7 Press the EXIT button to return to normal viewing You can set the sleep timer by simply press...

Page 44: ... menu is displayed with Clock Set selected 4 Press the or button to select On Timer Press the ENTER button Result The On Timer menu is displayed 5 Set the time channel and volume level at which you wish the set to be switched on To Press the Move to Hour Minute am pm Programme or button and Volume Set Hour Minute am pm Programme or button and Volume Move to Activation or button Select Yes to enabl...

Page 45: ...sult The options available in the Setup group are displayed 3 Press the or button to select Child Lock Press the ENTER button Result The options available in the Child Lock group are displayed 4 Press the ENTER button again Result The Child Lock is selected 5 Press the or button to select On Press the ENTER button 6 Press the or button to select Programme Press the ENTER button 7 Press the or butt...

Page 46: ...t Blue Screen Press the ENTER button 4 Press the or button to select On Press the ENTER button 5 Press the EXIT button to return to normal viewing English 44 Setting the Blue Screen Mode You can hear melody sound when the television is powered on or off 1 Press the MENU button Result The main menu is displayed 2 Press the or button to select Setup Press the ENTER button Result The options availabl...

Page 47: ...NTER button 4 Repeat step 1 Press the or button to select Edit Name Press the ENTER button Result The options available in the Edit Name menu are displayed 5 Select the device that you wish to edit by pressing the or button Result The following options are available AV1 AV2 S Video Component1 Component2 PC HDMI 6 Press the ENTER button 7 Select the required device by pressing the or button repeate...

Page 48: ...ton Result The edited device and audio status are displayed on top left of the set 3 Press the SOURCE button until the required input source is selected If you change the external source while viewing pictures might take a short period of time to be switched TV mode can be selected by pressing the TV or button on the remote control but you cannot select it by pressing the SOURCE button Viewing Pic...

Page 49: ...r computer manufacturer or Samsung Dealer 1 First click on Control Panel on the Windows start menu 3 When the control panel window appears click on Display and a display dialog box will appear 2 When the control panel window appears click on Appearance and Themes and a display dialog box will appear 4 Navigate to the Settings tab on the display dialog box The correct size setting resolution Optimu...

Page 50: ...lt The main menu is displayed 2 Press the or button to select Setup Press the ENTER button Result The options available in the Setup group are displayed 3 Press the or button to select PC Press the ENTER button Result The options available in the PC menu are displayed 4 Press the or button to select Auto Adjustment Press the ENTER button Result The screen quality and position are automatically adj...

Page 51: ...r button to select Setup Press the ENTER button Result The options available in the Setup group are displayed 3 Press the or button to select PC Press the ENTER button Result The options available in the PC menu are displayed 4 Press the ENTER button again Result The Image Lock menu is selected 5 Press the or button to select Coarse or Fine Press the ENTER button Result The horizontal bar is displ...

Page 52: ...roup are displayed 3 Press the or button to select PC Press the ENTER button Result The options available in the PC menu are displayed 4 Press the or button to select Position Press the ENTER button Result You can adjust the image Position 5 Press the or button to adjust horizontal position Press the or button to adjust vertical position Press the ENTER button 6 Press the MENU button to return to ...

Page 53: ...select Setup Press the ENTER button Result The options available in the Setup group are displayed 3 Press the or button to select PC Press the ENTER button Result The options available in the PC menu are displayed 4 Press the or button to select Image Reset Press the ENTER button Result You can initialize all image setting to the factory default values 5 Press the MENU button to return to the prev...

Page 54: ... 1 Using the or button select the channel providing the teletext service 2 Press the TTX MIX button to activate the teletext mode Result The contents page is displayed It can be redisplayed at any time by pressing the MENU button 3 Press the TTX MIX button again Result The screen will split into two This Double Teletext feature lets you view the actual broadcast and teletext information separately...

Page 55: ...quence To freeze the display on a given page press the PRE CH Press the PRE CH button again to resume 3 Using the various display options To display Press the Both teletext information and TTX MIX the normal broadcast Hidden text INFO answers to quiz games for example The normal screen INFO again A secondary page SLEEP by entering its 4 digit number The next page Page Up The previous page Page Dow...

Page 56: ...y pressing the TTX MIX button 2 Press the coloured button corresponding to the topic that you wish to select The available topics are listed on the status information line Result The page is displayed with additional colour coded information that can be selected in the same way 3 To display the Press the Previous page Red button Next page Green button 4 When you have finished press the PIP button ...

Page 57: ...ance that is affecting the set and move it further away Plug your set into a different mains socket Check the direction location and connections of your aerial This interference is often due to the use of an indoor aerial Replace the remote control batteries Clean the upper edge of the remote control transmission window Check the battery terminals Check that the signal cable is firmly connected to...

Page 58: ...t Set Bracket Screw 8 EA Wood Screw 7 EA Anchor 7 EA Screw 3 EA Installation Guide How to assemble the Wall Mount Bracket 1 Mark the location of hole on the wall Drill a hole of 35mm depth on the marked location Fix anchors on each hole on the wall Connect wall bracket to the wall with wood screws after fitting anchors into the wall bracket Note If the bracket is not firmly fixed to the wall LCD T...

Page 59: ... rear side of the TV set only model LA40M61B applied Attach the set bracket onto the rear side of the TV set and secure the screws For 40 inches model attach the bracket into the two holes with the two screws removed in step 6 above 3 Insert three Hangers of the set bracket into the grooves of the wall bracket Fix set bracket and wall bracket with screws Note Before installing the set on the wall ...

Page 60: ...rews to tightly fix the stand 2 3 Maximizing space is available with Stand swivel function This product supports left right swivel function on the desk You can adjust the angle up to 15 to the left or right Please move away all the stuff around the monitor There should be enough space between the wall and the monitor Place the monitor on a flat and stable space to easily swivel the TV 15 15 ...

Page 61: ...heavy stationary object The Kensington lock is a device used to physically fix the system when using it in a public place The locking device has to be purchased separately The appearance and locking method may differ from the illustration depending on the manufacturer Please refer to the manual provided with the Kensington lock for proper use Cable Figure 1 Figure 2 Option The place of the Kensing...

Page 62: ...8 60 Hz Optimum 1360 x 768 60 Hz 1360 x 768 60 Hz Input Signal Sync H V Separate TTL P or N H V Separate TTL P or N Video Signal 0 7 Vp p 75 Ω 0 7 Vp p 75 Ω TV Colour System PAL SECAM B G D K PAL SECAM B G D K I I I L L NTPB AV3 58 4 43 I I I L L NTPB AV3 58 4 43 Sound System BG DK I L BG DK I L Video Colour System PAL NTSC SECAM PAL NTSC SECAM Video System CVBS S VHS RGB CVBS S VHS RGB COMPONENT ...

Page 63: ...ndard video format is selected DVI dose not support PC function Model LA32M61B LA40M61B Weight With stand 19 2 kg 42 33 lbs 27 5 kg 60 63 lbs Environmental Considerations Operating Temperature 10 C to 40 C 50 F to 104 F 10 C to 40 C 50 F to 104 F Operating Humidity 10 to 80 non condensing 10 to 80 non condensing Storage Temperature 20 C to 45 C 4 F to 113 F 20 C to 45 C 4 F to 113 F Storage Humidi...

Page 64: ...tor 15Pin Pin Signal 1 Red R 2 Green G 3 Blue B 4 Grounding 5 Grounding DDC 6 Red R Grounding 7 Green G Grounding 8 Blue B Grounding Pin Signal 9 Reserved 10 Sync Grounding 11 Grounding 12 Data DDC 13 Horizontal sync 14 Vertical sync 15 Clock DDC ...

Page 65: ... 603 800 810 5858 010 6475 1880 2862 6001 3030 8282 1600 1100 11 0800 112 8888 0120 327 527 1800 88 9999 1800 10 SAMSUNG 7267864 1800 SAMSUNG 7267864 0860 7267864 SAMSUNG 0800 329 999 1800 29 3232 02 689 3232 800SAMSUNG 7267864 1 800 588 889 Web Site www samsung com au www samsung com cn www samsung com hk www samsung com in www samsung com id www samsung com jp www samsung com my www samsung com ...

Reviews: