background image

English - 7

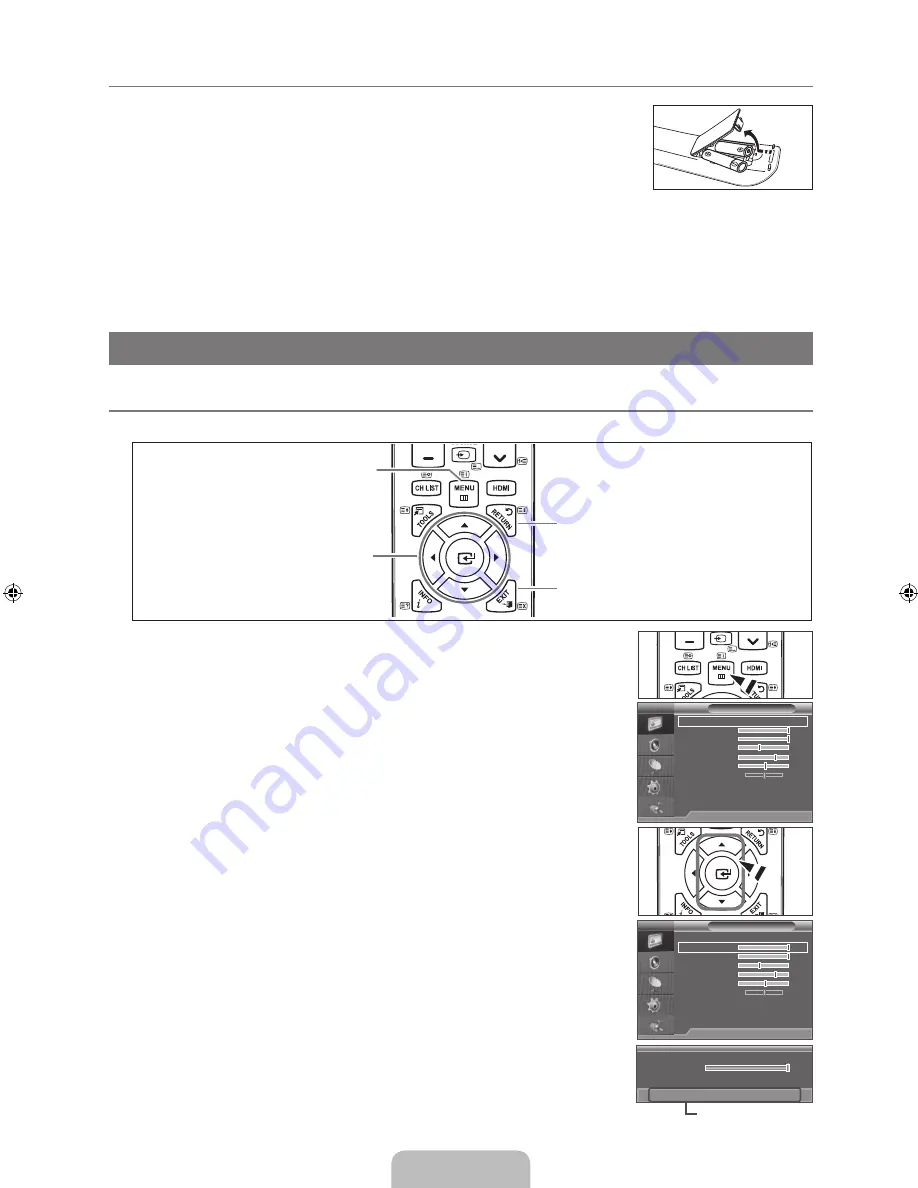
Installing Batteries in the Remote Control

Lift the cover at the back of the remote control upward as shown in the figure.

Install two AAA size batteries. 

Make sure to match the ‘+’ and ‘–’ ends of the batteries with the diagram inside the 

compartment.

3. 

Replace the cover.

Remove the batteries and store them in a cool, dry place if you won’t be using the 

remote control for a long time. 

If the remote control doesn’t work, check the following:

Is the TV power on? 

Are the plus and minus ends of the batteries reversed?

Are the batteries drained?

Is there a power outage or is the power cord unplugged?
Is there a special fluorescent light or neon sign nearby?

OPERATION

OPERATION

Viewing the menus

Before using the TV, follow the steps below to learn how to navigate the menu in order to select and adjust different functions.


Operation the OSD (On Screen Display)

The access step may differ depending on the selected menu.

Press the 

MENU

 button.

The main menu appears on the screen. The menu’s left side has icons : 

Picture, Sound, 

Channel, Setup, Input.

3. 

Press the ▲ or ▼ button to select one of the icons.

4. 

Then press the 

ENTER

E

 button to access the icon’s sub-menu.

5. 

Press the ▲ or ▼ button to select the icon’s submenu.

6. 

Press the ◄ or ► button to decrease or increase the value of a particular item. The 

adjustment OSD may differ depending on the selected menu.

7. 

Press the 

ENTER

E

 button to complete the configuration. Press the 

EXIT

 button to exit.

¦

N

N

N

¦

MENU

 Button

Display the main on-screen menu.

ENTER

E


/ DIRECTION Buttons

Move the cursor and select an 

item. Select the currently selected 

item. Confirm the setting.

RETURN

 Button

Return to the previous menu.

EXIT

Exit the on-screen menu.

Mode 

: Dynamic 

Backlight 


0

Contrast 


00

Brightness 


45

Sharpness 


75

Colour 


55

Tint (G/R)       G  50   

R  50

Advanced Settings   

Picture Options 


Reset 

: OK 

U

 Move          

E

 Enter          

R

 Return

TV

Picture

Mode 

: Dynamic

Backlight 


0

Contrast 


00

Brightness 


45

Sharpness 


75

Colour 


55

Tint (G/R)       G  50   

R  50

Advanced Settings   

Picture Options 


Reset 

: OK 

U

 Move          

E

 Enter          

R

 Return

TV

Picture

Help icon

      ▲

Backlight

      ▼

0

U

 Move          

L

 Adjust          

R

 Return

[450-Big]BN68-01928A-02Eng.indb   7

2009-09-11   �� 3:09:31

Summary of Contents for LA26B450

Page 1: ...LAND 0800 SAMSUNG 0800 726 786 www samsung com nz PHILIPPINES 1 800 10 SAMSUNG 726 7864 1 800 3 SAMSUNG 726 7864 1 800 8 SAMSUNG 726 7864 02 5805777 www samsung com ph SINGAPORE 1800 SAMSUNG 726 7864...

Page 2: ...3 format for a long period of time may leave traces of borders displayed on the left right and centre of the screen caused by the difference of light emission on the screen Playing a DVD or a game con...

Page 3: ...e Menu 11 Viewing Picture in Picture 14 Using Your TV as a Computer PC Display 15 Setting up the TV with your PC 16 SOUND Configuring the Sound Menu 16 Selecting the Sound Mode 17 SETUP Configuring th...

Page 4: ...ontrol 2 MENU Press to see an on screen menu of your TV s features 3 y Press to increase or decrease the volume In the on screen menu use the y buttons as you would use the and buttons on the remote c...

Page 5: ...on the model Holder Wire Cable Depending on the model Owner s Instructions Warranty card Safety Guide Registration Cards Please make sure the following items are included with your LCD TV If any items...

Page 6: ...rs on the Amplifier or DVD Home Theatre 5 HDMI IN 1 DVI 2 3 Connects to the HDMI jack of a device with an HDMI output No additional Audio connection is needed for an HDMI to HDMI connection What is HD...

Page 7: ...D you should connect the Set Top Box to the DVD and connect the DVD to component connector PR PB Y on your set The PR PB and Y connectors on your component devices DVD are sometimes labeled Y B Y and...

Page 8: ...ckly select frequently used functions 8 INFO Press to display information on the TV screen TV Selects the TV mode directly PRE CH Enables you to return to the previous channel you were watching MUTE M...

Page 9: ...U button 2 The main menu appears on the screen The menu s left side has icons Picture Sound Channel Setup Input 3 Press the or button to select one of the icons 4 Then press the ENTERE button to acces...

Page 10: ...the TV for 5 seconds 4 The message Check antenna input is displayed with OK selected Press the ENTERE button Please check that the antenna cable is connected correctly 5 Select the appropriate area by...

Page 11: ...me mode When completing tuning the broadcasting stations in your area have been assigned to position numbers from P00 to P99 You can select a channel by entering the position number in this mode C Air...

Page 12: ...owing characters are available Letters of the alphabet A Z Numbers 0 9 Special characters space Fine Tune If the reception is clear you do not have to fine tune the channel as this is done automatical...

Page 13: ...the picture Brightness Adjusts the brightness level of the picture Sharpness Adjusts the edge definition of the picture Colour Adjusts colour saturation of the picture Tint G R Adjusts the colour tint...

Page 14: ...our Space automatically adjusts to the most natural colour tone based on programme sources Native Native Colour Space offers deep and rich colour tone White Balance You can adjust the colour temperatu...

Page 15: ...a static image on the set for more than two hours Wide Zoom Move the screen up down using the or button after selecting the by pressing the or ENTERE button Zoom Select by pressing the or button Use t...

Page 16: ...w becomes slightly unnatural when you use the main screen to view a game or karaoke PIP Off On You can activate or deactivate the PIP function When watching at the 1080P resolution setting PIP to Off...

Page 17: ...click OK and exit the dialog box Display Modes Both screen position and size will vary depending on the type of PC monitor and its resolution The resolutions in the table are recommended D Sub and HDM...

Page 18: ...ntrol Standard Selects the normal sound mode Music Emphasizes music over voices Movie Provides the best sound for movies Clear Voice Emphasizes voice over other sounds Custom Recalls your customized s...

Page 19: ...ings will be limited TV s Internal Speakers Audio Out L R Out to Sound System RF AV Component PC HDMI RF AV Component PC HDMI TV Speaker Sound Output Sound Output External Speaker Mute Sound Output Vi...

Page 20: ...ting you ve chosen set to Activated Repeat Select Once Everyday Mon Fri Mon Sat or Sat Sun Volume Select the desired turn on volume level Programme When the On Timer is active you can turn on a specif...

Page 21: ...de the screen shakes slightly If Game Mode is On Picture mode is automatically changed to Standard and cannot be changed Melody Off Low Medium High A melody sound can be set to come on when the TV is...

Page 22: ...control TV AV1 AV2 Component1 Component2 PC HDMI1 DVI HDMI2 HDMI3 Edit Name VCR DVD Cable STB Satellite STB PVR STB AV Receiver Game Camcorder PC DVI DVI PC TV IPTV Blu ray HD DVD DMA Name the device...

Page 23: ...eletext page are colour coded and can be selected by pressing the coloured buttons Press one of them corresponding to the required The page is displayed with other coloured information that can be sel...

Page 24: ...support version 2 5 are not capable of displaying any additional graphics or text regardless of the Teletext transmission Press the TV button to exit from the Teletext display Installing the Stand LA...

Page 25: ...t may lean to one side N N N N Disconnecting the Stand 1 Remove four screws from the back of the TV 2 Separate the stand from the TV Two or more people should carry the TV 3 Cover the bottom hole with...

Page 26: ...tationary object N N 3 1 2 Optional Securing the Installation Space Keep the required distances between the product and other objects e g walls to ensure proper ventilation Failing to do so may result...

Page 27: ...e additionally 2 Remove the screws from the centre back of the TV put the screws into the clamps and then fasten the screws onto the TV again Screws may not be supplied with the product In this case p...

Page 28: ...nu Picture mode Colour Brightness Sharpness Adjust Energy Saving option in Setup menu Try picture reset to view the default picture setting Go to MENU Picture Picture Reset Dotted line on the edge of...

Page 29: ...For example external device s output HDMI TV s input HDMI Make sure your connected device is powered on Make sure to select the TV s correct source by pressing the SOURCE button on the TV remote RF C...

Page 30: ...e sure TV is placed on flat surface If can not remove screws from TV please use magnetized screw driver Channel menu is grey out unavailable Channel menu is only available when TV source is selected Y...

Page 31: ...95 non condensing Stand Swivel Left Right 0 10 10 20 20 Model Name LA37B450 LA40B450 Screen Size Diagonal 37 inch 40 inch PC Resolution Optimum 1360 x 768 60Hz 1360 x 768 60Hz Sound Output 10W X 2 10W...

Reviews: