background image

English - 5

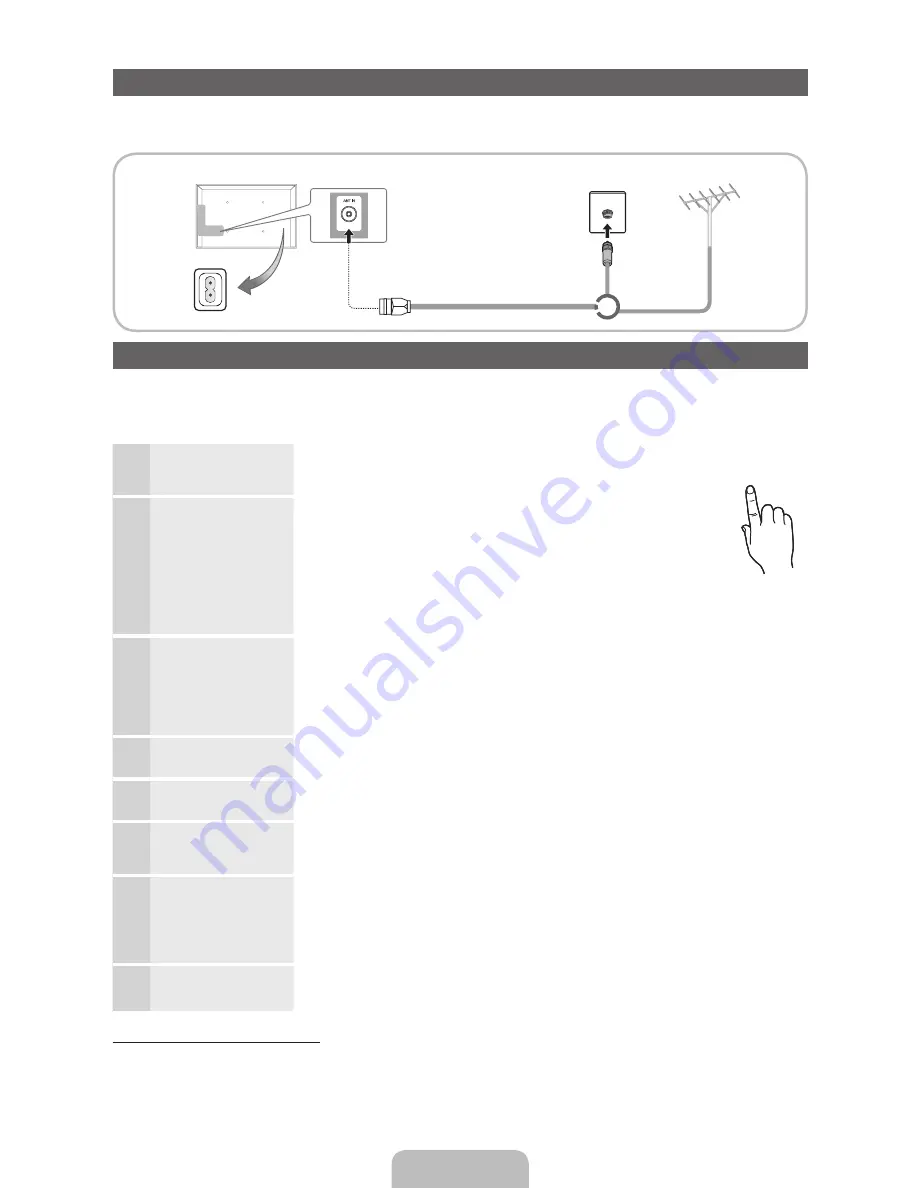
Connecting to an Antenna

When the TV is initially powered on, basic settings proceed automatically.


Preset: Connecting the mains and antenna. 

Plug & Play (Initial Setup)

When the TV is initially powered on, a sequence of on-screen prompts will assist in configuring basic settings. Press the 

POWER

P

 button. 

Plug & Play

 is available only when the 

Source

 is set to TV.


To return to the previous step, press the Red button.

1

Selecting a language

Press the 

 or 

 button, then press the 

ENTER

E

 button. 

Select the desired OSD (On Screen Display) language. 
(Not available in some locations)

P

POWER

Selecting 

Store Demo


or 

Home Use

Press the 

 or 

 button, then press the 

ENTER

E

 button.

Select the 

Home Use

 mode. 

Store Demo

 mode is for retail 

environments.
To return the unit’s settings from 

Store Demo

 to 

Home Use

 (standard): 

Press the volume button on the TV. When the OSD volume is displayed, 
press and hold 

MENU

 for 5 sec.

Store Demo

 is only for shop display. If you select it, several functions 

are not able to use. Please select 

Home Use

 when you watch at home.

2

Selecting a country

Press the 

 or 

 button, then press the 

ENTER

E

 button. 

Select the appropriate country. (Not available in some locations) 


After selecting the country in the 

Country

 menu, some models may proceed with an 

additional option to setup the pin number.


When you input the PIN number, 0-0-0-0 is not available.

Selecting an area

Press the 

 or 

 button, then press the 

ENTER

E

 button. 

Select the appropriate area. (Not available in some locations)  

3

Setting the 

Clock 

Mode

Set the 

Clock Mode

 automatically or manually.


If you select the 

Auto

, select the time zone which you live. (Australia only)  

4

Selecting an antenna

Press the 

 or 

 button, then press the 

ENTER

E

 button. 

Select 

Air (Digital & Analogue/Digital/Analogue)

 or 

Cable (Digital & Analogue/Digital/

Analogue)

.

5

Selecting a channel

Press the 

 or 

 button, then press the 

ENTER

E

 button. 

Select the channel source to memorise. When setting the antenna source to 

Cable

, a step 

appears allowing you to assign numerical values (channel frequencies) to the channels. For 
more information, refer to 

Channel


Auto Tuning

.

Press the 

ENTER

E

 button at any time to interrupt the memorisation process.

6

Enjoy your TV. 

Select the 

Watch TV

. Press the 

ENTER

E

 button.

If You Want to Reset This Feature...

Select 

System

 - 

Plug & Play

 (Initial Setup). Enter your 4 digit PIN number. The default PIN number is “0-0-0-0.” If you want to 

change the PIN number, use the 

Change PIN

 function.

You should do 

Plug & Play 

(

MENU


System

) again at home although you did in shop.


If you forget the PIN code, press the remote control buttons in the following sequence in Standby mode, which resets 
the PIN to “0-0-0-0” : 

MUTE


 8 

 2 

 4 


POWER

 (on)

VHF/UHF Antenna

Cable

or

Power Input

[LD450-XY]BN68-03396A-ENG.indd   5

2011-02-24   �� 4:13:19

Summary of Contents for LA22D450

Page 1: ...al imagine the possibilities Thank you for purchasing this Samsung product To receive more complete service please register your product at www samsung com register Model______________Serial No ______________ E MANUAL ...

Page 2: ...educe brightness and contrast values to minimum required to achieve desired picture quality exceeded values may speed up the burnout process Frequently use all TV features designed to reduce image retention and screen burnout refer to proper user manual section for details Securing the Installation Space Keep the required distances between the product and other objects e g walls to ensure proper v...

Page 3: ... Power Indicator Blinks and turns off when the power is on and lights up in standby mode SOURCEE Toggles between all the available input sources In the on screen menu use this button as you would use the ENTERE button on the remote control MENU Displays an on screen menu the OSD on screen display of your TV s features y Adjusts the volume In the OSD use the y buttons as you would use the and butto...

Page 4: ...tly access to channels Adjusts the volume Alternately select Teletext ON Double Mix or OFF Displays the main on screen menu Quickly select frequently used functions Displays the My Downloads Watch TV and Source Returns to the previous menu Selects the on screen menu items and changes the values seen on the menu Buttons used in the Channel List Channel Manager My Downloads menu etc Use these button...

Page 5: ...eed with an additional option to setup the pin number When you input the PIN number 0 0 0 0 is not available Selecting an area Press the or button then press the ENTERE button Select the appropriate area Not available in some locations 3 Setting the Clock Mode Set the Clock Mode automatically or manually If you select the Auto select the time zone which you live Australia only 4 Selecting an anten...

Page 6: ...t does not support HDMI output use an HDMI DVI and audio cables x x The picture may not display normally if at all or the audio may not work if an external device that uses an older version of HDMI mode is connected to the TV If such a problem occurs ask the manufacturer of the external device about the HDMI version and if out of date request an upgrade x x Be sure to purchase a certified HDMI cab...

Page 7: ...ideo cable Yellow 22 When connecting to AV IN the colour of the AV IN Y VIDEO jack Green does not match the colour of the video cable Yellow To obtain the best picture quality the Component connection is recommended over the A V connection AV connection AV connection Component connection Component connection LA22D450 LA26D450 LA32D450 LA32D451 It may differ depending on the model ...

Page 8: ...TV signal the TV will send 5 1 CH sound to the home theatre receiver When the source is a digital component such as a DVD Blu ray player cable box STB Set Top Box satellite receiver and is connected to the TV via HDMI only 2 CH audio will be heard from the home theatre receiver If you want to hear 5 1 CH audio connect the digital audio out jack from your DVD Blu ray player cable box STB satellite ...

Page 9: ... HDMI DVI IN LA26D450 LA32D450 LA32D451 Display Modes D Sub and HDMI DVI Input 26 32 Optimal resolution is 1360x768 60Hz Mode Resolution Horizontal Frequency KHz Vertical Frequency Hz Pixel Clock Frequency MHz Sync Polarity H V IBM 640 x 350 31 469 70 086 25 175 720 x 400 31 469 70 087 28 322 MAC 640 x 480 35 000 66 667 30 240 832 x 624 49 726 74 551 57 284 VESA DMT 640 x 480 31 469 59 940 25 175 ...

Page 10: ...00 1024 x 768 48 363 60 004 65 000 1024 x 768 56 476 70 069 75 000 1024 x 768 60 023 75 029 78 750 1152 x 864 67 500 75 000 108 000 1280 x 1024 63 981 60 020 108 000 1280 x 1024 79 976 75 025 135 000 1280 x 800 49 702 59 810 83 500 1280 x 800 62 795 74 934 106 500 1280 x 960 60 000 60 000 108 000 1360 x 768 47 712 60 015 85 500 1440 x 900 55 935 59 887 106 500 1440 x 900 70 635 74 984 136 750 1680...

Page 11: ... DVI Devices TV IPTV Blu ray HD DVD DMA Name the device connected to the input jacks to make your input source selection easier 26 32 When connecting a PC to the HDMI IN 1 DVI port with HDMI cable you should set the TV to PC mode under Edit Name When connecting a PC to the HDMI IN 1 DVI port with HDMI to DVI cable you should set the TV to DVI PC mode under Edit Name If you connected an AV device t...

Page 12: ...xit This function is not enabled in some menus Method 1 Method 2 1 If you want to use the menu that corresponds to an e Manual topic press the red button to select Try Now 2 To return to the e Manual screen press the E MANUAL button 1 Press the ENTERE button when a topic is displayed Are you sure appears Select Yes and then press the ENTERE button The OSD window appears 2 To return to the e Manual...

Page 13: ...vious or next page Using the Zoom mode UMove R Return Select the Zoom and then press ENTERE to magnify the screen You can scroll through the magnified screen by using the or buttons To return to the screen to normal size press the RETURN button How to search for a topic on the index page Not available in a certain language 1 To search for a topic press the left or right arrow button to select a le...

Page 14: ...nstallation manual and all parts necessary for assembly are provided x x Do not use screws that do not comply with the VESA standard screw specifications x x Do not use screws longer than the standard dimension as they may cause damage to the inside of the TV set x x For wall mounts that do not comply with the VESA standard screw specifications the length of the screws may differ depending on thei...

Page 15: ...lect the TV s correct source by pressing the SOURCE button on the remote control Reboot the connected device by reconnecting the device s power cable The remote control does not work Replace the remote control batteries with the poles in the right direction Clean the sensor s transmission window on the remote Try pointing the remote directly at the TV from 5 6 feet away The cable set top box remot...

Page 16: ...t be supplied with the product In this case please purchase the screws of the following specifications Screw Specifications x x For a 19 26 Inch LCD TV M4 x x For a 32 40 Inch LCD TV M6 3 Connect the clamps fixed onto the TV and the clamps fixed onto the wall with a strong string and then tie the string tightly NOTE x x Install the TV near to the wall so that it does not fall backwards x x It is s...

Page 17: ...50 LA32D450 LA32D451 Screen Size 22 inch 26 inch 32 inch Sound Output 3 W x 2 5 W x 2 10 W x 2 Dimensions WxDxH Body With stand 543 4 X 61 9 X 353 5 mm 543 4 X 171 6 X 395 9 mm 660 7 x 78 6 x 435 0 mm 660 7 x 222 1 x 482 8 mm 795 5 x 80 4 x 510 3 mm 795 5 x 251 7 x 571 1 mm Weight Without Stand With Stand 5 0 Kg 5 2 Kg 6 2 kg 6 7 kg 8 6 kg 10 9 kg Design and specifications are subject to change wi...

Page 18: ...www samsung com HONG KONG 852 3698 4698 www samsung com hk INDIA 3030 8282 1800 3000 8282 www samsung com INDONESIA 0800 112 8888 021 5699 7777 www samsung com JAPAN 0120 327 527 www samsung com MALAYSIA 1800 88 9999 www samsung com PHILIPPINES 1 800 10 SAMSUNG 726 7864 1 800 3 SAMSUNG 726 7864 1 800 8 SAMSUNG 726 7864 02 5805777 www samsung com SINGAPORE 1800 SAMSUNG 726 7864 www samsung com THAI...

Reviews: