background image

English - 22

RECOMMENDATIONS

Teletext Feature

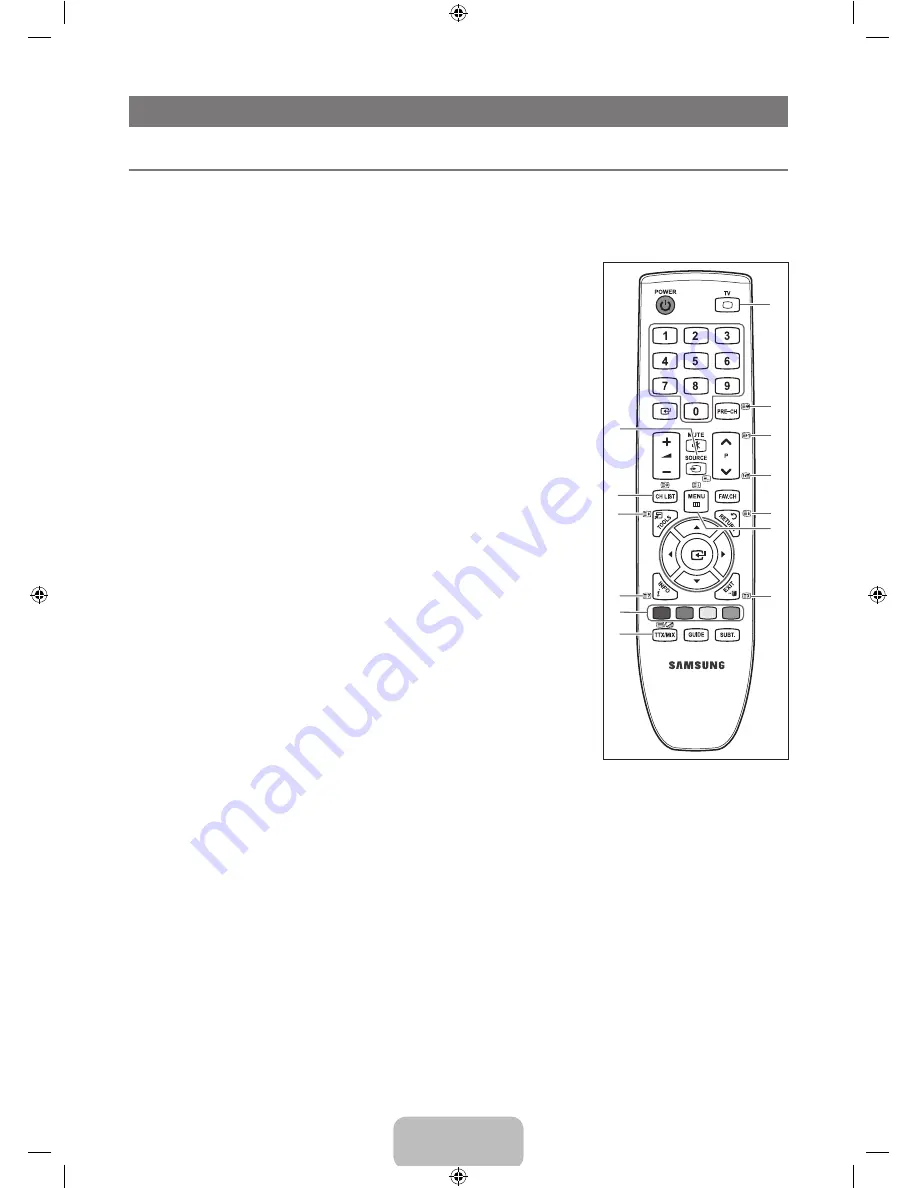
Most television stations provide written information services via Teletext. The index page of the teletext service gives you information 

on how to use the service. In addition, you can select various options to suit your requirements by using the remote control buttons.

For teletext information to be displayed correctly, channel reception must be stable. Otherwise, information may be missing or 

some pages may not be displayed. 

You can change teletext pages by pressing the numeric buttons on the remote control.

1


0

 (mode)

Press to select the Teletext mode 

(LIST/FLOF). If you press it in the 

LIST mode, it switches into the List 

save mode. In the List save mode, 

you can save Teletext page into list 

using the 

(store) button.

2


8

 (store)

Used to store the Teletext pages.

3


4

 (size)

Press to display the double-size 

letters in the upper half of the screen. 

For lower half of the screen, press 

it again. To display normal screen, 

press it once again.

4


5

 (reveal)

Used to display the hidden text 

(answers to quiz games, for 

example). To display normal screen, 

press it again.

5

  Colour buttons  

(red / green / yellow / blue)

If the FASTEXT system is used 

by a broadcasting company, the 

different topics covered on a 

Teletext page are colour-coded 

and can be selected by pressing 

the coloured buttons. Press one of 

them corresponding to the required. 

The page is displayed with other 

coloured information that can be 

selected in the same way. To display 

the previous or next page, press the 

corresponding coloured button.

6


/

 (Teletext on/mix)

Press to activate Teletext mode after 

selecting the channel providing the 

Teletext service. Press it twice to overlap 

the Teletext with the current broadcasting 

screen.

7


:

 (exit)

Exit from the Teletext display.

8


1

 (sub-page)

Used to display the available sub-page.

9


2

 (page up)

Used to display the next Teletext page.

0


3

 (page down)

Used to display the previous Teletext 

page.

!


9

 (hold)

Used to hold the display on a given 

page if the selected page is linked with 

several secondary pages which follow on 

automatically. To resume, press it again.

@


6

 (index)

Used to display the index (contents) 

page at any tim e while you are viewing 

Teletext.

#


7

 (cancel)

Used to display the broadcast when 

searching for a page.


You can change Teletext pages by pressing the numeric buttons on the remote control. 

¦

N

N

N

1

2

3

4

5

6

7

8

9

0

!

#

@

[650_Aus]BN68-02089G-01Eng.indb   22

2009-08-21   ¿ÀÈÄ 1:40:37

Summary of Contents for LA22B650

Page 1: ...LAND 0800 SAMSUNG 0800 726 786 www samsung com nz PHILIPPINES 1 800 10 SAMSUNG 726 7864 1 800 3 SAMSUNG 726 7864 1 800 8 SAMSUNG 726 7864 02 5805777 www samsung com ph SINGAPORE 1800 SAMSUNG 726 7864 www samsung com sg THAILAND 1800 29 3232 02 689 3232 www samsung com th TAIWAN 0800 329 999 www samsung com tw VIETNAM 1 800 588 889 www samsung com vn SOUTH AFRICA 0860 SAMSUNG 726 7864 www samsung c...

Page 2: ...se screen image retention This image retention is also known as screen burn To avoid such image retention reduce the degree of brightness and contrast of the screen when displaying a still image Watching the LCD TV in 4 3 format for a long period of time may leave traces of borders displayed on the left right and centre of the screen caused by the difference of light emission on the screen Playing...

Page 3: ...g Your TV as a Computer PC Display 14 Setting up the TV with your PC 15 SOUND CONTROL Configuring the Sound Menu 15 Selecting the Sound Mode 16 SETUP Configuring the Setup Menu 17 INPUT SUPPORT Configuring the Input Menu 20 Configuring the Support Menu 20 RECOMMENDATIONS Teletext Feature 22 Anti Theft Kensington Lock 23 Securing the Installation Space 24 Securing the TV to the Wall 24 Troubleshoot...

Page 4: ...e and buttons on the remote control 5 CH Press to change channels In the on screen menu use the CH buttons as you would use the and buttons on the remote control 6 POWER INDICATOR Blinks and turns off when the power is on and lights up in stand by mode 7 P POWER Press to turn the TV on and off 8 SPEAKERS Accessories Remote Control Batteries AAA x 2 Power Cord Stand Base Stand Body Cleaning Cloth O...

Page 5: ...ing sources An outdoor aerial A cable television network 6 KENSINGTON LOCK depending on the model The Kensington Lock optional is a device used to physically fix the system when used in a public place If you want to use a locking device contact the dealer where you purchased the TV The location of the Kensington Lock may be different depending on its model 7 H HEADPHONE depending on the model Head...

Page 6: ...vourites channels RETURN Returns to the previous menu UP DOWN LEFT RIGHT ENTERE Use to select on screen menu items and change menu values EXIT Press to exit the menu SUBT Digital subtitle display a GUIDE Electronic Programme Guide EPG display Teletext Functions 5 0 Teletext mode selection LIST FLOF 6 8 Teletext store 7 4 Teletext size selection 8 5 Teletext reveal 9 Fastext topic selection 0 Alter...

Page 7: ...ess the or button to decrease or increase the value of a particular item The adjustment OSD may differ depending on the selected menu 7 Press the ENTERE button to complete the configuration Press the EXIT button to exit MENU Buttons Display the main on screen menu ENTERE DIRECTION Buttons Move the cursor and select an item Select the currently selected item Confirm the setting RETURN Button Return...

Page 8: ...he message Set the Clock Mode is displayed 5 Press the ENTERE button Press the or button to select Auto then Press the ENTERE button If you select Manual Set current date and time is displayed If you have received a digital signal the time will be set automatically If not select Manual to set the clock 6 Press the or button to highlight the time zone for your local area Press the ENTERE button Aus...

Page 9: ...nished channels are updated in the channel list Analogue Channel Manual store for analogue channel Programme Programme number to be assigned to a channel Sets the programme number using the or number 0 9 buttons Colour System Auto PAL SECAM NTSC4 43 Sets the colour system value using the or button Sound System BG DK I L Sets the sound system value using the or button Channel When you know the numb...

Page 10: ... Guide Australia Singapore Only You can decide whether to display either the Mini Guide or the Full Guide when the GUIDE button on the remote control is pressed Channel List For the detailed procedures on using the Channel List refer to page 9 You can select these options by simply pressing the CH LIST button on the remote control Channel Mode When press the P button Channels will be switched with...

Page 11: ...wards quickly 24 hours Scrolls forwards quickly 24 hours Press the green button repeatedly Press the yellow button repeatedly Managing Channels Using this menu you can add delete or set favourite channels and use the programme guide for digital broadcasts All Channels Shows all currently available channels Added Channels Shows all added channels Favourites Shows all favourite channels To select th...

Page 12: ...the number buttons on the remote control Reserving a programme will be shown on Programmed menu Digital Programme Guide and Viewing Reservation When a digital channel is selected and you press the button the Programme Guide for the channel appears You can reserve a programme according to the procedures described above Edit Channel Name analogue channels only Channels can be labeled so that their c...

Page 13: ...light Contrast Adjusts the contrast level of the picture Brightness Adjusts the brightness level of the picture Sharpness Adjusts the edge definition of the picture Colour Adjusts colour saturation of the picture Tint G R Adjusts the colour tint of the picture Select a picture mode to be adjusted first The adjusted values are saved for each picture mode When you make changes to Backlight Contrast ...

Page 14: ...ormal Warm1 Warm2 You can select the most comfortable colour tone to your eyes Settings can be adjusted and stored for each external device you have connected to an input of the TV Warm1 or Warm2 is only activated when the picture mode is Movie Size You can select the picture size which best corresponds to your viewing requirements Press the TOOLS button to display the Tools menu You can also set ...

Page 15: ...e Zoom Magnify the size of the picture more than 4 3 Zoom Magnify the size of the picture vertically on screen 4 3 Sets the picture to 4 3 normal mode This function is available in Auto Wide mode This function is not available in PC Component or HDMI mode Digital NR Off Low Medium High Auto If the broadcast signal received by your TV is weak you can activate the Digital Noise Reduction feature to ...

Page 16: ...og box Display Modes Both screen position and size will vary depending on the type of PC monitor and its resolution The resolutions in the table are recommended D Sub and HDMI DVI Input Mode Resolution Horizontal Frequency KHz Vertical Frequency Hz Pixel Clock Frequency MHz Sync Polarity H V IBM 640 x 350 31 469 70 086 25 175 720 x 400 31 469 70 087 28 322 MAC 640 x 480 35 000 66 667 30 240 832 x ...

Page 17: ...und mode by selecting Tools Sound Mode Equalizer The sound settings can be adjusted to suit your personal preferences Mode You can select a sound mode to suit your personal preferences Balance Controls the balance between the right and left speakers 100Hz 300Hz 1KHz 3KHz 10KHz Bandwidth Adjustment To adjust the level of different bandwidth frequencies Reset Resets the equalizer settings to the def...

Page 18: ...und output when the modulation signal is high or by raising the sound output when the modulation signal is low Speaker Select External Speaker TV Speaker If you want to hear the sound through separate speakers cancel the internal amplifier The volume and MUTE buttons do not operate when the Speaker Select is set to External Speaker If you select External Speaker in the Speaker Select menu the soun...

Page 19: ...e Tools menu You can also set the sleep timer by selecting Tools Sleep Timer Timer 1 Timer 2 Timer 3 Three different on off timer settings can be made You must set the clock first On Time Set the hour minute and activate inactivate To activate timer with the setting you ve chosen set to Activate Off Time Set the hour minute and activate inactivate To activate timer with the setting you ve chosen s...

Page 20: ...fore the setup screen appears the PIN number input screen appears Enter your 4 digit PIN number The default PIN number of a new TV set is 0 0 0 0 If you forget the PIN code press the remote control buttons in the following sequence which resets the PIN to 0 0 0 0 POWER Off MUTE 8 2 4 POWER On Parental Lock This feature allows you to prevent unauthorized users such as children from watching unsuita...

Page 21: ...Group An International standard for data encoding systems used in multimedia and hypermedia This is at a higher level than the MPEG system which includes data linking hypermedia such as still images character service animation graphic and video files as well as multimedia data MHEG is user runtime interaction technology and is being applied to various fields including VOD Video On Demand ITV Inter...

Page 22: ...be a problem with your external equipment Please check your connections If the problem still persists refer to the external device s user manual Sound Test If you think you have a sound problem please perform the sound test You can check the sound by playing a built in melody sound through the TV If you hear no sound from the TV s speakers before performing the sound test make sure Speaker Select ...

Page 23: ...ion period this function searches for available software and downloads the software The time required to download the software is determined by the signal status Standby Mode Upgrade To continue software upgrade with master power on Select On by pressing the or button 45 minutes after entering standby mode a manual upgrade is automatically conducted Since the power of the unit is turned on interna...

Page 24: ...lour buttons red green yellow blue If the FASTEXT system is used by a broadcasting company the different topics covered on a Teletext page are colour coded and can be selected by pressing the coloured buttons Press one of them corresponding to the required The page is displayed with other coloured information that can be selected in the same way To display the previous or next page press the corre...

Page 25: ...der TV s which do not support version 2 5 are not capable of displaying any additional graphics or text regardless of the Teletext transmission Press the TV button to exit from the Teletext display Anti Theft Kensington Lock The Kensington Lock is a device used to physically fix the system when using it in a public place The appearance and locking method may differ from the illustration depending ...

Page 26: ...Flyer For added stability install the anti fall device for safety purposes as follows To secure the TV 1 Put the screws into the clamps and firmly fasten them onto the wall Confirm that the screws have been firmly installed onto the wall You may need additional material such as an anchor depending on the type of wall Since the necessary clamps screws and string are not supplied please purchase the...

Page 27: ...e Colour Brightness Sharpness Adjust Energy Saving option in Setup menu Try picture reset to view the default picture setting Go to MENU Picture Picture Reset Dotted line on the edge of screen If picture size is set to Screen Fit change to 16 9 Change cable set top box resolution Picture is black and white with AV Composite input only Confirm Composite yellow cable is in yellow jack in source as w...

Page 28: ... s output HDMI TV s input HDMI Make sure your connected device is powered on Make sure to select the TV s correct source by pressing the SOURCE button on the TV remote RF Cable Antenna Connection Cannot receive all channels Make sure Antenna cable is connected securely Please try Plug Play to add available channels to the channel list Go to MENU Setup Plug Play and wait for all available channels ...

Page 29: ...This function is only available with digital channels with an Antenna RF Coax connection TV is tilted to right or left side Remove the stand base from TV and reassemble Can not assemble stand base Make sure TV is placed on flat surface If can not remove screws from TV please use magnetized screw driver Channel menu is grey out unavailable Channel menu is only available when TV source is selected Y...

Page 30: ...s Operating Temperature Operating Humidity Storage Temperature Storage Humidity 10 C to 40 C 50 F to 104 F 10 to 80 non condensing 20 C to 45 C 4 F to 113 F 5 to 95 non condensing Stand Swivel Left Right 0 Design and specifications are subject to change without prior notice This device is a Class B digital apparatus For the power supply and Power Consumption refer to the label attached to the prod...

Page 31: ...This page is intentionally left blank 650_Aus BN68 02089G 01Eng indb 29 2009 08 21 ÀÈÄ 1 40 39 ...

Reviews: