background image

ENG - 7

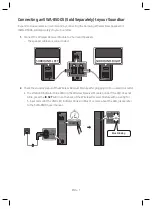
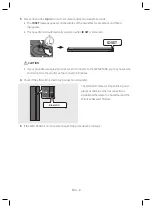
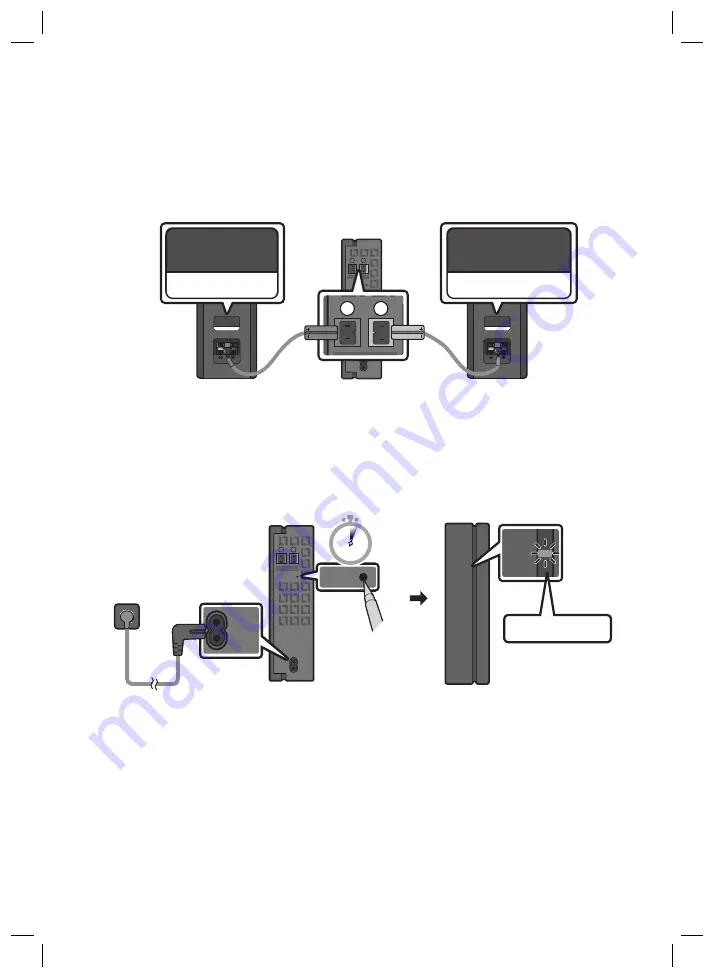
Connecting an SWA-8500S (Sold Separately) to your Soundbar

Expand to true wireless surround sound by connecting the Samsung Wireless Rear Speaker Kit  
(SWA-8500S, sold separately) to your Soundbar. 

1. 

Connect the Wireless Receiver Module to 2 Surround Speakers.


– The speaker cables are colour coded.

SURROUND-LEFT

ID SET

L

R

SURROUND SPEAKERS OUT

SPEAKER IMPEDANCE : 3Ω

POWER

ID SET

L

R

SURROUND SPEAKERS OUT

SPEAKER IMPEDANCE : 3Ω

SURROUND-RIGHT

SURROUND-LEFT

SURROUND-RIGHT

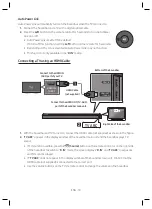
2. 

Check the standby status of the Wireless Receiver Module after plugging it into an electrical outlet.


The LINK LED indicator (blue LED) on the Wireless Receiver Module blinks. If the LED does not 
blink, press the 

ID SET

 button on the back of the Wireless Receiver Module with a pen tip for 

5~6 seconds until the LINK LED indicator blinks (in Blue). For more about the LED, please refer 
to the SWA-8500S user manual.

ID SET

L

R

SURROUND SPEAKERS OUT

SPEAKER IMPEDANCE : 3Ω

POWER

POWER

ID SET

SURROUND SPEAKERS OUT

SPEAKER IMPEDANCE : 3Ω

STANDBY

LINK

STANDBY

LINK

Blue blinking

5 Sec

Summary of Contents for HW-R550

Page 1: ...USER MANUAL HW R550...

Page 2: ...This symbol indicates that the rated voltage marked with the symbol is AC voltage DC voltage This symbol indicates that the rated voltage marked with the symbol is DC voltage Caution Consult instruct...

Page 3: ...the unit malfunctions Your product is not intended for industrial use It is for personal use only Condensation may occur if your product has been stored in cold temperatures If transporting the unit...

Page 4: ...n the Subwoofer and the Soundbar 5 Manually connecting the Subwoofer if automatic connection fails 6 Connecting an SWA 8500S Sold Separately to your Soundbar 7 04 ConnectingtoyourTV 9 Method 1 Connect...

Page 5: ...e Remote Control 17 Adjusting the Soundbar volume with a TV remote control 20 09 InstallingtheWallMount 21 Installation Precautions 21 Wallmount Components 21 10 Troubleshooting 24 11 Licence 25 12 Op...

Page 6: ...1 2 3 For more information about power connections see page 4 To purchase additional components or optional cables contact a Samsung Service Centre or Samsung Customer Care Depending on the region th...

Page 7: ...rce input mode D IN AUX HDMI BT USB To turn on BTPAIRING mode change the source to BT mode and then press and hold the Source button for more than 5 seconds D IN Connect to the digital optical output...

Page 8: ...ed electrical power and power consumption refer to the label attached to the product Label Bottom of the Soundbar Main Unit POWER RearofSubwoofer 1 PowerCord Connecting ElectricalPower HDMI IN USB 5V...

Page 9: ...ofer LED Status Description Resolution Blue On Successfully connected normal operation Blinking Recovering the connection Check if the power cable attached to the main Soundbar unit is connected prope...

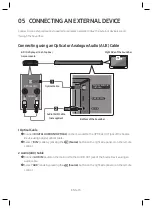
Page 10: ...the subwoofer turns off and the blue indicator blinks 5 Sec RearofSubwoofer 2 Press and hold the Upbutton on the remote control for at least 5 seconds The IDSET message appears on the display of the...

Page 11: ...3 SURROUND RIGHT SURROUND LEFT SURROUND RIGHT 2 Check the standby status of the Wireless Receiver Module after plugging it into an electrical outlet The LINK LED indicator blue LED on the Wireless Re...

Page 12: ...ec CAUTION If your Soundbar was playing music when it connects to the SWA 8500S you may hear some stuttering from the woofer as the connection finalises 4 Check if the LINK LED is solid blue connectio...

Page 13: ...When the audio in a broadcast is encoded in Dolby Digital and the Digital Output Audio Format on your TV is set to PCM we recommend that you change the setting to Dolby Digital When the setting on th...

Page 14: ...MI IN HDMI IN ARC HDMICable notsupplied BottomoftheSoundbar ConnecttotheHDMIOUT TV ARC portoftheSoundbarmainunit TVARC RightSideoftheSoundbar 1 With the Soundbar and TV turned on connect the HDMI cabl...

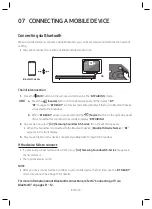
Page 15: ...ss and hold the Source button on the right side panel of the Soundbar for more than 5 seconds to display BTPAIRING 2 Select Bluetooth mode on the TV For more information see the TV s manual 3 Select A...

Page 16: ...tton on the remote control or press and hold the Source button on the right side of the Soundbar for more than 5 seconds while the Soundbar is in BT mode NOTES If asked for a PIN code when connecting...

Page 17: ...able notsupplied BD DVDplayer Set topbox Gameconsole RightSideoftheSoundbar 1 OpticalCable X X Connect DIGITALAUDIOIN OPTICAL on the main unit to the OPTICAL OUT jack of the Source Device using a digi...

Page 18: ...I cable not supplied from the HDMIIN jack on the back of the product to the HDMI OUT jack on your digital device 2 Connect an HDMI cable not supplied from the HDMIOUT TV ARC jack on the back of the pr...

Page 19: ...f the adapter cable 3 Press the Source button on the right side panel or on the remote control and then select USB 4 USB appears in the display screen 5 Play music files from the USB storage device th...

Page 20: ...and hold the Source button on the right side panel of the Soundbar for more than 5 seconds to display BTPAIRING 2 On your device select AV SamsungSoundbarR5 Series from the list that appears When the...

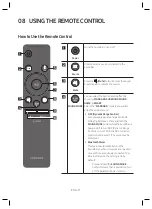
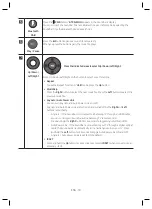
Page 21: ...SURROUNDSOUND GAME orSMART Select the STANDARD mode if you want to enjoy the original sound DRC DynamicRangeControl Lets you apply dynamic range control to Dolby Digital tracks Press and hold the SOUN...

Page 22: ...to select the next music file Press the Left button to select the previous music file Anynet AutoPowerLink You can turn Anynet and Auto Power Link on or off Anynet and Auto Power Link are turned on an...

Page 23: ...OOFER SOUND MODE PAIR WOOFER S O U N D M O D E V O L W O O F E R S O U N D B A R S O U N D M O D E V O L W O O F E R S O U N D B A R V O L W O O F E R S O U N D B A R S O U N D M O D E V O L W O O F E...

Page 24: ...s remote push up and hold the WOOFER button for 5seconds repeatedly until ALL TVREMOTE appears in the display Then use your TV s menu to select external speakers S O U N D M O D E V O L W O O F E R S...

Page 25: ...s into wall studs Purchase wall mounting screws according to the type and thickness of the wall you want to mount the Soundbar on Diameter M5 Length 35 mm or longer recommended Connect cables from the...

Page 26: ...d drill bit drill a hole in the wall at each marking If the markings do not correspond to the positions of studs make sure you insert appropriate anchors or mollies into the holes before you insert th...

Page 27: ...Screws on the wall 8 Slide the Soundbar down as shown below so that the Bracket WallMounts rest securely on the Holder Screws Insert the Holder Screws into the wide bottom part of the Bracket Wall Mou...

Page 28: ...n to cancel the function Isthevolumesettominimum Adjust the Volume Theremotecontroldoesnotwork Arethebatteriesdrained Replace with new batteries IsthedistancebetweentheremotecontrolandSoundbarmainunit...

Page 29: ...tered trademarks of HDMI Licensing LLC in the United States and other countries 12 OPENSOURCE LICENCENOTICE To send inquiries and requests regarding open sources contact Samsung via Email oss request...

Page 30: ...mitter power SRD max transmitter power 100mW at 2 4GHz 2 4835GHz 25mW at 5 725GHz 5 825GHz Subwoofer Name PS WR55D Weight 5 0 kg Dimensions W x H x D 200 6 x 353 0 x 290 0 mm AMPLIFIER Rated Output po...

Page 31: ...return system CorrectDisposalofThisProduct WasteElectrical ElectronicEquipment Applicableincountrieswithseparatecollectionsystems This marking on the product accessories or literature indicates that t...

Page 32: ...es sich bei der mit diesem Symbol gekennzeichneten Nennspannung um eine Wechselspannung handelt Gleichspannung Dieses Symbol zeigt an dass es sich bei der mit diesem Symbol gekennzeichneten Nennspannu...

Page 33: ...gewerblichen Einsatz vorgesehen Verwenden Sie dieses Produkt nur f r den privaten Bereich Wenn Ihr Produkt oder die CD bei kalten Temperaturen aufbewahrt wurden kann Kondensation auftreten Wenn Sie d...

Page 34: ...en des Subwoofers bei Fehlschlagen der automatischen Verbindung 6 Verbinden des SWA 8500S separat erh ltlich mit einer Soundbar 7 04 AnschlussanihrFernsehger t 9 Methode 1 Verbindung mit einem Kabel 9...

Page 35: ...n der Soundbar Lautst rke mit einer TV Fernbedienung 20 09 InstallierenderWandhalterung 21 Vorsichtsma nahmen f r die Installation 21 Komponenten f r die Anbringung an der Wand 21 10 Fehlerbehebung 24...

Page 36: ...ennzeichnet 1 2 3 Weitere Informationen zu den Stromanschl ssen finden Sie auf Seite 4 Wenden Sie sich f r den Kauf zus tzlicher Komponenten oder optionaler Kabel an ein Servicezentrum oder den Kunden...

Page 37: ...BT USB Zum Einschalten des Modus BTPAIRING schalten Sie die Quelle auf den Modus BT um und halten Sie dann die taste Quelle l nger als 5 Sekunden lang gedr ckt D IN An den digitalen optischen Ausgang...

Page 38: ...ionen zur ben tigten Stromversorgung und zum Stromverbrauch finden Sie auf dem Etikett am Ger t Etikett Unterseite des Soundbar Hauptger ts POWER R ckseitedes Subwoofers 1 Stromkabel Stromanschluss HD...

Page 39: ...desSubwoofers LED Status Beschreibung Abhilfe Blau Ein Erfolgreich verbunden normaler Betrieb Blinkend Verbindung wird wieder hergestellt Pr fen Sie ob das am Soundbar Hauptger t angeschlossene Stromk...

Page 40: ...R ckseite des Subwoofers erlischt und die blaue Anzeigeleuchte blinkt 5 Sec R ckseitedesSubwoofers 2 Halten Sie die Taste Oben auf der Fernbedienung l nger als 5 Sekunden gedr ckt F r kurze Zeit ersc...

Page 41: ...LEFT SURROUND RIGHT 2 berpr fen Sie den Standby Status des drahtlosen Empfangsmoduls nachdem es an eine Steckdose angeschlossen worden ist Die LINK LED Anzeige blaue LED Lampe auf dem drahtlosen Empf...

Page 42: ...Musik abspielt w hrend sie mit der SWA 8500S eine Verbindung herstellt h ren Sie m glicherweise ein Stottern aus dem Woofer w hrend die Verbindung hergestellt wird 4 Pr fen Sie ob die LINK LED blau l...

Page 43: ...ndungmiteinemKabel Wenn Rundfunksignale Dolby Digital sind und die Einstellung f r Digitales Ausgangsaudioformat auf Ihrem Fernseher auf PCM gestellt ist wird empfohlen die Einstellung auf Dolby Digit...

Page 44: ...HDMIIN AnschlussIhres Fernsehers HDMI Kabel nichtenthalten UnterseitederSoundbar berpr fenSieden HDMIOUT TV ARC Anschlussam Soundbar Hauptger t RechteSeitederSoundbar TVARC 1 Bei eingeschalteter Sound...

Page 45: ...Feld der Soundbar f r mehr als 5 Sekunden gedr ckt um BTPAIRING anzuzeigen 2 W hlen Sie den Bluetooth Modus an dem Fernseher aus Weitere Informationen finden Sie im Handbuch des Fernsehers 3 W hlen Si...

Page 46: ...er Fernbedienung oder dr cken und halten Sie die Taste Quelle an der rechten Seite der Soundbar f r l nger als 5 Sekunden gedr ckt w hrend sich die Soundbar im Modus BT befindet HINWEISE Falls sie bei...

Page 47: ...bel nichtmitgeliefert BD DVD Player Set Top Box Spielkonsole RechteSeitederSoundbar 1 OptischesKabel X X Verbinden Sie den Anschluss DIGITALAUDIOIN OPTICAL am Hauptger t ber ein optisches Digitalkabel...

Page 48: ...seite des Ger ts ber ein HDMI Kabel nicht enthalten mit dem Anschluss HDMI OUT Ihres Digitalger ts 2 Verbinden Sie den Anschluss HDMIOUT TV ARC auf der R ckseite des Ger ts ber ein HDMI Kabel nicht en...

Page 49: ...Quelle auf der rechten Seite oder der Fernbedienung und w hlen Sie dann USB 4 Auf dem Anzeigebildschirm wird USB angezeigt 5 Musikdateien vom Speicherger t ber die Soundbar wiedergeben Die Soundbar wi...

Page 50: ...n Feld der Soundbar f r mehr als 5 Sekunden gedr ckt um BTPAIRING anzuzeigen 2 W hlen Sie AV SamsungSoundbarR5 Series aus der Liste aus Wenn eine Soundbar mit dem Bluetooth Ger t verbunden ist wird Bl...

Page 51: ...oder SMART ausw hlen Wenn Sie den Originalton h ren m chten w hlen Sie den Modus STANDARD DRC DynamicRangeControl DRC Funktion Dynamic Range Control auf Dolby Digital Tracks anwenden Dr cken Sie die...

Page 52: ...die n chste Musikdatei auszuw hlen Dr cken Sie die Taste Links um die vorherige Musikdatei auszuw hlen Anynet AutoPowerLink Sie k nnen Anynet und Auto Power Link ein oder ausschalten Anynet und Auto...

Page 53: ...ND MODE PAIR WOOFER S O U N D M O D E V O L W O O F E R S O U N D B A R S O U N D M O D E V O L W O O F E R S O U N D B A R V O L W O O F E R S O U N D B A R S O U N D M O D E V O L W O O F E R S O U...

Page 54: ...llen dr cken Sie wiederholt die Taste WOOFER nach oben und halten Sie sie f r 5 Sekunden gedr ckt bis ALL TVREMOTE in der Anzeige erscheint Verwenden Sie dann das Men Ihres Fernsehers um externe Lauts...

Page 55: ...e Wandmontage entsprechend der Art und der Dicke der Wand an der Sie die Soundbar montieren wollen Durchmesser M5 L nge 35 mm oder l nger empfohlen Schlie en Sie die Kabel vom Ger t an externe Ger te...

Page 56: ...e mit einem geeigneten Bohrer an jeder Markierung ein Loch in die Wand Wenn die Markierungen nicht den Positionen der Halterungsbolzen entsprechen achten Sie darauf geeignete D bel oder Molly D bel in...

Page 57: ...nd h ngen 8 Schieben Sie die Soundbar wie nachfolgend dargestellt nach unten sodass die Wandhalterung sicher auf den Aufh ngungsschraube ruhen Setzen Sie die Aufh ngungsschraube in den breiten unteren...

Page 58: ...e VOL um die Funktion zu deaktivieren IstdieLautst rkeaufdasMinimumeingestellt Passen Sie die Lautst rke an DieFernbedienungfunktioniertnicht SinddieBatterienleer Tauschen Sie sie gegen neue aus Istde...

Page 59: ...s and other countries 12 BEKANNTMACHUNG ZUOPENSOURCE LIZENZEN Wenn Sie Fragen bez glich des Themas Open Source haben wenden Sie sich bitte per E Mail unter der Adresse an Samsung oss request samsung c...

Page 60: ...max Transmitterleistung 100mW bei 2 4GHz 2 4835GHz 25mW bei 5 725GHz 5 825GHz Subwoofername PS WR55D Gewicht 5 0 kg Abmessungen B H T 200 6 x 353 0 x 290 0 mm VERST RKER Nennausgangsleistung 160W AUSG...

Page 61: ...ahmesystem entsorgen KorrekteEntsorgungvonAltger ten Elektroschrott Giltf rL ndermitAbfalltrennsystemen Die Kennzeichnung auf dem Produkt Zubeh rteilen bzw auf der dazugeh rigen Dokumentation gibt an...

Page 62: ...822607 93 33 op atawed ugtaryfyoperatora http www samsung com pl support HUNGARY 0680SAMSUNG 0680 726 7864 www samsung com hu support AUSTRIA 0800 SAMSUNG 0800 7267864 www samsung com at support Count...

Reviews: