background image

3

EnG

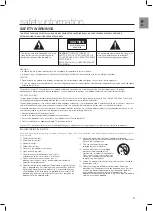
safety Warnings

tO reDUce tHe risK Of eLectric sHOcK, DO nOt reMOVe tHe cOVer (Or BacK). nO User-serViceaBLe Parts are insiDe. 

referserVicing tO QUaLifieD serVice PersOnneL.

CAUTION

RISK OF ELECTRIC SHOCK  

DO NOT OPEN

The lighting flash and Arrowhead within the 

triangle are warning signs alerting you to 

dangerous voltage Inside the product

caUtiOn

: TO REDUCE THE RISK OF 

ELECTRIC SHOCK, DO NOT REMOVE THE 

COVER (OR BACK). NO USER SERVICEABLE 

PARTS INSIDE. 

REFER SERVICING TO QUALIFIED SERVICE 

PERSONNEL.

The exclamation point within the triangle is a 

warning sign alerting you to important 

instructions accompanying the product.

WARNING

• 

To reduce the risk of fire or electric shock, do not expose this appliance to rain or moisture.

• 

To prevent injury, this apparatus must be securely attached to the floor/wall in accordance with the  installation instructions. 

CAUTION

• 

Do not expose this apparatus to dripping or splashing. Do not put objects filled with liquids, such as vases on the apparatus. 

• 

To turn this apparatus off completely, you must pull the power plug out of the wall socket. Consequently, the power plug must be easily and readily 
accessible at all times.

This product satisfies FCC regulations when shielded cables and connectors are used to connect the unit to other equipment. To prevent 

electromagnetic interference with electric appliances, such as radios and televisions, use shielded cables and connectors for connections.

FCC NOTE (for U.S.A):
This equipment has been tested and found to comply with the limits for a Class B digital device, pursuant to Part 15 of the FCC Rules. These limits 

are designed to provide reasonable protection against harmful interference in a residential installation.
This equipment generates, uses and can radiate radio frequency energy and, if not installed and used in accordance with the instructions, may cause 

harmful interference to radio communications. However, there is no guarantee that interference will not occur in a particular installation.
If this equipment does cause harmful interference to radio or television reception, which can be determined by turning the equipment off and on, the 

user is encouraged to try to correct the interference by one or more of the following measures:

• 

Reorient or relocate the receiving antenna.

• 

Increase the separation between the equipment and receiver.

• 

Connect the equipment to an outlet that is on a different circuit than the radio or TV.

• 

Consult the dealer or an experienced radio/TV technician for help.

Caution : FCC regulations state that any unauthorized changes or modifications to this equipment may void the user's authority to operate it.

Important Safety Instructions

Read these operating instructions carefully before using the unit. Follow all the safety instructions listed below. Keep these operating instructions handy for 

future reference.

1)   Read these instructions.
2)   Keep these Instructions.
3)   Heed all warnings.
4)   Follow all instructions.
5)   Do not use this apparatus near water.
6)   Clean only with dry cloth.
7)    Do not block any ventilation openings. Install in  

accordance with the manufacturer's instructions.

8)    Do not install near any heat sources such as  

radiators, heat registers, stoves, or other apparatus (including 

amplifiers) that produce heat.

9)    Do not defeat the safety purpose of the polarized or grounding-type 

plug. A polarized plug has two blades with one wider than the other. 

A grounding type plug has two blades and a third grounding prong. 

The wide blade or the third prong are provided for your safety. If the 

provided plug does not fit into your outlet, consult an electrician for 

replacement of the obsolete outlet.

10)     Protect the power cord from being walked on or pinched 

particularly at plugs, convenience receptacles, and the point where 

they exit from the apparatus.

11)    Only use attachment/accessories 

specified by the manufacturer.

12)     Use only with the cart, stand, tripod, 

bracket, or table specified by the 

manufacturer, or sold with the apparatus. 

When a cart is used, use caution when 

moving the cart/apparatus combination 

to avoid injury from tip-over.

13)     Unplug this apparatus during lightning storms or when unused for 

long periods of time.

14)     Refer all servicing to qualified service personnel. Servicing is 

required when the apparatus has been damaged in any way, such 

as when the power-supply cord or plug is damaged, liquid has 

been spilled or objects have fallen into the apparatus, the 

apparatus has been exposed to rain or moisture, does not operate 

normally, or has been dropped.

safety information

Summary of Contents for HW-FM35

Page 1: ...nd Air Track Active Speaker System user manual imagine the possibilities Thank you for purchasing this Samsung product To receive more complete service please register your product at www samsung com register HW FM35 ...

Page 2: ...not require any satellite loudspeakers or speaker cabling which are normally associated with conventional surround sound systems USB Host support You can connect and play music files from external USB storage devices such as MP3 players USB flash memory etc using the Air Track s USB HOST function Bluetooth Function You can use connect a Bluetooth device to the SAT and enjoy music with high quality...

Page 3: ...d to try to correct the interference by one or more of the following measures Reorient or relocate the receiving antenna Increase the separation between the equipment and receiver Connect the equipment to an outlet that is on a different circuit than the radio or TV Consult the dealer or an experienced radio TV technician for help Caution FCC regulations state that any unauthorized changes or modi...

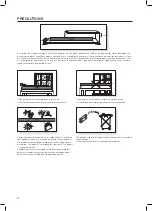
Page 4: ...unit Protect the product from moisture vases coffee cups etc and excess heat fireplaces heaters etc or equipment creating strong magnetic or electric fields Disconnect the power cable from the AC supply if the unit malfunctions Your product is not intended for industrial use This product is for personal use only Condensation may occur if your product has been stored in cold tem peratures If transp...

Page 5: ...8 Installing the ferrite core on the Subwoofer speaker cable 7 REMOTE CONTROL 9 Tour of the remote control 9 CONNECTIONS 10 Installing the wall mount 11 Connecting an external device using Audio Analog cable or Optical Digital cable 10 FUNCTIONS 12 Input mode 12 Bluetooth 14 SoundShare 15 USB 16 Using the remote control 19 Software upgrade 12 TROUBLESHOOTING 20 Troubleshooting 20 APPENDIX 21 Speci...

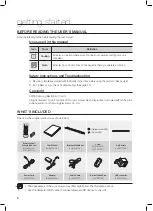
Page 6: ...ed without the prior written permission of Samsung Electronics Co Ltd getting started WHAT s inclUDED Check for the supplied accessories shown below POWER TV POWER AH59 02548A TV VOL TV CH AUDIO SYNC AUX USB TV SOURCE TV PRE CH TV EXIT SMART VOLUME SOUND EFFECT S W LEVEL S W LEVEL VOL VOL 3D SOUND PLUS DRC TV INFO TV MUTE AUTO POWER DIMMER REPEAT OPTICAL MUTE Screw 2EA Holder screw 2EA Remote Cont...

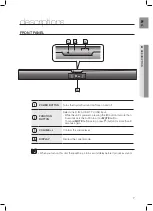
Page 7: ...SB input While the unit is powered pressing the button for more than 3 seconds sets the button to act as MUTE button To cancel MUTE button setup press button for more than 3 seconds again VOLUME Controls the volume level DISPLAY Displays the current mode When you turn on this unit there will be a 4 to 5 second delay before it produces sound 1 2 3 4 ...

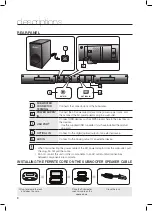
Page 8: ...ect to the Analog output of an external device When disconnecting the power cable of the AC power adaptor from the wall outlet pull the plug Do not pull the cable Do not connect this unit or other components to an AC outlet until all connections between components are complete descriptions Rear Panel INSTALLING THE FERRITE CORE ON THE Subwoofer Speaker CABLE Lift up to release the lock and open th...

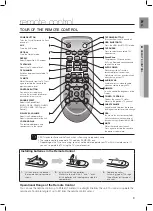
Page 9: ...e Subwoofer level Adjusts the volume level of the unit USB BLUETOOTH Press the USB BLUETOOTH mode TV SOURCE Press to select a connected TV s video source SoundShare This produces TV sound on your SAT via a Bluetooth connection and controls the sound AUDIO SYNC Used to help sync video to audio when connected to a digital TV AUTO POWER Synchronizes the Air Track to a connected Optical source via the...

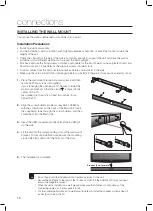
Page 10: ...the flxing screws or mollys appropriate for the kind of wall you have plaster board iron board wood etc If possible fix the support screws into wall studs Connect cables from the unit to external devices before you install it on the wall Make sure the unit is turned off and unplugged before you install it Otherwise it may cause an electric shock 2 inches 5 cm or more 1 Place the wall mount bracket...

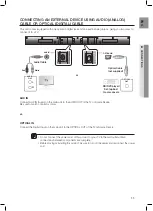
Page 11: ... OPTICAL IN OPTICAL OUT Optical Cable not supplied BD DVD player Set top box Game console AUX IN Connect AUX IN Audio on the main unit to the AUDIO OUT of the TV or Source Device Be sure to match connector colors or OPTICAL IN Connect the Digital Input on the main unit to the OPTICAL OUT of the TV or Source Device Do not connect the power cord of this product or your TV to the wall outlet until al...

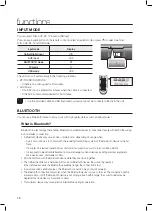
Page 12: ...al interference from same frequency band devices including medical equipment microwave ovens and wireless LANs Pair the Air Track with the Bluetooth device while they are close together The further the distance is between Air Track and Bluetooth device the worse the quality is If the distance exceeds the Bluetooth operational range the connection is lost In poor reception sensitivity areas the Blu...

Page 13: ...tooth device over the Crystal Surround Air Track system In BT mode the Play Repeat Stop Next Prev functions are not available You may be required to enter a PIN code password when connecting the Bluetooth device to the Air Track If the PIN code input window appears enter 0000 The Air Track supports SBC data 44 1kHz 48kHz The AVRCP feature is not supported Connect only to a Bluetooth device that su...

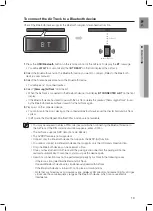
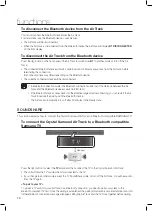
Page 14: ...ce exceeds 16 25 ft 5m If the Bluetooth device comes back into the effective range after disconnecting you can restart the Air Track to restore the pairing with the Bluetooth device The Air Track automatically turns off after 20 minutes in the Ready state SOUNDSHARE This section explains how to connect the Crystal Surround Air Track to a Bluetooth compatible SAMSUNG TV To connect the Crystal Surro...

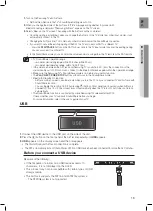
Page 15: ...hin the operational range Make sure the Samsung TV s SoundShare mode is on before you use this function The PLAY NEXT PREV STOP buttons will not work in the SoundShare mode Bluetooth Standby On function Air Track will be powered on automatically when you turn the TV on if you connected TV and Air Track with SoundShare function You can toggle this fucntion On Off by pressing button of front panel o...

Page 16: ...TV PRE CH DIMMER SMART VOLUME SOUND EFFECT VOL VOL DRC TV INFO TV MUTE OPTICAL MUTE S W LEVEL S W LEVEL 3D SOUND PLUS AUTO POWER SoundShare USB REPEAT POWER TV POWER AH59 02548A TV VOL TV CH AUDIO SYNC AUX TV SOURCE DIMMER REPEAT SMART VOLUME SOUND EFFECT VOL VOL DRC TV INFO TV MUTE OPTICAL MUTE S W LEVEL S W LEVEL 3D SOUND PLUS AUTO POWER SoundShare AirTrack On USB POWER TV POWER AH59 02548A TV V...

Page 17: ...AUDIO SYNC AUX TV SOURCE TV PRE CH DIMMER SMART VOLUME SOUND EFFECT VOL VOL DRC TV INFO TV MUTE OPTICAL MUTE S W LEVEL S W LEVEL 3D SOUND PLUS AUTO POWER SoundShare USB REPEAT POWER TV POWER AH59 02548A TV VOL TV CH AUDIO SYNC AUX TV SOURCE DIMMER REPEAT SMART VOLUME SOUND EFFECT VOL VOL DRC TV INFO TV MUTE OPTICAL MUTE S W LEVEL S W LEVEL 3D SOUND PLUS AUTO POWER SoundShare AirTrack On USB POWER ...

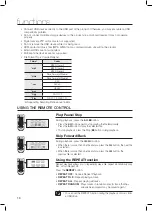
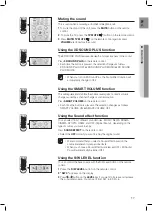
Page 18: ...CE TV PRE CH DIMMER SMART VOLUME SOUND EFFECT VOL VOL DRC TV INFO TV MUTE OPTICAL MUTE S W LEVEL S W LEVEL 3D SOUND 3 PLUS AUTO POWER SoundShare USB REPEAT AUTO POWER POWER TV POWER AH59 02548A TV VOL TV CH AUDIO SYNC AUX TV SOURCE TV PRE CH DIMMER SMART VOLUME SOUND EFFECT VOL VOL DRC TV INFO TV MUTE OPTICAL MUTE S W LEVEL S W LEVEL 3D SOUND PLUS AUTO POWER SoundShare USB REPEAT POWER TV POWER AH...

Page 19: ...SB drive in NTFS format because it is not a supported file system Depending on the manufacturer some USB devices may not be supported Using the TV functions with Samsung TVs only Press TV SOURCE on the remote control to change the TV s input source Press TV INFO on the remote control to display the TV channel information Press TV CH on the remote control to select the TV channel Press TV VOL on th...

Page 20: ...ected properly Connect it correctly The remote control does not work Are the batteries drained Is the distance between remote control and main unit too far Replace with new batteries Move closer to the unit The sound from the left right channels are reversed Are the left right audio output cables from the TV connected properly Check the left right channel and connect it them correctly The SoundSha...

Page 21: ...to 75 AMPLIFIER Rated output power Main unit 30W CH 8OHM THD 10 1kHz Subwoofer PS EW1 1 60W 3OHM THD 10 100Hz S N ratio analog input 60dB Separation 1kHz 50dB S N ratio distortion separation and usable sensitivity are based on measurement using AES Audio Engineering Society guidelines Nominal specification Samsung Electronics Co Ltd reserves the right to change the specifications without notice We...

Page 22: ...roducts equipment systems utilities services parts supplies accessories applications installations repairs external wiring or connectors not supplied and authorized by SAMSUNG or which damage this product or result in service problems incorrect electrical line voltage fluctuations and surges customer adjustments and failure to follow operating instructions cleaning maintenance and environmental in...

Page 23: ...AH68 02614B 00 QUESTIONS OR COMMENTS COUNTRY CALL OR VISIT US ONLINE AT WRITE U S A 1 800 SAMSUNG 726 7864 www samsung com Samsung Electronics America Inc 85 Challenger Road Ridgefield Park NJ 07660 ...

Reviews: