background image

ENG

CONNECTIONS

17

Resetting the Wireless Receiving Module

Reset the system if a communication failure occurs, or if the Link indicator (blue LED) on the wireless receiver does not
light up and the "REAR CHECK" message blinks on the main unit's display.  
Reset the system while the main unit and the wireless receiver module (SWA-3000) are in Power Standby mode.

1

With the main unit turned off, press and hold the remote 

control's REMAIN button for 5 seconds.

The STANDBY LED on the front panel of the wireless receiver module

blinks.

2

With the wireless receiver module turned on, use a ball point

pen or a toothpick to press the 

RESET

button on the back of

the unit.

The STANDBY LED on the front panel of the wireless receiver module

blinks 2 Times.

3

Turn on the main unit.

The LINK LED of the wireless receiver module is lit and the Reset is  
completed.

If Power Standby mode continues, repeat Steps 1 to 3 above.

• Place the wireless receiver module at the rear of the listening position. If the wireless receiver module is too close

to the main unit, some sound interruption may be heard due to interference.

• If you use a device such as a microwave oven, wireless LAN Card, Bluetooth equipment, or any other device that

uses the same frequency (2.4GHz) near the system, some sound interruption may be heard due to interference.

• The transmission distance of a radio wave is about 33 feet, but may vary depending on your operating

environment. If a steel-concrete wall or metallic wall is between the main unit and the wireless receiver module,
the system may not operate at all, because the radio wave cannot penetrate metal.

• When the wireless receiving module setting is complete, no audio signal is output from the Rear Speaker Output

Connector on the back of the main unit.

• The wireless receiving antenna is built into the wireless receiver module. Keep the unit away from water and 

moisture.

• For optimal listening performance, make sure that the area around the wireless receiver module location is clear of

any obstructions.

• Sound will be heard from the wireless rear speakers in DVD 5.1-CH or Dolby Pro Logic II mode only.
• In 2-CH mode, no sound will be heard from the wireless rear speakers.

16

To connect the rear speakers wirelessly, you have to purchase the wireless receiving module and 
TX card from your Samsung retailer.

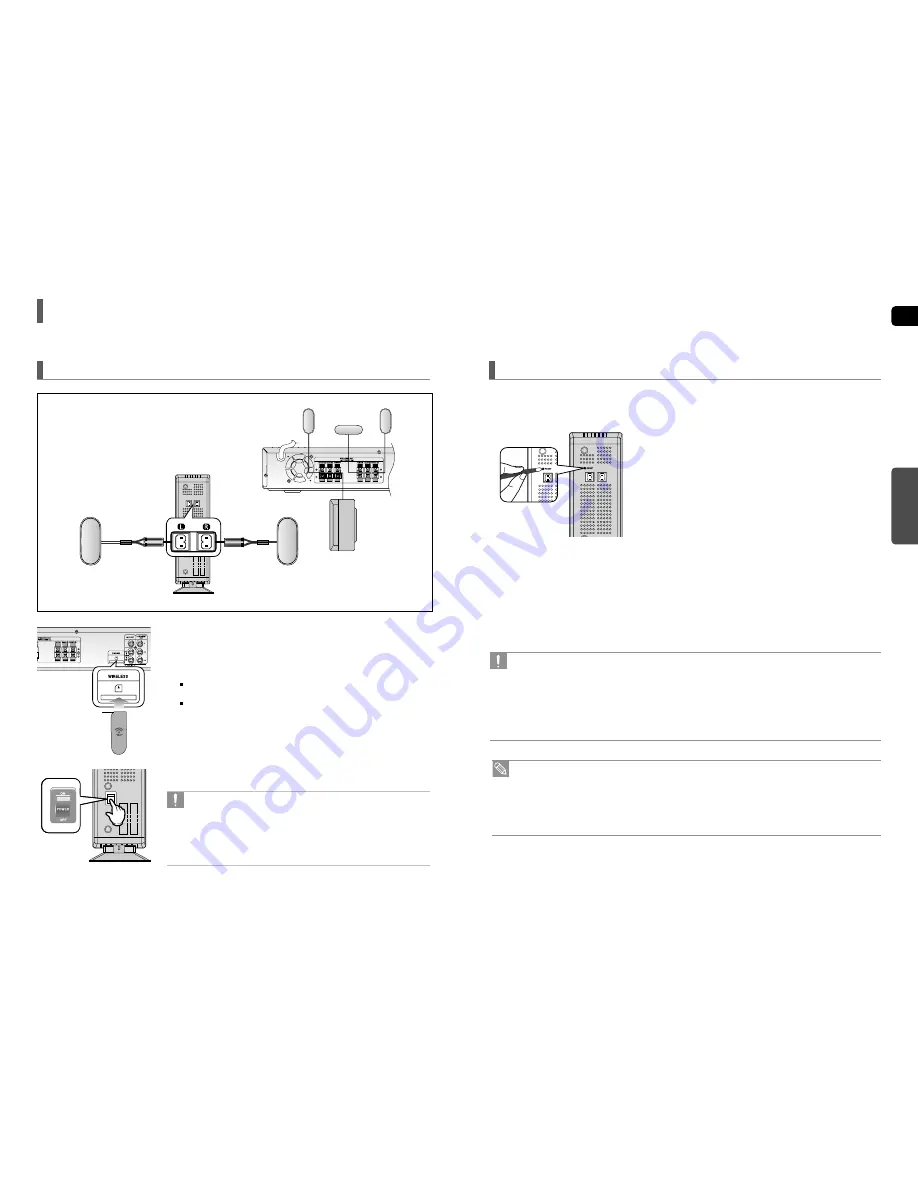
Connecting the Optional Wireless Receiving Amplifier

Front Speaker (R)

Rear Speaker (L)

Subwoofer

Center Speaker

Front Speaker (L)

Rear Speaker (R)

WIRELESS RECEIVER MODULE

When you have Purchased the Wireless Receiving Module (SWA-3000)  

1

Connect the Front, Center and Subwoofer speakers to the main unit,

referring to pages 13~14.

2

With the main unit turned off, insert the TX card into the TX Card

Connection(WIRELESS) on the back of the main unit.

Hold the TX card so that the slanted side faces leftward and insert the 

card into the port. 

The TX card enables communication between the main unit and the wireless receiver.

3

Connect the left and right rear speakers to the wireless receiving 

module. 

4

Plug the power cord of the wireless receiving module in the wall outlet

and switch the power switch ‘ON’. 

• Do not insert a card other than the TX card dedicated for the product. 

The product might be damaged or the card may not be removed easily.  

• Do not insert the TX card upside down or in the reverse direction.
• Insert the TX card when the main unit is turned off.Inserting the card

when it is turned on may cause a problem.

• If the TX Card is inserted, sound is not output from the Rear Speaker

connectors on the main unit.

TX card

Slanted side face left

Summary of Contents for HT X50 - DVD Home Theater System

Page 1: ...7C REV 00 COMPACT DIGITAL AUDIO SAMSUNG ELECTRONICS CANADA INC HEADQUARTERS 55 Standish Court Mississauga Ontario L5R 4B2 Canada TEL 1 905 542 3535 www samsung ca SERVICE DIVISION 55 Standish Court Mississauga Ontario L5R 4B2 Canada 1 800 SAMSUNG 1 800 726 7864 AH68 01957D REV 00 ...

Page 2: ...ble at any time Do not expose the unit to direct sunlight or other heat sources This could lead to overheating and malfunction of the unit The batteries used with this product contain chemicals that are harmful to the environment Do not dispose of batteries in the general household trash PREPARATION Safety Warnings RISK OF ELECTRIC SHOCK DO NOT OPEN TO REDUCE THE RISK OF ELECTRIC SHOCK DO NOT REMO...

Page 3: ...SUNG TV using an HDMI Cable This is only available with SAMSUNG TVs that support Anynet PREPARATION Safety Warnings 2 Precautions 3 Features 4 Notes on Discs 6 Description 8 CONNECTIONS Connecting the Speakers 12 Speaker Installation 15 Connecting the Optional Wireless Receiving Amplifier 16 Connecting the Video Out to your TV 18 HDMI Function 19 Connecting Audio from External Components 20 Connec...

Page 4: ...c a DivX file created by the user might not play Software update for incompatible formats is not supported Example QPEL GMC resolution higher than 800 x 600 pixels etc Sections with a high frame rate might not be played while playing a DivX file For more information about the formats authorized by DivX Networks Inc please visit www divxnetworks net This product does not support Secure DRM Media fi...

Page 5: ...th component video inputs to these jacks 4 External Digital Optical Input Connector Use this to connect external equipment capable of digital output 5 FM 75Ω COAXIAL Jack 6 Cooling Fan 7 TX Card Connection WIRELESS 8 AUX IN 2 Connectors 9 HDMI Output Jack 1 DOLBY DIGITAL indicator 2 LINEAR PCM indicator 3 DTS indicator 4 TITLE indicator 5 GROUP indicator 6 CHAPTER indicator 7 TRACK indicator 8 PRO...

Page 6: ...utton 33 SOUND EDIT button 34 DIGEST button 35 TEST TONE button 36 SLIDE MODE button 37 LOGO button 1 Remove the battery cover in the direction of the arrow 2 Insert two 1 5V AAA batteries paying attention to the correct polarities and 3 Replace the battery cover Follow these precautions to avoid leaking or cracking cells Place batteries in the remote control so they match the polarity to and to U...

Page 7: ...er Place it on a stand cabinet shelf or under the TV stand Selecting the Listening Position The listening position should be located about 2 5 to 3 times the distance of the TV s screen size away from the TV Example For 32 TVs 2 2 4m 6 8 feet For 55 TVs 3 5 4m 11 13 feet Before moving or installing the product be sure to turn off the power and disconnect the power cord R L C SR SL SW Red Black If ...

Page 8: ...tallation 1 Turn the STAND upside down and connect it to the STAND BASE 2 Turning the screw A clockwise connect it to two holes marked with the arrow using a screwdriver as shown in the illustration 3 Turning the supplied screw B clockwise connect it to a hole on the rear of the Speaker STAND 4 Connect the assembled stand to the SPEAKER 5 Turning the screw B clockwise connect to a hole on the rear...

Page 9: ...nal is output from the Rear Speaker Output Connector on the back of the main unit The wireless receiving antenna is built into the wireless receiver module Keep the unit away from water and moisture For optimal listening performance make sure that the area around the wireless receiver module location is clear of any obstructions Sound will be heard from the wireless rear speakers in DVD 5 1 CH or ...

Page 10: ... Operation The Home Theater disc playback information will be displayed Receiver On You can listen to audio through the Home Theater Receiver Off You can listen to audio through the TV Using Anynet HDMI CEC Anynet is a function that enables you to control other Samsung Devices with your Samsung TV s remote control Anynet can be used by connecting this Home Theater to a SAMSUNG TV using an HDMI Cab...

Page 11: ... the AUX button on the remote control to select AUX1 input You can also use the FUNCTION button on the main unit The mode switches as follows DVD CD DIGITAL IN AUX 1 AUX 2 USB FM Audio Cable not supplied If the external analog component has only one Audio Out connect either left or right You can connect the Video Output jack of your VCR to the TV and connect the Audio Output jacks of the VCR to th...

Page 12: ...terms before reading the user manual In this manual the instructions marked with DVD are applicable to DVD VIDEO DVD AUDIO and DVD R RW discs that have been recorded in Video Mode and then finalized Where a particular DVD type is mentioned it is indicated separately If a DVD R RW disc has not been recorded properly in DVD Video format it will not be playable DVD OPERATION Icons that will be used i...

Page 13: ...playback To resume playback press the PLAY PAUSE button again To select a specific disc press the corresponding the DIRECT PLAY 1 2 3 4 5 buttons on the front panel or the DISC SKIP button on the remote control until the required disc indicator flashes If the disc selected is not loaded the next disc is played automatically Selecting a Disc in the Disc changer 24 Before Using Your Home Theater To ...

Page 14: ... or camcorder or JPEG files on a PC can be stored on a CD and then played back with this Home Theater JPEG File Playback The maximum resolutions supported by this product are 5120 x 3480 or 19 0 MPixel for standard JPEG files and 2048 x 1536 or 3 0 MPixel for progressive image files If a JPEG file is played when the HDMI output resolution is 720p 1080i the mode is automatically converted to 480p m...

Page 15: ... be played normally If the disc has more than one subtitle file Format AVI WMV Supported Versions DivX3 11 DivX5 1 XviD V1 V2 V3 V7 DivX is a video file format developed by Microsoft and is based on MPEG4 compression technology to provide audio and video data over the Internet in real time MPEG4 is used for video encoding and MP3 for audio encoding so that the users can watch a movie at near DVD q...

Page 16: ... playback of a CD or MP3 CD sound is heard only at 2x speed and not at 4x 8x and 32x speeds Using the Playback Function Press the INFO button Each time the button is pressed the display changes as follows The information Display disappears from the screen The information Display disappears from the screen The information Display disappears from the screen Screen Display CD display DVD display TITL...

Page 17: ...tton For DivX MP3 and JPEG discs you cannot select Repeat Play from the information display screen To Select a Repeat Playback Mode in the Disc Information Screen DVD CD DVD CD TITLE Press the button Each time the button is pressed during playback the previous or next chapter track or directory file will be played You cannot skip chapters consecutively Skipping Scenes Songs TITLE 01 05 CHAPTER 002...

Page 18: ...button is pressed during playback A B DVD DVD DivX Step Function 1 Press the INFO button 2 Press the Cursor button to move to ANGLE display 3 Press the Cursor button or numeric buttons to select the desired angle Each time the button is pressed the angle changes as follows This function allows you to view the same scene in different angles Angle Function 2 3 3 3 1 3 The Angle function works only w...

Page 19: ...that requires a 4 digit key number to access See the disc packaging for details and the key number Bonus Group During playback press the button on the remote control You can select the desired image from a DVD Audio disc containing still images With some discs you may not be able to select images Navigating Pages BONUS GROUP KEY NUMBER To operate this function you can also press the AUDIO or SUBTI...

Page 20: ...1 040 0 00 37 1 1 Using the Disc Menu Using the Title Menu The disc menu display may be different depending on the disc 1 In Stop mode press the MENU button 2 Press the Cursor button to move to the DISC MENU and then press the ENTER button When you select Disc Menu and it is not supported by the disc the This menu is not supported message appears on the screen 3 Press the Cursor button to select t...

Page 21: ...er without additional driver installation 2 MP3 Player HDD and flash type MP3 players 3 Digital camera Cameras that support USB Mass Storage v1 0 Cameras that operate as a removable disc in Windows 2000 or later without additional driver installation 4 USB HDD and USB Flash Drive Devices that support USB2 0 or USB1 1 You may experience a difference in playback quality when you connect a USB1 1 dev...

Page 22: ...joy the widescreen aspect Adjusting the TV Aspect Ratio Screen Size If a DVD is in the 4 3 ratio you cannot view it in widescreen Since DVD discs are recorded in various image formats they will look different depending on the software the type of TV and the TV aspect ratio setting In HDMI operation the screen is automatically converted to Wide mode MOVE ENTER EXIT RETURN MOVE SELECT EXIT RETURN 42...

Page 23: ...he Cursor button to move to PARENTAL and then press the ENTER button 4 Press the Cursor button to select the desired rating level and then press the ENTER button If you have selected Level 6 you cannot view DVDs with Level 7 or higher The higher the level the closer the content is to violent or adult material 5 Enter the password and then press the ENTER button The password is set to 7890 by defau...

Page 24: ... Time 0 inch 13 6 inches 27 2 inches 40 8 inches 4 5 feet 5 6 feet 0 ms 1 ms 2 ms 3 ms 4 ms 5 ms Distance between Df and Dc Delay Time 0 inch 40 8 inches 6 7 feet 10 0 feet 13 4 feet 16 7 feet 0 ms 3 ms 6 ms 9 ms 12 ms 15 ms 46 Settings Con t Depending on PRO LOGIC and STEREO settings the speaker mode may vary see page 53 Signal outputs and frequency responses from the speakers will automatically ...

Page 25: ...ETURN MOVE CHANGE EXIT RETURN 48 Settings Con t Use the Test Tone feature to check the speaker connections 1 In Stop mode press the MENU button 2 Press the Cursor button to move to Audio and then press the ENTER button 3 Press the Cursor button to move to TEST TONE and then press the ENTER button The test tone will be sent to L C R SR SL SW in order If the ENTER button is pressed again at this tim...

Page 26: ...video 1 In Stop mode press the MENU button 2 Press the Cursor button to move to Audio and then press the ENTER button 3 Press the Cursor button to move to AV SYNC and then press the ENTER button 4 Press the Cursor button to select the AV SYNC Delay Time and then press the ENTER button You can set the audio delay time between 0 ms and 300 ms Set it to the optimal status Press the RETURN button to r...

Page 27: ...al Processor DSP modes have been designed to simulate different acoustic environments EQ You can select ROCK POP or CLASSIC to optimize the sound for the genre of music you are playing Press the DSP EQ button DSP appears on the display panel Each time the button is pressed the selection changes as follows Sound Field DSP EQ Function The DSP EQ function is only available in STEREO mode Press the PL...

Page 28: ... In a poor reception area select MONO for a clear interference free broadcast Remote Control Main Unit MISCELLANEOUS 54 Settings Con t When playing a DVD disc encoded with two or more channels multi channel mode will be selected automatically and Dolby Pro Logic II button does not work This function works only in Dolby Pro Logic MUSIC mode 1 Press the PL II MODE button to select MUSIC mode 2 Press...

Page 29: ...call Press the MUTE button MUTE ON appears in the display To restore the sound press the button again to select MUTE OFF Mute Function Use headphones not supplied for private listening pleasure Connect the headphones to the Headphone jack for private listening Using Headphones To prevent hearing damage do not increase the volume excessively when using headphones Listening to Radio Con t 56 Presett...

Page 30: ...SSS Sylvania Symphonic Tatung Techwood Teknika TMK Toshiba Vidtech Videch Wards Yamaha York Yupiteru Zenith Zonda Dongyang No Brand Code 18 18 19 20 40 59 60 03 03 03 06 07 08 09 54 66 67 73 74 18 03 15 17 18 48 54 59 62 69 90 15 17 18 40 48 54 62 72 63 66 80 91 15 18 59 40 06 66 67 17 48 56 60 61 75 18 59 67 76 77 78 92 93 94 03 19 40 00 15 16 17 40 43 46 47 48 49 59 60 98 19 61 65 03 40 60 61 15...

Page 31: ...if the instruction below does not help turn off the unit disconnect the power cord and contact the nearest authorized dealer or Samsung Electronics Service Center Troubleshooting Is the remote control being operated within its operation range of angle and distance Are the batteries exhausted Have you selected the mode TV DVD functions of the remote control TV or DVD correctly The remote control do...

Page 32: ... 1298 Greenlandic 1481 Rhaeto Romance 1543 Twi 1144 English 1299 Cambodian 1482 Kirundi 1557 Ukrainian 1145 Esperanto 1300 Kannada 1483 Romanian 1564 Urdu 1149 Spanish 1301 Korean 1489 Russian 1572 Uzbek 1150 Estonian 1305 Kashmiri 1491 Kinyarwanda 1581 Vietnamese 1151 Basque 1307 Kurdish 1495 Sanskrit 1587 Volapuk 1157 Persian 1311 Kirghiz 1498 Sindhi 1613 Wolof 1165 Finnish 1313 Latin 1501 Sangr...

Page 33: ...tal Camera C 760 Olympus Digital Camera C 5060 Olympus Digital Camera X1 Olympus Digital Camera U mini Olympus Digital Camera Lumix FZ20 Panasonic Digital Camera DMC FX7GD Panasonic Digital Camera Lumix LC33 Panasonic Digital Camera LUMIX DMC F1 Panasonic Digital Camera Optio S40 Pentax Digital Camera Optio S50 Pentax Digital Camera Optio 33LF Pentax Digital Camera Optio MX Pentax Digital Camera D...

Page 34: ... in Canada HEADQUARTERS SAMSUNG ELECTRONICS CANADA INC CUSTOMER SERVICE 55 STANDISH COURT MISSISSAUGA ONTARIO L5R 4B2 CANADA FABRIQUE EN CORÉE 1 800 SAMSUNG 1 800 7267864 www samsung com ca EXCLUSIONS WHAT IS NOT COVERED LABOR One year Carry in PARTS One year 66 Specifications Con t HT X50 HT TX52 Speaker system Impedance Frequency range Output sound pressure level Rated input Maximum input Dimens...

Page 35: ...Contact SAMSUNG WORLD WIDE If you have any questions or comments relating to Samsung products please contact the SAMSUNG customer care centre Region Country Customer Care Center Web Site ...

Reviews: