background image

EnG

  D

ES
c

R

iPT
iO

n

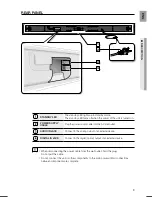
REAR PAnEl

STAnDBy lED

The standby LED lights up in standby mode.
The standby LED turns off when the power of the unit is turned on.

POWER SUPPly 
cABlE

Plug the power supply cable into the AC wall outlet.

AUDiO in JAcK

Connect to the analog output of an external device.

DiGiTAl in JAcK

Connect to the digital (optical) output of an external device.


When disconnecting the power cable from the wall outlet, hold the plug.  
Do not pull the cable.
Do not connect this unit or other components to the main power until all connections 
between components are complete.

DIGITAL IN

(OPTICAL)

AUDIO IN

1

Summary of Contents for HT-WS1R

Page 1: ... Active Speaker System user manual imagine the possibilities Thank you for purchasing this Samsung product To receive more complete service please register your product at www samsung com register HT SB1G HT SB1R HT WS1G HT WS1R ...

Page 2: ...source you want to enjoy Compatibility with the Technologies This unit employs decoders compatible with Dolby Digital DTS Digital Theater Systems and SFE Sound Field Effect Dolby Digital This is the standard audio signal format used on DVDs and other purely digital media This surround technology delivers high quality digital audio of up to 5 1 discrete channels to produce a directional and more re...

Page 3: ...O A INPUT POWER LINK AUTO MENU EXIT TOOLS INFO Optical Cable AH39 00779A User s Manual AH68 02184R Remote Control Batteries AAA size AH59 02196A 4301 000116 Cradle stand AH96 00044A Bracket Wall Mount AH61 02952A Wireless Subwoofer PS WWS1 AH59 02215B The accessories may look slightly different than these HT WS1G HT WS1R only ...

Page 4: ...ich the receiver is connected Consult the dealer or an experienced radio TV technician for help Caution FCC regulations state that any unauthorized changes or modifications to this equipment may void the user s authority to operate it Important Safety Instructions Read these operating instructions carefully before using the unit Follow all the safety instructions listed below Keep these operating ...

Page 5: ...as been stored in cold temperatures If transporting the unit during the winter wait approximately 2 hours until the unit has reached room temperature before using Do not expose the unit to direct sunlight or other heat sources This could lead to overheating and malfunction of the unit The batteries used with this product contain chemicals that are harmful to the environment Do not dispose of batte...

Page 6: ...iptions 8 8 Front panel 9 Rear panel remote control 10 10 Tour of the remote control connections 12 12 Installing the cradle stand 12 Installing the wall mount 13 Connecting the wireless subwoofer 14 Connecting the Crystal Surround Air Track troubleshooting 17 17 Troubleshooting appendix 18 18 Specifications functions 15 15 Basic functions 15 Advanced functions ...

Page 7: ...e This involves tips or instructions on the page that help each function operate About the use of this user s manual Be sure to be familiar with Safety Instructions before using this product See page 4 If a problem occurs check the Troubleshooting See page 17 Copyright 2009 Samsung Electronics Co Ltd All rights reserved No part or whole of this user s manual may be reproduced or copied without the...

Page 8: ...d on POWER BUTTON Turns the Crystal Surround Air Track on and off VOLUME Controls the volume level INPUT MODE Selects the Optical or Audio input 6 SOUND FIELD MODE Selects the sound field mode News Cinema or Music When you turn on the power of this unit you will hear a click and there will be a 4 to 5 second delay before it can reproduce sound PCM DOLBY DTS INPUT MODE NEWS CINEMA MUSIC MAX MIN PCM...

Page 9: ...the AC wall outlet AUDIO IN JACK Connect to the analog output of an external device DIGITAL IN JACK Connect to the digital optical output of an external device When disconnecting the power cable from the wall outlet hold the plug Do not pull the cable Do not connect this unit or other components to the main power until all connections between components are complete DIGITALIN OPTICAL AUDIOIN 3 4 2...

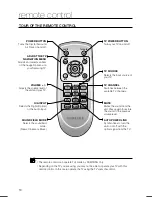
Page 10: ...udio input SOUND FIELD MODE Selects the sound field mode News Cinema or Music TV POWER BUTTON Turns your TV on and off TV SOURCE Selects the input source of your TV TV CHANNEL Switches between the available TV channels MUTE Mutes the sound from the unit Press again to restore the sound to the previous volume level AUTO POWER LINK Synchronizes to turn the unit on or off with the optical signal from...

Page 11: ...up to approximately 23 feet 7 meters in a straight line It can also be operated at a horizontal angle of up to 30 from the remote control sensor Installing batteries in the Remote Control 1 Lift the cover at the back of the remote control upward as shown 2 Install two AAA size batteries Make sure to match the and ends of the batteries with the diagram inside the compartment 3 Replace the cover Ass...

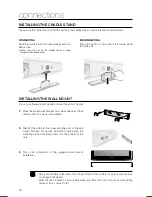
Page 12: ...ion make sure the mounting studs slide firmly down into the bottom of the slots 1 Place the wall mount bracket on a wall surface and then secure it with two screws not supplied PCM DOLBY DTS INPUT MODE NEWS CINEMA MUSIC MAX MIN 3 This is the completion of the suggested wall mount installation connections INSTAllING THE CRADLE STAND You can use the cradle stand to install this unit on a shelf Make ...

Page 13: ...al If the main unit doesn t make wireless connection follow steps 1 4 above to retry the connection between the main unit and wireless subwoofer The wireless receiving antenna is built into the wireless subwoofer Keep the unit away from water and moisture For optimal listening performance make sure that the area around the wireless subwoofer location is clear of any obstructions 1 Plug the power c...

Page 14: ...GITAL IN OPTICAL Connect the Digital Input on the main unit to the OPTICAL OUT of the TV Do not connect the power cord of this product or your TV to the wall outlet until all connections between components are complete Before moving or installing this product be sure to turn off the power and disconnect the power cord You can connect this unit to other external components such as DVD player Set To...

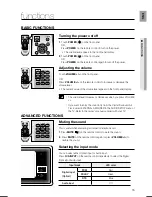
Page 15: ...2 Press MUTE on the remote control again or press VOLUME to restore the sound Selecting the input mode You can select either Optical input or Audio input Press O A INPUT on the remote control repeatedly to select the Digital Optical or Audio input Input mode LED color Digital input Optical PCM Red DOLBY Green DTS Blue Audio input Off PCM DOLBY DTS INPUT MODE NEWS CINEMA MUSIC POWER TV POWER TV SOU...

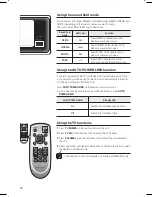
Page 16: ... on off The unit will power off after 20 min Press AUTO POWER LINK on the remote control of this unit Auto power link function turns on and off each time you press AUTO POWER LINK AUTO POWER LINK Standby LED On Standby LED will blink quickly 3 times Off Standby LED will blink 1 time Using the TV functions 1 Press TV POWER on the remote control of this unit 2 Press TV CH on the remote control to se...

Page 17: ...the Mute function on Is the volume set to minimum Connect it correctly Press Mute button to cancel the function Adjust the volume Picture does not appear on a TV when the function is selected Is the TV connected properly Connect it correctly Remote control does not work Are the batteries drained Is the distance between remote control and main unit too far Replace with new batteries Operate at a cl...

Page 18: ...ted output power Main unit 80W CH 4Ω THD 10 1kHz Subwoofer 100W 3Ω THD 10 120Hz Input sensitivity Impedance 1800mV 47KΩ S N ratio analog input 70dB Separation 1kHz 60dB FREQUENCY RESPONSE Analog input 20Hz 20kHz 3dB Digital input 48kHz PCM 20Hz 20kHz 3dB based on TV S N ratio distortion separation and usable sensitivity are based on measurement using AES Audio Engineering Society guidelines Nomina...

Page 19: ...lies accessories applications installations repairs external wiring or connectors not supplied and authorized by SAMSUNG or which damage this product or result in service problems incorrect electrical line voltage fluctuations and surges customer adjustments and failure to follow operating instructions cleaning maintenance and environmental instructions that are covered and prescribed in the instr...

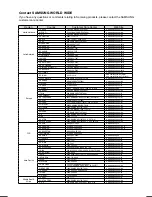
Page 20: ...ANDS 0900 SAMSUNG 0900 7267864 0 10 Min www samsung com nl NORWAY 3 SAMSUNG 7267864 www samsung com no POLAND 0 801 1SAMSUNG 172678 022 607 93 33 www samsung com pl PORTUGAL 80820 SAMSUNG 726 7864 www samsung com pt SLOVAKIA 0800 SAMSUNG 726 7864 www samsung com sk SPAIN 902 1 SAMSUNG 902 172 678 www samsung com es SWEDEN 075 SAMSUNG 726 78 64 www samsung com se U K 0845 SAMSUNG 7267864 www samsun...

Page 21: ... OR COMMENTS COUNTRY CALL OR VISIT US ONLINE AT WRITE IN THE US 1 800 SAMSUNG 7267864 www samsung com us Samsung Electronics America Inc 105 Challenger Road Ridgefield Park NJ 07660 0511 Code No AH68 02184R 0 0 ...

Reviews: