background image

23

eN
G

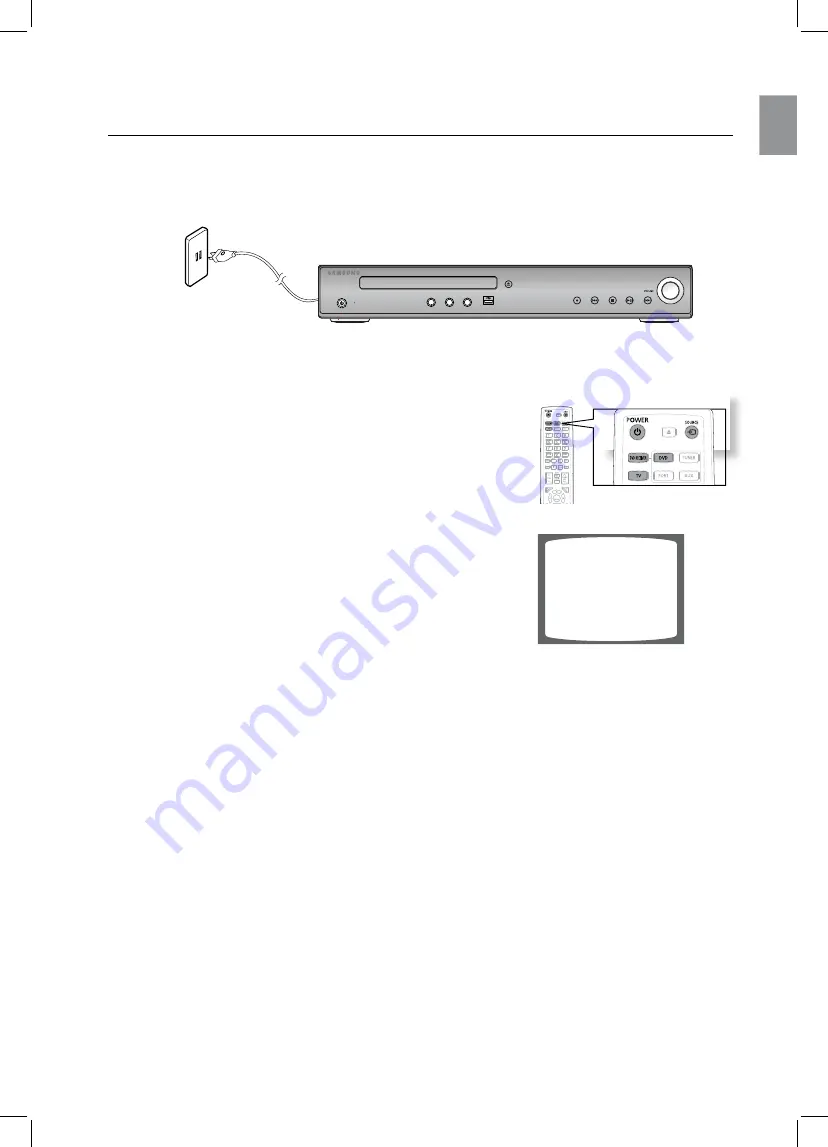
The DVD Home Theater's remote can be used to control Samsung TV's.

Plug the main unit's power cord into the AC power supply.

1. 

Press the 

2. 

DVD reCeIVer

 button to operate the DVD Home Theater. 

 
Press the 

3. 

FUNCTION

 button on the main unit or 

DVD

 button  

on the remote to enable DVD/CD playback. 

Press the 

4. 

TV

 button to set the remote to TV mode. 

Press the 

5. 

POWer

 button to turn on your Samsung TV 

 with this remote.  

Press the 

6. 

SOUrCes

 button to select VIDEO mode  

on your TV. 

Before using your home theater

VIDEO

STANDBY

FUNC.

MIC 2

MIC 1

MIC VOL

MIN

MAX

Summary of Contents for HT-TZ122

Page 1: ...Code No AH68 02159K 0 0 ...

Page 2: ...l Home Theater System Imagine the possibilities Thank you for purchasing this Samsung product To receive more complete service please register your product at www samsung com global register HT Z120 HT TZ122 ...

Page 3: ...unit remains in Stop mode for 5 minutes the Samsung logo appears on the TV screen The HT Z120 TZ122 will automatically switch to the Power Saving mode after 20 minutes in the Screen Saver mode Power Saving Function The HT Z120 TZ122 will automatically shut off after 20 minutes in Stop mode Customized TV Screen Display The HT Z120 TZ122 allows you to select your favourite image during JPEG or DVD p...

Page 4: ...performance of procedures other than those specified herein may result in hazardous radiation exposure CAUTION INVISIBLE LASER RADIATION WHEN OPEN AND INTERLOCKS DEFEATED AVOID EXPOSURE TO BEAM WARNING To reduce the risk of fire or electric shock do not expose this appliance to rain or moisture CAUTION TO PREVENT ELECTRIC SHOCK MATCH WIDE BLADE OF PLUG TO WIDE SLOT FULLY INSERT This apparatus shal...

Page 5: ...g period of time During thunderstorms disconnect the AC main plug from the wall outlet Voltage peaks due to lightning could damage the unit Protect the player from moisture i e vases and excess heat e g fireplace or equipment creating strong magnetic or electric fields i e speakers Disconnect the power cable from the AC supply if the player malfunctions Your player is not intended for industrial u...

Page 6: ...nel remote control 12 12 Tour of the Remote Control 14 Setting the Remote Control connections 16 16 Connecting the Speakers 19 Connecting the Video Out to your TV 20 P Scan Function 21 Connecting Audio from External Components 22 Connecting the FM Antenna 22 Cooling Fan playback 24 24 Disc Playback 25 MP3 WMA CD playback 26 JPEG File Playback 27 Divx Playback 29 Using The Playback Function 37 Play...

Page 7: ...udio 46 Setting the DRC Dynamic Range Compression 47 Setting the AV SYNC 48 Sound field DSP EQ Function 48 Dolby Pro Logic II Mode 49 Dolby Pro Logic II Effect 49 P BASS 49 Connecting Microphone radio 50 50 Listening To Radio 50 Presetting Stations convenient function 51 51 Sleep Timer Function 51 Adjusting Display Brightness 51 Mute Function 52 CD Ripping troubleshooting 53 53 Troubleshooting app...

Page 8: ... or settings may be cancelled M Note This involves tips or instructions on the page that help each function operate M M In this manual the instructions marked with DVD DVD are applicable to DVD VIDEO and DVD R RW discs that have been recorded in Video Mode and then finalised Where a particular DVD type is mentioned it is indicated separately If a DVD R RW disc has not been recorded properly in DVD...

Page 9: ...rted picture from copy protected DVD discs This product incorporates copyright protection technology that is protected by methods claims of certain U S patents and other intellectual property rights owned by Macrovision Corporation and other rights owners Use of this copyright protection technology must be authorized by Macrovision Corporation and is intended for home and other limited viewing use...

Page 10: ...it Rate VBR format i e files encoded in both low bit rate and high bit rate e g 32Kbps 320Kbps the sound may skip during playback A maximum of 500 tracks can be played per CD A maximum of 300 folders can be played per CD CD R JPEG Discs Only files with the jpg extensions can be played If the disc is not closed it will take longer to start playing and not all of the recorded files may be played Onl...

Page 11: ...B CONNECTOR STOP BUTTON DISC TRAY OPEN CLOSE BUTTON 10 PLAY PAUSE BUTTON MIC VOLUME CONTROL FUNCTION BUTTON 11 TUNING UP SKIP BUTTON MIC 1 MIC 2 TUNING DOWN SKIP BUTTON 12 VOLUME CONTROL STANDBY FUNC MIC 2 MIC 1 MIC VOL MIN MAX 10 11 12 DISPLAY ...

Page 12: ...a minimum of 4 inches of clear space on all sides of the fan when installing the product FM 75Ω COAXIAL JACK Connect the FM antenna AUX IN JACKS Connect to the 2CH analogue output of an external device such as a VCR VIDEO OUTPUT JACK Connect your TV s Video Input jack VIDEO IN to the VIDEO OUT jack COMPONENT VIDEO OUTPUT JACKS Connect a TV with Component video inputs to these jacks 6 3 FM ANT 1 4 ...

Page 13: ...12 Remote control Tour of the Remote Control 2 1 36 35 34 33 32 31 30 29 28 27 26 25 23 24 22 21 20 19 17 16 15 14 13 12 11 10 9 8 7 6 5 4 3 37 18 38 39 ...

Page 14: ...OPEN CLOSE button 22 DVD DVD button DVD TUNER button DVD AUX button 23 PORt button 24 SUBTITLE 25 PAUSE button 26 PLAY button STOP button SEARCH buttons MUTE button TUNING CH button REMAIN button RETURN button EXIT button CANCEL button SOUND EDIT button REPEAT button ECHO button DSP EQ button P BASS button DIMMER button SLEEP button POWER button DVD RECEIVER button TV button Number 0 9 buttons AUD...

Page 15: ...he table enter one at a time to determine which code works Example For a Samsung TV While holding down the POWER button use the number buttons to enter 00 15 16 17 or 40 4 If the TV turns off the setting is complete You can use the TV POWER VOLUME CHANNEL and Numeric buttons 0 9 M M The remote control may not work on some brands of TV s Also some operations may not be possible depending on your br...

Page 16: ...8 03 15 40 15 01 15 16 17 37 38 39 40 41 42 43 44 18 19 54 56 59 60 62 63 65 71 15 17 18 48 54 59 60 62 72 89 40 54 54 18 40 18 40 59 60 75 44 45 46 47 48 49 50 51 52 53 54 55 56 57 58 59 60 61 62 63 64 65 66 67 68 69 70 71 72 73 74 75 76 77 78 79 80 81 82 83 84 85 86 MTC NEC Nikei Onking Onwa Panasonic Penney Philco Philips Pioneer Portland Proton Quasar Radio Shack RCA Proscan Realistic Sampo Sa...

Page 17: ...front of the Centre speakers Centre Speaker f It is best to install it at the same height as the front speakers You can also install it directly over or under the TV Rear Speakers hj Place these speakers behind your listening position If there isn t enough room place these speakers so they face each other Place them about 60 to 90cm 2 to 3feet above your ear facing slightly downward Unlike the fro...

Page 18: ...r Speaker L Subwoofer M M If you place a speaker near your TV set screen colour may be distorted because of the magnetic field generated by the speaker If this occurs place the speaker away from your TV set Do not let children play with or near the speakers They could get hurt if a speaker falls When connecting the speaker wires to the speakers make sure that the polarity is correct Keep the subwo...

Page 19: ...into the five holes marked with arrows using a screwdriver as shown in the illustration Connect upper SPEAKER to the assembled 3 STAND Insert another large 4 SCREW into the hole on the rear of the speaker marked with arrow using a screwdriver STAND BASE STAND 1 2 3 4 How to Install the Speaker on the Stand HT TZ122 Front Speakers ...

Page 20: ... VIDEO OUT jack on the back panel of the system to the VIDEO IN jack on your television METHOD 2 Component Progressive Scan Video If your television is equipped with Component Video inputs connect a component video cable not supplied from the Pr Pb and Y jacks on the back panel of the system to the corresponding jacks on your television M M When the Progressive scan mode is selected the VIDEO outp...

Page 21: ... disc and play Depending on the capabilities of your TV this function may not work In interlaced scan video a frame consists of two interlaced fields odd and even where each field contains every other horizontal line in the frame The odd field of alternating lines is displayed first and then the even field is displayed to fill in the alternating gaps left by the odd field to form a single frame On...

Page 22: ...or colours Press the 2 AUX button on the remote control to select AUX input You can also use the FUNCTION button on the main unit The mode switches as follows USB FM DVD CD AUX M M You can connect the Video Output jack of your VCR to the TV and connect the Audio Output jacks of the VCR to this product Audio Cable not supplied If the external Analogue component has only one Audio Out connect either...

Page 23: ...g Fan The cooling fan supplies cool air to the unit to prevent overheating Please observe the following cautions for your safety Make sure the unit is well ventilated If the unit has poor ventilation the temperature inside the unit may rise and may damage it Do not obstruct the cooling fan or ventilation holes If the cooling fan or ventilation holes are covered with a newspaper or cloth heat may b...

Page 24: ...the DVD Home Theater Press the 3 FUNCTION button on the main unit or DVD button on the remote to enable DVD CD playback Press the 4 TV button to set the remote to TV mode Press the 5 POWER button to turn on your Samsung TV with this remote Press the 6 SOURCEs button to select VIDEO mode on your TV Before using your home theater VIDEO STANDBY FUNC MIC 2 MIC 1 MIC VOL MIN MAX ...

Page 25: ...stored in memory If the PLAY button or ENTER button is pressed playback resumes from the stop position This function works only with DVDs If pressed twice STOP is displayed and if the PLAY button is pressed playback starts from the beginning To temporarily pause playback press the PAUSE button during playback To resume playback press the PLAY button M M The initial screen may appear different depe...

Page 26: ... Cursor 3 button to select another album in Stop mode and then press the ENTER button Press the 4 STOP button to stop playback M M Some MP3 WMA CDs may not play depending on the recording mode Table of contents of a MP3 CD varies depending on the MP3 WMA track format recorded on the disc Press the Cursor button when it is in Stop mode and select a desired icon from the top part of the menu Music F...

Page 27: ... next image is displayed Press the button to skip to the next slide Each time the button is pressed the slide moves backward or forward Rotate Flip Function G Press the Cursor button during playback M M The maximum resolutions supported by this product are 5120 x 3480 or 19 0 MPixel for standard JPEG files and 2048 x 1536 or 3 0 MPixel for progressive image files button Rotate 90 Clockwise button ...

Page 28: ... D During playback press the Cursor button Playback skips 5 minutes forward whenever you press the Cursor button Playback skips 5 minutes back whenever you press the Cursor button Audio Display D Press the AUDIO button If there are multiple audio languages on a disc you can toggle between them Each time you press the button your selection will toggle between AUDIO 1 N 2 N and M M is displayed when...

Page 29: ...problems such as broken images or no sound Supported Video Formats Format AVI WMV Supported Versions DivX3 11 DivX5 1 XviD V1 V2 V3 V7 Supported Audio Formats Format MP3 WMA AC3 Bit Rate 80 384kbps 56 128kbps 128 384kbps Sampling Frequency 44 1khz 44 1 48khz DivX files including audio and video files created in the DTS format can only support up to 6Mbps Aspect Ratio Although the default DivX reso...

Page 30: ... PRO LOGIC appears on the TV screen If this symbol appears on the TV screen when pressing a button that operation is not possible with the disc currently being played Checking the Remaining Time dBA Press the REMAIN button For checking the total and remaining time of a title or chapter being played Each time the Remain button is pressed DVD VIDEO TITLE ELAPSED TITLE REMAIN CHAPTER ELAPSED CHAPTER ...

Page 31: ...2x speeds Slow Playback dD Press the SLOW button Each time the button is pressed during playback the playback speed changes as follows d 1 2 1 4 1 8 1 2 1 4 1 8 PLAY D 1 2 1 4 1 8 PLAY M M No sound is heard during slow playback Reverse slow playback does not work with CD Skipping Scenes Songs dA Press the button Each time the button is pressed during playback the previous or next chapter track or ...

Page 32: ...ack that has already been played may be played again TRACK Repeatedly plays the selected track DIR Repeatedly plays all tracks in the selected folder DISC Repeatedly plays the entire disc OFF Cancels Repeat Playback To Select a Repeat Playback Mode in the Disc Information Screen dB Press the 1 INFO button twice Press the Cursor 2 button to move to REPEAT PLAYBACK display Press the Cursor 3 button ...

Page 33: ...selected position will be stored in memory Press the 4 ENTER button at the end of the desired segment The specified segment will be played repeatedly A A A B REPEAT AÐ A TO B REPEAT ON d To return to normal playback press the Cursor button to select OFF M M The A B Repeat function does not operate with DivX MP3 or JPEG discs Step Function dD Press the STEP button The picture moves forward one fram...

Page 34: ...llows 1 3 2 3 3 3 1 3 M M The Angle function works only with discs on which multiple angles have been recorded Zoom Screen Enlarge Function d This function allows you to enlarge a particular area of the displayed image Press the 1 ZOOM button Press the Cursor 2 button to move to the area you want to enlarge Press the 3 ENTER button Each time the button is pressed the zoom level changes as follows ...

Page 35: ...desired subtitle EN 01 03 SP 02 03 FR 03 03 OFF 03 EN 01 03 M M To operate this function you can also press the AUDIO or SUBTITLE buttons on the remote control Depending on the disc the Subtitle and Audio Language functions may not be available Moving Directly to a Scene Song dBAG dB Press the 1 INFO button Press the Cursor 2 button or numeric buttons to select the desired title track and then pre...

Page 36: ...ed title or time Using the Disc Menu d You can use the menus for the audio language subtitle language profile etc DVD menu contents differ from disc to disc In Stop mode press the 1 MENU button Press the Cursor 2 button to move to Disc Menu and then press the ENTER button When you select Disc Menu and it is not supported by the disc the This menu is not supported message appears on the screen Pres...

Page 37: ... on the disc the availability of this feature may vary In Stop mode press the 1 MENU button Press the Cursor 2 button to move to Title Menu Press the 3 ENTER button The title menu appears d Press the EXIT button to exit the setup screen M M The Title menu display may be different depending on the disc ENTER MOVE EXIT ...

Page 38: ... to the memory stored in the USB device perform safe removal before disconnecting the USB cable Press the STOP button twice in a row The display will show REMOVE USB Remove the USB cable M M To listen to your music files with 5 1 channel home theater sound you must set the Dolby Pro Logic II mode to Matrix See page 48 In USB mode you are not able to change the resolution or use the SETUP menu if t...

Page 39: ... 160 Gbytes are supported Removable HDDs equipped with 160Gbytes or more may not be recognized depending on the device If the connected device does not work due to insufficient power supply you can use a separate power cable to supply power so that it can work properly The connector of the USB cable may differ depending on the manufacturer of the USB device USB card Reader One slot USB card reader...

Page 40: ... the EXIT button to exit the setup screen OSD LANGUAGE Selecting the OSD Language AUDIO Selecting the Audio Language recorded on the disc SUBTITLE Selecting the Subtitle Language recorded on the disc DISC MENU Selecting the Disc Menu Language recorded on the disc a If the language you selected is not recorded on the disc the menu language will not change even if you set it to your desired language...

Page 41: ...en playing DVDs recorded in different screen sizes you should adjust the aspect ratio to fit your TV or monitor For a standard TV select either 4 3PS or 4 3LB option according to personal preference Select WIDE HDTV if you have a widescreen TV 4 3PS 4 3 Pan Scan Select this to play a 16 9 picture in the pan scan mode on a conventional TV You can see the central portion of the screen only with the ...

Page 42: ... M This function works only if a DVD disc contains the rating level information Setting the Password You can set the password for the Parental rating level setting In Stop mode press the 1 MENU button Press the Cursor 2 button to move to Setup and then press the ENTER button Press the Cursor 3 button to move to PASSWORD and then press the ENTER button Press the 4 ENTER button Enter the password an...

Page 43: ...Stop mode press the 1 MENU button Press the Cursor 2 button to move to Setup and then press the ENTER button Press the Cursor 3 button to move to LOGO and then press the ENTER button Press the Cursor 4 button to select the desired USER and then press the ENTER button This selects one of the 3 wallpaper screens 5 Press the EXIT button to exit the setup screen ORIGINAL Select this to set the Samsung...

Page 44: ...een M M Depending on PRO LOGIC and STEREO settings the speaker mode may vary see page 51 Setting the Delay Time If the speakers cannot be placed at equal distances from the listening position you can adjust the delay time of the audio signals from the centre and rear speakers In Stop mode press the 1 MENU button Press the Cursor 2 button to move to Audio and then press the ENTER button Press the C...

Page 45: ...1 76 m Delay Time 0 ms 1 ms 2 ms 3 ms 4 ms 5 ms Setting REAR SPEAKER If the distance of Dc is equal to or longer than the distance of Dr in the figure set the mode as 0ms Otherwise change the setting according to the table Distance between Df and Dc 0 00 m 1 06 m 2 11 m 3 16 m 3 62 m 5 29 m Delay Time 0 ms 3 ms 6 ms 9 ms 12 ms 15 ms M M With PL II Dolby Pro Logic II the delay time may be different...

Page 46: ...on to return to the previous level d Press the EXIT button to exit the setup screen Setting the Audio You can adjust the balance and level for each speaker In Stop mode press the 1 MENU button Press the Cursor 2 button to move to Audio and then press the ENTER button Press the Cursor 3 button to move to SOUND EDIT and then press the ENTER button Press the Cursor 4 button to select and adjust the d...

Page 47: ...oudest and quietest sounds You can use this function to enjoy Dolby Digital sound when watching movies at low volume at night In Stop mode press the 1 MENU button Press the Cursor 2 button to move to Audio and then press the ENTER button Press the Cursor 3 button to move to DRC and then press the ENTER button Press the Cursor 4 to adjust the DRC When the Cursor button is pressed the effect is grea...

Page 48: ...o Audio and then press the ENTER button Press the Cursor 3 button to move to AV SYNC and then press the ENTER button Press the Cursor 4 button to select the AV SYNC Delay Time and then press the ENTER button You can set the audio delay time between 0 ms and 300 ms Set it to the optimal status d Press the RETURN button to return to the previous level d Press the EXIT button to exit the setup screen...

Page 49: ...eature works with CDs MP3 CDs DivX tuner and Dolby Digital discs When playing a DVD disc encoded with two or more channels multi channel mode will be selected automatically and DSP EQ function does not work Dolby Pro Logic II Mode You can select the desired Dolby Pro Logic II audio mode Press the PL II MODE button Each time the button is pressed the mode changes as follows MUSIC CINEMA PRO LOGIC M...

Page 50: ...available with 2 channel LPCM sources such as mp3 Divx cd and wma Press P BASS button and POWER BASS ON will be displayed on the screen The P bass does not work with DSP EQ or DOLBY PRO LOGIC ll modes If you press P BASS in the DSP EQ mode the DSP EQ mode is automatically shut off and the P BASS function comes on Connecting Microphone You can enjoy the feeling of a karaoke bar in the comfort of yo...

Page 51: ...MANUAL and then press and hold the button to automatically search the band Manual Tuning Press the STOP button to select MANUAL and then briefly press the button to tune in to a lower or higher frequency Press the MO ST button to listen in Mono Stereo Each time the button is pressed the sound switches between STEREO and MONO In a poor reception area select MONO for a clear interference free broadc...

Page 52: ...g the button again changes the sleep time from what you have set earlier To cancel the sleep timer press the SLEEP button until OFF appears on the display Adjusting Display Brightness You can adjust the brightness of the display on the main unit so it won t interfere with your movie viewing Press the DIMMER button Each time the button is pressed the brightness of front display will be adjusted Mut...

Page 53: ...button and disconnect the USB device after the system stops playing the CD completely If you disconnect the USB connection during the CD ripping the system will turn off and you will not be able to delete the ripped file If you connect the USB device to the system while it is playing a CD the system stops playing and will resume playing when the USB connection initialization is completed The initi...

Page 54: ...nd is output to the front speakers L R only Select PRO LOGIC II by pressing PL II Dolby Pro Logic II on the remote control to use all six speakers Make sure that the DVD disc is 5 1 CH compatible If you set C SL and SR to NONE in the speaker mode in the audio setup of the setup screen no sound is heard from the centre speaker and the front left and right speakers Set C SL and SR to SMALL Dolby Dig...

Page 55: ...he DVD player is not working normally Turn off the power and hold the STOP button on the main unit for longer than 5 seconds reset function Using the RESET function will erase all stored settings Do not use this unless necessary The rating level password has has been forgotten While NO DISC message appears on the display of the main unit hold the main unit s STOP button for longer than 5 seconds I...

Page 56: ...Bangla 1245 Inupiak 1376 Dutch 1527 Tajik 1067 Tibetan 1248 Indonesian 1379 Norwegian 1528 Thai 1070 Breton 1253 Icelandic 1393 Occitan 1529 Tigrinya 1079 Catalan 1254 Italian 1403 Afan Oromo 1531 Turkmen 1093 Corsican 1257 Hebrew 1408 Oriya 1532 Tagalog 1097 Czech 1261 Japanese 1417 Punjabi 1534 Setswana 1103 Welsh 1269 Yiddish 1428 Polish 1535 Tonga 1105 Danish 1283 Javanese 1435 Pashto Pushto 1...

Page 57: ...ted area Keep in a clean Protection jacket Store vertically M M Do not allow the discs to become contaminated with dirt Do not load cracked or scratched discs Handling and Storing Discs When you get fingerprints or dirt on the disc clean it with a mild detergent diluted in water and wipe with a soft cloth When cleaning wipe gently from the inside to the outside of the disc M M Condensation may for...

Page 58: ...m COMPACT DISC Reading Speed 4 8 5 6 m sec Maximum Play Time 74 min CD 8cm COMPACT DISC Reading Speed 4 8 5 6 m sec Maximum Play Time 20 min Video Output Composite Video 1 channel 1 0 Vp p 75 Ω load Component Video Y 1 0 Vp p 75 Ω load Pr 0 70 Vp p 75 Ω load Pb 0 70 Vp p 75 Ω load Amplifier Front speaker output 45W x 2 3Ω Centre speaker output 75W 6Ω Rear speaker output 45W x 2 3Ω Subwoofer speake...

Page 59: ... 9 kg HT TZ122 Speaker Speaker system 5 1ch speaker system Impedance Frequency range Output sound pressure level Rated input Maximum input Dimensions W x H x D Weights Nominal specification Samsung Electronics Co Ltd reserves the right to change the specifications without notice Weight and dimensions are approximate Front Rear 3 Ω 140Hz 20KHz 86dB W M 45W 90W Centre 6 Ω 140Hz 20KHz 86dB W M 75W 15...

Page 60: ...XEMBURG 02 261 03 710 www samsung com lu NETHERLANDS 0900 SAMSUNG 726 7864 0 10 Min www samsung com nl NORWAY 815 56 480 www samsung com no POLAND 0 801 801 881 022 607 93 33 www samsung com pl PORTUGAL 80820 SAMSUNG 726 7864 www samsung com pt SLOVAKIA 0800 SAMSUNG 726 7864 www samsung com sk SPAIN 902 1 SAMSU 72678 www samsung com es SWEDEN 0771 400 200 www samsung com se U K 0845 SAMSUNG 726786...

Reviews: