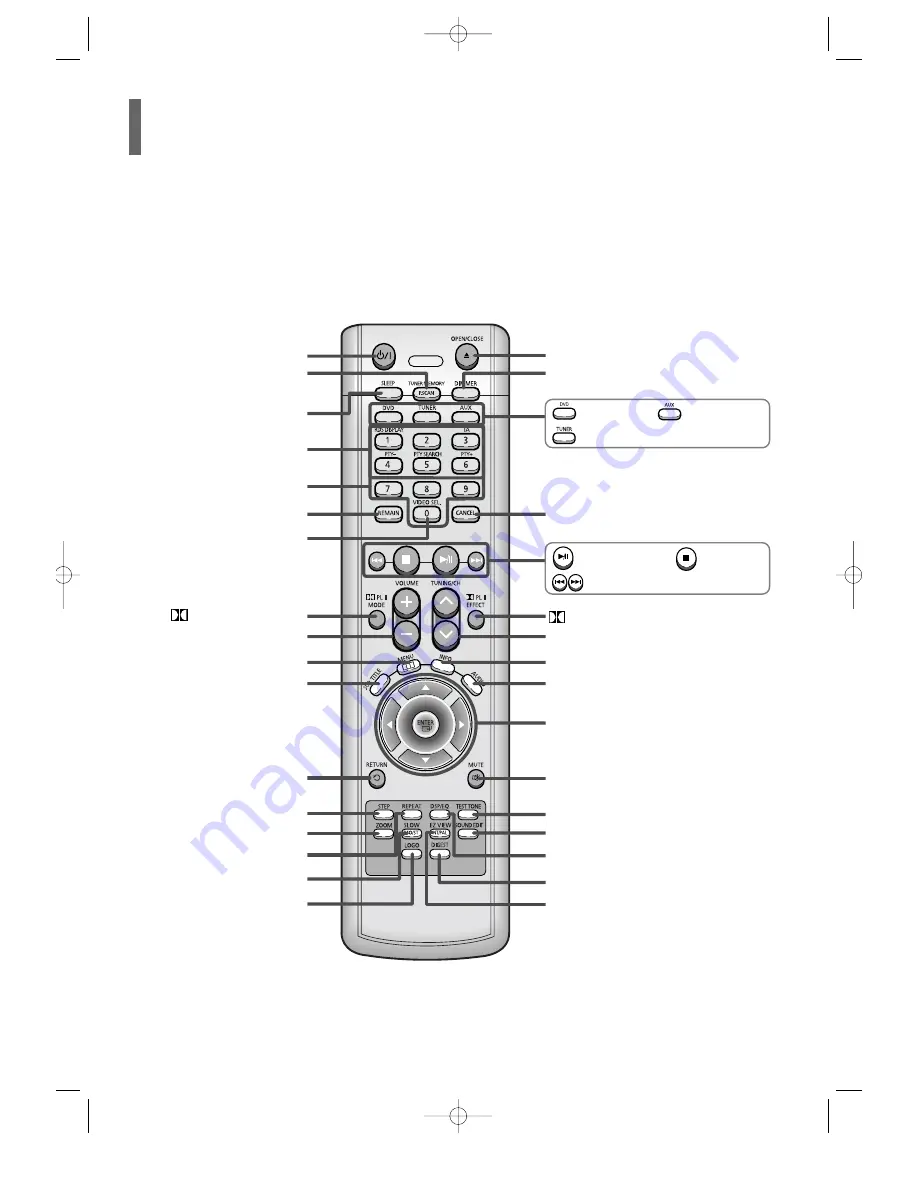
Samsung HT-P10 Instruction Manual Download Page 10

PL II MODE button

VOLUME button

MENU button

TV, DVD POWER button

SLEEP button

STEP button

MUTE button

DSP/EQ button

RETURN button

Number(0~9) buttons

VIDEO SEL. button 

RDS Selection button

SLOW, MO/ST button

ZOOM button

TUNER MEMORY, P.SCAN button

DIMMER button

DIGEST button

OPEN/CLOSE button

Cursor/Enter button 

EZ VIEW, NTSC/PAL button

CANCEL button

LOGO COPY button

SOUND EDIT button

TEST TONE button

AUDIO button

INFO. button

TUNING/CH button

REMAIN button

REPEAT button

SUB TITLE button

PL II EFFECT button

—Remote Control—

DVD button 

Play/Pause button

Tuning Preset/CD Skip button

Stop button 

AUX button 

9

TUNER button 

Description

  1p~30p(P10)-GB  2/1/05 10:44 AM  Page 12

Summary of Contents for HT-P10

Page 1: ...DIGITAL HOME CINEMA SYSTEM HT P10 Instruction Manual V I D E O COMPACT DIGITAL AUDIO COMPACT DIGITAL VIDEO 1p 30p P10 GB 2 1 05 10 44 AM Page 3 ...

Page 2: ...wer point you should obtain a suitable safety approved extension lead or consult your dealer for assistance However if there is no alternative to cutting off the plug remove the fuse and then safely dispose of the plug Do not connect the plug to a main socket as there is a risk of shock hazard from the bared flexible cord Never attempt to insert bare wires directly into a main socket A plug and fu...

Page 3: ...time Protect the player from moisture i e vases and excess heat e g fire place or equipment creating strong magnetic or electric fields i e speak ers Disconnect the power cable from the AC supply if the player mal functions Your player is not intended for industrial use Use of this product is for personal use only Condensation may occur if your player or disc have been stored in cold temperatures ...

Page 4: ...d by Digital Theater Systems Inc It delivers full frequency 5 1 channel sound Power Saving Function The HT P10 automatically shuts itself off after 20 minutes in the stop mode TV Screen Saver Function The HT P10 automatically brightens and darkens the brightness of the TV screen after 3 minutes in the stop mode The HT P10 automatically switches itself into the power saving mode after 20 minutes in...

Page 5: ... Scene Song 29 Using Disc Menu 30 Using the Title Menu 30 SETUP Setting the Language 31 Setting TV Screen type 33 Setting Parental Controls Rating Level 35 Setting the Password 36 Setting the Wallpaper 37 Setting the Speaker Mode 39 Setting the Test Tone 40 Setting the Delay Time 41 Setting the Audio Quality 43 Setting the DRC Dynamic Range Compression 45 AV SYNC Setup 46 Dolby Pro Logic II Mode 4...

Page 6: ... DVD discs are encoded with copy protection Because of this you should only connect your DVD player directly to your TV not to a VCR Connecting to a VCR results in a distorted pic ture from copy protected DVD discs This product incorporates copyright protection technology that is protected by methods claims of certain U S patents and other intellectual property rights owned by Macrovision Corporat...

Page 7: ...ent A maximum of 9 999 images can be stored on a single CD When playing a Kodak Fuji Picture CD only the JPEG files in the picture folder can be played Picture discs other than Kodak Fuji Picture CDs may take longer to start playing or may not play at all Disc Recording Format 6 CD R MP3 Discs Only CD R discs with MP3 files in ISO 9660 or Joliet format can be played MP3 file names should be 8 char...

Page 8: ...dicator PRO LOGIC indicator TITLE indicator GROUP indicator PROGRAM indicator STEREO indicator CHAPTER indicator TRACK indicator TUNER indicator DSP indicator RDS indicator RTA indicator P SCAN indicator RADIO FREQUENCY indicator System Status Display SPEAKER indicator DVD AUDIO indicator DTS Disc indicator LINEAR PCM indicator MPEG indicator PBC indicator REPEAT indicator 1p 30p P10 GB 2 1 05 10 ...

Page 9: ...utput Connector Connect the TV s video input jacks VIDEO IN to the VIDEO OUT connector Accessories SCART JACK Connect to a TV with scart input jack Cooling Fan COMPONENT VIDEO OUTPUT jacks Connect a TV with component video inputs to these jacks External Audio Component Input Connector PREPARATION 1p 30p P10 GB 2 1 05 10 44 AM Page 11 ...

Page 10: ...CAN button DIMMER button DIGEST button OPEN CLOSE button Cursor Enter button EZ VIEW NTSC PAL button CANCEL button LOGO COPY button SOUND EDIT button TEST TONE button AUDIO button INFO button TUNING CH button REMAIN button REPEAT button SUB TITLE button PL II EFFECT button Remote Control DVD button Play Pause button Tuning Preset CD Skip button Stop button AUX button 9 TUNER button Description 1p ...

Page 11: ...y pressing down and sliding the cover in the direction of the arrow 1 Insert two 1 5V AAA batteries paying attention to the correct polarities and 2 Replace the battery cover 3 Follow these precautions to avoid leaking or cracking cells Place batteries in the remote control so they match the polarity to and to Use the correct type of batteries Batteries that look similar may differ in voltage Alwa...

Page 12: ...the speakers so that their tweeters will be at the same height as your ear Align the front face of the front speakers with the front face of the center speaker or place them slightly in front of the center speakers Center Speaker It is best to install it at the same height as the front speakers You can also install it directly over or under the TV Position of the DVD Player Place it on a stand or ...

Page 13: ... R Subwoofer Center Speaker Press and hold the terminal tab Insert the speaker cord Release the finger 1 2 3 12 CONNECTIONS 1 2 3 Red Black Connect the red cord to the red terminal and the black cord to the black terminal Note 1p 30p P10 GB 2 1 05 10 44 AM Page 15 ...

Page 14: ...k panel of the system to the corresponding jacks on your television When the Progressive scan mode is selected the VIDEO and SCART outputs do not feed any signal Note METHOD 1 METHOD 3 METHOD 2 Choose one of the three methods for connecting to a TV Connecting the Video Out to TV VIDEO SELECT Function Press and hold VIDEO SEL button on the remote control for over 5 seconds COMPOSITE or RGB will app...

Page 15: ...till object Interlaced Scan 1 FRAME 2 FIELDS The progressive scanning method scans one full frame of video consecutively down the screen line by line An entire image is drawn at one time as opposed to the interlaced scanning process by which a video image is drawn in a series of passes The progressive scanning method is desirable for dealing with moving objects Progressive Scan FULL FRAME What is ...

Page 16: ...he DVD player to Audio Out on the external analog component Be sure to match connector colors 1 2 Example Analog signal components such as a VCR or TV Connecting an External Analog Component Audio Cable not supplied If the external analog component has only one Audio Out connect either left or right Connecting External Component 1p 30p P10 GB 2 1 05 10 44 AM Page 18 ...

Page 17: ...t the cooling fan or ventilation holes If the cooling fan or ventilation holes are covered with a newspaper or cloth heat may build up inside the unit and fire may result Cooling Fan FM antenna connection 1 Connect the FM antenna supplied to the FM 75Ω COAXIAL terminal 2 Slowly move the antenna wire around until you find a location where reception is good then fasten it to a wall or other rigid su...

Page 18: ...ce STOP is displayed and if PLAY PAUSE button is pressed playback starts from the beginning To temporarily pause playback press PLAY PAUSE during playback To resume playback press PLAY PAUSE button again DVD VCD CD Playback starts automatically Disc Playback Selecting the Video Format Press and hold NT PAL button on the remote controller for over 5 seconds while the power is turned off By default ...

Page 19: ...the ENTER button The MP3 menu screen will appear and playback will start The appearance of the menu depends on the MP3 disc 1 Press the OPEN CLOSE button to open the disc tray and then load the MP3 disc 4 Press the STOP button to stop playback To select another album and track repeat Steps 2 and 3 above 3 To change the album use to select another album in Stop mode and then press the ENTER button ...

Page 20: ...ss and hold either button the playback speed will change as follows 2x 4x 8x 32x Normal DIVX file can be zoomed only in ZOOM X2 mode Note Zoom Function 2 Press Cursor buttons to move to the area you want to enlarge 1 Press ZOOM button Each time you press the button your selection will toggle between ZOOM X2 and ZOOM OFF 5 Minute Skip function During playback press the button Go to the screen about...

Page 21: ... quality video and audio 1 Supported Formats This product only provides the following media formats If both of the video and audio formats are not supported simultaneously the user may experience problems such as broken image or no sound 2 Caption Related To use the caption function save the caption file smi in the same file name as that of the DivX media file avi within the same folder Example Ro...

Page 22: ...G Press the OPEN CLOSE button to open the disc tray and then load the JPEG disc Playback will start automatically and each image will show for 5 seconds before moving to the next image Rotate vertically Rotate 90 counterclockwise Rotate horizontally Rotate 90 clockwise During playback press Cursor buttons To rotate the image 1p 30p P10 GB 2 1 05 10 44 AM Page 24 ...

Page 23: ...d that Depending on the disc the disc information display may appear different Depending on the disc you can also select DTS DOLBY DIGITAL or PRO LOGIC Note TRACK REMAIN TOTAL ELAPSED TOTAL REMAIN TRACK ELAPSED CHAPTER REMAIN TITLE REMAIN CHAPTER ELAPSED TITLE ELAPSED Each time the REMAIN button is pressed DVD CD VCD Screen Display CD display VCD display DVD display TITLE display MP3 CD display CH...

Page 24: ...chapter track or directory file will be played You cannot skip chapters consecutively TITLE 01 05 CHAPTER 002 040 TITLE 01 05 CHAPTER 004 040 VCD MP3 When watching a VCD with a track longer than 15 minutes each time is pressed playback will skip back or forward 5 minutes Something like you Back for good Love of my life More than words I need you My love Uptown girl DVDRECEIVER SMARTNAVI Something ...

Page 25: ...DVD VCD CD MP3 JPEG DVD VCD CD Repeat playback operation is not possible with version 2 0 VCD discs if PBC is turned on To use Repeat Playback on a VCD with PBC you should set the PBC to OFF in the disc menu See page 30 To Select a Repeat Playback Mode in the Disc Information Screen Press INFO button twice 1 Press Cursor button to move to REPEAT PLAYBACK display 2 Press Cursor button to select the...

Page 26: ...d repeatedly 4 Press ENTER button at the end of the desired segment When ENTER button is pressed the selected position will be stored in memory 3 Press Cursor buttons to select A and then press ENTER button at the beginning of the desired segment To return to normal playback press Cursor buttons to select OFF DVD VCD CD 25 Note A B Repeat Playback You can repetitively play back a designated sectio...

Page 27: ...s on which multiple angles have been recorded Note Step Function DVD VCD During fast playback of a CD or MP3 CD sound is heard only at 2x speed and not at 4x 8x and 32x speeds No sound is heard during slow playback and step motion playback Note Press STEP button The picture moves forward one frame each time the button is pressed during playback This function allows you to view the same scene in di...

Page 28: ... in Widescreen format black bars at the top and bottom of the TV screen can be removed by pressing the EZ VIEW button This function will not work if the DVD is recorded with multi camera angle format Black bars may not disappear because some DVD discs have a built in horizontal to vertical ratio 27 Note This function allows you to enlarge a particular area of the displayed image Zoom Screen Enlarg...

Page 29: ...use the SUBTITLE button on the remote control to select a subtitle language Depending on the disc the Subtitle and Audio Language functions may not work Audio Language Selection Function DVD Subtitle Language Selection Function DVD 2 Press Cursor button to move to SUBTITLE display 1Press INFO button twice 3 Press Cursor button or numeric buttons to select the desired subtitle Note Selecting Audio ...

Page 30: ... buttons to select the desired chapter and then press ENTER button 01 05 025 040 0 00 01 1 1 Moving to a Chapter 6 Press the numeric buttons to select the desired time and then press ENTER button 01 05 028 040 1 30 00 1 1 Moving to a Specific Time 3 Press Cursor buttons to move to Chapter display Moving to a Chapter 01 05 025 040 1 17 30 1 1 5 Press Cursor buttons to move to time display Moving to...

Page 31: ...item PBC Playback Control Function When playing a VCD version 2 0 you can select and view various scenes according to the menu screen PBC ON This VCD disc is version 2 0 The disc is played back according to the menu screen Some functions may be disabled When some functions are disabled select PBC OFF to enable them PBC OFF This VCD disc is version 1 1 The disc is played back in the same way as wit...

Page 32: ...ess MENU button Press Cursor button to move to Setup and then press ENTER button To select other language select OTHER and enter the language code of your country See 59 page for language code of countries AUDIO SUB TITLE and DISC MENU language can be selected Note 31P 60P P10 GB 2 1 05 10 45 AM Page 32 ...

Page 33: ...en press ENTER button Press RETURN button to return to the previous level Press MENU button to exit the setup screen try If the language you selected is not recorded on the disc menu language will not change even if you set it to your desired language Selecting the OSD Language Selecting the Audio Language recorded on the disc Selecting the Subtitle Language recorded on the disc Selecting the Disc...

Page 34: ...button to move to TV DISPLAY and then press ENTER button Press Cursor button to select the desired item and then press ENTER button Press RETURN button to return to the previous level Press MENU button to exit the setup screen Depending on your TV type Wide Screen TV or conventional 4 3 TV you can select the TV s aspect ratio Setting TV Screen type 31P 60P P10 GB 2 1 05 10 45 AM Page 34 ...

Page 35: ...een TV You can enjoy the widescreen aspect Select this to play a 16 9 picture in the letter box mode on a conventional TV Black bars will appear at the top and bottom of the screen Select this to play a 16 9 picture in the pan scan mode on a conventional TV You can see the central portion of the screen only with the sides of the 16 9 picture cut off 4 3LB 4 3 Letterbox WIDE 4 3PS 4 3 Pan Scan If a...

Page 36: ...er The higher the level the closer the content is to violent or adult material 3 5 Press Cursor button to move to PARENTAL and then press ENTER button Press Cursor button to select the desired rating level and then press ENTER button Enter the password and then press ENTER button Note 35 2 1 In Stop mode press MENU button Press Cursor button to move to Setup and then press ENTER button Use this to...

Page 37: ...ssword is set to 7890 by default Note If you have forgotten the rating level password do the following While NO DISC message appears on the display of main unit hold the main unit s button for longer than 5 seconds INITIALIZE appears on the display and all settings will return to the default values Press the POWER button Using the RESET function will erase all stored settings Do not use this unles...

Page 38: ...turn off and then back on Setting the Wallpaper While watching a DVD VCD or JPEG CD you can set the image you like as background wallpaper Setting the Wallpaper You can set up to three wallpapers by repeating operation from Step1 to Step 3 Note PAUSE COPY LOGO DATA Select this to set the Samsung Logo image as your wallpaper Select this to set the desired image as your wallpaper 31P 60P P10 GB 2 1 ...

Page 39: ...ss Cursor button to move to LOGO and then press ENTER button To Change the Wallpaper 5 4 Press MENU button to exit the setup screen Press to select the desired USER and then press ENTER Press RETURN button to return to the previous level Press MENU button to exit the setup screen 31P 60P P10 GB 2 1 05 10 45 AM Page 39 ...

Page 40: ...ion and whether certain speakers are used or not Setting the Speaker Mode 2 1 4 3 In Stop mode press MENU button Press Cursor button to move to Audio and then press ENTER button In the Speaker Setup press the ENTER button again Press Cursor buttons to move to the desired speaker and then press ENTER button For C LS and RS each time the button is pressed the mode switches alternately as follows SMA...

Page 41: ... C R RS LS SW in that order If the ENTER button is pressed again at this time the test tone will stop To end the test tone press TEST TONE button again Press TEST TONE button Test tone will be produced as follows When playing a DVD or CD this will work only in Stop mode Use this function to check that each speaker is correctly connected and that there is no problem Alternate method press the TEST ...

Page 42: ...to the sound of the Center Speaker and Surround Speakers 2 1 In Stop mode press MENU button Press Cursor button to move to Audio and then press ENTER button With Dolby Pro Logic II the delay time may be different for each mode With AC 3 and DTS the delay time can be set between 00 and 15mSEC Note If the speakers cannot be placed at equal distances from the listening position you can adjust the del...

Page 43: ...d then press ENTER button Press Cursor to set the Delay time 0 ms 3 ms 6 ms 9 ms 12 ms 15 ms Setting REAR SURROUND SPEAKERS If the distance of Df is equal to the distance of Ds in the figure set the mode as 0ms Otherwise change the setting according to the table Setting CENTER SPEAKER If the distance of Dc is equal to or longer than the distance of Df in the figure set the mode as 0ms Otherwise ch...

Page 44: ... and then press ENTER button Press Cursor button to move to SOUND EDIT and then press ENTER button Method 1 Whenadjustingtheaudioqualityusingthesetupscreen Press Cursor buttons to select and adjust the desired item Press the buttons to adjust the settings You can adjust the balance and level for each speaker Setting the Audio Quality 31P 60P P10 GB 2 1 05 10 45 AM Page 44 ...

Page 45: ...n 2 1 Adjusting Front Speaker Balance Adjusting Rear Speaker Balance Press SOUND EDIT button and then press Cursor 3 Adjusting Center Speaker Level 4 5 Adjusting Rear Speaker Level Adjusting Subwoofer Speaker Level 44 Press SOUND EDIT button and then press Cursor Press SOUND EDIT button and then press Cursor Press SOUND EDIT button and then press Cursor Press SOUND EDIT button and then press Curso...

Page 46: ... smaller the effect 3 4 Press Cursor button to move to DRC and then press ENTER button Press Cursor to adjust the DRC Press RETURN button to return to the previous level Press MENU button to exit the setup screen You can use this function to enjoy Dolby Digital sound when watching movies at low volume at night Setting the DRC Dynamic Range Compression 31P 60P P10 GB 2 1 05 10 45 AM Page 46 ...

Page 47: ... the setup screen Audio menu appears 2 1 Setup menu appears AV SYNC screen appears 3 Press Cursor buttons to move to Audio and then press ENTER button Press Cursor buttons to move to AV SYNC and then press ENTER button Press the MENU button 4 You can set the audio delay time between 0 ms and 300 ms Set it to the optimal status Press Cursor buttons to select the Delay Time of AV SYNC and then press...

Page 48: ...MATRIX You will hear 5 1 channel surround sound STEREO Select this to listen to sounds from the front left and right speakers and the subwoofer only Each time the button is pressed the mode changes as follows When selecting Pro Logic II mode connect your external device to the AUDIO INPUT jacks L and R on the player If you connect to only one of the inputs L or R you cannot listen to 5 1 channel s...

Page 49: ...the front or rear When playing a DVD disc encoded with two or more channels multi channel mode will be selected automatically and Dolby Pro Logic II button does not work You can select either 0 or 1 Press PL II MODE button to select MUSIC mode Press PL II EFFECT button and then press Cursor buttons to select the mode Press PL II EFFECT button and then press Cursor buttons to select the mode Press ...

Page 50: ... movie theater CHURCH Gives the feel of being in a grand church PASS Select this for normal listening Press DSP EQ button Note This feature works with CDs MP3 CDs and 2 channel DVD Audio and Dolby Digital discs When playing a DVD disc encoded with two or more channels multi channel mode will be selected automatically and DSP EQ function does not work Note DSP Digital Signal Processor DSP modes hav...

Page 51: ... time that the DVD player will shut itself off Sleep Timer Function The remaining time before the DVD player will shut itself off is displayed Pressing the button again changes the sleep time from what you have set earlier To confirm the sleep timer setting press SLEEP button To cancel the sleep timer press SLEEP button until OFF appears on the display SETUP 31P 60P P10 GB 2 1 05 10 45 AM Page 51 ...

Page 52: ...briefly press to tune in to a lower or higher frequency Manual Tuning Each time the button is pressed the sound switches between STEREO and MONO In a poor reception area select MONO for a clear interference free broadcast Press MO ST button to listen in Mono Stereo This applies only when listening to an FM station When is pressed a preset broadcast station is selected Press and hold to automatical...

Page 53: ... TUNER MEMORY button before PRGM disappears from the display PRGM disappears from the display and the station is stored in memory 5 4 You can select between 1 and 15 Press the TUNER MEMORY button Press the TUNER MEMORY button again 6 To preset another station repeat steps 2 to 5 Press to select preset number You can store up to 15 FM stations FM Frequency Modulation TITLE CHAP PRGM RDS RT ST TUNED...

Page 54: ...eal time clock from the FM frequency Some stations may not transmit PTY RT or CT information therefore this may not be displayed in all cases 5 TA Traffic Announcement When this symbol flashes it shows that the traffic announcement is in progress Note Note You can see the RDS signals the station sends on the display TO show the RDS signals Press RDS DISPLAY while listening to an FM station Each ti...

Page 55: ...nd tunes in that station 3 Display NEWS AFFAIRS INFO SPORT EDUCATE DRAMA CULTURE SCIENCE VARIED POP M ROCK M M O R M LIGHT M CLASSICS OTHER M WEATHER FINANCE CHILDREN SOCIAL A RELIGION PHONE IN TRAVEL LEISURE JAZZ COUNTRY NATION M OLDIES FOLK M DOCUMENT Program Type News including an announced opinion and report Several matters including a current incident documentary discussion and analysis Infor...

Page 56: ...n the main unit so it won t interfere with your movie viewing Press DIMMER button Adjusting Display Brightness This is useful when answering a doorbell or telephone call Mute Function MUTE flash in the display To switch the sound back on at the same volume as before press MUTE again or the VOLUME buttons Press MUTE button 55 31P 60P P10 GB 2 1 05 10 45 AM Page 56 ...

Page 57: ...outside of the disc Handling discs Disc Storage Handling and Storing Discs Do not allow the discs to become contaminated with dirt Do not load cracked or scratched discs Caution Condensation may form if warm air comes into contact with cold parts inside the player When condensation forms inside the player the player may not operate correctly If this occurs remove the disc and let the player stand ...

Page 58: ...nsation disappears When listening to a CD or radio sound is output to the front speakers L R only Select PRO LOGIC II by pressing Dolby Pro Logic II on the remote control to use all six speakers Make sure that the DVD disc is 5 1 CH compatible If you set C SL and SR to NONE in the speaker mode in the audio setup of the setup screen no sound is heard from the center speaker and the front left and r...

Page 59: ...pears on the display and all settings will return to the default values Press the POWER button Using the RESET function will erase all stored settings Do not use this unless necessary Turn off the power and hold the button on the main unit for longer than 5 seconds Using the RESET function will erase all stored settings Do not use this unless necessary The password for rating level has been forgot...

Page 60: ...ya 1079 Catalan 1254 Italian 1403 Afan Oromo 1531 Turkmen 1093 Corsican 1257 Hebrew 1408 Oriya 1532 Tagalog 1097 Czech 1261 Japanese 1417 Punjabi 1534 Setswana 1103 Welsh 1269 Yiddish 1428 Polish 1535 Tonga 1105 Danish 1283 Javanese 1435 Pashto Pushto 1538 Turkish 1109 German 1287 Georgian 1436 Portuguese 1539 Tsonga 1130 Bhutani 1297 Kazakh 1463 Quechua 1540 Tatar 1142 Greek 1298 Greenlandic 1481...

Page 61: ...nsumption Weight Dimensions W x H x D Operating Temperature Range Operating Humidity Range Usable Sensitivity S N Ratio Distortion Composite Video Scart Jack Front speaker output Center speaker output Rear speaker output Subwoofer speaker output Frequency range S N Ratio Channel separation Input sensitivity G E N E R A L T U N E R F M VIDEO OUTPUT A M P L I F I E R Specifications 70W 3 2Kg 430 x 6...

Page 62: ...AH68 01660B THIS APPLIANCE IS MANUFACTURED BY 1p 30p P10 GB 2 1 05 10 44 AM Page 2 ...

Reviews: