ENG
20
19
CONNECTIONS
Connecting External Components
Press AUX on the remote control to select ‘DIGITAL IN’.
•
Each time the button is pressed, the selection changes as follows:
HDMI IN
➝
DIGITAL IN
➝
AUX 1
➝
AUX 2
.
•
You can also use the FUNCTION button on the main unit.
The mode switches as follows:
DVD/CD
➝
HDMI IN
➝
DIGITAL IN
➝
AUX 1
➝
AUX 2
➝
FM
➝
AM
.
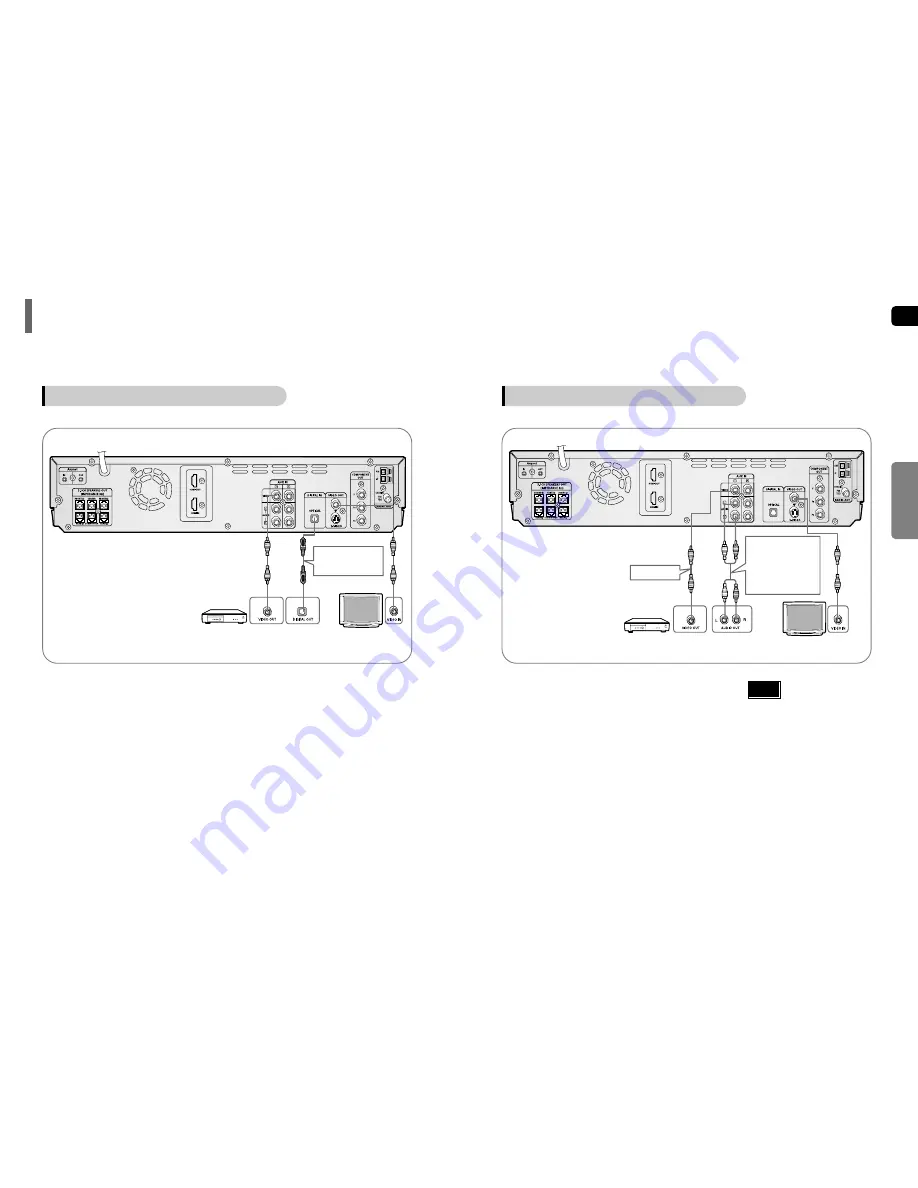
Connect Video Out on the Home Theater to Video In on the TV.
1
Connect the Digital Input (OPTICAL) to the Digital Output on the external digital component.
3
4
Example: Digital signal components such as a Settop Box or CD Recorder.
Connecting an External Digital Component
Optical Cable
(not supplied)
External Digital
Component
TV
Connect Video In on the Home Theater to Video Out on the external digital component.
2
Press AUX on the remote control to select AUX 1
or AUX 2 input.
•
Each time the button is pressed, the selection changes as
follows:
HDMI IN
➝
DIGITAL IN
➝
AUX 1
➝
AUX 2
.
•
You can also use the FUNCTION button on the main unit.
The mode switches as follows:
DVD/CD
➝
HDMI IN
➝
DIGITAL IN
➝
AUX 1
➝
AUX 2
➝
FM
➝
AM
.
•
If you have connected an external digital
component and also an Analog
component to Video In (1, 2) at the same
time, there will be video from AUX 1 even
when you select DIGITAL IN.
•
If you have connected Audio In (L, R) to
1, connect Video In to 1 as well, and if
you have connected Audio In (L, R) to 2,
connect Video In to 2 also.
•
When you select Aux 1 or 2, you are
selecting Video 1 or 2 inputs respectively.
Connect Audio In on the Home Theater to Audio
Out on the external analog component.
•
Be sure to match connector colors.
Connect Video Out on the Home Theater to
Video In on your TV.
1
Connect Video In on the Home Theater to
Video Out on the external analog component.
2
3
4
Example: Analog signal components such as a VCR or TV.
Connecting an External Analog Component
Video Cable
Audio Cable
If the external analog
component has only
one Audio Out, connect
either left or right.
External Analog
Component
TV
Note


