background image

37

38

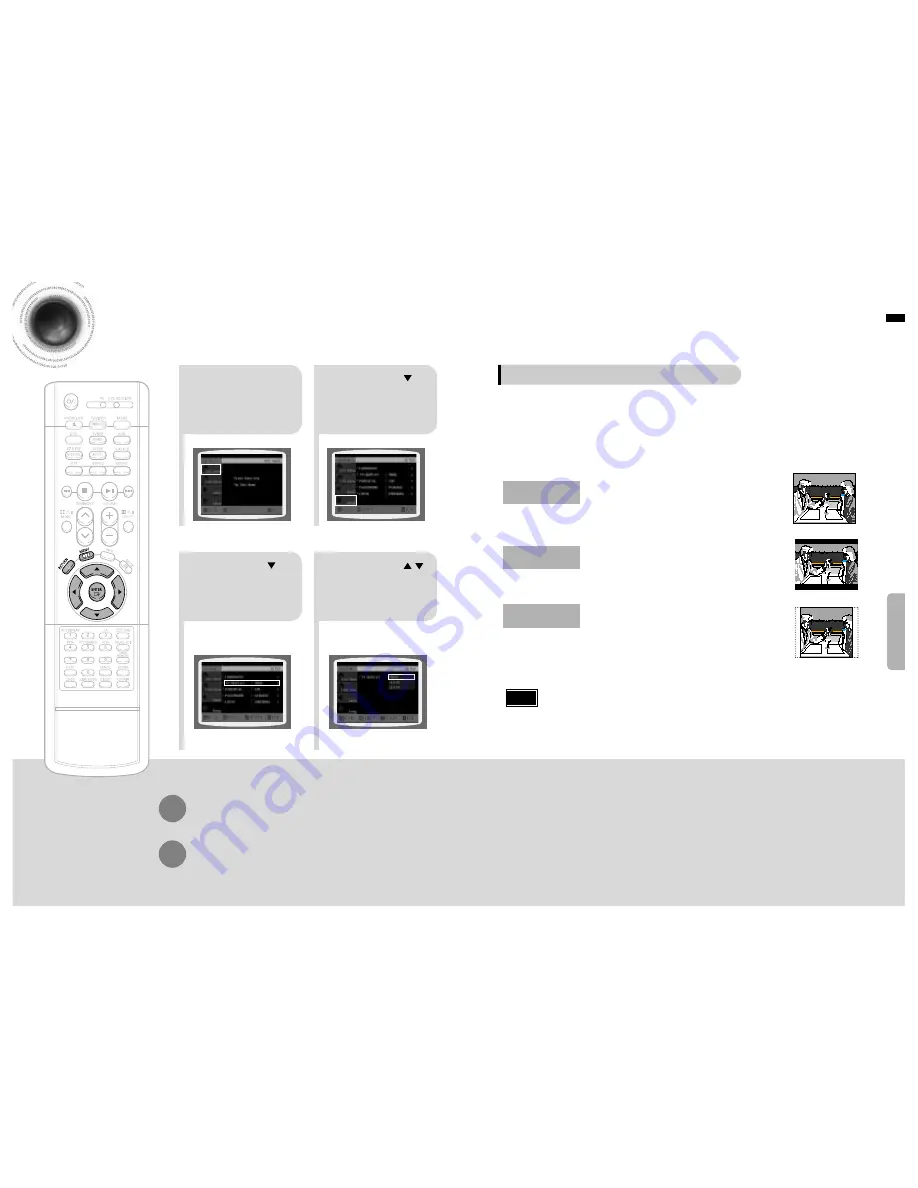
Setting TV Screen type

2

1

4

3

Press MENU button.

Press Cursor
button to move to
‘Setup’ and then
press ENTER button.

Once the setup is complete, you will
be taken to the previous screen.

Press Cursor
button to move to ‘TV
DISPLAY’ and then

Press Cursor      ,
button to select the
desired item and then
press ENTER button.

Press RETURN button to return to the previous level.

Press MENU button to exit the setup screen.

SETUP

The horizontal to vertical screen size ratio of conventional TVs is 4:3, while that of wide screen and high
definition TVs is 16:9. This ratio is called the aspect ratio. When playing DVDs recorded in different
screen size, you should adjust the aspect ratio to fit your TV or monitor.

✱ 

For a standard TV, select either "4:3LB" or "4:3PS" option according to
personal preference. Select "16:9" if you have a wide screen TV.

: Select this to view a 16:9 picture in the full-screen

mode on your wide screen TV.

• You can enjoy the wide screen aspect.

: Select this to play a 16:9 picture in the letter box

mode on a conventional TV.

• Black bars will appear at the top and bottom of the screen.

: Select this to play a 16:9 picture in the pan & scan

mode on a conventional TV.

• You can see the central portion of the screen only (with the

sides of the 16:9 picture cut off).

4:3LB

(4:3 Letterbox)

WIDE

4:3PS

(4:3 Pan&Scan)

• If a DVD is in the 4:3 ratio, you cannot view it in wide screen.
• Since DVD discs are recorded in various image formats, they will look different depending on

the software, the type of TV, and the TV aspect ratio setting.

Note

Adjusting the TV Aspect Ratio (Screen Size)

Summary of Contents for HT-EV100

Page 1: ...ITLE STEP TUNING CH PL II RET URN MENU INFO MU TE MODE ENTER SOUNDEDIT TESTTONE RDSDISPLAY PTY PTY PTYSEARCH TA SLEEP LOGO DIGEST SLIDEMODE CANCEL ZOOM REMAIN TUNER MEMORY PL II EFFECT VOLUME DSP EQ REPEAT BAND MO ST TV VIDEO MODE DIMMER V I D E O COMPACT DIGITAL AUDIO COMPACT DIGITAL VIDEO Instruction Manual AH68 01326B THIS APPLIANCE IS MANUFACTURED BY ...

Page 2: ... operating and maintenance instructions accompanying the unit WARNING To reduce the risk of fire or electric shock do not expose this appliance to rain or moisture CAUTION TO PREVENT ELECTRIC SHOCK MATCH WIDE BLADE OF PLUG TO WIDE SLOT FULLY INSERT Wiring the Main Power Supply Plug UK Only IMPORTANT NOTICE The main lead on this equipment is supplied with a moulded plug incorporating a fuse The val...

Page 3: ...as your background wallpaper PREPARATION Contents PREPARATION Safety Warnings 1 Precautions 2 Features 3 Notes on Discs 5 Description 7 CONNECTIONS Connecting the Speakers 11 Connecting the FM and AM MW LW Antennas 13 Connecting the Video to TV 14 Connecting External Components 15 Using the SUB MODE button 17 Before Using Your DVD Player 19 OPERATION Disc Playback 21 Displaying Disc Information 22...

Page 4: ... recorded on a single CD a maximum of 500 tracks can be played If more than 300 folders are recorded on a single CD a maximum of 300 folders can be played What is MP3 MP3 is short for MPEG 1 Audio Layer 3 and MPEG is an acronym for Moving Pictures Experts Group MP3 is a file format with compression ratio of 1 12 128 Kbps That is you can use MP3 format to record about 12 times the usual amount of d...

Page 5: ...Tray VOLUME button FM Antenna Connector 5 1 Channel Speaker Output Terminals Accessories RADIO FREQUENCY indicator System Status Display SPEAKER indicator DTS Disc indicator LINEAR PCM indicator MPEG indicator AUX indicator PREPARATION OPEN CLOSE button SUB MODE button AM Antenna Connector SCART JACK Connect to a TV with scart input jack VIDEO OUT SELECT SWITCH Use the switch to set video out Vide...

Page 6: ...ame time Do not expose batteries to heat or flame TV DVD RECEIVER OPEN CLOSE DVD TUNER AUX EZ VIEW NTSC PAL SLOW SUBTITLE STEP TUNING CH PL II R E T U R N MENU INFO M U T E MODE ENTER SOUNDEDIT TESTTONE RDSDISPLAY PTY PTY PTYSEARCH TA SLEEP LOGO DIGEST SLIDEMODE CANCEL ZOOM REMAIN TUNER MEMORY PL II EFFECT VOLUME DSP EQ REPEAT BAND MO ST TV VIDEO MODE DIMMER PL II MODE button TUNING UP DOWN button...

Page 7: ...ter speakers the rear speakers are used to handle mainly sound effects and sound will not come from them all the time Subwoofer The position of the subwoofer is not so critical Place it anywhere you like Usually it is placed by a corner near the front speakers Front Speakers Place these speakers in front of your listening position facing inwards about 45 toward you Place the speakers so that their...

Page 8: ...ture inside the unit could rise and may damage it Do not obstruct the cooling fan or ventilation holes If the cooling fan or ventilation holes are covered with a newspaper or cloth heat may build up inside the unit and fire may result Cooling Fan AM COAXIAL FM 75 SPEAKERS 6Ω ANTENNA CENTER WOOFER FRONT REA Connecting the FM andAM MW LW Antennas FM antenna connection AM MW LW antenna connection 1 C...

Page 9: ...ernal Analog Component Audio Cable If the external analog component has only one Audio Out connect either left or right 15 CONNECTIONS Press AUX on the remote control to select DIGITAL IN Each time the button is pressed the selection changes as follows DIGITAL IN AUX You can also use the FUNCTION button on the main unit The mode switches as follows DVD CD DIGITAL IN AUX FM MW LW Connecting Externa...

Page 10: ...at A B Repeat Off SUB MODE 18 17 CONNECTIONS If no button is pressed within 8 seconds while in the Mode 1 or Mode 2 the Display switches to the Normal Mode Mode does not work in AUX Function Note During DVD operation During CD MP3 CD operation Normal Mode Mode 1 UNED RDS RT TA ST DISC UNED RDS RT TA ST DISC SUB MODE Rpt Chapter Rpt Title Repeat Off Repeat A Repeat A B Repeat Off SUB MODE Normal Mo...

Page 11: ...s the POWER button to turn on the TV 5 6 Press the MODE button so that the DVD RECEIVER indicator on the remote control flashes Press DVD button to select DVD CD mode 19 CONNECTIONS Before Using Your DVD Player Your DVD player is capable of playing DVD VCD CD MP3 and JPEG discs Depending on the disc you are using these instructions may vary slightly Read the instructions carefully before using By ...

Page 12: ...nt of the disc the initial screen may appear different Depending on the recording mode some MP3 CDs cannot be played Table of contents of a MP3 CD varies depending on the MP3 track format recorded on the disc To resume playback press PLAY PAUSE button again 1 Press OPEN CLOSE button to open the disc tray 3 Press OPEN CLOSE button to close the disc tray To temporarily pause playback press PLAY PAUS...

Page 13: ...ressed playback will skip back or forward 5 minutes TITLE 01 05 CHAPTER 002 040 TITLE 01 05 CHAPTER 004 040 Fast Slow Playback Fast Playback DVD VCD CD MP3 Press and hold Each time the button is held down during playback the playback speed changes as follows Press SLOW button Each time the button is pressed during playback the playback speed changes as follows Slow Playback DVD VCD 23 Reverse slow...

Page 14: ...back mode changes as follows DVD VCD CD MP3 JPEG Repeat playback operation is not possible with version 2 0 VCD discs if PBC is turned on To use Repeat Playback on a VCD with PBC you should set the PBC to OFF in the disc menu See page 33 CHAPTER Repeatedly plays the selected chapter TITLE Repeatedly plays the selected title RANDOM Plays tracks in random order A track that has already been played m...

Page 15: ...ottom of the TV screen can be removed by pressing the EZ VIEW button This function will not work if the DVD is recorded with multi camera angle format Black bars may not disappear because some DVD discs have a built in horizontal to vertical ratio 27 Angle Function This function allows you to view the same scene in different angles DVD 2 Press Cursor button to move to ANGLE display 1Press INFO but...

Page 16: ... 025 040 1 17 30 1 1 5 Press Cursor buttons to move to time display Moving to a Specific Time Press the numeric buttons You can press on the remote control to move directly to the desired title chapter or track Depending on the disc you may not be able to move to the selected title or time 29 Selecting Audio Subtitle Language Depending on the number of languages on a DVD disc a different audio lan...

Page 17: ...red with a digital camera or camcorder or JPEG files on a PC can be stored on a CD and then played back with this DVD player Slide Mode JPEG 31 Place the JPEG disc on the disc tray Each time the button is pressed the slide moves backward or forward Press to skip to the next slide 1 Playback starts automatically Each image is shown for 5 seconds before another image is displayed Press the OPEN CLOS...

Page 18: ...tween PBC ON and OFF When you select the disc menu that is not supported by the disc the This menu is not supported message appears on the screen 1Press MENU button Press Cursor buttons to move to DISC MENU and then press ENTER button 4 Press ENTER button 3 Press Cursor buttons to select the desired item PBC Playback Control Function When playing a VCD version 2 0 you can select and view various s...

Page 19: ...move to Setup and then press ENTER button 4 Once the setup is complete if the language was set to English OSD will be displayed in English 3 Selecting the Subtitle Language recorded on the disc Selecting the Disc Menu Language recorded on the disc Press ENTER button 5 Press Cursor button to select the desired item and then press ENTER button Press Cursor button to select the desired language and t...

Page 20: ...our TV or monitor For a standard TV select either 4 3LB or 4 3PS option according to personal preference Select 16 9 if you have a wide screen TV Select this to view a 16 9 picture in the full screen mode on your wide screen TV You can enjoy the wide screen aspect Select this to play a 16 9 picture in the letter box mode on a conventional TV Black bars will appear at the top and bottom of the scre...

Page 21: ...s Cursor button to move to Setup and then press ENTER button 4 The password is set to 7890 by default Once the setup is complete you will be taken to the previous screen If you have selected Level 6 you cannot view DVDs with Level 7 or higher The higher the level the closer the content is to violent or adult material 3 5 Press Cursor button to move to PARENTAL and then press ENTER button Press Cur...

Page 22: ... The setting is complete 3 5 Press RETURN button to return to the previous level Press MENU button to exit the setup screen 41 42 Press Cursor button to move to PASSWORD and then press ENTER button Press ENTER button Enter the password and then press ENTER button SETUP Setting the Password You can set the password for the Parental rating level setting ...

Page 23: ... Cursor button to move to LOGO and then press ENTER button Press MENU button to exit the setup screen Press OPEN CLOSE button to open and then close the disc tray Press Cursor button to move to USER and then press ENTER button DVD VCD JPEG To Change the Wallpaper 1 During playback press PLAY PAUSE button when you see an image you like Press LOGO button LOGO COPYING will be displayed on the TV scre...

Page 24: ...nd STEREO the speaker mode may vary Press RETURN button to return to the previous level Press MENU button to exit the setup screen 45 46 Note SETUP SMALL Select this when using the speakers NONE Select this when no speakers are installed 2 1Press MENU button Press Cursor button to move to Audio and then press ENTER button 3 Press Cursor button to move to TEST TONE and then press ENTER button The t...

Page 25: ... and each speaker is the same Since the sounds arrive at the listening position at different times depending on the placement of speakers you can adjust this difference by adding a delay effect to the sound of the Center Speaker and Surround Speakers Df The distance from FRONT SPEAKER Dc The distance from CENTER SPEAKER Ds The distance from SURROUND SPEAKER Ideal CENTER SPEAKER placement It is des...

Page 26: ... to 6dB The sound gets louder as you move closer to 6dB and smaller as you get closer to 6dB Method 1 Whenadjustingtheaudioqualityusingthesetupscreen Method 2 When manually adjusting with the SOUND EDIT button 2 1 Adjusting Front Speaker Balance Adjusting Rear Speaker Balance Press SOUND EDIT button and then press Cursor 3 Adjusting Center Speaker Level 4 5 Adjusting Rear Speaker Level Adjusting S...

Page 27: ...ton is pressed the selection changes as follows POP JAZZ ROCK Depending on the genre of music you can select from POP JAZZ and ROCK STUDIO Provides a sense of presence as if in a studio CLUB Simulates the sound of a dance club with a throbbing bass beat HALL Provides a clear vocal as if listening in a concert hall MOVIE Provides the feeling of a movie theater CHURCH Gives the feel of being in a gr...

Page 28: ... select between 0 and 7 You can select between 0 and 6 3 4 PANORAMA This mode extends the front stereo image to include the surround speakers for an exciting wraparound effect with side wall imaging CENTER WIDTH Sound is output to the center speaker only The front left and right speakers produce phantom sound DIMENSION Incrementally adjusts the sound field DSP from the front or rear When playing a...

Page 29: ...station To tune in to a preset station press on the remote control to select a channel Refer to Step 2 on page 55 to automatically or manually tune in to a station 2 1 Each time the button is pressed the band switches between FM MW LW 01 flashes in the display 3 Example Presetting FM 89 1 in the memory Press to select 89 10 Press the TUNER BAND button and select Press the TUNER MEMORY button befor...

Page 30: ...he display window cannot show accented letters A for instance may stans for accented A s like À Â Ä Á Åand à 57 58 To search for a program using the PTY codes Before you start remember The PTY Search is only applicable to preset stations To stop searching any time during the process press PTY SEARCH while searching There is a time limit in doing the following steps If the setting is cancelled befo...

Page 31: ...0 20 30 60 90 120 150 Off Press SLEEP button Sleep Timer Function You can set the time that the DVD player will shut itself off Adjusting Display Brightness You can adjust the brightness of the LCD display depending on the surrounding lighting conditions To cancel the sleep timer press SLEEP button until OFF appears on the display Press the DIMMER button on the remote control to adjust the brightn...

Page 32: ... and press POWER If the TV turns off or on the setting is complete TV DVDRECEIVER Note MISCELLANEOUS 1 2 3 4 5 6 7 8 9 10 11 12 13 14 15 16 17 18 19 20 21 22 23 24 25 26 27 28 29 SAMSUNG ANAM DAEWOO LG HITACHI JVC SHARP SONY TOSHIBA SANYO MITSUBISHI MATSUSHITA TELEFUNKEN RCA PANASONIC SABA PHILIPS GRUNDIG ZENITH MIVAL NOBLEX EMERSON MAGNAVOX LOEWE THOMSON NORDMENDE LOEWE OPTA BLAUPUNKT SIEMENS TV ...

Page 33: ...Digital 5 1 CH Surround Sound is produced only if the disc is recorded with 5 1 channel sound Is the audio language correctly set to DOLBY DIGITAL 5 1 CH in the information display Dolby Digital 5 1 CH Surround Sound is not produced Symptom Check Remedy Is the TV power on Are the video cables connected properly Is the disc dirty or damaged A poorly manufactured disc may not be playable Disc is rot...

Page 34: ...ause breaks in playback Be especially careful not to scratch discs when handling them Do not allow the discs to become contaminated with dirt Do not load cracked discs or discs that are scratched Caution Condensation may form if warm air comes into contact with cold parts inside the player When condensation forms inside the player the player may not operate correctly If this occurs remove the disc...

Page 35: ...nnot play the disc Translated appearing at the bottom of the screen A DVD disc can contain up to 32 subtitle languages These numbers are recorded on DVD discs When a disc contains two or more movies these movies are numbered as Title 1 Title 2 etc These numbers are assigned to the tracks which are recorded on video and audio CDs They enable specific tracks to be located quickly Contains recordings...

Reviews: