background image

18


English

Setup

Before Starting (Initial Settings)

1. 

Press the 

POWER

 button when it is plugged in 

TV for the first time.
Initial Settings screen will be displayed.

2. 

Press the ▲▼ buttons to select the desired 
language, then press the 

ENTER

 button.

3. 

Press the ▲▼ buttons to select desired TV Aspect, 
then press the 

ENTER

 button.


 NOTE


If you have not selected a preferred language in the 
initial settings, you will see a language selection window 
next time you turn on the product.


Your language selection will apply to all menus: 
On-Screen Menu, Disc Menu, Audio, Subtitle.


If you want to move to the previous screen, press the 

A(PREVIOUS) 

or

 RETURN

 button.


Once you select a menu language, you can change it by 
pressing the 

STOP

 (

) button on the remote control or 

the main set  for more than 5 seconds in no disc state.


When the Initial Settings screen does not appear, refer 

to the Initial Settings. (see page 20)

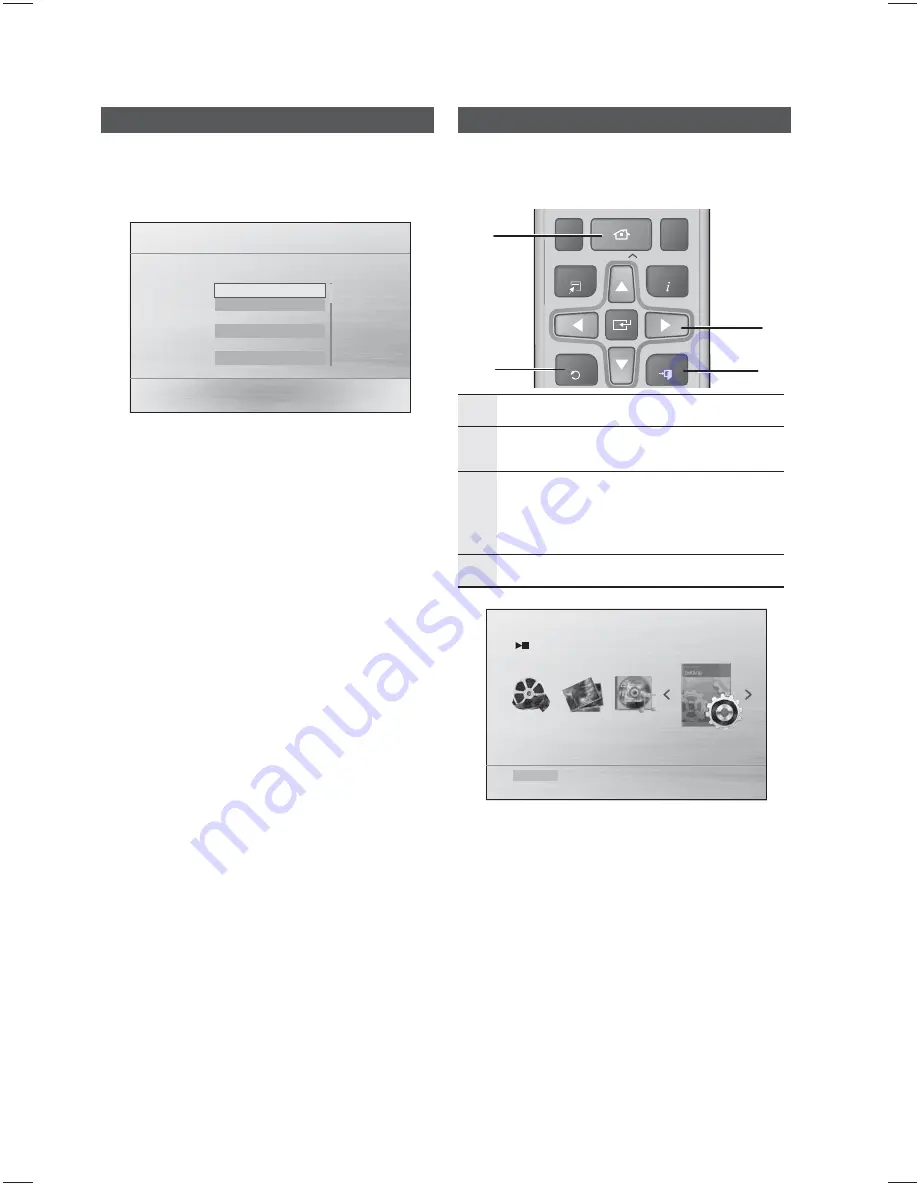
Setting the Setup menu

The access step may differ depending on the selected 
menu. The GUI (Graphical User Interface) in this 
manual may differ, depending on the firmware version.

1

HOME 

BUTTON : Display the home menu.

2

RETURN

 BUTTON : Return to the previous 

setup menu.

3

ENTER / DIRECTION

 BUTTON

Move the cursor and select an item.
Select the currently selected item.

Confirm the setting.

4

EXIT

 BUTTON : Exit the setup menu.

Function    DVD/CD      

Settings

1. 

Press the 

POWER

 button.

2. 

Press the 

◄►

 buttons to select 

Settings

, then 

press the 

ENTER

 button.

3. 

Press the 

▲▼

 buttons to select the desired 

menu, then press the 

ENTER

 button.

4. 

Press the 

▲▼

 buttons to select the desired 

sub-menu, then press the 

ENTER

 button.

5. 

Press the 

▲▼

 buttons to select the desired 

item, then press the 

ENTER

 button.

6. 

Press the 

EXIT

 button to exit the setup menu.

>

Move    

Select 

Initial settings > On-Screen Language

Select a language for the on-screen displays

English

한국어

Nederlands

Français

Deutsch

Italiano

TOOLS

RETURN

EXIT

INFO

TUNING


HOME

TITLE MENU

DISC MENU

b

#

1

2

3

4

Summary of Contents for HT-E330K

Page 1: ... Home Entertainment System user manual Imagine the possibilities Thank you for purchasing this Samsung product To receive more complete service please register your product at www samsung com register HT E330K ...

Page 2: ... dripping or splashing and no objects filled with liquids such as vases shall be placed on the apparatus The Mains plug is used as a disconnect device and shall stay readily operable at any time This apparatus shall always be connected to an AC outlet with a protective grounding connection To disconnect the apparatus from the mains the plug must be pulled out from the mains socket therefore the ma...

Page 3: ... due to lightning could damage the product Do not expose the product to direct sunlight or other heat sources This could lead to overheating and malfunction of the product Protect the product from moisture and excess heat or equipment creating strong magnetic or electric fields i e speakers Disconnect the power cable from the AC supply if the product malfunctions Your product is not intended for i...

Page 4: ...s of Dolby Laboratories ABOUT DIVX VIDEO DivX is a digital video format created by DivX LLC a subsidiary of Rovi Corporation This is an official DivX Certified device that plays DivX video Visit divx com for more information and software tools to convert your files into DivX videos ABOUT DIVX VIDEO ON DEMAND This DivX Certified device must be registered in order to play purchased DivX Video on Dem...

Page 5: ...cting the Speakers 15 Connecting the Video Out to your TV 16 Connecting the FM Antenna 17 Connecting Audio from External Components 17 Connecting Microphone SETUP 18 18 Before Starting Initial Settings 18 Setting the Setup menu 19 Display 19 TV Aspect 19 Video Out Signal option 19 Audio 19 Speaker Setting 20 DRC Dynamic Range Compression 20 AUDIO SYNC 20 User EQ 20 Karaoke Scoring 20 System 20 Ini...

Page 6: ...ures and illustrations in this User Manual are provided for reference only and may differ from actual product appearance An administration fee may be charged if either a an engineer is called out at your request and there is no defect in the product i e where you have failed to read this user manual b you bring the unit to a repair centre and there is no defect in the product i e where you have fa...

Page 7: ...where a function does not operate or settings may be cancelled NOTE This involves tips or instructions on the page that help each function operate Shortcut Key This function provides direct and easy access pressing the button on the remote control Disc Types and Characteristics Region Code The product and the discs are coded by region These regional codes must match in order for the disc to play I...

Page 8: ...age appears on the TV screen Disc Types And Disc Format This product does not support Secure DRM Media files CD R Discs Some CD R discs may not be playable depending on the disc recording device CD Recorder or PC and the condition of the disc Use a 650MB 74 minute CD R disc Do not use CD R discs over 700MB 80 minutes as they may not be played back Some CD RW Rewritable media may not be playable On...

Page 9: ...ion Supported devices USB storage media MP3 player digital camera 1 If a folder or file name is longer than 10 characters it may not properly display or operate 2 A subtitle file bigger than 300KB may not be properly displayed 3 A certain USB digital camera device USB card reader is not supported 4 FAT16 and FAT32 file systems are supported 5 Photo JPEG music MP3 WMA and video file should have the...

Page 10: ... more than 500mA at 5V may not be supported 4 OPEN CLOSE BUTTON Opens and closes the disc tray 5 FUNCTION BUTTON The mode switches as follows DVD CD AUX USB FM 6 STOP BUTTON Stops disc playback 7 PLAY PAUSE BUTTON Plays a disc or pauses playback 8 VOLUME CONTROL BUTTON Volume adjustment 9 POWER BUTTON Turns the product on and off 10 REMOTE CONTROL SENSOR Detects signals from the remote control 11 ...

Page 11: ...put of an external device such as a VCR 4 VIDEO OUT JACK Connect your TV s Video Input jack VIDEO IN to the VIDEO OUT jack 5 COMPONENT VIDEO OUTPUT JACKS Connect a TV with Component video inputs to these jacks 6 FM ANTENNA JACK Connect the FM antenna Rear Panel SURROUND SURROUND SUBWOOFER CENTER FRONT VIDEO OUT FRONT SPEAKERS OUT SPEAKER IMPEDANCE 3 FM ANT COMPONENT OUT FA NET Only For Service AUX...

Page 12: ...on Used to turn on off GIGA Sound function Press to skip backwards or forwards Press to search backwards or forwards Press to pause a disc Cut off the sound temporarily Allows you to repeat a title chapter track or disc Press to check the disc menu Brings up the product s setup menu Select on screen menu items and change menu value Search for active FM stations and change channels Press the Key Co...

Page 13: ...ut 60 to 90cm above your ear facing slightly downward Unlike the front and center speakers the surround speakers are used to handle mainly sound effects and sound will not come from them all the time Subwoofer g The position of the subwoofer is not so critical Place it anywhere you like Position of the product Place it on a stand or cabinet shelf or under the TV stand Selecting the Listening Posit...

Page 14: ... on the wall 5 mm 10 mm Hold on the back of the speaker 30 mm 4 mm 8 to 10 mm Depth of fastened screw Connecting The Speakers 1 Connect the connecting plugs to the back of the product by matching the colours of the speaker plugs to the speaker jacks Front Speaker R Subwoofer Surround Speaker R Surround Speaker L Front Speaker L Center Speaker SURROUND SURROUND SUBWOOFER CENTER FRONT FRONT SPEAKERS...

Page 15: ... the Progressive scan mode is selected the VIDEO output does not feed any signals This product operates in Interlace scan mode 480i 576i for component composite output After making the video connection set the Video input source on your TV to match the corresponding Video output mode on your product Turn this product on first before you set the video input source on your TV See your TV owner s man...

Page 16: ...d holding the button for over 5 seconds will select P SCAN and I SCAN alternately When you select P SCAN P SCAN will appear on the display To set P Scan mode for DivX discs press the P SCAN button on the remote control for more than 5 seconds with no disc in the unit NO DISC on the display then load the DivX disc and play Connecting the FM Antenna 1 Connect the FM antenna supplied to the FM Antenn...

Page 17: ...ack on the front of the product You can connect up to two microphones 2 Press the MIC VOL button to adjust the volume of the microphone 3 Press the ECHO button to adjust the echo level of the microphone 4 During the playback press the KEYCON button then press the b button Each time the button is pressed the key is increased and each time the b button is pressed the key is decreased 5 Press the MY ...

Page 18: ...r to the Initial Settings see page 20 Setting the Setup menu The access step may differ depending on the selected menu The GUI Graphical User Interface in this manual may differ depending on the firmware version 1 HOME BUTTON Display the home menu 2 RETURN BUTTON Return to the previous setup menu 3 ENTER DIRECTION BUTTON Move the cursor and select an item Select the currently selected item Confirm...

Page 19: ... select the NTSC video format PAL You can select the PAL video format Audio Speaker Setting Speaker Size You can set the Speaker Size of the Center and Surround Speakers as well as Test Tone in this mode Settings mMove Select Return Select Return Speaker Setting Speaker Size Sound Edit Delay Time Test Tone Off For the Front the mode is set to Small For the Subwoofer the mode is set to Present For ...

Page 20: ...C Dynamic Range Compression This feature balances the range between the loudest and quietest sounds You can use this function to enjoy Dolby Digital sound when watching movies at low volume at night You can select either Full 6 8 4 8 2 8 off AUDIO SYNC Video and audio sync may not match with digital TV If this occurs adjust the audio delay time to match the video You can set the audio delay time b...

Page 21: ...sing the number buttons on the remote control Disc Playback 1 Press the OPEN CLOSE button 2 Place a disc gently into the tray with the disc s label facing up 3 Press the OPEN CLOSE button to close the disc tray NOTE Resume function When you stop disc play the product remembers where you stopped so when you press PLAY button again it will pick up where you left off This function works only with DVD...

Page 22: ...mages captured with a digital camera or camcorder or JPEG files on a PC can be stored on a CD and then played back with this product 1 Insert a JPEG disc on the disc tray 2 Press the buttons to select Photo and then press the ENTER button 3 Press the buttons to select the folder you want to play and then press the ENTER button 4 Press the buttons to select the photo you want to play and then press...

Page 23: ...ack Reverse slow playback does not work Step Motion Play dD Press the PAUSE button repeatedly The picture moves forward one frame each time the button is pressed during playback NOTE No sound is heard during step motion playback 5 Minute Skip function D During playback press the button Playback skips 5 minutes forward whenever you press the button Playback skips 5 minutes backward whenever you pre...

Page 24: ...t 1 During the CD MP3 playback press the REPEAT button repeatedly to select the repeat mode you want B Repeat Off Repeat Track Repeat All Random Repeat Section A B A Repeat Off Repeat Track Repeat Dir Directory Repeat All Random A B Repeat Playback dB You can repeatedly play back a designated section of a DVD or CD 1 During the DVD disc or CD playback press the REPEAT button on the remote control ...

Page 25: ...be identified as a Title Chapter Most DVD discs are recorded in chapters so that you can quickly find a specific chapter Playing time Allows playback of the film from a desired time You must enter the starting time as a reference The time search function does not operate on some discs Audio Refers to the film s soundtrack language A DVD Disc can contain up to 8 audio languages Subtitle Refers to t...

Page 26: ...erent angles 1 Press the TOOLS button 2 Press the buttons to select ANGLE display 3 Press the buttons to select the desired angle NOTE The Angle function works only with discs on which multiple angles have been recorded DIMMER You can adjust the brightness of the display on the main unit Press the DIMMER button Sound Mode P BASS The P BASS function provides a bass boost to reinforce the low freque...

Page 27: ... with a throbbing bass beat HALL Provides a clear vocal as if listening in a concert hall MOVIE Provides the feeling of a movie cinema CHURCH Provides the feeling of being in a grand church OFF Select this for normal listening NOTE The DSP EQ function is only available in Stereo mode The DSP EQ function is not available while playing AC3 signal in 2 1 channel mode Some regional EQs are special suc...

Page 28: ...automatically search the band Setting Mono Stereo Press the MO ST button Each time the button is pressed the sound switches between STEREO and MONO In a poor reception area select MONO for a clear interference free broadcast Presetting Stations Example Presetting FM 89 10 in the memory 1 Press the FUNCTION button to select FM 2 Press the TUNING CH button to select 89 10 3 Press the TUNER MEMORY bu...

Page 29: ...C button on the remote control FULL RECORDING appears on the display and recording starts 4 Press the STOP button to stop recording When USB recording of a CD is completed you will find a new folder named RECORDING in the USB drive The contents will be saved in the folder in the MP3 format When USB recording of FM radio or AUX source is completed you will find a new folder named TUNER RECORDING or...

Page 30: ... speakers are connected properly Adjust the volume When listening to a CD radio or TV sound is output to the front speakers only Select PROLOG by pressing PL II Dolby Pro Logic II on the remote control to use all six speakers Dolby Digital 5 1 CH Surround Sound is not produced Is there Dolby Digital 5 1 CH mark on the disc Dolby Digital 5 1 CH Surround Sound is produced only if the disc is recorde...

Page 31: ...ya 1039 Amharic 1149 Spanish 1253 Icelandic 1350 Malayalam 1491 Kinyarwanda 1531 Turkmen 1044 Arabic 1150 Estonian 1254 Italian 1352 Mongolian 1495 Sanskrit 1532 Tagalog 1045 Assamese 1151 Basque 1257 Hebrew 1353 Moldavian 1498 Sindhi 1534 Setswana 1051 Aymara 1157 Persian 1261 Japanese 1356 Marathi 1501 Sangro 1535 Tonga 1052 Azerbaijani 1165 Finnish 1269 Yiddish 1357 Malay 1502 Serbo Croatian 15...

Page 32: ...nter speaker output 95W 3Ω Surround speaker output 35W x 2 3Ω Subwoofer output 95W 3Ω Frequency range 20Hz 20KHz S N Ratio 65dB Channel separation 60dB Input sensitivity AUX 800mV Speaker Speaker system 5 1ch speaker system Impedance Frequency range Output sound pressure level Rated input Maximum input Dimensions W x H x D Weights Nominal specification Samsung Electronics Co Ltd reserves the right...

Page 33: ... Project 6 Redistributions of any form whatsoever must retain the following acknowledgment This product includes software developed by the OpenSSL Project for use in the OpenSSL Toolkit http www openssl org THIS SOFTWARE IS PROVIDED BY THE OpenSSL PROJECT AS IS AND ANY EXPRESSED OR IMPLIED WARRANTIES INCLUDING BUT NOT LIMITED TO THE IMPLIED WARRANTIES OF MERCHANTABILITY AND FITNESS FOR A PARTICULA...

Page 34: ...word cryptographic can be left out if the rouines from the library being used are not cryptographic related 4 If you include any Windows specific code or a derivative thereof from the apps directory application code you must include an acknowledgement This product includes software written by Tim Hudson tjh cryptsoft com THIS SOFTWARE IS PROVIDED BY ERIC YOUNG AS IS AND ANY EXPRESS OR IMPLIED WARR...

Page 35: ...Area Contact Centre Web Site Serbia 0700 Samsung 0700 726 7864 www samsung com Slovakia 0800 SAMSUNG 726 7864 www samsung com Spain 902 1 SAMSUNG 902 172 678 www samsung com Sweden 0771 726 7864 SAMSUNG www samsung com Switzerland 0848 SAMSUNG 7267864 CHF 0 08 min www samsung com ch www samsung com ch_fr French U K 0330 SAMSUNG 7267864 www samsung com Eire 0818 717100 www samsung com Lithuania 8 8...

Page 36: ...Code No AH68 02259B AH68 02459N ...

Reviews: