background image

18

CONNECTIONS

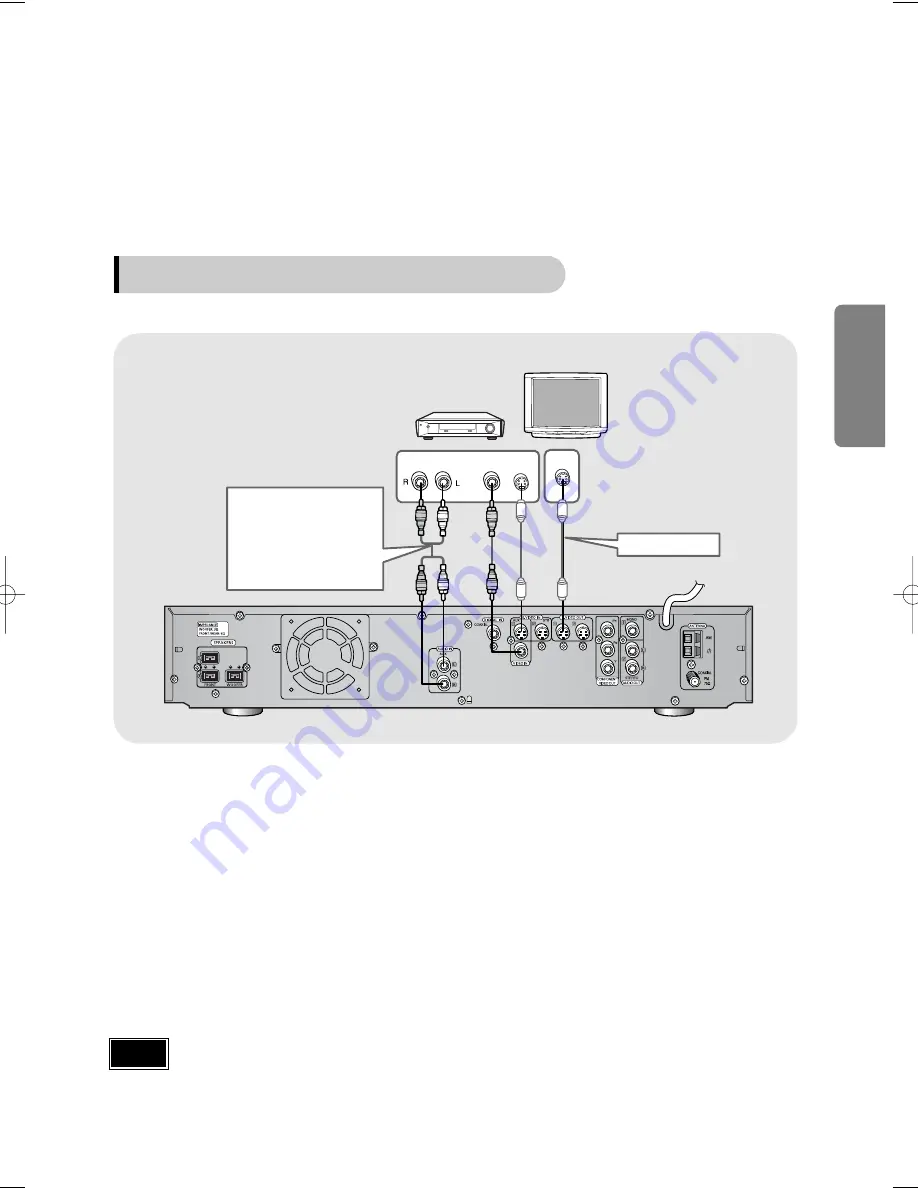
Press AUX on the remote control to select '

AUX

'

You can also use the FUNCTION button on the main unit. The mode switches as follows:
DVD/CD 

➝ 

STB 

➝ 

AUX 

➝ 

FM 

➝ 

AM.

If both Video In and S-Video In are connected, composite video will be shown.

Connect Audio In on the DVD Player to Audio Out on the external  analog component.

Be sure to match connector colors.

Connect S-Video Out on the DVD player to S-Video In on the TV.

1

Connect S-Video In to S-Video Out on your video component.
(Alternatively, connect Video In to Video Out on your TV.)

2

3

4

AUDIO

OUT

VIDEO

OUT

S-VIDEO

OUT

S-VIDEO

IN

Example: Analog signal components such as a VCR, Camcorder, and TV.

Connecting an External Analog Component

S-Video Cable

Audio Cable

If the external analog

component has only one

Audio Out, connect

either left or right.

Note

✽ 

Connect to either Video In
or S-Video In, but not both.

  1p~34p(DB400M)-SEA  2004.3.18  4:48 PM  Page 21

Summary of Contents for HT-DB400M

Page 1: ...AM AUX STB SUB TITLE STEP TUNING CH RE TU RN MENU INFO M U TE ENTER SOUNDEDIT TESTTONE SLEEP P SCAN MO ST SLOW VOL RESET VOL SET CANCEL ZOOM F RESET TUNER MEMORY VOLUME DVS REPEAT TV VIDEO MODE DIMMER V I D E O COMPACT DIGITAL AUDIO COMPACT DIGITAL VIDEO Instruction Manual ...

Page 2: ...shock do not expose this appliance to rain or moisture CAUTION TO PREVENT ELECTRIC SHOCK MATCH WIDE BLADE OF PLUG TO WIDE SLOT FULLY INSERT CLASS 1 LASER PRODUCT KLASSE 1 LASER PRODUKT LUOKAN 1 LASER LAITE KLASS 1 LASER APPARAT PRODUCTO LASER CLASE 1 RISK OF ELECTRIC SHOCK DO NOT OPEN CAUTION TO REDUCE THE RISK OF ELECTRIC SHOCK DO NOT REMOVE REAR COVER NO USER SERVICEABLE PARTS INSIDE REFER SERVI...

Page 3: ... a long period of time Protect the player from moisture i e vases and excess heat e g fireplace or equipment creating strong magnetic or electric fields i e speakers Disconnect the power cable from the AC supply if the player malfunctions Your player is not intended for industrial use Use of this product is for personal use only Condensation may occur if your player or disc have been stored in col...

Page 4: ...int where they exit from the appliance CLEANING Unplug this video product from the wall outlet before cleaning Do not use liquid cleaners or aerosol cleaners Use a damp cloth for cleaning LIGHTNING For added protection of this video product receiver during a lightning storm or when it is left unattended and unused for long periods of time unplug it from the wall outlet and disconnect the antenna o...

Page 5: ... may expose you to dangerous voltage or other hazards Refer all servicing to qualified service personnel REPLACEMENT PARTS When replacement parts are required be sure the service technician has used replacement parts specified by the manufacturer or having the same characteristics as the original part Unauthorized substitutions may result in fire electric shock or other hazards SAFETY CHECK Upon c...

Page 6: ...omatically brightens and darkens the brightness of the TV screen after 2 minutes in the stop or pause mode The HT DB400M automatically switches itself into the power saving mode after 20 minutes in the screen saver mode Dolby Virtual Speaker This technology simulates a highly realistic 5 1 channel surround sound using 2 channel speakers Manufactured under license from Dolby Laboratories Dolby Pro ...

Page 7: ...es Songs 26 Repeat Playback 27 A B Repeat Playback 28 Angle Function 29 Zoom Function 30 Selecting Audio Subtitle Language 31 Moving Directly to a Scene Song 32 Using Disc Menu 33 Using the Title Menu 34 SETUP Setting the Language 35 Setting TV Screen type 37 Setting Parental Controls Rating Level 39 Setting the Password 41 Setting the Test Tone 43 Setting the Audio Quality 44 Dolby Virtual Speake...

Page 8: ...e Disc Size Max Playing Time LD CD G CD I CD ROM and DVD ROM cannot be played on this player If such discs are played a WRONG DISC FORMAT message appears on the TV screen DVD discs purchased abroad may not play on this player If such discs are played a WRONG REGION CODE message appears on the TV screen 7 Notes on Discs Playable Discs Do not use the following types of disc Many DVD discs are encode...

Page 9: ... play at all Disc Recording Format 8 CD R MP3 Discs Only CD R discs with MP3 files in ISO 9660 or Joliet format can be played MP3 file names should be 8 characters or less in length and contain no blank spaces or special characters If the name of a file is in Korean the name will be displayed on the TV screen in Korean and will be shown in the display of the main unit Use discs recorded with a com...

Page 10: ...CHAP PRGM ST TUNED kHz MHz LINEAR PCM MPEG L R SW DOLBY DIGITAL indicator TITLE indicator PROGRAM indicator STEREO indicator CHAPTER indicator TUNER indicator DSP indicator RADIO FREQUENCY indicator System Status Display SPEAKER indicator DTS Disc indicator LINEAR PCM indicator MPEG indicator PBC indicator All buttons other than the OPEN CLOSE button and the Volume Control on the main unit are dis...

Page 11: ...it to the player s S Video output jack S Video Input Connector If the external component is equipped with an S Video output connector S VIDEO OUT connect it to the player s S Video input jack Audio Output mono connector Video Input Connector Connect the external component s video output jacks VIDEO OUT to the Video IN connector External Digital Component Input Connector Use this to connect externa...

Page 12: ...ton STEP button Dolby VS button AUX button RETURN button Number 0 9 buttons SLEEP button VOL SET button SLOW MO ST button TV indicator DVD RECEIVER indicator TV VIDEO DIMMER button MODE button Direction Enter button VOL RESET button F RESET button CANCEL button ZOOM button TUNER MEMORY P SCAN button SOUND EDIT button TEST TONE button MUTE button INFO button VOLUME button Forward search button REPE...

Page 13: ...ery cover on the back of the remote by pressing down and sliding the cover in the direction of the arrow 1 Insert two 1 5V AAA batteries paying attention to the correct polarities and 2 Replace the battery cover 3 Follow these precautions to avoid leaking or cracking cells Place batteries in the remote control so they match the polarity to and to Use the correct type of batteries Batteries that lo...

Page 14: ...e of the front speakers with the front face of the center speaker or place them slightly in front of the center speakers Position of the DVD Player Place it on a stand or cabinet shelf or under the TV stand Selecting the Listening Position The listening position should be located about 2 5 to 3 times the distance of the TV s screen size away from the TV Example For 32 TVs 2 2 4m 6 8feet For 55 TVs...

Page 15: ... the colors of the speaker terminals match the colors of the connecting jacks Make sure the polarities and are correct Connect the speakers to the jacks 3 on the back of your DVD player 1 Purple White White Red Red 14 Connecting the Speakers CONNECTIONS ...

Page 16: ...If your television is equipped with Component Video inputs connect a component video cable not supplied from the Pr Pb and Y jacks on the back panel of the system to the corresponding jacks on your television Component Video S Video TV When the Progressive scan mode is selected the VIDEO and S VIDEO outputs do not feed any signals See page 16 to select Progressive Scan Depending on your TV Compone...

Page 17: ...fill in the alternating gaps left by the odd field to form a single frame One frame displayed every 1 30th of a second contains two interfaced fields thus a total of 60 fields are displayed every 1 60th of a second The interlaced scanning method is intended for capturing a still object Interlaced Scan 1 FRAME 2 FIELDS The progressive scanning method scans one full frame of video consecutively down...

Page 18: ...lternatively connect Video In to Video Out on your TV 2 3 Press STB on the remote control to select STB You can also use the FUNCTION button on the main unit The mode switches as follows DVD CD STB AUX FM AM 4 DIGITAL OUT S VIDEO OUT S VIDEO IN VIDEO OUT Connect to either Video In or S Video In but not both Set Top Box Coaxial Cable not supplied If both Video In and S Video In are connected compos...

Page 19: ...re to match connector colors Connect S Video Out on the DVD player to S Video In on the TV 1 Connect S Video In to S Video Out on your video component Alternatively connect Video In to Video Out on your TV 2 3 4 AUDIO OUT VIDEO OUT S VIDEO OUT S VIDEO IN Example Analog signal components such as a VCR Camcorder and TV Connecting an External Analog Component S Video Cable Audio Cable If the external...

Page 20: ...o Out MONO to Audio In MONO on your external amplifier 1 If you have a Stereo amp connect Connect Audio Out STEREO to Audio In STEREO on your external amplifier 2 Connecting to an External Amplifier External Amplifier You can connect Audio Out to your external amplifier ...

Page 21: ... connection 1 Connect the FM antenna supplied to the FM 75Ω COAXIAL terminal as a temporary measure 2 Slowly move the antenna wire around until you find a location where reception is good then fasten it to a wall or other rigid surface If reception is poor connect an outdoor antenna Before attaching a 75Ω coaxial cable with a standard type connector disconnect the supplied FM antenna 1 Connect the...

Page 22: ... TV s video format TV Broadcast System Before Using Your DVD Player Your DVD player is capable of playing DVD VCD CD MP3 and JPEG discs Depending on the disc you are using these instructions may vary slightly Read the instructions carefully before using 21 1 Plug the power cord into the AC power supply 4 Press TV VIDEO button to select VIDEO mode ...

Page 23: ... Enabled for TV Operation POWER CHANNEL VOLUME TV VIDEO and Numeric 0 9 buttons Press MODE button To Operate the TV and DVD Player with a Single Remote Control 2 3 Press the MODE button so that the TV indicator on the remote control flashes TV DVDRECEIVER TV DVDRECEIVER Press the POWER button to turn on the TV 5 6 Press the MODE button until the DVD RECEIVER indicator on the remote lights Press DV...

Page 24: ... list of MP3s on the CD will appear on the TV screen Something like you Back for good Love of my life More than words I need you My love Uptown girl DVDRECEIVER SMARTNAVI If pressed once PRESS PLAY is displayed and the stop position will be stored in memory If PLAY PAUSE button or ENTER button is pressed playback resumes from the stop position This function works only with DVDs If pressed twice ST...

Page 25: ...tions called chapters appears on the TV screen If this symbol appears on the TV screen while buttons are being operated that operation is not possible with the disc currently being played What is a Track File A section of video or a music file recorded on a VCD CD or MP3 CD Screen Display DVD display VCD display CD display MP3 CD display TITLE display CHAPTER display TRACK FILE display ELAPSED TIM...

Page 26: ...ch time the button is held down during playback the playback speed changes as follows Press SLOW button Each time the button is pressed during playback the playback speed changes as follows Slow Playback DVD VCD 25 Reverse slow playback does not work with VCDs Note ...

Page 27: ...u Back for good Love of my life More than words I need you My love Uptown girl DVDRECEIVER SMARTNAVI Something like you Back for good Love of my life More than words I need you My love Uptown girl DVDRECEIVER SMARTNAVI Something like you Back for good Love of my life More than words I need you My love Uptown girl DVDRECEIVER SMARTNAVI DVD VCD During fast playback of a CD or MP3 CD sound is heard o...

Page 28: ...TITLE Repeatedly plays the selected title RANDOM Plays tracks in random order A track that has already been played may be played again TRACK Repeatedly plays the selected track FOLDER Repeatedly plays all tracks in the selected folder DISC Repeatedly plays the entire disc OFF Cancels Repeat Playback To Select a Repeat Playback Mode in the Disc Information Screen Press INFO button twice 1 Press Cur...

Page 29: ...utton twice A A REPEAT A A B REPEAT A B The specified segment will be played repeatedly 4 Press ENTER button at the end of the segment When ENTER button is pressed the selected position will be stored in memory 3 Press Cursor buttons to select A and then press ENTER button at the beginning of the segment To return to normal playback press Cursor buttons to select OFF DVD VCD CD Note OPERATION ...

Page 30: ... Cursor button to move to ANGLE display 1Press INFO button 1 3 Each time the button is pressed the angle changes as follows 3 Press Cursor buttons or numeric buttons to select the desired angle 2 3 3 3 1 3 1 3 The Angle function works only with discs on which multiple angles have been recorded Note ...

Page 31: ...r area of the displayed image Zoom Screen Enlarge Function DVD VCD 2 Press Cursor buttons to move to the area you want to enlarge 1Press ZOOM button Each time the button is pressed the zoom level changes as follows 3 Press ENTER button OPERATION SELECT ZOOM POSITION ...

Page 32: ...ss INFO button twice EN 2 3 JA 3 3 Audio Language Selection Function DVD Subtitle Language Selection Function DVD KO 1 3 KO 01 03 OFF EN 02 03 JA 03 03 OFF 03 2 Press Cursor button to move to SUBTITLE display 1Press INFO button twice 3 Press Cursor button or numeric buttons to select the desired subtitle You can use the SUBTITLE button on the remote control to select a subtitle language Depending ...

Page 33: ... a Title Track 4 Press Cursor buttons or numeric buttons to select the desired chapter and then press ENTER button 01 05 025 040 0 00 01 1 1 Moving to a Chapter 6 Press the numeric buttons to select the desired time and then press ENTER button 01 05 028 040 1 30 00 1 1 Moving to a Specific Time 3 Press Cursor buttons to move to Chapter display Moving to a Chapter 01 05 025 040 1 17 30 1 1 5 Press ...

Page 34: ...Press Cursor buttons to move to DISC MENU and then press ENTER button 4 Press ENTER button 3 Press Cursor buttons to select the desired item PBC Playback Control Function When playing a VCD version 2 0 you can select and view various scenes according to the menu screen PBC ON This VCD disc is version 2 0 The disc is played back according to the menu screen Some functions may be disabled When some ...

Page 35: ... title of each movie Depending on the disc this function may either not work at all or may work differently 2 Press Cursor button to move to Title Menu DVD 1 Press MENU button 3 Press ENTER button The title menu appears 34 Press MENU button to exit the setup screen OPERATION ...

Page 36: ... OSD language is set to English by default 2 1 Press MENU button Press Cursor button to move to Setup and then press ENTER button Press RETURN button to return to the previous level Press MENU button to exit the setup screen ...

Page 37: ... on the disc 4 Once the setup is complete if the language was set to English OSD will be displayed in English 3 Selecting the Subtitle Language recorded on the disc Selecting the Disc Menu Language recorded on the disc Press ENTER button 5 Press Cursor button to select the desired item and then press ENTER button Press Cursor button to select the desired language and then press ENTER button SETUP ...

Page 38: ...s ENTER button Once the setup is complete you will be taken to the previous screen Press Cursor button to move to TV DISPLAY and then Press Cursor button to select the desired item and then press ENTER button Press RETURN button to return to the previous level Press MENU button to exit the setup screen ...

Page 39: ...ode on your widescreen TV You can enjoy the widescreen aspect Select this to play a 16 9 picture in the letter box mode on a conventional TV Black bars will appear at the top and bottom of the screen Select this to play a 16 9 picture in the pan scan mode on a conventional TV You can see the central portion of the screen only with the sides of the 16 9 picture cut off 4 3LB 4 3 Letterbox WIDE 4 3P...

Page 40: ...ing Parental Controls Rating Level Use this to restrict playback of adult or violent DVDs you do not want children to view 2 1Press MENU button Press Cursor button to move to Setup and then press ENTER button ...

Page 41: ... setup is complete you will be taken to the previous screen If you have selected Level 6 you cannot view DVDs with Level 7 or higher The higher the level the closer the content is to violent or adult material 3 5 Press Cursor button to move to PARENTAL and then press ENTER button Press Cursor buttons to select the desired rating level and then press ENTER button Enter the password and then press E...

Page 42: ...2 1 Press MENU button Press Cursor button to move to Setup and then press ENTER button 41 Setting the Password You can set the password for the Parental rating level setting ...

Page 43: ... The setting is complete 3 5 Press RETURN button to return to the previous level Press MENU button to exit the setup screen 42 Press Cursor button to move to PASSWORD and then press ENTER button Press ENTER button Enter the password and then press ENTER button SETUP ...

Page 44: ... move to TEST TONE and then press ENTER button The test tone will be sent to L R SW in that order If the button is pressed again at this time the test tone will stop To end the test tone press TEST TONE button Press TEST TONE button Test tone will be produced as follows When playing a DVD or CD this will work only in Stop mode Use this function to check that each speaker is correctly connected and...

Page 45: ...olume level can be adjusted in steps from 6dB to 6dB The sound gets louder as you move closer to 6dB and smaller as you get closer to 6dB 2 1 Adjusting Front Speaker Balance Adjusting Subwoofer Speaker Level Press SOUND EDIT button and then press Cursor Press RETURN button to return to the previous level Press MENU button to exit the setup screen Press SOUND EDIT button and then press Cursor Note ...

Page 46: ...up actually sound like the five separate speakers in a full bore home theater system You can enjoy DVD movies with all the exciting effects intended by their directors and sound mixers Gaming takes on a thrilling new third dimension Even with stereo music CDs MP3 files and TV shows you ll hear convincing realistic surround sound Dolby Virtual Speaker technology is a next generation process that re...

Page 47: ...ess MENU button Press Cursor button to move to Audio and then press ENTER button Press the button to increase the effect and press the button to reduce it 3 4 Press Cursor button to move to DRC and then press ENTER button Press Cursor repeatedly to adjust the DRC Press RETURN button to return to the previous level Press MENU button to exit the setup screen ...

Page 48: ...hen press and hold button to automatically search the band AutomaticTuning2 Press STOP to select MANUAL and then briefly press to tune in to a lower or higher frequency Manual Tuning Each time the button is pressed the sound switches between STEREO and MONO In a poor reception area select MONO for a clear interference free broadcast Press MO ST button to listen in Mono Stereo This applies only whe...

Page 49: ...xample Presetting FM 89 1 in the memory Press to select 89 10 Press the FM button and select the FM band Press the TUNER MEMORY button before PRGM disappears from the display PRGM disappears from the display and the station is stored in memory 5 4 You can select between 1 and 15 TITLE RDS RT ST TUNED kHz MHz TITLE CHAP RDS RT ST TUNED kHz MHz Press the TUNER MEMORY button Press the TUNER MEMORY bu...

Page 50: ...50 OFF TITLE CHAP PRGM RDS RT ST TUNED kHz MHz Press SLEEP button Sleep Timer Function You can set the time that the DVD player will shut itself off Adjusting Display Brightness You can adjust the brightness of the display on the main unit so it won t interfere with your movie viewing To cancel the sleep timer press SLEEP button until OFF appears on the display Press DIMMER button MUTE flash in th...

Page 51: ...the display and all settings will return to the default values 2 1 Press the VOL SET button Use the VOLUME control on the main unit or the VOLUME buttons on the remote control to adjust the maximum volume level With no disc in the unit and NO DISC on the display press the F RESET button Factory Reset If necessary use only to reset the default settings Using the F RESET function will erase all stor...

Page 52: ...pressed No sound is heard during fast playback slow playback and step motion playback Are the speakers connected properly Is the speaker setup correctly customized Is the disc severely damaged Sound is not produced Was the DVD player suddenly moved from a cold place to a warm one When condensation forms inside the player remove the disc and let the player stand for 1 or 2 hours with the power on Y...

Page 53: ...y Turn off the power and hold the button on the main unit for longer than 5 seconds Using the RESET function will erase all stored settings Do not use this unless necessary The password for rating level has been forgotten The main unit is not working Example Thepowergoesoutor strangenoiseisheard The DVD player is not working normally Is the antenna connected properly If the antennas input signal i...

Page 54: ...utside of the disc Handling discs Disc Storage Handling and Storing Discs Cautions on Handling and Storing Discs Small scratches on the disc may reduce sound and picture quality or cause breaks in playback Be especially careful not to scratch discs when handling them Do not allow the discs to become contaminated with dirt Do not load cracked discs or discs that are scratched Caution Condensation m...

Page 55: ... accessories applications installations repairs external wiring or connectors not supplied and authorized by SAMSUNG or which damage this product or result in service problems incorrect electrical line voltage fluctuations and surges customer adjustments and failure to follow operating instructions cleaning maintenance and environmental instructions that are covered and prescribed in the instructi...

Page 56: ...AH68 01340B SAMSUNG ELECTRONICS AMERICA INC SERVICE DIVISION 400 Valley Road Suite 201 Mount Arlington NJ 07856 1 800 SAMSUNG 1 800 726 7864 www samsungusa com ...

Reviews: