

This product can play 3D contents through an HDMI cable. To implement the 3D effect,
connect a 3D device (3D-compliant AV receiver, 3D-compliant TV) to the product using an
HDMI cable, and play the 3D content while wearing 3D vision glasses.
Selecting the 3D Function
Move to Home menu.
Press the ◄► buttons to select
Settings
, and then press the
ENTER
button.
Press the ▲▼ buttons to select
Display
, and then press the
ENTER
button.
Press the ▲▼ buttons to select
3D
, and then press the
ENTER
button.
- You can select a desired 3D Mode or TV Screen Size.
1.
2.
3.
4.
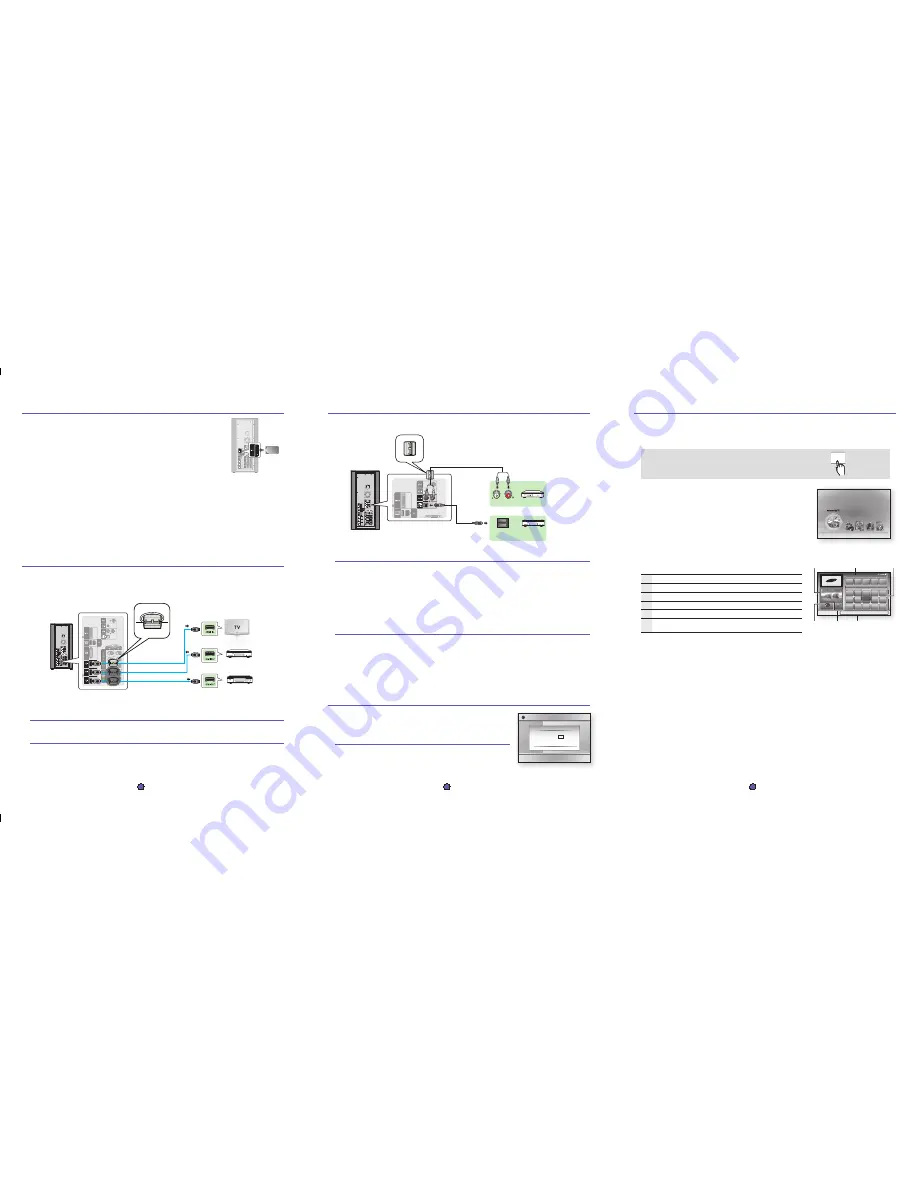
OPTICAL : Connecting an External Digital Component
For components with digital optical audio signals such as a Cable Box/Satellite receiver (Set-Top Box).
Connect the Digital Input (OPTICAL) on the product to the Digital Audio Output of the external digital component using a digital optical
cable.
Press the
FUNCTION
button on the product to select
D.IN
input.
The mode switches as follows :
BD/DVD
D. IN
AUX
iPod
HDMI1
HDMI2
TUNER
NOTE
To see video from your Cable Box/Satellite receiver, you must connect its video output directly to a TV.
If you are using a digital optical connection for audio, do not connect the Cable Box/Satellite receiver to your home theater
using an HDMI connection.
AUX : Connecting an External Analog Component
For analog audio signal components such as a VCR.
Connect AUX IN (Audio) on the product to the Audio Out of the external analog component.
Be sure to match connector colors.
Press the
FUNCTION
button on the remote control to select
AUX
input.
The mode switches as follows :
BD/DVD
D. IN
AUX
iPod
HDMI1
HDMI2
TUNER
NOTE
You can connect the Video Output jack of your VCR to the TV, and connect the Audio Output jacks of the VCR to this product.
1.
2.
•
✎
1.
•
2.
•
✎
5
- English
6
- English
AH68-02298Y
5
Connecting Audio from External Components
3
Connecting the speakers
7
Using Internet@TV
Connect this product to a network to download various for-a-fee or free-of-charge applications.
Enjoy contents such as news, weather forecast, stock market quotes, games, movies, and music.
You can also initiate this function by pressing the
INTERNET@
button on the remote control.
Move to the home menu.
- The home menu appears when you power on the product.
Use the ◄► buttons to select
Internet@TV
and press the
ENTER
button.
In the start screen of the Internet@TV service, you will see the service agreement
screen. You must agree to the service terms and conditions before you can use
the Internet@TV service.
After you have signed off on the service agreement, the Internet@TV service
starts updating. It takes several minutes. When the update is complete, you will
see the Internet@TV menu screen.
1.
2.
3.
4.
NOTE
Samsung Electronics shall take no legal responsibility for any interruption of the Internet@TV service caused by the service
provider for any reasons.
The Internet@TV service is to download and process data via the Internet so that you can enjoy the contents on the TV screen.
If the Internet connection is unstable, the service may be delayed or interrupted. If the connection is especially unstable, your
home theater may turn off automatically.
If this occurs, check the Internet connection and try again.
For more information about an Internet@TV service, visit the web site of the applicable service provider.
The provided services are subject to change, depending on the Internet@TV service provider.
✎
internet radio
You Tube
No Disc
a
Change Device
d
View Devices
"
Enter
Please activate Internet@TV service
to enjoy a variety of Internet Services.
Internet@TV at a Glance
1
Commercial
: A Samsung commercial appears.
2
Recommended
: Recommended contents, which are always displayed.
3
My Application
: Displays a list of service contents available.
4
Navigation Help
: Displays remote control buttons available.
5
Settings
: You can set the system values and create acconuts, etc.
6
Samsung AppS
: You can download various for-a-fee or free-of-charge widget
services.
Contents 1
Contents 2
Contents 3
Contents 4
Contents 1
Contents 2
Contents 3
My Applications
Recommended
by Date 1/3
a
Login
b
Mark as Favorite
d
Sort by
'
Return
1
5
6
4
2
3
Settings
Samsung AppS
6
Playing 3D contents
Display
Audio
System
Network
Language
Security
General
Support
Settings
3D
Still Mode
: Auto
3D Mode
: Auto
TV Screen Size :
55 inch
>
Move
s
Select
r
Return
3D
4
Connecting External Devices to Your TV via HDMI
HDMI OUT : Connecting to a TV with an HDMI Cable
Connect an HDMI cable (not supplied) from the HDMI OUT jack on the back of the subwoofer to the HDMI IN jack on your TV.
HDMI IN : Connecting to an External Component with an HDMI Cable
Connect an HDMI cable (not supplied) from the
HDMI IN1
or
HDMI IN2
jack on the back of the product to the HDMI OUT jack on
your digital devices.
Press the
FUNCTION
button to select
HDMI1
or
HDMI2
input.
The mode switches as follows :
BD/DVD
D. IN
AUX
iPod
HDMI1
HDMI2
TUNER
1.
2.
HDMI is a standard digital interface for connection to such devices as a TV, projector, DVD player, Blu-ray player, set top box and more.
HDMI removes any loss of signal from analog conversion, enabling you to enjoy video and audio sound quality as it was originally created in the
digital source.
CAUTION
Do not let children play with or near the speakers. They could get hurt if a speaker falls.
When connecting the speaker wires to the speakers, make sure that the polarity (+/ –) is correct.
Keep the subwoofer speaker out of reach of children to prevent children from inserting their hands or alien
substances into the duct (hole) of the subwoofer speaker.
Do not hang the subwoofer on the wall through the duct (hole).
!
NOTE
If you place a speaker near your TV set, screen color may be distorted because of the magnetic fi eld generated
by the speaker. If this occurs, move the speaker away from your TV set.
✎
4
- English
With the product turned off, insert the TX card into the TX Card Connection (WIRELESS) on the back of
the Subwoofer.
Hold the TX card so that the label "WIRELESS" faces leftward and insert the card into the port.
The TX card enables communication between the product and the wireless receiver module.
Connect the left and right surround speakers to the wireless receiver module.
Plug the power cord of the wireless receiver module into the wall outlet.
Turn on the product. The product and wireless receiver module will communicate with each other
and you will hear sound from the Surround speakers.
4.
•
•
5.
6.
7.
TX card
INTERNET
@
DVD or Blu-ray Player
SAT
(Satellite/Set top box)
HDMI OUT
HDMI IN
HDMI IN
Loop the HDMI cable once and attach
the ferrite core (Large) as shown.
Attach one ferrite core (large) to the cable that is
connected to HDMI OUT; attach the other one to the
cable that is connected to either HDMI1 or HDMI2.
Optical Cable
(not supplied)
Audio Cable
(not supplied)
If the external analog component has only one
Audio Out, connect either left or right.
Set-Top Box
AUX
White
Red
OPTICAL
VCR
Attach the ferrite core (Large) as close to AUX IN as
possible with no loop of core made on the audio cable.
HT-C9950W_XAA_QG_0820.indd 4-6
HT-C9950W_XAA_QG_0820.indd 4-6
2010-08-30 5:55:03
2010-08-30 5:55:03


