background image

31

Getting Started

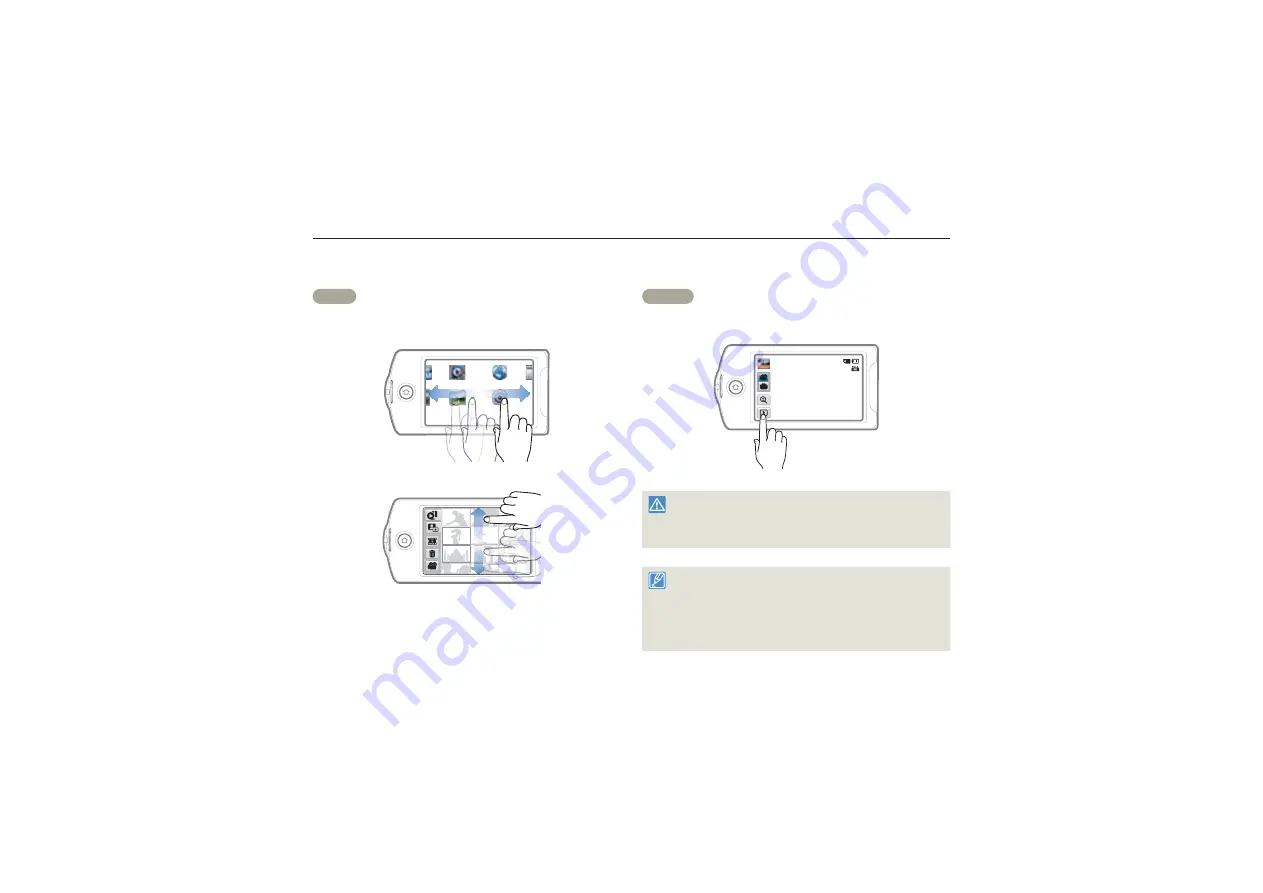
Drag

Drag the touch screen up, down, left, or right to select the desired 
items or files. 

Manual

Art Film

Social Sharing Auto Backup

Vertical HD 

Recording

Album

Settings

1

Albu

1

Albu

1

1

1

1

1

1

1

1

1

1

Touch

Slightly touch the items to select or execute with your finger. 

STBY

 00:00:00 [253Min]

Do not place any protective film on the LCD screen.
If you leave a film attached for a long while, strong adhesion between 
the film and the surface of the screen may cause a malfunction of 
the touch screen.


Be careful not to accidentally press the button near the LCD screen 
while using the touch screen.
The tabs and icons that appear on the LCD screen depend on the 
current recording/playback status of your camcorder.
The camcorder does not recognize touches if you touch more than two 
points on the screen at the same time. Touch one point at a time. 

Using the touch screen

The touch screen lets you playback and recording with a simple touch of your finger. Place your hand on the rear side of the LCD screen to 
support it. Then, touch the items displayed on the screen.

Summary of Contents for HMX-QF20BN

Page 1: ...Manual HMX QF20BN HMX QF20UN High Definition Digital Camcorder www samsung com register For video recording use a memory card that supports faster write speeds Recommended Memory Card 6MB s Class 6 or above ...

Page 2: ...atus near water 6 Clean only with dry cloth 7 Do not block any ventilation openings Install in accordance with the manufacturer s instructions 8 Do not install near any heat sources such as radiators heat registers stoves or other apparatus including amplifiers that produce heat 9 Do not defeat the safety purpose of the polarized or grounding type plug A polarized plug has two blades with one wide...

Page 3: ...ON This CAMCORDER may be equipped with either a polarized 2 wire AC line plug a plug having one blade wider than the other or a 3 wire grounding type plug a plug having a third grounding pin If you are unable to insert the plug fully into the outlet try reversing the plug If the plug still fails to fit contact your electrician to replace your outlet Do not defeat the safety purpose of the polarize...

Page 4: ...ed service personnel 26 DAMAGE REQUIRING SERVICE Unplug this CAMCORDER from the wall outlet and refer servicing to qualified service personnel under the following conditions a When the power supply cord or plug is damaged b If any liquid has been spilled onto or objects have fallen into the CAMCORDER c If the CAMCORDER has been exposed to rain or water d If the CAMCORDER does not operate normally ...

Page 5: ...munications However there is no guarantee that interference will not occur in a particular installation If this equipment does cause harmful interference to radio or television reception which can be determined by turning the equipment off and on the user is encouraged to try to correct the interference by one or more of the following measures Reorient or relocate the receiving antenna Increase th...

Page 6: ...hen you operate the camcorder These warning signs are here to prevent injury to you and others Please follow them explicitly After reading this section keep it in a safe place for future reference Before reading this user manual Precautions Warning When using the AC power adaptor with your camcorder connect the adaptor to an outlet with protective grounding Do not expose the camcorder battery to d...

Page 7: ...show performance or exhibition for personal enjoyment we strongly recommend that you obtain permission beforehand Important information on use About this user manual Thank you for purchasing this Samsung Camcorder Please read this user manual carefully before you use the camcorder and keep it handy for future reference Should your camcorder fail to operate correctly refer to Troubleshooting pages ...

Page 8: ...arks of their respective holders Furthermore and are not mentioned in each case in this manual The SD SDHC and SDXC logos are trademarks of SD 3C LLC Microsoft Windows Windows Vista Windows 7 and DirectX are either registered trademarks or trademarks of the Microsoft Corporation in the United States and or other countries Intel Core Core 2 Duo and Pentium are the registered trademarks or trademark...

Page 9: ...tering the camcorder or AC power adaptor could cause electric shock malfunctions or defects Do not aim the camcorder directly into the sun Doing so could cause eye injuries as well as lead to malfunctioning of internal parts of the product Do not bend the power cord or damage the AC power adaptor by pressing on it with a heavy object There may be a risk of fire or electric shock Do not disconnect ...

Page 10: ...tery or memory card is swallowed by a child consult physician immediately Do not plug or unplug the power cord with wet hands There is a risk of electric shock Keep the power cord unplugged when not in use or during lightning storms There is a risk of fire When cleaning the AC adaptor unplug the power cord There is a risk of malfunction or electric shock If the camcorder emits an abnormal sound or...

Page 11: ... soot or steam Thick soot or steam could damage the camcorder case or cause a malfunction Do not use the camcorder near dense exhaust gas generated by gasoline or diesel engines or near a corrosive gas such as hydrogen sulfide Doing so may corrode the external or internal terminals disabling normal operation Do not expose the camcorder to insecticide Insecticide entering the camcorder could cause ...

Page 12: ...y cause overheating fire explosion electric shock or personal injuries caused by abnormal operation Place the camcorder on a stable surface that is well ventilated Keep important data separately Samsung is not responsible for data loss Only plug the adaptor plug into a socket that is easily accessible If any problem occurs with the product you must pull the plug out of the socket to disconnect the...

Page 13: ...6 Recording videos 37 Recording videos in portrait mode 39 Tagging great moments while recording 40 Recording photos 41 Recording with ease for beginners SMART AUTO 42 Zooming 43 Extended functions 44 Using the Manual modes 45 White Balance 45 EV Exposure Value 46 Back Light 47 Focus 48 Super C Nite 49 Self Timer 50 Cont Shot 50 Using the Art Film modes 51 Fader 51 Digital Effect 52 Using the Art ...

Page 14: ...e Wakeup on LAN WOL feature 77 Using with other devices 79 Connecting to a TV 80 Connecting to a high definition TV with HDMI 80 Connecting to a regular TV 81 Viewing on a TV screen 82 Dubbing videos to VCR or DVD HDD recorders 83 Printing photos with a PictBridge photo printer 84 Transferring files to your Windows computer 86 Transferring files with Intelli studio 87 Transferring files by connect...

Page 15: ... ejecting the battery 15 Inserting ejecting a memory card not supplied 16 Charging the battery 20 Checking the battery state 21 Turning your camcorder on off 24 Performing the initial setup 25 Selecting the language 26 Learning icons 27 Using the touch screen 31 Using the Home screen 34 Accessing the Home screen 34 Icons on the Home screen 34 Using the grip belt 35 ...

Page 16: ...able AD39 00194A User manual CD AD46 00423A Quick start guide AD68 06831A Optional accessories Mini HDMI cable AD39 00179A External battery charger IA BC9UA4 Carrying case AD69 00929A Memory card The exact appearance of each item may vary by model The contents may vary depending on the sales region You can purchase parts and accessories consulting with your local Samsung dealer SAMSUNG is not resp...

Page 17: ...button 4 LCD screen Touch screen 5 Internal microphone 6 Internal speaker 7 Jack cover AV HDMI micro USB 8 AV Audio Video jack 9 HDMI jack 10 micro USB jack Be careful not to cover the internal microphone and lens during recording 2 3 4 6 7 8 9 10 1 2 5 Camcorder layout ...

Page 18: ...s open close switch 2 Grip belt 3 Jack cover DC IN 4 DC IN jack 5 T W button 6 Like It button 7 Recording start stop button 8 Battery slot 9 Memory card slot 10 Battery Memory card cover 11 Battery release switch 12 Tripod receptacle 8 10 11 12 9 1 3 4 2 7 6 5 ...

Page 19: ...he figure 3 Close the battery slot cover To eject the battery 1 Slide and open the battery slot cover as shown in the figure 2 Slide the Battery release switch in the direction as shown in the figure and pull out the battery 3 Close the battery slot cover Samsung is not responsible for problems that are caused by using unapproved batteries If you use batteries from other manufacturers there is a d...

Page 20: ...bel portion of the card is facing up and the camcorder is placed as shown in the figure 3 Close the memory card cover To eject a memory card 1 Slide and open the memory card cover as shown in the figure 2 Gently push the memory card to eject it 3 Close the memory card cover To avoid the data loss turn off the camcorder by pressing and hold the Home button before inserting or ejecting the memory ca...

Page 21: ...y and your recordings may be lost The memory cards released after this camcorder may not be compatible with the camcorder When the camcorder operates with 6MB S Class 6 or above memory cards it can be stable SD SDHC SDXC memory cards have a mechanical write protection switch Setting the switch prevents accidental erasure of files recorded on the card To enable writing move the switch up in the dir...

Page 22: ...ard terminals Use a soft dry cloth to clean the terminals if required Do not paste anything other than the label provided with the card on the label pasting area of the card Do not use a damaged memory card Be careful to keep the memory card out of the reach of children who might swallow it The camcorder supports SD SDHC and SDXC memory cards giving you a wider choice of cards The data storage spe...

Page 23: ...000 bytes Actual formatted capacity may be less as the internal firmware uses a portion of the memory Actual recording times may differ depending on the recording conditions and the subject The higher the quality and resolution the more memory the camcorder uses Lower resolution and quality increases the recording time but the image quality may suffer The bit rate automatically adjusts to the imag...

Page 24: ...ing the AC power adaptor Disconnect the AC power adaptor from the wall outlet immediately if any malfunction occurs while using your camcorder Do not place the AC Adaptor in a confined space when you use it such as between a wall and a piece of furniture When charging if both the USB cable and AC power adaptor are connected the AC power adaptor will override the USB You cannot operate the camcorde...

Page 25: ...level display The battery level display shows the amount of battery power remaining in the battery Battery level icon State Message Fully charged 25 50 used 50 75 used 75 95 used 95 98 used Exhausted flickers The camcorder will be forced to turn off after 3 minutes Change the battery as soon as possible After 3 seconds the camcorder turns off Low Battery The figures above are based on a fully char...

Page 26: ...Time Lapse function Continuous Recording without zoom The continuous recording time above shows the available recording time when you record without using any other function after recording starts The battery may discharge 2 3 times faster than this reference if you use the recording start stop the zoom and the playback functions Prepare additional batteries with the expectation that the actual re...

Page 27: ... a cool dry place Charge an extra battery before using the camcorder outdoors in cold temperatures The cold temperature may shorten the available recording time Carry the supplied AC power adaptor to charge the battery while travelling Check whether the battery terminal is damaged if the battery falls or is dropped If you install a battery with the damaged terminal into the camcorder you can damag...

Page 28: ...gnosis function when you turn it on pages 104 109 If the Quick On STBY function is set to 5 Min and you close the LCD screen when the power is on the power saving mode activates page 101 The camcorder turns on automatically if connecting the AC power adaptor or inserting the battery to the camcorder with the LCD screen open When using this camcorder for the first time When you use your camcorder f...

Page 29: ...rd by 1 hour Internal rechargeable battery Your camcorder includes a internal rechargeable battery that retains the date and time settings even after the power is turned off If the battery is depleted the current date time values are reset to the default values If this occurs you need to recharge the internal rechargeable battery see below and then re set the current date and time Charging the int...

Page 30: ...glish ǎᨕ Français Deutsch Italiano Español Português Nederlands Svenska Suomi Norsk Dansk Polski eština Slovensky Magyar Român Srpski Hrvatski ၭ ၭ ၭ ߨ ၭ 瀌煓铅 ęðû Türkçe Language options may be changed without prior notice The camcorder retains the language you select even when not connected to the battery or AC power The date and time format may change depending on the language you selected Selecti...

Page 31: ...2 12 00 AM Date Time Right of the LCD screen Icon Description Storage media Memory card Battery information remaining charge level Optical zoom Digital zoom bar Video resolution Tele Macro OIS Duo The icons are based on an 32GB SDHC memory card capacity The screen above is an example and may differ from the actual display For warning icons and messages see pages 104 109 The illustrated items above...

Page 32: ...on Description 9999 Photo image counter total number of recordable photos Time Zone Visit JAN 01 2012 12 00 AM Date Time Right of the LCD screen Icon Description Storage media Memory card Battery information remaining charge level Optical zoom Digital zoom bar Photo resolution Tele Macro OIS Duo The total number of recordable photos is based on available space on the storage media The largest numb...

Page 33: ...reen Icon Description Video playback mode Operating status playback pause etc 00 00 00 00 00 55 Time code elapsed time recorded time 100_0001 File name File number Storage media memory card Battery information remaining battery level Playback progress bar Video resolution Video playback option Like It Erase protection Bottom of the LCD screen Icon Description Volume tab Thumbnail view tab MENU tab...

Page 34: ...ent image total number of recorded images 100_0001 File name file number Storage media memory card Battery information remaining battery level Photo resolution Erase protection Bottom of the LCD screen Icon Description Thumbnail view tab MENU tab Slide show start tab Icon Description Video thumbnail view tab Photo thumbnail view tab Delete tab Icon Description Photo recording mode tab Erase protec...

Page 35: ...lm and the surface of the screen may cause a malfunction of the touch screen Be careful not to accidentally press the button near the LCD screen while using the touch screen The tabs and icons that appear on the LCD screen depend on the current recording playback status of your camcorder The camcorder does not recognize touches if you touch more than two points on the screen at the same time Touch...

Page 36: ... can switch the on screen information display mode Each time you touch the LCD screen the full and minimum display modes alternate Minimum display mode STBY Full display mode STBY 00 00 00 253Min Warning icons and messages may appear depending on the recording conditions pages 104 109 ...

Page 37: ... rotate it up to 180 towards the lens and up to 90 backward To view recordings more conveniently rotate the screen by 180 towards the lens then fold it back to the body When you reverse and close the LCD screen by rotating it to 180 towards the lens the camcorder switches to the playback mode automatically Excessive rotation may damage the connective hinge between the screen and the camcorder Clea...

Page 38: ... automatically by the camcorder page 42 Manual Records a video or photo using manually setting items for scene conditions pages 45 50 Art Film Records a video or photo using items for a fun and unique look pages 51 52 Art Time Lapse Records a time lapse video using Art Time Lapse items pages 53 54 Vertical HD Recording Records a video in portrait mode page 39 Album Views videos or photos using pla...

Page 39: ...mcorder is designed for you to use conveniently with either your right or left hand If you want to use this function set Switch Grip to On in the Settings menu page 101 When you hold the camcorder with your right hand STBY 00 00 00 253Min When you hold the camcorder with your left hand STBY 00 00 00 253Min If you make the grip belt too tight and use excessive force to insert your hand the grip bel...

Page 40: ...out basic functions for video and photo shooting Recording videos 37 Recording videos in portrait mode 39 Tagging great moments while recording 40 Recording photos 41 Recording with ease for beginners SMART AUTO 42 Zooming 43 ...

Page 41: ...ecording start stop button The recording icon appears and recording starts 00 00 00 253Min 4 To stop recording press the Recording start stop button again Recording pause resume The camcorder allows you to pause temporarily while recording a video With this function you can record your favorite scenes as a single video Touch the Pause tab to pause while recording Touch the Recording tab to resume ...

Page 42: ...he power cable battery is disconnected or recording is disabled during recording the system is switched to the data recovery mode While data is being recovered no other function is enabled When the recording time is short the data recovery might fail You can adjust the brightness of the LCD screen in the menu options Adjusting the LCD screen does not affect the image being recorded page 97 The men...

Page 43: ...rtrait mode vertical position Smart Auto Manual Art Film Art Time Lapse Vertical HD Recording Album 1 2 Rotate the camcorder to 90º for vertical recording STBY 00 00 00 253Min 3 Select a subject to record 4 Press the Recording start stop button The recording icon appears and recording starts 00 00 00 253Min 5 To stop recording press the Recording start stop button again In portrait mode you can re...

Page 44: ...rt stop button again Understanding the Like It function When the camcorder extracts the scenes tagged as Like It and creates one file with them the file is saved on the video thumbnail view Like It Like It Like It During a video recording The camcorder tags the scene recorded between before 3 seconds and after 5 seconds when pressing the Like It button while recording in all video recording modes ...

Page 45: ...hotos as it may damage the storage media or data The recordable number of photos varies depending on the photo resolution page 19 The camcorder does not record audio when you take photos You can adjust the brightness of the LCD screen in the menu options Adjusting the LCD screen does not affect the image being recorded page 97 For on screen display information see page 28 For various functions ava...

Page 46: ...e Appears when recording an outdoor scene Landscape Appears when recording images using close up Macro Appears when recording images of clear skies Blue sky Appears when recording images of forested areas Natural green Appears when recording images of sunsets Sunset Appears when the camcorder and subject are stationary for a while Tripod Most settings are automatically adjusted in the Smart Auto m...

Page 47: ... clarity Use the digital zoom function when you want to zoom more than the optical zoom range page 96 Focusing may become unstable when you record with a fast zoom or zoom into a subject standing too far away If this occurs use the manual focus function Video recording mode only page 48 The minimum distance you can have between the camcorder and subject while maintaining sharp focus is about 1cm a...

Page 48: ... and photo by selecting a mode Using the Manual modes 45 White Balance 45 EV Exposure Value 46 Back Light 47 Focus 48 Super C Nite 49 Self Timer 50 Cont Shot 50 Using the Art Film modes 51 Fader 51 Digital Effect 52 Using the Art Time Lapse mode 53 ...

Page 49: ...ormal daylight Adjusts the white balance according to outdoor lighting conditions Cloudy Use when recording in the shade or cloudy weather Fluorescent Use when recording under white fluorescent lights Tungsten Use when recording under halogen lamps and incandescent lights Custom WB Manually adjust the white balance to match the light source or situation Understanding White Balance White balance WB...

Page 50: ...ng to Auto may provide better results Cancel the digital zoom function for clear and precise setting page 96 Reset the white balance if light conditions change EV Exposure Value Depending on the intensity of the ambient light your videos and photos may be too bright or dark In these cases you can adjust the exposure to get a better videos and photos 1 Press the Home button touch Manual EV tab 2 To...

Reviews: