Samsung HL-S5065W Owner'S Instructions Manual Download Page 50

English - 50

Channel Control

Viewing the Channel Lists

You can display a list of all channels or your favorite channels.

Preset : To use the Channel Manager function, first run Auto Program (see page 31).
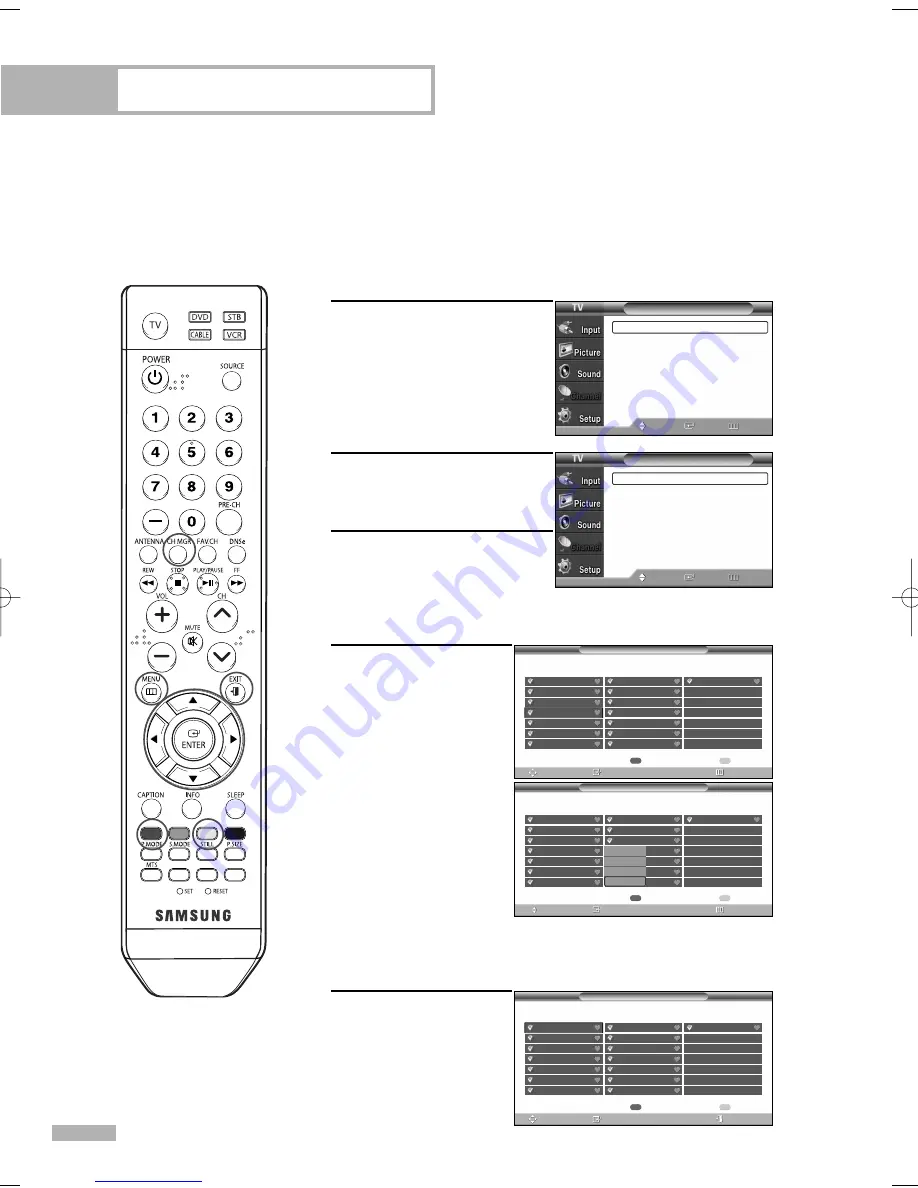
1

Press the MENU button. 
Press the 

or 

button to

select “Channel”, then press
the ENTER button.

2

Press the 

or 

button to

select “Channel Manager”,
then press the ENTER button.

3

Press the ENTER button to
select “All”. If you want to
watch the channel, press the

/

/

œ

/

button to select a channel, then press the ENTER

button and option window will appear.

4

Press the ENTER button to
select “Watch”, then
press the ENTER button
again.
The selected channel
broadcasting window 
will appear.

•  Red button

(List Mode) : If you
press the Red button
repeatedly, the All
Channel List, the
Added Channel List
or the Favorite
Channel List is selected sequentially.

•  Yellow button : Press to delete all channels memorized.

Alternate method

Press the CH MGR button
on the remote control to
display a list of channels.

Channel

Antenna

: Air

Auto Program

Channel Manager

Name

Fine Tune

Signal Strength

LNA

: On

Move

Enter

Return

Channel Manager

All

Added  

Favorite

Default List mode : All

Move

Enter

Return

Channel Manager /All

List Mode

Delete All

Move

Enter

Return

Air 5

Air 2
Air 3
Air 4

Air 5

Air 6
Air 7
Air 8

Air 9
Air 10
Air 11
Air 12
Air 13
Air 14
Air 15

Air 16

Watch

Add

Delete

Favorite

Channel Manager /All

List Mode

Delete All

Move

Enter

Return

Air 2

Air 3
Air 4
Air 5
Air 6
Air 7
Air 8

Air 9
Air 10
Air 11
Air 12
Air 13
Air 14
Air 15

Air 16

Channel Manager / All

List Mode

Delete All

Move

Enter

Exit

Air 2

Air 2

Air 3
Air 4
Air 5
Air 6
Air 7
Air 8

Air 9
Air 10
Air 11
Air 12
Air 13
Air 14
Air 15

Air 16

BP68-00586F-00Eng(048~059)  3/30/06  7:14 PM  Page 50

Downloaded from 

www.Manualslib.com


manuals search engine


Summary of Contents for HL-S5065W

Page 1: ...s HL S4265W HL S5065W HL S5665W HL S6165W HL S6765W HL S5055W Register your product at www samsung com global register This device is a Class B digital apparatus Downloaded from www Manualslib com man...

Page 2: ...roduct is licensed under the following US patents 5 991 715 5 740 317 4 972 484 5 214 678 5 323 396 5 539 829 5 606 618 5 530 655 5 777 992 6 289 308 5 610 985 5 481 643 5 544 247 5 960 037 6 023 490...

Page 3: ...r broadcast This is a big advantage for DTV over analog TV there is no noise ghosting static or scratchy audio 3 How can I connect an antenna in my townhouse co operative apartment condominium or apar...

Page 4: ...Top Box 22 Connecting to Y PB PR 22 Connecting to HDMI High Definition Multimedia Interface 22 Connecting to DVI Digital Visual Interface 23 Connecting a Digital Audio System 23 Connecting to an Anal...

Page 5: ...es 84 Setting the Function Help 84 Menu Transparency Level 85 Using Game Mode 86 Using the V Chip 87 Using the V Chip for Digital channels 97 Viewing Closed Captions On Screen Text Messages 99 Viewing...

Page 6: ...SAMSUNG Downloaded from www Manualslib com manuals search engine...

Page 7: ...Your New Wide TV Downloaded from www Manualslib com manuals search engine...

Page 8: ...he screen as possible Your New Wide TV English 8 When installing the product make sure to keep it away from the wall more than 10 cm 4 inches for ventilation purposes Poor ventilation may cause an inc...

Page 9: ...coder for stereo and bilingual listening Built in dual channel speakers A special sleep timer Widescreen TV with adjustable image size Life like clear images provided by DNle technology My Color Contr...

Page 10: ...items when using the on screen menu Press to change channels and move between items on the on screen menu Press to activate or change a particular item Side Panel Jacks Use the right side panel jacks...

Page 11: ...because if the inner temperature is too high the power will shut off Lamp may be defective Please contact a certified technician LAMP STAND BY TEMP Indication Light is On Light is Blinking Light is O...

Page 12: ...es 19 and 21 VIDEO AUDIO output jacks Sends video audio signals from the TV to an external source such as a VCR These jacks are available only in TV Video and S Video modes Refer to pages 19 and 24 CO...

Page 13: ...annel Television Stereo Press to choose Stereo Mono or SAP Secondary Audio Program 16 Mode TV DVD STB CABLE VCR Selects a target device to be controlled by the Samsung remote control i e TV DVD STB CA...

Page 14: ...control If you won t be using the remote control for a long time remove the batteries and store them in a cool dry place 1 Lift the cover at the back of the remote control upward as shown in the figu...

Page 15: ...Connections Downloaded from www Manualslib com manuals search engine...

Page 16: ...le system you will need to connect an antenna to your TV Antennas with 75 ohm Round Leads If your antenna looks like this it has 75 ohm round leads 1 Plug the antenna lead into the ANT 2 IN AIR on the...

Page 17: ...g the incoming cable into the ANT 1 IN CABLE on the rear panel of your TV Cable with a Cable Box that Descrambles All Channels 1 Find the cable connected to the ANTENNA OUT terminal on your Cable box...

Page 18: ...e IN terminal of the Cable box 3 Connect a coaxial cable between the ANTENNA OUT terminal of the Cable box and the B IN terminal of the RF A B switch 4 Connect another cable between the other OUT term...

Page 19: ...e jacks TV Rear Panel Incoming Cable or Antenna Stereo VCR or 2 1 Connecting a Second VCR to Record from the TV 1 Connect a video cable between the VIDEO OUT jack on the TV and the VIDEO input jack on...

Page 20: ...order connect L mono to the Camcorder audio out using only one audio cable 3 Connect a video cable between the VIDEO IN or S VIDEO IN jack on the TV and the VIDEO or S VIDEO output jack on the Camcord...

Page 21: ...player Connecting to Audio and Video Jacks 1 Connect a set of audio cables between the AUDIO IN 1 or 2 jacks on the TV and the AUDIO OUT jacks on the DVD player 2 Connect a video cable between the VI...

Page 22: ...Please be sure to match the color coded input terminals and cable jacks Connections English 22 TV Rear Panel DTV Set Top Box Incoming Cable or Antenna 1 2 Connecting to HDMI High Definition Multimedia...

Page 23: ...udio systems on the market today A simplified illustration of an audio system is shown below For more information see your audio system owner s manual 1 If your audio system has an optical digital aud...

Page 24: ...ut on the TV the audio output signal is available only when the TV s Internal Mute is set to on Refer to page 79 Connections English 24 TV Rear Panel Amplifier 1 When Internal mute is set to On Sound...

Page 25: ...Operation Downloaded from www Manualslib com manuals search engine...

Page 26: ...ess the ENTER button Selects the antenna to execute the Auto Program Function menu is automatically displayed 3 Press the or button to memorize the channels of the selected connection Press the ENTER...

Page 27: ...6 Press the ENTER button to select Clock Mode Press the or button to select Auto or Manual then press the ENTER button Continued Plug Play Enter Skip Selects a cable signal type for your location Mov...

Page 28: ...n the real time and set time please set the time manually Plug Play Enter Skip Select the time zone where you are located Move Newfoundland Atlantic Eastern Central Mountain Pacific Alaska Hawaii Plug...

Page 29: ...l and Setup 2 Press the or button to select an item you want in the menu Press the or ENTER button to display change or use the selected items Use the ENTER button to enter items in the menu 3 Press t...

Page 30: ...English Espa ol or Fran ais then press the ENTER button Press the EXIT button to exit Setup Language English Time Game Mode Off V Chip Caption MenuTransparency Medium Blue Screen Off Move Enter Retur...

Page 31: ...or button to select Air or Cable then press the ENTER button 3 Press the or button to select Auto Program then press the ENTER button Continued NOTE All available DTV and analog channels are automatic...

Page 32: ...company to identify the type of cable system that exists in your particular area At this point the signal source has been selected Auto Program Move Enter Return The TV must be connected to an antenna...

Page 33: ...el 7 2 analog press 7 then then 2 Using the Previous Channel Press the PRE CH button The TV changes to the last channel you were watching Press the CH or CH button to change channels Press the number...

Page 34: ...ur TV s remote control 4 Using the number buttons on your remote control enter three digits of the VCR code listed on page 38 of this manual for your brand of VCR Make sure you enter three digits of t...

Page 35: ...e even if the first digit is a 0 If more than one code is listed try the first one 5 Press the POWER button on the remote control Your cable box should turn on if your remote is set up correctly If yo...

Page 36: ...e code even if the first digit is a 0 If more than one code is listed try the first one 5 Press the POWER button on the remote control Your DVD should turn on if your remote is set up correctly If you...

Page 37: ...code even if the first digit is a 0 If more than one code is listed try the first one 5 Press the POWER button on the remote control Your STB should turn on if your remote is set up correctly If your...

Page 38: ...81 082 083 021 056 059 007 008 018 021 026 037 062 006 036 073 074 075 076 021 006 021 024 025 034 005 019 041 075 Brand MITSUBISHI MONTGOMERY WARD MTC MULTITECH NEC OPTIMUS PANASONIC PENTAX PENTEX RE...

Page 39: ...12 013 014 SET TOP BOX Code 023 043 018 034 019 035 015016017019022045060061062065066067 068 074 069 070 069 018 024 032 027 025 069 070 071 069 069 065 046 047 048 063 064 069 056 022 015 017 020 020...

Page 40: ...RRUS CINEVISION DAEWOO DENON FARENHEIT FISHER GPX GO VIDEO GE GREENHILL HITACHI HITEKER HOYO HARMAN KARDON IRT INTEGRA JBL JVC JATON KENWOOD KISS KONKA KLH LG Goldstar LOEWE LASONIC MOBILE AUTHORITY M...

Page 41: ...m Set the clock you want by pressing the or button then press the ENTER button Press the EXIT button to exit Option 1 Setting the Clock Manually You can set the month day year hour and minute directly...

Page 42: ...select DST Daylight Saving Time then press the ENTER button Press the or button to select Off or On then press the ENTER button Press the EXIT button to exit When you set up Auto Time the set time ma...

Page 43: ...y pressing or button When finished press the EXIT button to exit You can set the hour minute and channel directly by pressing the number buttons on the remote control On Timer Move Adjust Return Enter...

Page 44: ...y Press the EXIT button to exit Alternate method Press the SLEEP button on the remote control repeatedly until the appropriate time interval appears any of the preset values from 30min to 180min Time...

Page 45: ...rol repeatedly to select an external signal source NOTES Only connected devices can be selected Before selecting an input source connect an external device first HDMI input can be selected only when t...

Page 46: ...ceiver Game Camcorder DVD Combo DVD HDD Recorder PC Internet TV Recv Interactive TV Recv VOD Video On Demand STB TV Press the ENTER button Set other signal sources AV2 AV3 S Video1 S Video2 S Video3 C...

Page 47: ...Channel Control Downloaded from www Manualslib com manuals search engine...

Page 48: ...an be set as favorite channels Channel Control Selecting Your Favorite Channels You can store your favorite channels for each available input source such as TV and Cable box Then when you press the FA...

Page 49: ...rite setting on the channel is available in the Favorite channel list To Watch Favorite channels Press the FAV CH button repeatedly to jump from one favorite channel to another Channel Antenna Air Aut...

Page 50: ...annel List or the Favorite Channel List is selected sequentially Yellow button Press to delete all channels memorized Alternate method Press the CH MGR button on the remote control to display a list o...

Page 51: ...NTER button All channels on the Channel Manager are added and displayed Press the button to select a channel then press the ENTER button and an option window will appear Continued Channel Antenna Air...

Page 52: ...hannel List or the Favorite Channel List is selected sequentially Press the EXIT button to exit Channel Manager Added List Mode Delete All Move Enter Return Air 2 Air 2 Air 3 Air 4 Air 5 Air 6 Air 7 A...

Page 53: ...All of the memorized channels Added Added channels Favorite Favorite channels 4 Press the CH MGR button on the remote control then Default List mode will be displayed Channel Antenna Air Auto Program...

Page 54: ...ence A Z 0 9 blank 4 Press the button to switch to the next field which will be selected Select a second letter or digit pressing or button as above Repeat the process to select the last three digits...

Page 55: ...button to select Reset then press the ENTER button 5 Press the EXIT button to exit NOTES Only analog TV channels can be fine tuned will appear next to the name of fine tuned channels Channel Antenna...

Page 56: ...then press the ENTER button 2 Press the or button to select Signal Strength then press the ENTER button If the signal strength meter indicates that the signal is weak physically adjust your antenna t...

Page 57: ...XIT button to exit NOTES LNA functions only when antenna is set to Air The settings will be stored separately in each channel If the picture is noisy with the LNA set to On select Off The LNA setting...

Page 58: ...SAMSUNG Downloaded from www Manualslib com manuals search engine...

Page 59: ...Picture Control Downloaded from www Manualslib com manuals search engine...

Page 60: ...d picture mode Choose Dynamic for viewing the TV during the day or when there is a bright light in the room Choose Standard for general TV watching mode Choose Movie when viewing a movie Choose Custom...

Page 61: ...d Color Tone according to personal preference You can select Standard which automatically recalls your personalized picture settings Contrast 80 You can also select these options Contrast Brightness S...

Page 62: ...he previously adjusted settings will be reset to the factory defaults Resetting the Picture Settings to the Factory Defaults Mode Mode Standard Contrast 80 Brightness 50 Sharpness 50 Color 50 Tint G R...

Page 63: ...of the picture on screen Zoom2 Magnifies the size of the picture more than Zoom1 Wide Fit Enlarges the aspect ratio of the picture to fit the entire screen 4 3 Sets the picture to 4 3 normal mode NOT...

Page 64: ...r button to select Digital NR then press the ENTER button 3 Press the or button to select Off or On then press the ENTER button Press the EXIT button to exit Picture Mode Dynamic Size 16 9 Digital NR...

Page 65: ...Off Switches off the DNIe mode Demo The screen before applying DNIe appears on the left and the screen after applying DNIe appears on the right On Switches on the DNIe mode Press the EXIT button to ex...

Page 66: ...nt bar is shown on the bottom of the screen Press the ENTER button to accept the selected mode Press the EXIT button to exit Blue Emphasizes Clear Blues Green Emphasizes Mild Greens Pink Emphasizes Wa...

Page 67: ...ors to the Factory Defaults You can return to the factory default settings for My Color Control colors 4 Press the MENU button to display the Detail Control menu Press the or button to select Reset th...

Page 68: ...s the or button to select a color to be adjusted then press the ENTER button Press the or button to adjust the value of the color selected Press the EXIT button to exit 0 Color Weakness Adjust Move Re...

Page 69: ...Press the or button to select Off or On then press the ENTER button Press the EXIT button to exit NOTE Film mode is supported in 480i only Picture Mode Dynamic Size 16 9 Digital NR On DNIe On My Color...

Page 70: ...icture Press the STILL button to freeze a moving picture Normal sound will still be heard To cancel this function press the STILL button again or press any button on the remote control Downloaded from...

Page 71: ...lect Blue Screen then press the ENTER button 3 Press the or button to select Off or On then press the ENTER button Press the EXIT button to exit Setup Language English Time Game Mode Off V Chip Captio...

Page 72: ...SAMSUNG Downloaded from www Manualslib com manuals search engine...

Page 73: ...Sound Control Downloaded from www Manualslib com manuals search engine...

Page 74: ...or VOL button Customizing the Sound The sound settings can be adjusted to suit your personal preference Alternatively you can use one of the automatic settings See next page 1 Press the MENU button P...

Page 75: ...ess the ENTER button to select Mode Press the or button to select a particular item then press the ENTER button Press the EXIT button to exit Alternate method Press the S MODE button on the remote con...

Page 76: ...press the ENTER button 2 Press the or button to select Auto Volume then press the ENTER button 3 Press the or button to select Off or On then press the ENTER button Press the EXIT button to exit Sound...

Page 77: ...od Press the MTS button on the remote control You can listen in a language other than the favorite language by pressing the MTS button NOTE You can only select the language from among the actual langu...

Page 78: ...ontrol repeatedly to select an external signal source NOTES Choose Mono for channels that are broadcasting in mono or if you are having difficulty receiving a stereo signal Choose Stereo for channels...

Page 79: ...etween Off and On Press the EXIT button to exit NOTES The VOL VOL and MUTE buttons do not operate when the Internal Mute is set to On When Internal Mute is set to On Sound menus except Multi Track Opt...

Page 80: ...ody then press the ENTER button Press the or button to select Off or On then press the ENTER button Press the EXIT button to exit Sound Mode Custom Equalizer DNSe Off Multi Track Options Auto Volume O...

Page 81: ...ernate between Off and On Press the EXIT button to exit Alternate method Press the DNSe button on the remote control repeatedly to select Off or On Sound Mode Custom Equalizer DNSe Off Multi Track Opt...

Page 82: ...elect Sound then press the ENTER button 2 Press the or button to select Reset then press the ENTER button Press the EXIT button to exit Sound Mode Custom Equalizer DNSe Off Multi Track Options Auto Vo...

Page 83: ...Special Features Downloaded from www Manualslib com manuals search engine...

Page 84: ...function Help default setting is On Special Features English 84 Setting the Function Help Displays Help on the menu functions Switches the Function Help on Setup Language English Time Game Mode Off V...

Page 85: ...he ENTER button Press the or button to select level then press the ENTER button Press the EXIT button to exit Setup Language English Time Game Mode Off V Chip Caption MenuTransparency Medium Blue Scre...

Page 86: ...s On Picture Mode is automatically changed to Custom and users cannot change the mode Sound Mode in the Sound menu is deactivated Adjust the sound using the equalizer The Reset Sound function is activ...

Page 87: ...PIN then press the ENTER button 4 Press the number buttons to enter your new 4 digit PIN Re enter your new PIN to confirm Press the EXIT button to exit V Chip Return Enter PIN Enter PIN Change PIN Ent...

Page 88: ...Chip Lock field is On Pressing the or button will alternate between Off and On Press the ENTER button Press the EXIT button to exit Special Features English 88 How to Enable Disable the Rating Contro...

Page 89: ...to enter your current 4 digit PIN The default PIN for a new TV set is 0000 V Chip menu is displayed 3 Press the or button to select TV Parental Guidelines then press the ENTER button continued V Chip...

Page 90: ...ress the EXIT button to exit NOTES These categories consist of two separate groups TV Y and TV Y7 young children through age 7 and TV G through TV MA everybody else The restrictions for these two grou...

Page 91: ...ress the ENTER button 4 You can independently lock the movie ratings The locked movie ratings are indicated by the symbol To unlock a locked channel press the ENTER button again Press the ENTER button...

Page 92: ...ildren from ages two six TV FCC Content Category V Violence S Sexual content L Offensive language D Dialog sexual innuendo FV Fantasy or cartoon violence MPAA Rating System Movies G General audience N...

Page 93: ...r a new TV set is 0000 V Chip menu is displayed 3 Press the or button to select Canadian English then press the ENTER button continued V Chip Return Enter PIN Enter PIN V Chip V Chip Lock On TV Parent...

Page 94: ...ty programming C Programming intended for children under age 8 C8 Programming generally considered acceptable for children 8 years and over to watch on their own G General programming suitable for all...

Page 95: ...r a new TV set is 0000 V Chip menu is displayed 3 Press the or button to select Canadian French then press the ENTER button continued V Chip Return Enter PIN Enter PIN V Chip V Chip Lock On TV Parenta...

Page 96: ...on programming talk shows music videos and variety programming G General 8 ans Not recommended for young children 13 ans Programming may not be suitable for children under the age of 13 16 ans Program...

Page 97: ...tion the Downloadable US rating menu is deactivated Parental restriction information is automatically downloaded while watching DTV channels It may take several seconds The downloadable US rating menu...

Page 98: ...he default menu name and Downloadable US rating changes depending on the downloaded information Even if you set the On screen display to your desired language the Downloadable U S Rating menu will app...

Page 99: ...button to select Caption then press the ENTER button 3 Press the ENTER button to select Caption Press the or button to select On then press the ENTER button continued Caption Caption On Caption Mode...

Page 100: ...e program CC3 Secondary Synchronous Caption Service Alternate program related caption data typically second language captions CC4 Special Non Synchronous Use Captions Similar to CC2 Text1 First Text S...

Page 101: ...s the or button to select Caption Options then press the ENTER button continued NOTE Caption Options are available only when Service1 Service6 can be selected in Caption Mode Digital Caption Caption O...

Page 102: ...yan You can change the color of the letter The default is White Background Color This option consists of Default White Black Red Green Blue Yellow Magenta and Cyan You can change the background color...

Page 103: ...PC Display Downloaded from www Manualslib com manuals search engine...

Page 104: ...on the model Connecting a PC 15p D SUB to the TV 1 Connect a PC cable between the PC Output jack on the PC and the RGB input jack PC IN on the TV 2 Connect a Audio cable between the Audio jack on the...

Page 105: ...4 Click on the Monitor tab then set the Screen Refresh Rate with reference to the Display Modes Table Set the Vertical Frequency and Horizontal Frequency individually if you can do so instead of sett...

Page 106: ...a TV display monitor Same modes as PC are supported for the signal input to the DVI jack Only a separate sync signal is supported Resolution 640 x 350 720 x 400 640 x 480 800 x 600 1024 x 768 640 x 4...

Page 107: ...ER button 5 Press the or button to select Coarse or Fine then press the ENTER button 6 Press the or button to remove the picture noise Press the EXIT button to exit NOTE This feature may change the wi...

Page 108: ...or button to select Position then press the ENTER button 5 Adjust the position of picture by pressing the button Press the EXIT button to exit Position Input Picture Sound Channel Setup Listings Move...

Page 109: ...T button to exit English 109 Adjusting the Picture Quality and Position Automatically This feature allows the TV to self adjust to the incoming video signal The values of fine coarse and position are...

Page 110: ...the picture to the size of the TV screen regardless of the aspect ratio of the input source Wide PC Scales the picture to 92 of the TV screen regardless of the aspect ratio of the input source The pi...

Page 111: ...button The resolution information is displayed on the screen Press the EXIT button to exit NOTE To change the resolution see pages 105 106 Setup Language English Time Game Mode Off V Chip Caption Men...

Page 112: ...the or button to select Image Reset then press the ENTER button The picture settings are replaced with the factory default values Press the EXIT button to exit Setup Language English Time Game Mode O...

Page 113: ...Appendix Downloaded from www Manualslib com manuals search engine...

Page 114: ...e lamp case 3 After checking the code number for the lamp give the code number to the store where you purchased the TV or to a Samsung Service center Caution 1 Replace with the correct code numbered l...

Page 115: ...emove the screw securing the Lamp by using a screwdriver 5 Separate the Lamp from the engine by holding the handle and pulling it out NOTES Be sure the replacement Lamp is the same type After replacin...

Page 116: ...channels may vary depending on the original production method analog or digital If the original production method is digital High visual quality program If the original production method is analog Th...

Page 117: ...warm place unplug the power cord and allow at least two hours for moisture that may have formed inside the unit to dry completely Using Your TV in Another Country If you plan to take your TV with you...

Page 118: ...This page is intentionally left blank Downloaded from www Manualslib com manuals search engine...

Page 119: ...This page is intentionally left blank Downloaded from www Manualslib com manuals search engine...

Page 120: ...1 800 SAMSUNG 7267864 Web Site www samsung com ca www samsung com Address Samsung Electronics Canada Inc Customer Service 55 Standish Court Mississauga Ontario L5R 4B2 Canada Samsung Electronique Can...

Reviews: