background image

28

English

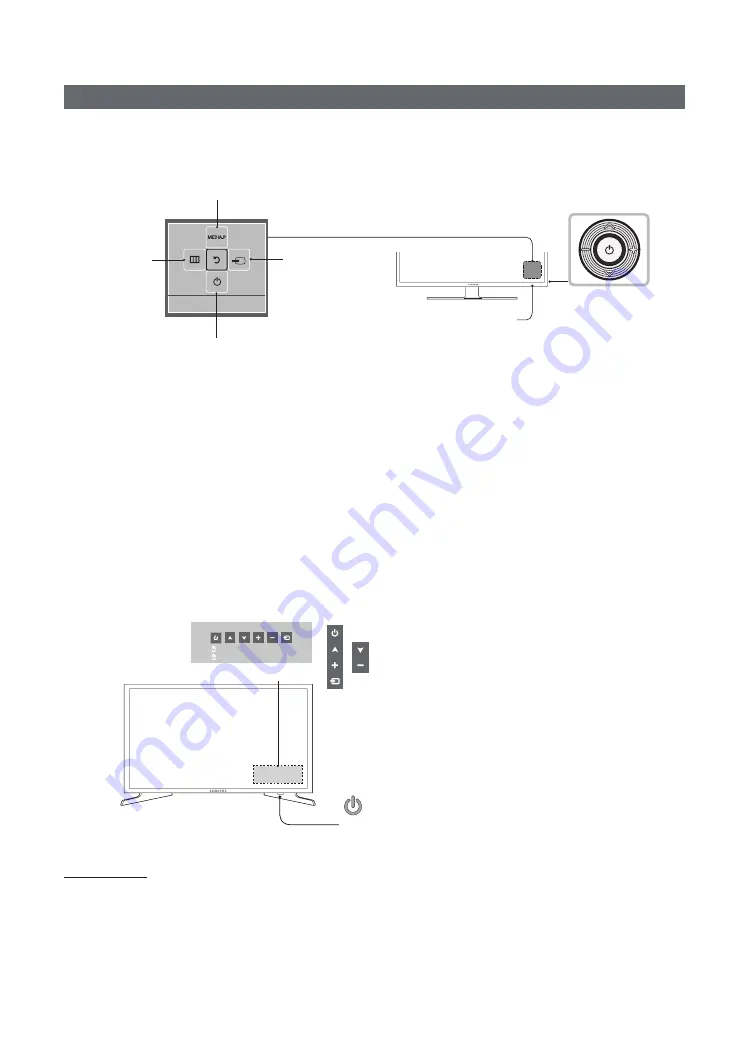
Using the TV’s Controller

The TV Controller, which is a small joystick-like button at the right of the back of the TV, lets you control the TV without 

the remote control.

There are two types of TV Controller.
The first type is operated as follows.

Selecting 

Media Play

Power off

Selecting a 

Source

Selecting the 

Menu

Function menu

TV Controller

The image is drawn by 

facing the front side 

of the TV.

Remote control sensor


Some functions which require a PIN code may not be available.


The color and shape of the product may vary depending on the model.


To exit the menu, press and hold the controller for longer than 1 second.


If you are selecting the function by moving the controller in the up/down/left/right directions, be sure not to press 

the controller. If you press it first, you will be unable to move it in the up/down/left/right directions.

The second type is as follows.
Turn on the TV using the 

P

 button on the remote control or TV panel.


The TV's Controller, which is at the bottom right of the TV, lets you control the TV without the remote control.


If you press it first, the control menu will appear. You can select the function by pressing and holding the TV's 

controller.


The color and shape of the product may vary depending on the model.


With the TV’s Controller, you cannot perform any operations other than turning the TV on or off, changing the 

channel, adjusting the volume, and switching the input source.

Press: Move
Press & Hold: Select

 : Turns the TV on or off.
 / 

 : Changes channels.

 / 

 : Adjusts the volume.

 : Displays and selects the available video sources.

Control Menu

Remote control sensor/TV Controller

Standby mode

Your TV enters Standby mode when you turn it off and continues to consume a small amount of electric power. For safety 

and to reduce power use, you should avoid leaving your TV in standby mode for long periods of time (when away on 

vacation, for example). It is best to unplug the power cord.

Summary of Contents for HG49EE670DKXXU

Page 1: ...LED TV Installation manual Thank you for purchasing this Samsung product To ensure full warranty coverage please registeryour product at www samsung com register Model Serial No 460 470 570 670 ...

Page 2: ...guests from cheating the TV system y y No main menu Interactive mode or Channel Menu Plug Play in Main Menu Stand Alone mode y y Limited Volume and Panel key lock or unlock Still image warning Avoid displaying still images like jpeg picture files or still image elements watermark images such as TV Program Network logos the panorama or 4 3 image format stock or news bars at the bottom of the screen...

Page 3: ...y Using the TV s Controller 27 y y Viewing the Remote Control 28 y y Connecting the TV with the SBB 32 y y Connecting the Bathroom Speakers 34 y y Connecting the MediaHub HD 36 y y Connecting the RJP Remote Jack Pack 37 y y Setting the Hotel Option Data 39 y y Installing the Wall Mount 66 y y Securing the TV to the Wall 68 y y Anti theft Kensington Lock 68 y y Specifications 69 ...

Page 4: ...h all models y y Quick Setup Guide y y Guide Stand y y Screws y y Stand y y Holder Stand Cable Not included with all models The stand and stand screws may not be included depending on the model The Data Cable may not be included depending on the SI Vendor Installing the LED TV Stand Stand Components When installing the stand use the components and parts provided HG EE470 A or or or B or C M4 X L12...

Page 5: ...soft cloth on a table to protect the TV and then lay the TV flat on the cloth screen side down Insert the Stand Guide into the slot on the bottom of the TV x4 M4 X L12 x4 M4 X L12 HG32EE470 HG40EE470 HG48EE470 HG28EE470 x3 M4 X L12 2 3 4 HG24EE460 A B x3 M4 x L12 Stand Screws 1 2 ...

Page 6: ...loth screen side down Insert the Stand Guide into the slot on the bottom of the TV 1 3 X3 M4 X L12 2 HG32EE460 HG32AE460 A B C x8 M4 X L12 Stand Guide Stand Screws DO NOT USE OIL DO NOT USE GREASE DO NOT USE CHEMICALS A B C C Front x 4 M4 X L12 TOP View ATTENTION Place a soft cloth on the table to protect the TV and then lay the TV flat on the cloth screen side down Insert the Stand Guide into the...

Page 7: ...ish HG40EE460 HG40AE460 HG48AE460 HG43AE570 HG48AE570 L R A L 1EA R 1EA 2EA B C x4 M4 X L12 Stand Guide Stand Screws 1 2 C M4 X L12 x4 3 4 5 6 HG32AE570 A B C M4 X L12 Stand Guide Stand Screws 1 x4 M4 X L12 C ...

Page 8: ...8 English 2 3 x3 M4 X L12 C ...

Page 9: ...9 English HG32AE570 A B x4 M4 X L12 Stand Screws 1 2 x2 M4 X L12 x2 M4 X L12 3 ...

Page 10: ...10 English HG43AE570 HG48AE570 A B C x4 M4 X L12 Stand Guide Stand Screws 1 2 3 x4 M4 X L12 ...

Page 11: ...11 English HG58AE570 A B C x8 M4 X L12 Stand Guide Stand Screws 1 正面 背面 x4 M4 X L12 A B C 注意 请勿使用化学品 请勿使用润滑脂 请勿使用润滑油 俯视图 2 3 O O O O X X X O O O O X X X 4 x4 M4 X L12 x4 M4 X L12 ...

Page 12: ...M4 X L12 DO NOT USE GREASE Attention DO NOT USE CHEMICALS DO NOT USE OIL Place a soft cloth on the table to protect the TV and then lay the TV flat on the cloth screen side down Insert the Stand Guide into the slot on the bottom of the TV Slide and assemble it to the end line in the direction of the arrow 1 1 2 1 3 1 X4 M4 X L12 Tighten the bottom of the screw first and stow the upper side of scre...

Page 13: ... M4 X L12 40 55 x8 M4 X L12 Stand Guide Stand Screws C M4 X L12 x4 A 1 1 1 3 1 2 B 1 3 1 3 2 3 1 3 2 Place a soft cloth on the table to protect the TV and then lay the TV flat on the cloth screen side down 2 3 2 1 2 2 3 2 C 40 55 x4 M4 X L12 32 x3 M4 X L12 C ...

Page 14: ...0 HG48EE470 HG32AE570SW K HG40AE570SW K HG43AE570SW K HG48AE570SW K 20 60 swivel If you assemble the wedge on the bottom of the stand to the hole of BRACKET HOLDER SWIVELwhere 20 or 60 is marked the swivel angle becomes 20 60 in the left and right side The shape of the stand depends on the model 90 swivel If you assemble only screws afteryou remove BRACKET HOLDER SWIVEL the swivel angle becomes ea...

Page 15: ... Bolt 2EA Nut 2EA Washer 2EA Top Bottom Affix the stand to a flat surface such as a dresser top desk top or entertainment center as shown in the figure WARNING To prevent injury this apparatus must be securely attached to the floor table in accordance with the installation instructions ...

Page 16: ...4 RJP PC DVI AUDIO IN AV IN VIDEO COMMON INTERFACE HDMI IN ARC HP ID DATA 5V0 5A CLONING ANTIN HG24EE470 1 7 8 3 4 5 RJP PC DVI AUDIO IN AV IN VIDEO COMMON INTERFACE HDMI IN DVI ARC HP ID DATA 5V0 5A CLONING PC DVI AUDIO IN PCIN ANTIN 2 CLOCK HG28EE470 ...

Page 17: ...EO COMMON INTERFACE HP ID CLOCK 5V0 5A CLONING ANTIN HDMI IN DVI ARC PC DVI AUDIO IN DATA PCIN HG32EE470 4 3 1 7 5 8 RJP PC DVI AUDIO IN AV IN VIDEO COMMON INTERFACE HP ID 5V0 5A CLONING ANTIN HDMI IN DVI ARC PCIN PC DVI AUDIO IN DATA HG40EE470 HG48EE470 ...

Page 18: ...C DVI AUDIO IN PC IN AUDIO RJP HP ID HDMI IN DVI ARC 5V 0 5A CLONING USB ANT IN COMMON INTERFACE 8 7 7 5 3 4 8 3 4 8 7 5 6 3 4 4 65 6 3 6 HG24EE460 5V 0 5A CLONING USB COMMON INTERFACE RJP HP ID ANT IN HDMI IN ARC AUDIO 5V 0 5A CLONING USB COMMON INTERFACE HDMIIN DVI ARC ANTIN PC DVI AUDIO IN PC IN AUDIO HP ID RJP PC DVI AUDIO IN PC IN AUDIO RJP HP ID HDMI IN DVI ARC 5V 0 5A CLONING USB ANT IN COM...

Page 19: ...ABLE AUDIO OUT VOL CTRL AUDIO HP ID RJP PC IN CLOCK DATA 4 7 9 0 3 1 2 5 8 6 HG32EE460 COMMON INTERFACE HP ID ANT IN AUDIO 5V 0 5A CLONING USB COMMON INTERFACE HDMIIN DVI ARC ANTIN PC DVI AUDIO IN PC IN AUDIO HP ID RJP 5V 0 5A CLONING USB COMMON INTERFACE HDMIIN DVI ARC ANTIN PC DVI AUDIO IN PC IN AUDIO HP ID RJP PC DVI AUDIO IN PC IN AUDIO RJP HP ID HDMI IN DVI ARC 5V 0 5A CLONING USB ANT IN COMM...

Page 20: ...DIO IN PC IN AUDIO HP ID RJP 8 7 5 PC DVI AUDIO IN VARIABLE AUDIO OUT VOL CTRL AUDIO HP ID RJP PC IN CLOCK DATA 4 7 9 0 3 1 2 5 8 6 HG32EE670 HG40EE670 HG49EE670 HG55EE670 6 5 4 3 8 7 RJP PC DVI AUDIO IN AV IN AUDIO VIDEO PC IN HDMI IN DVI ARC HP ID 5V 0 5A CLONING ANT IN HG32AE460 ...

Page 21: ... 3 7 8 RJP AV IN HP ID 5V 0 5A CLONING PC DVI 㿟䔍ܺ PC䔍ܺ HDMI 䔍ܺ DVI ARC 㽫㿟 䔍ܺ ৈ 㿟 Ꮋ ANT 䔍ܺ HG32AE460 TAIWAN 3 8 7 6 5 4 RJP AV IN HP ID B PC DVI 㿟䔍ܺ PC䔍ܺ 㽫㿟 䔍ܺ ৈ 㿟 Ꮋ 5V0 5A CLONING ANT䔍ܺ HDMI 䔍ܺ DVI ARC HG40AE460 TAIWAN ...

Page 22: ...C DVI AUDIO IN AV IN AUDIO VIDEO PC IN HDMI IN DVI ARC HP ID DATA 5V 0 5A CLONING ANT IN HG32AE570 HDMIIN DVI ARC 5V0 5A CLONING ANTIN RJP PCIN 6 5 1 4 3 8 7 AV IN AUDIO VIDEO DATA HP ID PC DVI AUDIO IN HG40AE570 HG43AE570 HG48AE570 ...

Page 23: ... HDMIIN1 ARC 5V0 5A CLONING ANTIN 6 6 1 3 5 4 7 9 8 0 DATA HP ID RJP AUDIO VIDEO VOL CTRL PC DVI AUDIO IN VARIABLE AUDIO OUT PC IN DOOR EYE VIDEO AUDIO RJP HP ID PC 䕨ܺ HDMI䕨覂 DVI ARC DATA DC 19V 5V 0 5A CLONING ANT 䕨ܺ AV 䕨ܺ 书 Ꮋ ৈ 㾛书 6 1 3 5 7 8 4 HG32AE570 CHINA ...

Page 24: ...24 English HDMI 䕨覂2 DVI HDMI 䕨覂1 ARC 5V0 5A CLONING HP ID RJP AV 䕨ܺ 书 Ꮋ ৈ 㾛书 ߛ䞤 AV 䕨ܺ 书 Ꮋ ৈ ࠋ PC DVI 书䕨ܺ ৄভ 书䕨ߏ ᘧ䞤 书䕨ߏ PC 䕨ܺ ᄥ ⴑ DATA ANT䕨ܺ ᮵㒔 㒔 6 1 3 5 4 7 9 8 0 HG43AE570 HG48AE570 HG58AE570 CHINA ...

Page 25: ...t different devices to additional modules to improve device use and convenience 6 AV IN COMPONENT IN Connects the Component video audio Connect the component video cables optional to the component jacks PR PB Y at the back of your TV and the other ends to the corresponding component video out jacks on the DVD player If you wish to connect both a Set Top Box and a DVD player you should connect the ...

Page 26: ...e TV set the screen resolution for the TV on the computer The optimal resolution is 1920 x 1080 60 Hz If the output from the computer is set to any resolution other than those listed in the table below the TV may display nothing Set the resolution properly referring to the user guide for the computer or its graphic card Use of one of the resolutions in the table is recommended Optimal resolution i...

Page 27: ...00 1680 x 1050 31 469 37 861 37 500 37 879 48 077 46 875 48 363 56 476 60 023 67 500 63 981 79 976 45 000 49 702 62 795 47 712 55 935 70 635 65 290 59 940 72 809 75 000 60 317 72 188 75 000 60 004 70 069 75 029 75 000 60 020 75 025 60 000 59 810 74 934 60 015 59 887 74 984 59 954 25 175 31 500 31 500 40 000 50 000 49 500 65 000 75 000 78 750 108 000 108 000 135 000 74 250 83 500 106 500 85 500 106...

Page 28: ...The second type is as follows Turn on the TV using the P button on the remote control or TV panel The TV s Controller which is at the bottom right of the TV lets you control the TV without the remote control If you press it first the control menu will appear You can select the function by pressing and holding the TV s controller The color and shape of the product may vary depending on the model Wi...

Page 29: ...ed functions Select on screen menu items and change menu values Return to the previous menu Buttons in Channel List Contents Home menu etc Use these buttons in the Contents Home Display and select available video sources Electronic Programme Guide EPG display Cut off the sound temporarily Change channels Switch to the HOME Screen View the Contents Home Press to display information on the TV screen...

Page 30: ...to the previous menu Buttons in Channel List Contents Home menu etc Use these buttons in the Contents Home Display and select available video sources Electronic Programme Guide EPG display Cut off the sound temporarily Change channels Switch to the HOME Screen View the Contents Home Press to display information on the TV screen CLOCK When you press the INFO key while in standby mode the time is di...

Page 31: ...ion on the TV screen CLOCK When you press the INFO key while in standby mode the time is displayed on the TV screen Exit the menu ALARM Enter the houryou want the TV to turn on X Turn the 3D image on or off Not available SUBT Display digital subtitles Installing batteries Battery size AAA Rear of the Remote After you have installed the batteries use a screwdriver to screw in the screw that holds t...

Page 32: ...rts games y y a Zoom Pause playback and divide the picture into 9 parts Select a part to zoom it in Press this button again to resume When Sports Mode is On the picture and sound modes are set to Stadium automatically If you turn the TV off while watching in Sports Mode Sports Mode will be disabled When the Data Service is running Zoom is not available ...

Page 33: ...IDEO PC IN HDMI IN DVI ARC HP ID RJP PC DVI AUDIO IN AV IN AUDIO VIDEO PC IN HDMI IN DVI ARC HP ID DATA Data Cable TV Rear Panel Availability depends on the specific model 1 Connect the DATA jack on the TV to the ETH MODEM jack of the STB SBB with the Data cable Use data communication ...

Page 34: ...of Vendors and Compatible Data Cables Supplied with the TV y y Confirm that you are using the correct data cable foryourvendor Refer to the code label on the data cable Operation Specifications of Data Cable RJ12 RS232 ...

Page 35: ...UT port supports MONO output only y y Installing the Volume Control If you configure the Volume Control Box as shown in the figure you can control the volume of the bathroom speakers The jack used to connect from the Volume Control Box to the TV is a 3 5mm normal Phone jack The Volume Control Box switch consists of a Tact switch Setting the Sub AMP Mode 0 Turns the Sub AMP function off PWM off 1 D...

Page 36: ...dded convenience To do this follow the procedure described below y y Detailed Drawing of the Headphone Box HP ID A HP ID A HP ID HEADPHON BOX TV Rear Panel Headphone Box TV Headphones jack Whitewire Audio L Shield Wire TV HP ID jack Red wire White wire Red Wire Audio R Shield wire Headphone Box ...

Page 37: ... of the TV and the HDMI port of the MediaHub HD y y MediaHub HD MediaHub HD is a hardware module that has different Audio Video inputs A V Audio PC HDMI and USB and corresponding outputs The corresponding output sources connect from MediaHub to the TV MediaHub communicates with the TV via RS232 Hot Plug Play is a function that allows hotel guests to connect an external source to the MediaHub Media...

Page 38: ...nnect the HDMI IN port of the TV to the HDMI port of the RJP 5 Connect the RJP port of the TV to the RS 232 port of the RJP The RJP Remote Jack Pack compatible with this Samsung TV is TeleAdapt TA 7610 y y RJP Remote Jack Pack RJP stands for Remote Jack Pack and is a hardware module that has different Audio Video inputs A V Audio PC and HDMI and corresponding outputs The corresponding output sourc...

Page 39: ...o establish communication between the TV and the RJP y y The following table shows the approximate time in seconds to switch from the TV to the input source based on the priority Scenario 1 When no inputs are connected Source To Connect AV 2 Sec PC 0 7 Sec HDMI 3 9 Sec Scenario 2 When two or more inputs are connected and an Input source is disconnected and then reconnected Source Disconnect To Con...

Page 40: ... Volume manually See Power On Volume Number below y y Last Saved When the TV is turned on it returns to the volume that was set when the powerwas turned off Power On Volume Num The TV turns on with this Volume Level Min Volume 0 The minimum Volume Level the user can set in Stand Alone Hospitality mode Max Volume 100 The maximum Volume Level the user can set Power On Source TV Select the input sour...

Page 41: ...ls are being rescanned will be displayed to Hotel Guests y y OFF A Hotel Admin can turn the Channel Rescan Message OFF if the rescan message OSD should not to be displayed to Hotel Guests Pan Euro MHEG OFF y y OFF If Pan Euro MHEG is set to Off MHEG runs according to the existing product specifications y y ON If Pan Euro MHEG is set to On MHEG is ON regardless of the product specifications or regi...

Page 42: ...will work y y Ext Clock LED Clock related items work as Dimming Clock test Time Format Local Time Manual Select the way to update clock data Use clock data from a DTV channel to set the clock automatically or set the clock manually when the TV is in stand alone mode Timer Type Wakeup y y Wakeup You can set a specific time forthe TV to turn on automatically y y OnOff Have your TV turn itself on off...

Page 43: ...ation is displayed on the TV screen y y OFF The External Source information is not displayed on the TV screen Auto Source OFF y y ON When an external input source is connected to the TV the TV identifies the input source and then automatically switches to that input source y y OFF Auto Source function is Off Anynet Return Source Power On Src Selects the return TV source after stopping an Anynet HD...

Page 44: ...ration will be the same as when Setting Auto Initialize is set to Off 15 REACH Solution REACH 4 0 OFF y y ON Open REACH 4 0 y y OFF Close REACH 4 0 REACH Channel Select SIRCH Update Channel Group ID Select the SIRCH Group ID REACH Update Time Select the SIRCH update Time In SIRCH update time you have the option to perform an automatic upgrade at 12 00 AM PM or at 2 00 AM PM You can perform hourly ...

Page 45: ...nd Bar can be connected to the TV via an Anynet Connection and the TV Sound can be routed to the Sound Bar Device If the feature is OFF in the Hotel Factory Menu this functionality is disabled The main TV Speakerwill be muted while the Sound Bar option is ON and the Speaker is connected through HDMI Contact Samsung Samsung Contact information Standby LED ON y y ON The Function IR is On when in Sta...

Page 46: ...dio is forcibly routed to the Headphone jack even if Headphones are not connected physically HP Sound YES HP vol level from Factory applied Greyed OFF OFF Volume up down Main Speaker Mute HP volume level up down as per current HP volume Greyed OFF ON Mute Main Speaker Mute No Action HP Change to Mute Greyed OFF ON volume up down Mute state Main Speaker Sound No Mute HP volume level up down based o...

Page 47: ...athroom Speaker Eco Solution Logo Message Cloning REACH Solution Standalone OFF System Security r Welcome Message ON Hospitality Logo ON Hospitality Logo DL Logo Display Time Edit Welcome Message Depending on the model and region some menu items may be unavailable The Welcome message can be up to 25 characters and can be edited in the Hotel Service menu Characters that can be included in the Welco...

Page 48: ...on some menu items may not be available y y Hospitality Logo This option lets you choose whether or not the Hospitality Logo image is displayed By default it is set to OFF It can be set to OFF or ON When it is set to ON the Logo Download and Logo Time Display menu items become accessible y y Hospitality Logo DL This option lets you upload the logo image to the TV s memory from a USB device The Wai...

Page 49: ...is is an operation that uploads the data from a USB device to the TV set 1 Insert a USB drive into the USB port at the back of the TV 2 Enter the Hotel Options by pressing these buttons in the following order MUTE 1 1 9 ENTER 3 Press the or button to select Clone USB to TV then press the ENTER button 4 The message Clone USB to TV is displayed then press the ENTER button 5 You can check the status ...

Page 50: ...elect a solution to install on your TV Standalone Home Menu LYNK REACH Interactive STB Select if you do not want to connect to a specific solution and only want to use the TV c 5 1 2 3 4 Solution Setup Set options regarding the selected solution Room Number Group Group ID All Enter the room number Only numbers and English letters can be entered Clone Settings Clone system settings from a USB flash...

Page 51: ...anguage Select the OSD On Screen Display language 4 Select the Country and Picture Mode Select the appropriate country and picture mode Depending on the model and region some countries may not be included 5 Auto Tuning Select the antenna source and channel type Configure the settings and select Scan The Auto Tuning function starts searching for channels When Auto Tuning is completed the channel in...

Page 52: ...ctly configured When the region settings are changed your TV will automatically restart to apply them EU_GER EU_FRANCE EU_BENELUX EU_SPAIN EU_UK Country List Austria Switzerland Germany Turn off and reboot automatically as Local Set is changed Yes No Region Settings Change the region settings if you are located in North America Latin America or Europe Your TV might not function if the region setti...

Page 53: ...tion on again it is automatically turned off when the TV is turned on again If the master power is turned off the time setting is only maintained in models with a backup condenser and an RTC When a TV in standby mode shows the current time the video mute and audio mute settings are maintained In this case even if the Hotel logo is set to on the Hotel Logo display is skipped This feature only works...

Page 54: ...er the chosen digit For example the TV and Remote control will be set to ID code 1 if the user presses 1 The following text will be displayed Remote control code is changed to 1 The TV can then only be controlled by a remote control with the same ID code as the TV If the ID code between the remote control and the TV does not match the following text will be displayed TV ID x x is the TV s ID To re...

Page 55: ...e channel Select the channel that will be used when the remote control has no card b Bank2 Family Card Green Select the channel that will be used when the remote control has a GREEN CARD c Bank3 Adult Card Red Select the channel that will be used when the remote control has a RED CARD n Move E Select Deselect R Return Channel Bank Edit All Bank1 4 Bank2 6 Bank3 36 1 1futech c 1 BBC1 c c c 2 24ore ...

Page 56: ...Cloning REACH Solution Security r Channel Editor Depending on the model and region some menu items may not be available Simple Steps for channel Editor in Stand alone Mode Step Action 1 Select Channel Auto Store from the Hotel Option Menu 2 Select Channel Editor from the Hotel Option Menu 3 Compile a table related to the final channel lists you want 4 Rearrange channels using the TOOLS button base...

Page 57: ... Ch Mode Antenna Mode Activation Description Air Cable Hotel Genre All Default O Provide genre channel mode by each country that master has managed in factory mode News O Radio O Entertainment O Sport O Hotel O My Channel Current status All Country All Keep Previous n Move E Enter Austria Belgium China Denmark Finland France All News Radio Entertainment Sports Hotel Country Genre OK Cancel For the...

Page 58: ...tion 1 Background Screen Displays the last channel selected when TV is turned on 2 Function Title The name of the function 3 Current Status Displays the current Country Genre settings 4 Country Items The items for the country list are displayed Displays the last selected country 5 Genre Items The items for the genre list are displayed Displays available genre items by each country that master mana...

Page 59: ...Enter All Country Austria Belgium China Denmark Finland All News Radio Entertainment Sports Hotel Country Genre OK Cancel My Channel Current status All Country All Keep Previous n Move E Enter Austria Belgium China Denmark Finland France All News Radio Entertainment Sports Hotel Country Genre OK Cancel My Channel Current status All Country All Keep Previous n Move E Enter Belgium China Denmark Fin...

Page 60: ...y Austria Belgium China Denmark Finland All News Radio Entertainment Sports Hotel Country Genre OK Cancel y y The currently selected country is highlighted y y Default Highlight The current genre selected ENTER RIGHT LEFT My Channel Current status All Country All Keep Previous n Move E Enter Austria Belgium China Denmark Finland France All News Radio Entertainment Sports Hotel Country Genre OK Can...

Page 61: ...eep Previous n Move E Enter All Country Austria Belgium China Denmark Finland All News Radio Entertainment Sports Hotel Country Genre OK Cancel My Channel Current status All Country All Keep Previous n Move E Enter All Country Austria Belgium China Denmark Finland All News Radio Entertainment Sports Hotel Country Genre OK Cancel My Channel Current status All Country All Keep Previous n Move E Ente...

Page 62: ...ark Finland All News Radio Entertainment Sports Hotel Country Genre OK Cancel Genre Mode changed to Austria News My Channel Current status All Country All Keep Previous n Move E Enter All Country Austria Belgium China Denmark Finland All News Radio Entertainment Sports Hotel Country Genre OK Cancel 5 6 1 y y The genre mode change complete message is displayed y y Timeout 5 sec y y Pressing the lef...

Page 63: ... Channel Current status All Country All Keep Previous n Move E Enter All Country Austria Belgium China Denmark Finland All News Radio Entertainment Sports Hotel Country Genre OK Cancel My Channel Current status All Country All Keep Previous n Move E Enter Austria Belgium China Denmark Finland France All News Radio Entertainment Sports Hotel Country Genre OK Cancel Genre Mode Keep All Country All M...

Page 64: ... indicate possible interactions It may not be exactly identical to what appears on the actual screen POWER POWER Genre Mode changed to Austria News Genre Mode changed to Austria News Power Off 1 y y Current Genre Mode Austria News y y Current Genre Mode Austria News ...

Page 65: ...umn Deselect All Items On Column ESelect R Return Channel Genre Edit Registered News Radio Entertainment Sports Hotel 0 C67 1 C 2 C78 y y This is an editor to set the genre for each Hotel TV channel y y Stored channels can be added to a particular genre in the genre editor menu y y A channel can belong to multiple genres y y Available Genre Options are News Radio Entertainment Sport and Hotel y y ...

Page 66: ...r Out On Connect an HDMI cable from the HDMI OUT port of the Sound BAR to the HDMI1 port of the hospitality TV After being connected to the 2015 hospitality TV via an HDMI Cable the Sound Bar automatically detects the TV while it turns on and is converted to hotel mode by itself The change of the power on volume max volume on the TV is applied to the connected sound bar as the TV boots up twice y ...

Page 67: ... wall mount Contact a technician for assistance when installing the wall mount bracket We do not advise you to do it yourself Samsung Electronics is not responsible for any damage to the product or injury to yourself or others if you select to install the TV on your own Wall mount Adapter Not included with all models TV TV Wall mount bracket Wall mount bracket C C Wall mount Adapter Wall mount Ada...

Page 68: ... Do not use screws that are longer than the standard dimensions as they may cause damage to the inside of the TV set y y Forwall mounts that do not comply with the VESA standard screw specifications the length of the screws may differ depending on their specifications y y Do not fasten the screws too tightly This may damage the product or cause the product to fall leading to personal injury Samsun...

Page 69: ...kwards y y It is safe to connect the string so that the clamps fixed on the wall are parallel to or lower than the clamps fixed on the TV y y Untie the string before moving the TV 4 Verify that all connections are properly secured Periodically check connections for any sign of fatigue to protect against failure If you have any doubt about the security of your connections contact a professional ins...

Page 70: ... HG48EE470 HG32AE570SW K HG40AE570SW K HG43AE570SW K HG48AE570SW K Other models don t support swivel function Operating temperature 10 C 40 C 50 F 104 F Operating Humidity 10 80 non condensing Storage Temperature 20 C 45 C 4 F 113 F Storage Humidity 5 95 non condensing Design and specifications are subject to change without prior notice For information about the power supply and additional informa...

Page 71: ...Supports up to H 264 Level 4 1 FMO ASO RS are not supported y y frame rate Below 1280 x 720 60 frame max Above 1280 x 720 30 frame max y y VC1 AP L4 is not supported y y GMC is not supported y y WMA10 Pro supports up to 5 1 channels and M2 profile y y WMA lossless audio is not supported y y Vorbis supports up to 2ch y y Dolby Digital Plus supports up to 5 1 channels Supported Subtitle Formats y y ...

Page 72: ...11 726 7864 only from land line 30 210 6897691 from mobile and land line HUNGARY 0680SAMSUNG 0680 726 786 0680PREMIUM 0680 773 648 www samsung com hu support ITALIA 800 SAMSUNG 800 7267864 www samsung com it support LUXEMBURG 261 03 710 www samsung com be_fr support MONTENEGRO 020 405 888 www samsung com support SLOVENIA 080 697 267 brezplačna številka www samsung com si support NETHERLANDS 088 90...

Reviews: