10
English
Inserting Batteries into Samsung Smart Control
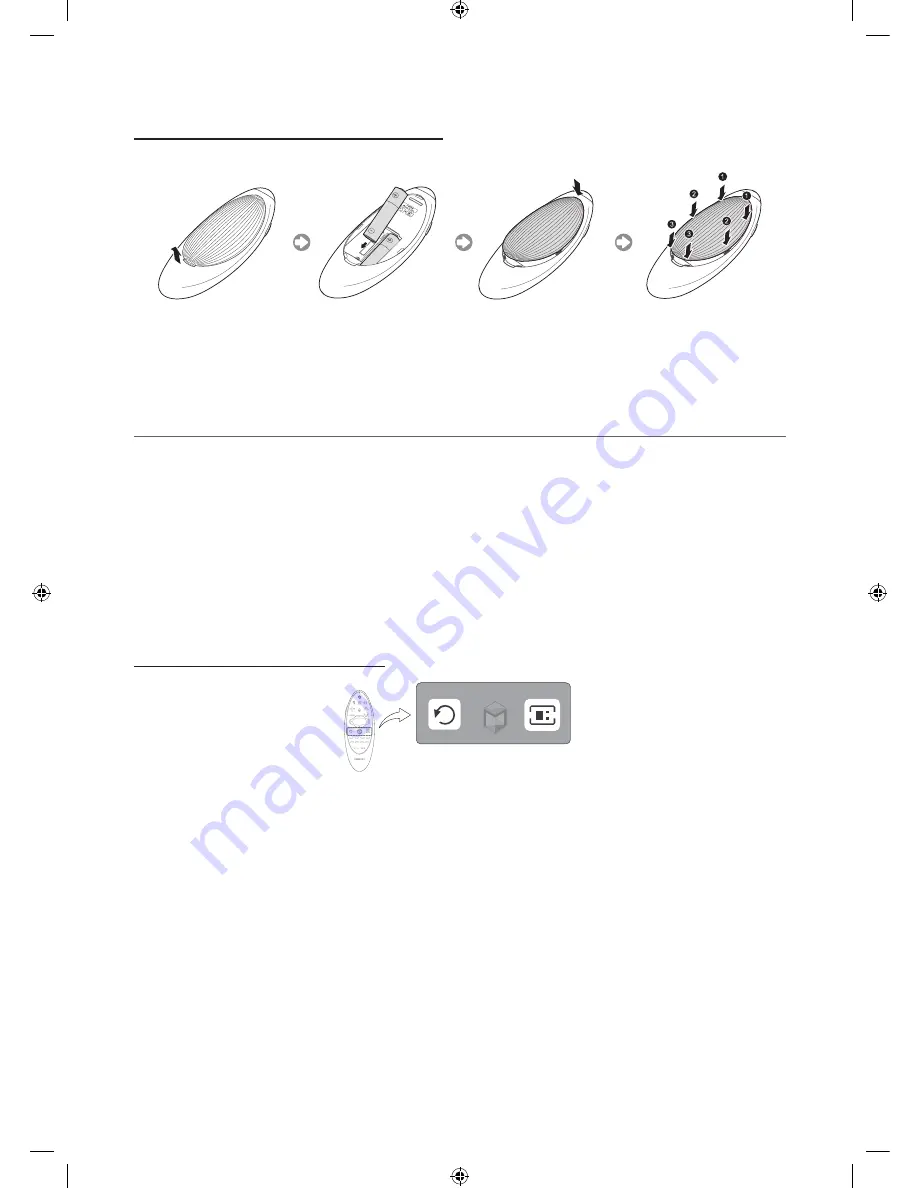
To use Samsung Smart Control, first refer to the figure below and insert batteries into the unit.
1.
Gently pull on the battery cover's notch and then remove the cover completely once it comes loose.
2.
Insert 2 AA alkaline batteries, making sure to align the positive and negative polarities correctly.
3.
Place the battery cover on the remote control and insert the top part of the cover into the remote control.
4.
Press the catches on both sides of the battery cover in the order shown so that the cover is completely attached to the
remote control.
¦
Using the Samsung Smart Control
Samsung Smart Control makes it even easier and more convenient to use the TV. Pressing the
KEYPAD
button displays a
virtual remote control that allows you to easily enter digits, control content, and activate functions on the screen.
- We recommend using Samsung Smart Control at a distance of less than 6m. A usable distance may differ depending on
the wireless environmental conditions.
Pairing the Samsung Smart Control
To control the TV with Samsung Smart Control, you need to pair Samsung Smart Control to the TV via Bluetooth. Pair
Samsung Smart Control to the TV.
- Samsung Smart Control can only be paired to a single TV.
Point Samsung Smart Control at the remote control sensor of the TV and press the
TV
button to turn the TV on.
- Remote control receiver’s location may vary depending on the model.
Reconnecting Samsung Smart Control
If the Samsung Smart Control stops operating or works abnormally, replace the batteries as this may be due to insufficient
battery power.
If the problem persists, the Samsung Smart Control restores pairing with the TV.
1.
Press
RETURN
button and
GUIDE
button simultaneously for 3 seconds.
- You must place the Samsung Smart Control approximately 30cm ~ 40cm away from the TV and ensure it is pointing
towards the remote control receiver.
2.
Connection image is appeared on the screen. And then, Samsung Smart Control is connecting to TV automatically.
[HC890-EU]Install Guide-X0ENG.indd 10
2014-05-22 4:37:09


