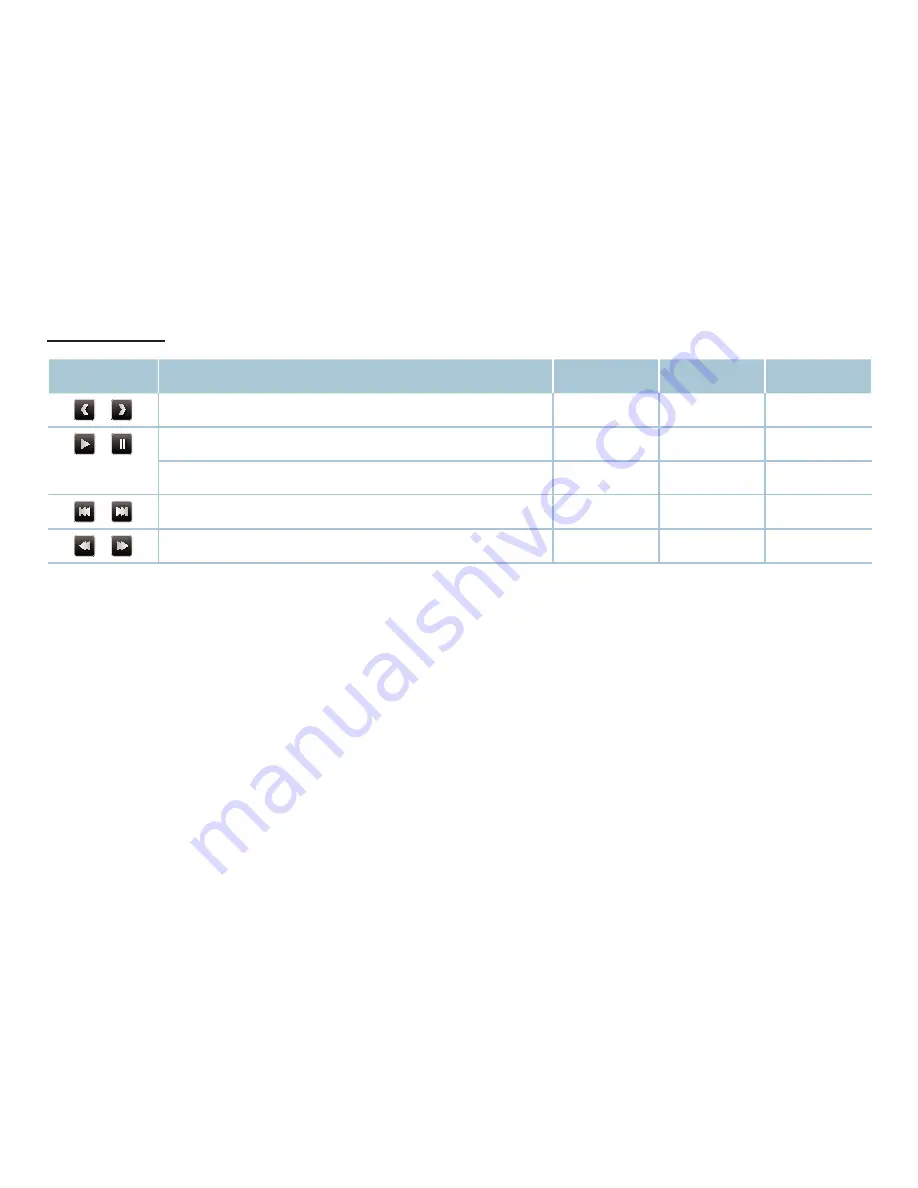
Samsung h4200 E-Manual Download Page 81

  Play  menu

  Button

  Operation

  Photos

  Videos

  Music


 / 

  Previous  /  Next

  ●


 / 

  Start Slide Show / Stop Slide Show

  ●


  Play  /  Pause

  Mini  Player*

  ●

  ●


 / 

  Previous  /  Next

  Mini  Player*

  ●

  ●


 / 

  Rewind / Fast forward


  ●

  ●

  * When setting the 

Background Music

 to 

Mini Player

 in 

Photos

, these buttons appear.

Summary of Contents for h4200

Page 1: ...E MANUAL ...

Page 2: ... 47 Adjusting Sound Settings Preference Features 53 Executing initial setup 54 Setting the Time 56 Using the Sleep Timer 57 Setting the On Off Timer 63 Economical Solutions 65 Other Features Advanced Features 71 Using the Source List 72 Connecting a USB Device 78 Using the Media Contents 80 Playing the Photos Videos Music Other Features 88 Using the Soccer Mode 89 Viewing the e Manual 90 Using the...

Page 3: ...Next guide shows daily TV program information for each channel according to the broadcasting time N N When you press the INFO button a channel information banner will appear on the top of the screen And then press the ENTERE button you can see the details of the program Scroll to view information for a desired program while watching the current channel ...

Page 4: ... a channel automatically and stores in the TV Both Air and Cable antenna signals Air Air antenna signal Cable Cable antenna signal N N NOTE Automatically allocated program numbers may not correspond to actual or desired program numbers If a channel is locked the PIN input window appears ...

Page 5: ... How to Stop Auto Programming 1 Press the ENTERE button 2 A message will ask Stop Auto Program Select Yes by pressing the or button 3 Press the ENTERE button ...

Page 6: ...na O O MENUm Broadcasting Antenna ENTERE Before your television can begin memorizing the available channels you must specify the type of signal source that is connected to the TV i e an Air or a Cable system ...

Page 7: ...he Channel List contains the channels your TV displays added channels when you press the channel button You can view channel information Added Ch Favorites 1 5 Press Mode button to change the channel mode N N When you press the CH LIST button Channel List screen is displayed at once ...

Page 8: ...ected channel in Favorites 1 5 N N For detailed information about using Edit Favorites refer to Edit Favorites Favorites 1 5 Show all favorite channels arranged in up to five groups Each group has a separate screen N N The TV displays Favorites 1 5 only if you have added favorites using Edit Favorites Added Ch Show all added channels ...

Page 9: ...h in advance so that the channel automatically changes to the selected program channel at the specified time Program entries may appear blank or out of date depending on a channel status a Red Quick Nav Viewing the TV programs on the list quickly using buttons b Green Channel Category Select the type of channels you want to display Yellow Schedule Manager Moves to the reserved programs in Schedule...

Page 10: ...hannel status and type Watch Schedule Viewing N N When selecting the current program you can watch the selected program N N When selecting the future program you can reserve to watch the selected program To cancel the schedule press the ENTERE button again and select Cancel Schedule More Info Display details of the selected program ...

Page 11: ...odify or delete a channel you have reserved to watch N N You must set the current time first using the Time Clock function in the System menu to use this function 1 Press the Schedule on the Schedule Manager screen The Schedule Viewing menu appears 2 Press the buttons to set each option menu Antenna Select the desired broadcasting signal Channel Select the desired channel ...

Page 12: ...ndicates a day you selected Date You can set a desired date N N Date is available only when you select Once in Repeat Start Time You can set the start time you want N N If you want to edit or cancel a reserved schedule select the reserved schedule on Schedule Manager Then press the ENTERE button and select the Edit or Delete ...

Page 13: ... Go to Edit Channel screen 2 Press the buttons to select the desired channel and then press ENTERE button The c mark indicates the channel you ve selected N N You can select more than one channel N N Press ENTERE button again to deselect the channel 3 Press b Delete button The selected channel will be deleted from the channel list ...

Page 14: ...egory 2 Select All and press the OK button A deleted channel appears in All channel list N N Your TV will display all channels including channels you deleted from the channel list on the All N N A gray colored channel indicates the channel has been deleted 3 Select a deleted channel and then press the b Add button ...

Page 15: ...nnel in All Yellow Lock Unlock Lock a channel so that the channel cannot be selected and viewed Unlock the channel that you locked N N This function is available only when the Channel Lock is set to On N N The PIN input screen appears Enter your 4 digit PIN the default of which is 0 0 0 0 Change the PIN using the Change PIN option Blue Select All Deselect All Selects or deselects all channels at o...

Page 16: ...lect the desired broadcasting signal Category Change the channel mode to All Added Ch Recently Viewed Mostly Viewed The selected channel mode is displayed Edit Favorites Go to Edit Favorites screen directly Rename Channel analog channels only Assign a name of up to five characters to a channel For example Food Golf etc This makes it easier to find and select the channel Information Display details...

Page 17: ...o to Edit Favorites screen 2 Press the buttons to select the desired channel and then press ENTERE button 3 Choose a specific favorite list among Favorites 1 5 using b Change Fav button and then press the Add button The selected channel has been added in Favorites 1 5 N N One favorites channel can be added in several of favorites among Favorites 1 5 ...

Page 18: ... b Change Fav button 2 Move to favorite list and then select the desired channel you want to delete 3 Press the Delete button The selected channel has been deleted from the Favorites 1 5 N N If you want to change the favorite channel order press the a Change order button and change the order using buttons ...

Page 19: ... selected channel mode is displayed Change order Changes the favorite channel order E Done Completes changing the channel order b Green Change Fav Changes favorite list among Favorites 1 5 Yellow Select All Deselect All Selects or deselects all channels at once Blue Add Delete Add Adds selected channels to Favorites 1 5 Delete Deletes the favorite channel from Favorites 1 5 ...

Page 20: ...ay differ depending on the channel status and type Copy to Favorites Edit the selected favorite channel in Favorites 1 5 You can add or delete from favorite list Rename Favorites Assign your own favorite channel name Antenna Select the desired broadcasting signal Edit Channel Go to Edit Channel screen directly Information Display details of the selected program ...

Page 21: ...event unauthorized users such as children from watching unsuitable program with a user defined 4 digit PIN code N N It is only available in Brazil signal N N The PIN input screen appears before the setup screen N N Enter your 4 digit PIN the default of which is 0 0 0 0 Change the PIN using the Change PIN option ...

Page 22: ...MENUm Broadcasting Channel Lock ENTERE Lock channels to prevent unauthorized users such as children from watching unsuitable program N N The PIN input screen appears Enter your 4 digit PIN the default of which is 0 0 0 0 ...

Page 23: ... not have to fine tune the channel as this is done automatically during the search and store operation If the signal is weak or distorted fine tune the channel manually N N Fine tuned channels that have been saved are marked with an asterisk on the right side of the channel number in the channel banner N N To reset the fine tuning select Reset ...

Page 24: ...ation is unsatisfactory select any of PAL M PAL N or NTSC Auto Run Data Service depending on the country and model O O MENUm Broadcasting Channel Settings Auto Run Data Service ENTERE Turn the Data Service Auto Run on or off If Auto Run is turned on data service starts automatically with no user prompt Enabling certain features of your system may prevent Data Service Auto Run from running ...

Page 25: ...k in Component or HDMI modes Caption Mode You can select the desired caption mode N N The availability of captions depends on the program being broadcasted CC1 CC4 Text1 Text4 analog channels only The Analog Caption function operates in either analog TV channel mode or when a signal is supplied from an external device to the TV Depending on the broadcasting signal the Analog Caption function may o...

Page 26: ...dio Options O O MENUm Broadcasting Audio Options ENTERE Audio Language t digital channels only Change the default value for audio languages N N The available language may differ depending on the broadcast ...

Page 27: ... you are having difficulty receiving a stereo signal Stereo Choose for channels that are broadcasting in stereo SAP Choose to listen to the Separate Audio Program which is usually a foreign language translation N N Depending on the particular program being broadcast you can listen to Mono Stereo or SAP ...

Page 28: ...andard Dynamic Suitable for a bright room Standard Suitable for a normal environment Natural Suitable for reducing eye strain N N Availability depends on the specific model and area Movie Suitable for watching movies in a dark room Entertain Suitable for watching movies and games N N Availability depends on the specific model and area N N It is only available when connecting a PC Basic Features ...

Page 29: ...ality control Backlight Contrast Brightness Sharpness Color Tint G R N N NOTE When connecting a PC you can only make changes to Backlight Contrast Brightness and Sharpness Settings can be adjusted and stored for each external device connected to the TV Lowering picture brightness reduces power consumption ...

Page 30: ... on the input source the picture size options may vary Picture Size t Your cable box satellite receiver may have its own set of screen sizes as well However we highly recommend you use 16 9 mode most of the time 16 9 Sets the picture to 16 9 wide mode Zoom1 Use for moderate magnification Zoom2 Use for a stronger magnification Wide Fit Enlarges the aspect ratio of the picture to fit the entire scre...

Page 31: ...rders displayed on the left right and center of the screen may cause image retention screen burn which are not covered by the warranty Screen Fit Displays the full image without any cut off when HDMI 720p 1080i 1080p or Component 1080i 1080p signals are input Smart View 1 Reduces a 16 9 picture by 50 ...

Page 32: ...reen Fit N N After selecting Zoom1 Zoom2 or Wide Fit select Position Follow the steps below in the Position screen 1 Select the Position press the ENTERE button 2 Select the Position button and then press ENTERE 3 Press the or button to move the picture up or down 4 Press the ENTERE button ...

Page 33: ...low the steps below in the Position screen 1 Select the Position press the ENTERE button 2 Select the Position button and then press ENTERE 3 Press the or button to move the picture 4 Press the ENTERE button N N If you want to reset the position you adjusted select Reset in the Position screen The picture will be set to its default position ...

Page 34: ...ut on the TV Input Source Picture Size ATV AV 16 9 Zoom1 Zoom2 4 3 DTV 720p 16 9 Wide Fit 4 3 DTV 1080i 1080p 16 9 Wide Fit 4 3 Screen Fit Component 480i 480p 576i 576p 16 9 Zoom1 Zoom2 4 3 Component 720p 16 9 Wide Fit 4 3 Component 1080i 1080p 16 9 Wide Fit 4 3 Screen Fit HDMI 720p 1080i 1080p 16 9 Wide Fit 4 3 Screen Fit DTV 480i 480p 16 9 Zoom1 Zoom2 4 3 ...

Page 35: ...in Picture does not function in the same mode N N NOTE For PIP sound refer to the Sound Select instructions If you turn the TV off while watching in PIP mode the PIP window will disappear You may notice that the picture in the PIP window becomes slightly unnatural when you use the main screen to view a game or karaoke ...

Page 36: ...he PIP function Antenna Select either Air or Cable as the input source for the sub screen Channel Select the channel for the sub screen Size Select a size for the sub picture Position Select a position for the sub picture Sound Select You can choose the desired sound Main or Sub in PIP mode ...

Page 37: ...When connecting a PC you can only make changes to the White Balance and Gamma Dynamic Contrast Adjust the screen contrast Black Tone Select the black level to adjust the screen depth Flesh Tone Emphasize pink Flesh Tone RGB Only Mode Displays the Red Green and Blue color for making fine adjustments to the hue and saturation ...

Page 38: ...e slightly pink or slightly yellow and the overall color of the picture looks natural 2 Point Adjust each color s luminosity with the offset menu and the brightness with the gain menu R Offset G Offset B Offset Adjust each color s red green blue darkness R Gain G Gain B Gain Adjust each color s red green blue brightness Reset Restore 2 point white balance settings to default values ...

Page 39: ...ry color intensity Motion Lighting Reduce power consumption by brightness control adapted motion N N When you change the Backlight Contrast or Brightness the TV sets Motion Lighting to Off N N Only available in Standard mode ...

Page 40: ...en connecting a PC you can only make changes to the Color Tone Color Tone Adjusts the color tone N N Warm1 or Warm2 will be deactivated when the picture mode is Dynamic N N Settings can be adjusted and stored for each external device connected to an input on the TV ...

Page 41: ...e signal is weak try other options until the best picture is displayed Auto Visualization When changing analog channels displays signal strength N N Only available for analog channels N N When the INFO button is pressed the signal strength bar is displayed N N When bar is green you are receiving the best possible signal MPEG Noise Filter Reduces MPEG noise to provide an improved picture quality ...

Page 42: ... Mode Sets the TV to automatically sense and process film signals from all sources and adjusts the picture for optimum quality N N Available in TV mode and external input mode which supports SD 480i 576i and HD 1080i signals except in PC mode N N If the screen does not seem natural change its option to Off Auto1 Auto2 in Film Mode ...

Page 43: ... LED Clear Motion Depending on the model Removes drag from fast scenes with a lot of movement to provide a clear picture N N The screen may become slightly darker when you play LED Clear Motion ...

Page 44: ... Picture Off O O MENUm Picture Picture Off ENTERE The screen is turned off but the sound remains on Press any button except the power key or volume button to turn on the screen ...

Page 45: ... Reset Picture O O MENUm Picture Reset Picture ENTERE Resets your current picture mode to its default settings ...

Page 46: ...al Speaker Sound Mode is disabled Standard Selects the normal sound mode Music Emphasizes music over voices Movie Provides the best sound for movies Clear Voice Emphasizes voices over other sounds Amplify Increase the intensity of high frequency sounds to allow a better listening experience for the hearing impaired ...

Page 47: ...ect is set to External Speaker Sound Effect is disabled DTS TruSurround This function provides a virtual 5 1 channel surround sound experience through a pair of speakers or headphones using HRTF Head Related Transfer Function technology DTS TruDialog This function allows you to increase the intensity of a voice over background music or sound effects so that dialog can be heard more clearly ...

Page 48: ...nd setting for each speaker Balance Adjusts the balance between the right and left speaker 100Hz 300Hz 1kHz 3kHz 10kHz Bandwidth Adjustment Adjusts the level of specific bandwidth frequencies Reset Resets the equalizer to its default settings ...

Page 49: ...aker N N When Speaker Select is set to External Speaker the volume and MUTE buttons will not operate and the sound settings will be limited N N When Speaker Select is set to External Speaker you should use these settings TV Speaker Off External Speaker On N N When Speaker Select is set to TV Speaker you should use these settings TV Speaker On External Speaker Off N N If there is no video signal bo...

Page 50: ...rovides an improved sound experience compared to Normal mode making almost no noise It is useful at night N N To use the volume control on the source device connected to the TV set Auto Volume to Off on the TV Otherwise a change to the volume control of the source device may not be applied ...

Page 51: ... DVD player Audio Format You can select the Digital Audio output format The available Digital Audio output format may differ depending on the input source N N By connecting to 5 1ch speakers in a dolby digital setup maximize your interactive 3D sound experience Audio Delay Correct audio video mismatch when watching TV or video and listening to digital audio output using an external device such as ...

Page 52: ... Reset Sound O O MENUm Sound Reset Sound ENTERE Reset all sound settings to the factory defaults ...

Page 53: ...up ENTERE Configure the channels when setting up the TV for the first time or when resetting the unit N N Execute the initial setup following instructions that the TV guides N N Enter your 4 digit PIN the default of which is 0 0 0 0 Preference Features ...

Page 54: ... the clock is for using various timer features of the TV N N If you disconnect the power cord you have to set the clock again Clock Mode Set up the current time manually or automatically Auto Set the current time automatically using the time from a digital channel N N The antenna must be connected in order to set the time automatically ...

Page 55: ...rrect In this case set the time manually Clock Set Set the Date and Time N N Available only when Clock Mode is set to Manual N N You can set the Date and Time directly by pressing the number buttons on the remote control Time Zone Select your time zone N N This function is only available when the Clock Mode is set to Auto ...

Page 56: ...g the Sleep Timer O O MENUm System Time Sleep Timer ENTERE Sleep Timer t Automatically shuts off the TV after a preset period of time 30 60 90 120 150 and 180 minutes N N To cancel the Sleep Timer select Off ...

Page 57: ...an be made You must set the clock first Setup Select Off Once Everyday Mon Fri Mon Sat Sat Sun or Manual to set at your convenience If you select Manual you can set up the day you want to activate the timer N N The c mark indicates the day you ve selected Time Set the hour minute am pm Volume Set the desired volume level ...

Page 58: ... TV display a specific air or cable channel Select USB and have the TV play photo or audio files from a USB device Select a source on your TV that you have connected a set top box to and have the TV display a channel from the set top box N N The USB device must be connected to your TV before you can select USB ...

Page 59: ...e or satellite set top box attached to that source Set the set top box to the channel you want to watch when the TV goes on Leave the set top box turned on N N When you select a source other than TV or USB the Antenna and Channel or Music and Photo options will disappear ...

Page 60: ...Source is set to USB Select a folder in the USB device containing music or photo files to be played when the TV is turned on automatically N N If there is no music file on the USB device or the folder containing a music file is not selected the Timer function does not operate correctly N N When there is only one photo file in the USB the Slide Show will not play ...

Page 61: ...f USB make sure the folders assigned to each USB have different names N N It is recommended that you use a USB memory stick and a multi card reader when using On Timer N N The On Timer function may not work with USB devices with a built in battery MP3 players or PMPs made by some manufacturers because these devices take a long time to be recognized ...

Page 62: ...et the clock first Setup Select Off Once Everyday Mon Fri Mon Sat Sat Sun or Manual to set at your convenience If you select Manual you can set up the day you want to activate the timer N N The c mark indicates the day you ve selected Time Set the hour minute and am pm ...

Page 63: ... This adjust the brightness of the TV in order to reduce power consumption Eco Sensor depending on the country and model To enhance your power savings the picture settings will automatically adapt to the light in the room N N If you adjust the Backlight the Eco Sensor will be set to Off ...

Page 64: ...on the surrounding light intensity No Signal Power Off Sets how quickly the TV switches to standby mode if no picture is being received N N Disabled when the PC is in power saving mode Auto Power Off The TV will be automatically turned off when no user operation is received for 4 hours N N If the Auto Power Off option is set to Off the TV will stay on even if no operations are performed on the TV ...

Page 65: ... Other Features Menu Language O O MENUm System Menu Language ENTERE Set the menu language 1 Select Menu Language and press the ENTERE button 2 Choose desired language and press the ENTERE button ...

Page 66: ...ystem Auto Protection Time ENTERE Auto Protection Time If the screen remains idle with a still image for a certain period of time defined by the user the screen saver is activated to prevent the formation of ghost images on the screen ...

Page 67: ... or Xbox you can enjoy a more realistic gaming experience selecting the game menu N N NOTE Precautions and limitations for game mode To disconnect the game console and connect another external device set Game Mode to Off in the setup menu If you display the TV menu in Game Mode the screen shakes slightly ...

Page 68: ... is set to Movie Panel Lock Lock or unlock all the keys on the panel Boot Logo Enable disable displaying the logo while the TV starts up AV Color System Normally the TV can receive image and sound with good quality when in the mode Auto This mode detects the signal color system automatically In case of some signal reception with color unsatisfactory select the AV Color System Mode to PAL M PAL N o...

Page 69: ...in the Confirm New PIN When the Confirm screen appears press the ENTERE button Your PIN has been memorized N N The PIN input screen appears before the setup screen Enter your 4 digit PIN the default of which is 0 0 0 0 N N If you forget the PIN code press the remote control buttons in the following sequence in Standby mode which resets the PIN to 0 0 0 0 MUTE 8 2 4 POWER on ...

Page 70: ...stration code authorized for the TV If you connect to the DivX web site and register with 10 digit registration code you can download the VOD activation file Once you play it using Media Play the registration is completed N N For more information on DivX VOD visit http vod divx com ...

Page 71: ...List ENTERE N N When you press the SOURCE button Source screen will be displayed at once N N You can only choose external devices that are connected to the TV In Source connected inputs are highlighted N N For the detailed information refer to Changing the Input Source in User Manual ...

Page 72: ...e 1 Turn on your TV 2 Connect a USB device containing photo music and movie files to the USB port on the side of the TV 3 When USB is connected to the TV popup window appears You can select the Photos Videos or Music directly ...

Page 73: ...FAT Certain types of USB Digital camera and audio devices may not be compatible with this TV Media Contents only supports sequential jpeg format Media Contents only supports USB Mass Storage Class MSC devices MSC is a Mass Storage Class Bulk Only Transport device Examples of MSC are Thumb drives Flash Card Readers USB HUB are not supported Devices should be connected directly to the TV s USB port ...

Page 74: ... data loss Do not disconnect the USB device while it is loading The higher the resolution of the image the longer it takes to display on the screen The maximum supported JPEG resolution is 15360 x 8640 pixels For unsupported or corrupted files the Not Supported File Format message is displayed The scene search and thumbnail functions are not supported in the Videos ...

Page 75: ... the prevention of the illegal copying of contents as well as managing billings and settlements PTP connection mode is fully available only with digital cameras When connecting a smartphone or tablet to the TV using PTP mode it may not be recognized depending on the country and model A USB device that requires high power more than 500mA or 5V may not be supported The HDD Hard Disk Drive connected ...

Page 76: ...zed the list of files on the device is corrupted or a file in the list is not played connect the USB device to the PC format the device and check the connection If a file deleted from the PC is still found when Media Contents is run use the Empty the Recycle Bin function on the PC to permanently delete the file If the number of files and folders saved on a USB storage device is approximately over ...

Page 77: ...esired USB device and then press the TOOLS button The Tools menu appears 3 Select Remove USB and then wait until the selected USB device is disconnected You can remove a USB device from the TV N N To remove a USB device from the TV we recommend use Remove USB function ...

Page 78: ...ass Storage Class MSC device 1 Press the MEDIA P button 2 Press button to select desired menu Photos Videos Music then press the ENTERE button 3 Press button to select desired device then press the ENTERE button again 4 Press the button to select the desired file in the list then press the ENTERE button or Play button ...

Page 79: ... Play Selected 2 Select the desired files N N The check box appears to the left of the selected files then press ENTERE button to select the file N N Press ENTERE button again to deselect the file 3 Press the button to select Play N N You can select or deselect all files pressing the Select All Deselect All ...

Page 80: ... the button to select the desired menu N N When the option menu is not displayed press the TOOLS button or ENTERE button N N You can also use buttons on the remote control during play N N If you press the INFO button during play you can view the play information ...

Page 81: ...ration Photos Videos Music Previous Next Start Slide Show Stop Slide Show Play Pause Mini Player Previous Next Mini Player Rewind Fast forward When setting the Background Music to Mini Player in Photos these buttons appear ...

Page 82: ...images in full screen mode Rotate You can rotate images in full screen mode Background Music Mini Player You can set background music when watching a slide show You can control simple play menus Settings Picture Mode Sound Mode You can adjust the picture or sound setting Information You can see detailed information about the played file ...

Page 83: ...N When you press the Play button or button Options Slide Show in the file list slide show will be started immediately N N During the slide show you can adjust the slide show speed using REW or FF button Supported Photo Formats N N For the details refer to Specifications in User Manual ...

Page 84: ...You can play movie files repeatedly Picture Size You can adjust the picture size to your preference Settings Subtitle Settings You can play the video with subtitles This function only works if the subtitles are the same file name as the video Picture Mode Sound Mode You can adjust the picture or sound setting Audio Language You can change the audio language if the video has more than one language ...

Page 85: ...own play time and progress bar are not displayed N N In this mode you can enjoy movie clips contained on a Game but you cannot play the Game itself Supported Subtitle Video Formats N N For the details refer to Specifications in User Manual ...

Page 86: ...lays the files with supported music file extension Other file extensions are not displayed even if they are saved on the same USB device N If the sound is abnormal when playing music files adjust the Equalizer in the Sound menu An over modulated music file may cause a sound problem Supported Music Formats N For the details refer to Specifications in User Manual ...

Page 87: ...ng the Encoding language Set the encoding language if the text is not supported 1 Press the button to select Options at the top of music main screen and select Encoding 2 Select the desired encoding language ...

Page 88: ...lay and divide the picture into 9 parts Select a part to zoom it in N N When the Soccer Mode is On the picture and sound modes are set to Stadium automatically N N If you turn the TV off while watching Soccer Mode the Soccer Mode will be disable N N When the Soccer Mode is On the Data Service is not available depending on the country and model Other Features ...

Page 89: ...ual O O MENUm Support e Manual ENTERE You can read the introduction and instructions about the TV features stored in your TV N N For the detailed information about e Manual Screen refer to How to view the e Manual in User Manual ...

Page 90: ...re does not appear or there is noise in the test picture select Yes There may be a problem with the TV Contact Samsung s Call Center for assistance No If the test picture is properly displayed select No There may be a problem with your external equipment Please check your connections If the problem persists refer to the external device s user manual ...

Page 91: ... Speaker Select is set to External Speaker or the sound is muted by pressing the MUTE button Yes If you can hear sound only from one speaker or not at all during the sound test select Yes There may be a problem with the TV Contact Samsung s Call Center for assistance No If you can hear sound from the speakers select No There may be a problem with your external equipment Please check your connectio...

Page 92: ...y is either perfect or the channels are unavailable Adjust your antenna to increase signal strength Reset Reset all settings to the factory defaults N N The PIN input screen appears before the setup screen N N Enter your 4 digit PIN Change the PIN using the Change PIN option ...

Page 93: ...e will return to their default settings We advise you to write down your settings so that you can easily reset them after the upgrade Update now Insert a USB drive containing the firmware upgrade file downloaded from www samsung com into the TV N N Please be careful not to disconnect the power or remove the USB drive until upgrades are complete The TV will be turned off and on automatically after ...

Page 94: ...mmend you select Home Use N N If your TV has been unintentionally set to Store Demo you can change the mode with this option Home Use Home Use is the default setting Store Demo Store Demo is for retail environments only If you select Store Demo some functions will not work and the picture settings will be reset every 5 minutes ...

Page 95: ...amsung O O MENUm Support Contact Samsung ENTERE View this information when your TV does not work properly or when you want to upgrade the software You can find information regarding our call centers and how to download products and software ...

Reviews: