background image

19 

EN

Cooking Guide(continued)

Reheating Liquids and Food

Use the power levels and times in this table as a guide lines for reheating.

Reheating Baby Food and Milk

Use the power levels and times in this table as guide lines for reheating.

Food

Portion

Power Time 

(min.)

Standing 
Time (min.)

Instructions

Drinks  
(coffee, milk, 
tec, water 
with room 
temperature)

150ml  

(1 cup)

250ml  

(1 mug)

750W

1½-2

2-2½

1-2

Pour in to a ceramic cup 
and reheat uncovered. 
Place cup (150ml) or 
mug (250ml) in the 
centre of turntable, Stir 
carefully before and 
after standing time.

Soup 
(chilled) 

250g
450g

750W

3-3½
4-4½

2-3

Pour into a deep 
ceramic plate.
Cover with plastic lid.
Stir well after reheating. 
Stir again before 
serving.

Stew (chilled) 

350g

600W

5-6

2-3

Put stew in a deep 
ceramic plate. 
Cover with plastic lid.
Stir occasionally during 
reheating and again 
before standing and 
serving.

Pasta with 
sauce 
(chilled) 

350g

600W

4-5

3

Put pasta (e.g. 
spaghetti or egg 
noodles) on a flat 
ceramic plate. Cover 
with microwave cling 
film. Stir before serving.

Filled pasta 
with sauce 
(chilled)

350g

600W

4½-5½

3

Put filled pasta (e.g. 
ravioli, tortellini) in a 
deep ceramic plate. 
Cover with plastic lid. 
Stir occasionally during 
reheating and again 
before standing and 
serving.

Plated Meal 
(chilled)

300g
400g

600W

5-6
6-7

3

Plate a meal of  2-3 
chilled components on 
a ceramic dish.
Cover with microwave 
cling-film.

Frozen 
Ready Meal

300g
400g

600W 11½-12½

13-14

4

Put microwave proof 
dish with frozen ready 
meal (-18°C) on the 
turntable. Pierce film or 
cover with microwave 
cling film. After 
reheating stand for 4 
minutes.

Food

Portion Power Time

Standing 
Time 
(min.)

Instructions

Baby food  
(vegetables 
+ meat)

190g

600W

30sec.

2-3

Empty into ceramic deep 
plate. 
Cook covered. Stir after 
cooking time. 
Stand for 2-3 minutes. 
Before serving, stir well 
and check the 
temperature carefully.

Baby 
porridge 
(grain + milk 
+ fruit)

190g

600W

20sec.

2-3

Empty into ceramic deep 
plate. 
Cook covered. Stir after 
cooking time. 
Stand for 2-3 minutes. 
Before serving, stir well 
and check the 
temperature carefully.

Baby milk

100ml

200ml

300W

30-40sec.

1min. to 

1min.10sec.

2-3

Stir or shake well and 
pour into a sterilised  
glass bottle. Place into the 
centre of turn-table. Cook 
uncovered. Shake well 
and stand for at least 3 
minutes. Before serving, 
shake well and check the 
temperature carefully.

Food

Portion

Power Time 

(min.)

Standing 
Time (min.)

Instructions

n~^ZlTzi†l|TWZ\XXqTWX†luU”GGwˆŽŒGX`GG{œ™š‹ˆ SGhœŽœš›GYWSGYWW`GGXWaZ]Ght

Summary of Contents for GW73E-SB

Page 1: ...e Cooking Time 9 Using the Instant Reheat Cook Feature 9 Instant Reheat Cook Settings 10 Using the Auto Rapid Defrost Feature 10 Auto Rapid Defrost Settings 11 Choosing the Accessories 11 Grilling 12 Combining Microwaves and the Grill 12 Multistage Cooking 13 Switching the Beeper Off 14 Safety Locking Your Microwave Oven 14 Cookware Guide 15 Cooking Guide 16 Installation Wiring Instructions 23 Wir...

Page 2: ...the frozen food in the oven Press the Rapid button once or more times according to the type of food to be defrosted 2 Select the weight by pressing the kg and g buttons as required 3 Press the Start button Leave the food in the oven Press 30 sonce or more times for each extra 30 seconds that you wish to add 1 Preheat the grill to the required temperature by pressing the Grill time settng 10 min 1 ...

Page 3: ... with the centre fitting to the coupler Purpose The turntable serves as the main cooking surface it can be easily removed for cleaning 4 Metal rack to be placed on the turntable Purpose The metal rack can be used in grill and combination cooking VENTILATION HOLES DOOR LATCHES DOOR TURNTABLE COUPLER ROLLER RING SAFETY INTERLOCK HOLES LIGHT DISPLAY CONTROL PANEL GRILL 1 DISPLAY 2 AUTO RAPID DEFROST ...

Page 4: ... bags Reason Electric arcing or sparking may occur and may damage the oven When heating food in plastic or paper containers keep an eye on the oven due to the possibility of ignition Do not use your microwave oven to dry papers or clothes Small amounts of food require shorter cooking or heating time If normal times are allowed they may overheat and burn If smoke is observed switch off or unplug th...

Page 5: ... anyone other than a comperent person to carry out any service or repair operation which involves the removal of a cover which gives protection against exposure to microwave energy WARNING Liquids and other foods must not be heated in sealed containers since they are liable to explode WARNING Only allow children to use the oven without supervision when adequate instructions have been given so that...

Page 6: ... Standing times specified in recipes and in this booklet must therefore be respected to ensure Even cooking of the food right to the centre The same temperature throughout the food 1 To display the time Then press the in the Clock button 24 hour notation Once 12 hour notation Twice 2 Set the hour with the h button and the minutes with the min button 3 When the right time is displayed press the Clo...

Page 7: ... electric circuit and caused a fuse to blow or a breaker to be triggered The food is either overcooked or undercooked Was the appropriate cooking length set for the type of food Was an appropriate power level chosen Sparking and cracking occur inside the oven arcing Have you used a dish with metal trimmings Have you left a fork or other metal utensil inside the oven Is aluminium foil too close to ...

Page 8: ...1 Press the Power Level button Result The 750W maximum cooking power indications are displayed Select the appropriate power level by pressing the Power Level button again until the corresponding wattage is displayed Refer to the power level table on the next page 2 Set the cooking time by pressing the 10 min 1 min and 10 s button 3 Press the Start button Result The oven light comes on and the turn...

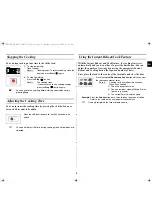
Page 9: ...the centre of the turntable and close the door Example Press the Drinks button once times to reheat one cups of coffee Refer to the table on the next page for further details Use only recipients that are microwave safe 1 To stop temporarily Open the door Result Cooking stops To resume cooking close the door and press Start again 2 To stop Completely Press the Stop button Result The cooking stops I...

Page 10: ...en Ready Meals frozen 300 350 g 400 450 g 4 min Take frozen ready meal and check if dish is suitable for microwave Pierce film of ready meal Put the frozen ready meal in the centre This programme is suitable for frozen ready meals consisting of 3 components e g meat with sauce vegetables and a side dish like potatoes rice or pasta Frozen Fish Gratin frozen 200 g 400 g 2 3 min Put the frozen fish g...

Page 11: ...eat 100 2000 g 20 90 min Shield the edges with aluminium foil Turn the meat over when the oven beeps This programme is suitable for beef lamb pork steaks chops minced meat 2 Poultry 100 2000 g 20 90 min Shield the leg and wing tips with aluminium foil Turn the poultry over when the oven beeps This programme is suitable for whole chicken as well as for chicken portions 3 Fish 100 2000 g 20 80 min S...

Page 12: ...Press the Grill button Select the cooking time by pressing the 10min 1min and 10s buttons The maximun grilling time is 60 minute 4 Press the Start button Result The oven light comes on and the turntable starts rotating 1 Cooking starts and when it has finished the oven beeps four times 2 The end reminder signal will beep 3 times once every minute 3 The current time is displayed again 1 Open the ov...

Page 13: ...e power level by pressing the Power Level button again one or more times 600W in the example 4 Set the cooking time by pressing the 10min 1min and 10s buttons the appropiate number of times 4 minutes in the example 5 Press the Grill button The grill mode II 6 Set the cooking time by pressing the 10min 1min and 10s buttons the appropiate number of times 5 minutes in the example The maximun grilling...

Page 14: ...e 1 Press the Stop and Start buttons at the same time Result The oven will not beep each time you press a button 2 To switch the beeper back on press the Stop and Start buttons again at the same time Result The oven operates with the beeper on again 1 Press the Stop and Clock buttons at the same time Result The oven is locked no functions can be selected 2 To unlock the oven press the Stop and Clo...

Page 15: ... cups containers Paper bags or newspaper Recycled paper or metal trims Glassware Can be used to warm food Overheating may cause the polystyrene to melt May catch fire May cause arcing Glassware Oven to table ware Fine glassware Glass jars Can be used unless decorated with a metal trim Can be used to warm foods or liquids Delicate glass may break or crack if heated suddenly Must remove the lid Suit...

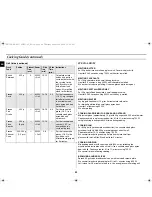
Page 16: ...r example see the chapter with tips techniques and hints Covering during cooking To cover the food during cooking is very important as the evaporated water rises as steam and contributes to cooking process Food can be covered in different ways e g with a ceramic plate plastic cover or microwave suitable cling film Standing times After cooking is over food the standing time is important to allow th...

Page 17: ...d 500 ml cold water Brown Rice parboiled 250g 750W 22 23 5 Add 500 ml cold water Mixed Rice rice wild rice 250g 750W 18 19 5 Add 500 ml cold water Mixed Corn rice grain 250g 750W 19 20 5 Add 400 ml cold water Pasta 250g 750W 11 12 5 Add 1000 ml hot water Food Portion Time min Standing Time min Instructions Broccoli 250g 500g 5 5 8 9 3 Prepare even sized florets Arrange the stems to the centre Brus...

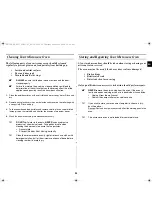
Page 18: ...s When reheating food for the first time it is helpful to make a note of the time taken for future reference Always make sure that the reheated food is piping hot throughout Allow food to stand for a short time after reheating to let the temperature even out The recommended standing time after reheating is 2 4 minutes unless another time is recommended in the chart Take particular care when heatin...

Page 19: ...eep ceramic plate Cover with plastic lid Stir occasionally during reheating and again before standing and serving Plated Meal chilled 300g 400g 600W 5 6 6 7 3 Plate a meal of 2 3 chilled components on a ceramic dish Cover with microwave cling film Frozen Ready Meal 300g 400g 600W 11 12 13 14 4 Put microwave proof dish with frozen ready meal 18 C on the turntable Pierce film or cover with microwave...

Page 20: ...t while freezing and defrosting food For defrosting of frozen food with a temperature of about 18 to 20 C use the following table as a guide All frozen food should be defrosted using defrosting power level 180 W Food Portion Time min Standing Time min Instructions Meat Minced beef Pork steaks 500g 250g 10 12 7 8 5 20 Place the meat on a flat ceramic plate Shield thinner edges with aluminium foil T...

Page 21: ...ing time to brown the top of the food Also this mode can be used for thick food portions that benefit from a browned and crispy top e g chicken pieces turning them over half way through cooking Please refer to the grill table for further details IMPORTANT REMARK Whenever the combination mode microwave grill is used make sure that the grill heating element is under the ceiling in the horizontal pos...

Page 22: ...wist off lids Stand on lid for 5 minutes COOKING PUDDING Mix pudding powder with sugar and milk 500 ml by following the manufacturers instructions and stir well Use a suitable sized glass pyrex bowl with lid Cook covered for 6 to 7 minutes using 750 W Stir several times well during cooking BROWNING ALMOND SLICES Spread 30 g sliced almonds evenly on a medium sized ceramic plate Stir several times d...

Page 23: ...roperly installed and earthed The wires in this mains lead are coloured in accordance with the following code Green and yellow Earth Blue Neutral Brown Live As the colours of the wires in the mains lead of this appliance may not correspond with the coloured markings indentifying the terminals in your plug proceed as follows Connect the green and yellow wire to the terminal in the plug marked with ...

Page 24: ...f the cooking instructions are based on a 650W oven then you will need to reduce some cooking time for the GW73E 750W Ready meals are now very convenient and popular These are meals which are already prepared and cooked by the food manufacturer and then frozen chilled or vacuum sealed for long life Increasingly heating times for such ready meals are being based on the Heating Categories A B C D an...

Page 25: ... any abrasive products or chemical solvents Take particular care when cleaning the door seals to ensure that no particles Accumulate Prevent the door from closing correctly Clean the microwave oven cavity right ofter each use with a mild detergent solution but let the microwave oven cool down before cleaning in order to avoid injury Storing and Repairing Your Microwave Oven A few simple precaution...

Page 26: ...wer source 230V 50 Hz Power consumption Microwave Grill Combined mode 1100 W 950 W 2050 W Output power 100 W 750 W IEC 705 240V 750 W 230V 700 W Operating frequency 2450 MHz Magnetron OM75S 31 Cooling method Cooling fan motor Dimensions W x H x D Outside Oven cavity 489 x 275 x 387 mm 330 x 187 x 320 mm Volume 20 liter Weight Net 13 5 kg approx n ZlTzi l TWZ XXqTWX luU GGw GY GG SGh GYWSGYWW GGXWa...

Page 27: ...27 EN Note n ZlTzi l TWZ XXqTWX luU GGw GY GG SGh GYWSGYWW GGXWaZ Ght ...

Page 28: ...n ZlTzi l TWZ XXqTWX luU GGw GY_GG SGh GYWSGYWW GGXWaZ Ght ...

Reviews: