

au-mail settings
au Initial Setting
How to transfer data from the au Settings Menu
Setting screen timeout
Diagnosis regularly
1
2
3
4
5
6
[
GET STARTED
]
*1
[
Sign in
]
*2
Enter a security number
*3
→ [
次へ (Next)
]
Enter a password → [
同意し
て次へ (Agree and next)
]
[
次へ (Next)
]
[
OK
]
7
8
9
10
[
ALLOW
]
*4
Check the apps to install
*5
→ [
Next
]
Check the content
to set → [
Next
]
[
Finish
]
*6
●On au initial setting, you can make settings for updating pre-
installed applications, setting au ID, downloading applications
previously used or using this product more conveniently.
●When you have set an au ID, you can use various au services
including "au Simple Payment Service" which offers you a
simple way to purchase applications from au Smart Pass and
Google Play.
*1 Check "Update", if you want to update pre-installed applications.
*2 If you have registered an au ID previously, step 3 and 4 are not
displayed. Proceed to step 5.
*3 The security number is the four-digit security code you wrote on
the application form.
*4 A confirmation screen is displayed for application permission
several times. Continue by following the on-screen instructions.
*5 If "Select apps" is displayed in the "Backed up" field, you can
confirm the application by tapping.
*6 If you have backup data in "Data Storage App" application, the
data can be returned by tapping "Data Storage App".
■
Initial Setup
The au-mail address will be determined automatically after initial setup.
●Initial setup cannot be available with Wi-Fi
®
connecting.
●To use au-mail, subscription to LTE NET is required.
●Operation and screen may be changed without notice.
1
2
3
On the home screen,
[
au-mail
]
Confirm the content
→ [
Agree
]
Checking the
au-mail address →
[
閉じる (Close)
]
* If the confirmation screen is displayed, follow the on-screen instructions.
■
Checking au-mail address
1
On the home screen, [
au-mail
] → [ ] → [
E-mail information
]
Your au-mail address appears in the E-mail address field.
■
Checking how to use au-mail application
1
2
3
On the home screen,
[
au-mail
]
[ ]
[
Operation guide
]
* Tap the item which you
want to check.
■
Changing your au-mail address
The au-mail address can be changed which automatically decided by initial setup.
1
On the home screen, [
au-mail
] → [ ] → [
Change Address/Setting Filter
]
2
[
メールアドレスの変更へ (To Change E-mail address)
] → enter the security
code → [
送信 (Send)
]
3
Confirm the content → [
承諾する (Accept)
]
4
Select " ご希望のメールアドレスに変更する (Change to your desired e-mail
address)" → enter au-mail address → [
送信 (Send)
]
5
[
OK
] → [
閉じる (Close)
]
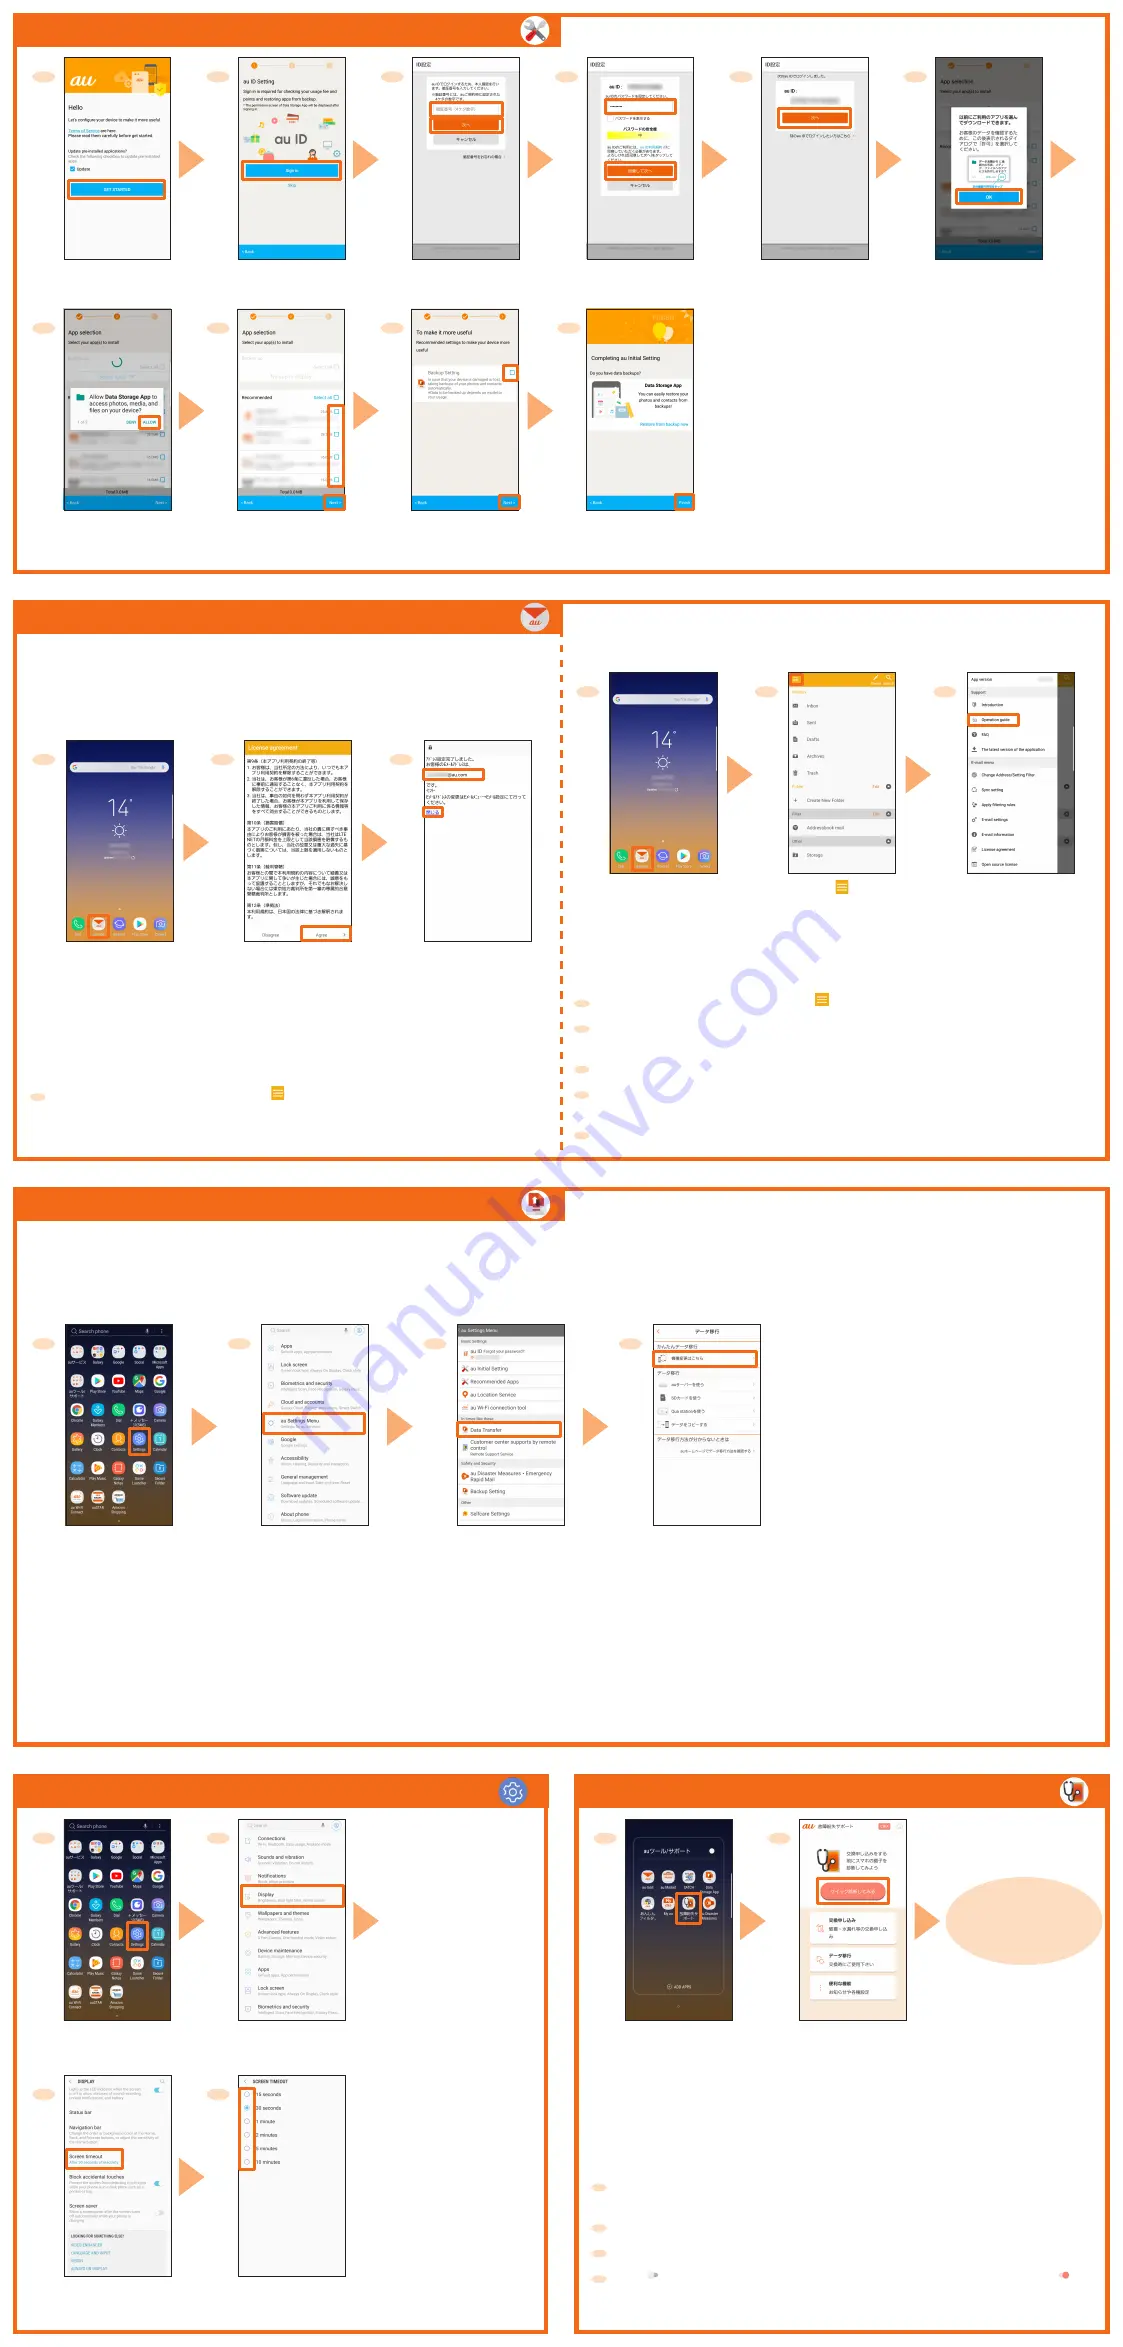
You can restore/store data from your previous au phone to this product using a microSD memory card or au server.
●If you restore data using au server, store the data using your previous au phone to au server in advance. You need to set up an au ID to use the au server.
(If your previous au phone does not have the au Settings Menu, use the au Cloud app.)
●If you restore data using a microSD memory card, save the data using your previous au phone to a microSD memory card in advance.
(If your previous au phone does not have the au Settings Menu, use the au backup app.)
1
2
3
4
On the home screen, flick up
or flick down → [
Settings
]
[
au Settings Menu
]
[
Data Transfer
]
* If the confirmation screen is
displayed, follow the on-screen
instructions.
[
機種変更はこちら (Model
changing is here)
] and
perform data transfer according
to the screen guidance.
If you want to store your pictures, address book (contacts), etc. automatically to the au server using "データお預かり(Data Storage)" app, you can set up by following
procedure.
●
On the home screen, flick up or flick down → [Settings] → [au Settings Menu] → [Backup Setting] → select the type of data to automatically store
1
2
On the home screen, flick up
or flick down → [
Settings
]
[
Display
]
1
2
Continue by
following the on-
screen instructions.
On the Applications
screen, [
auツール/サポー
ト (au tool/support)
] →
[
故障紛失サポート (Repair
and Delivery Service)
]
[
クイック診断してみる(Try
quick diagnosis)
]
3
4
[
Screen timeout
]
Tap the time until screen
turns off
■
Setting notification of regular cleaning
Set the " 定期クリーニング通知 (Notification of regular cleaning)" to notify you to
diagnosis regularly.
1
On the Applications screen, [
auツール/サポート (au tool/support)
] → [
故障紛
失サポート (Repair and Delivery Service)
]
2
[
便利な機能 (Convenient function)
]
3
[
各種設定 (Various settings)
]
4
Tap " " of " 定期クリーニング通知 (Notification of regular cleaning)" to " "
* Please diagnose with "クイック診断してみる (Try quick diagnosis)", when you receive the
notification.