background image

Y

OUR 

N

EW 

M

ACHINE

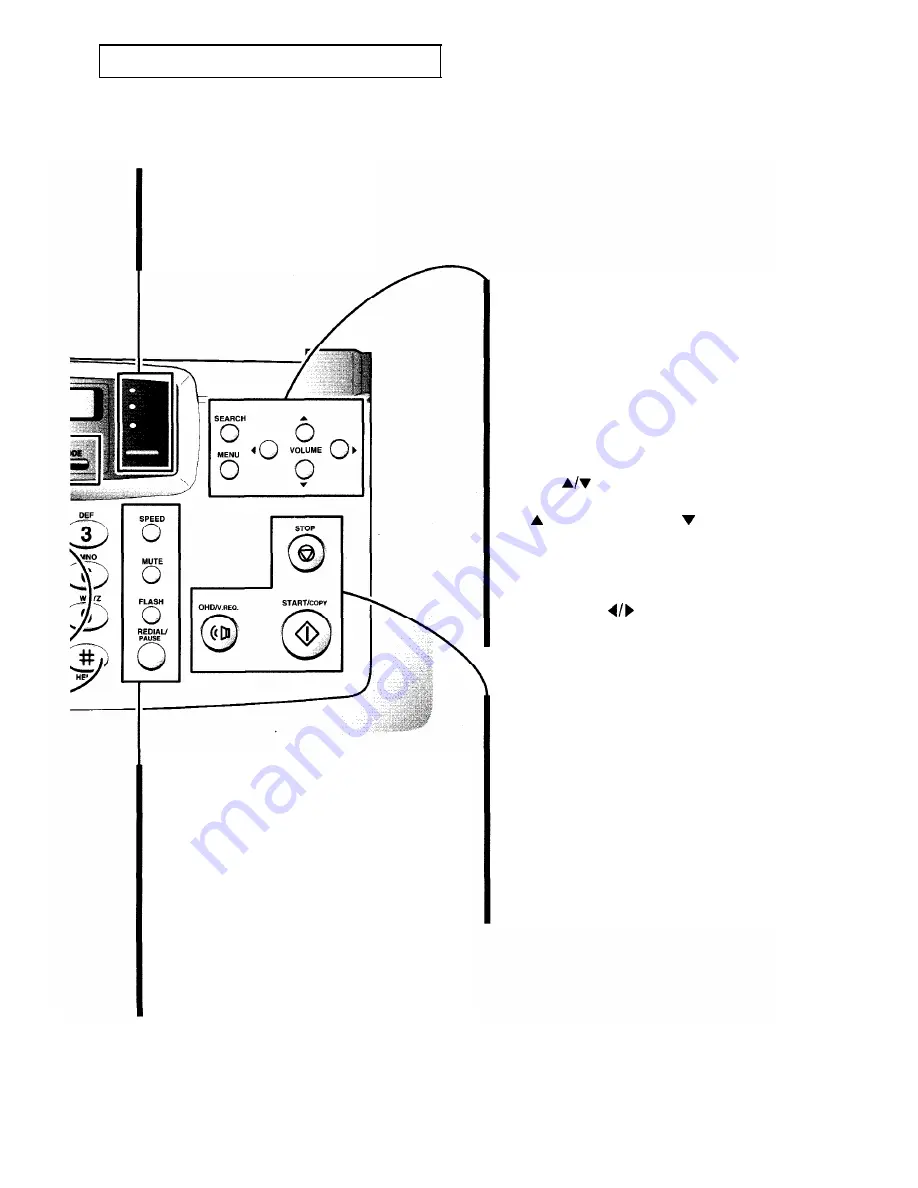
RCV.
Press to choose the receive mode.

The indicators will light up to show
you which setting you have chosen.
When no lights are showing, you
are in TEL mode.

SPEED

Press to make calls and send documents by entering
a 2-digit number (01 to 50).

MUTE
Press to turn off the microphone on the handset.

FLASH
Press to transfer a call in a PABX (Private Automatic
Branch Exchange).

REDIAL/PAUSE
Press to redial the last phone number you called.
You can also press it to add a pause when you store
a number in the memory.

SEARCH
Press to search for a number in the
autodialer.

MENU
Press to choose different functions.
If you do not press any number code within
3 seconds after you press MENU, the
machine briefly displays each function
sequentially and which code to press to
enter the function set up mode.

VOLUME 
Press to change the volume on the speaker.
Press   to make it louder, and   to make
it quieter.

Also press to display the last or the next
menu.

SCROLL/CLEAR 
Press to move right or left through the
display or to delete digits in the edit mode.

START/COPY
Press to start a job, make copies or print
reports.

STOP
Press to stop the machine in the middle of a
job. If also clears an error display and ejects
your original documents.

OHD/V.REQ.
Press to dial a number without picking up
the handset. You can also press it to make a
voice call after sending or receiving
documents.

C

HAPTER 

O

NE

: Y

OUR 

New M

ACHINE 

1

.5

Summary of Contents for FX1600

Page 1: ...Operator s Guide FACSIMILE FX1600 FX600 Please read this guide before you use this equipment ...

Page 2: ......

Page 3: ...f power that is supplied to your home or office call your electric company Grounding You machine must be plugged into a grounded outlet for your safety If you can t insert the plug into your wall outlet easily the outlet should be inspected by a qualified electrician Overload Don t plug too many electrical devices into a wall outlet or extension cord An overloaded outlet is a fire and electrical s...

Page 4: ...ut your telephone line such as how many pieces of equipment you can connect to it the telephone company will provide this information upon request In certain circumstances it may be necessary for the telephone company to request information from you concerning the equipment you have connected to your telephone line Upon request of the telephone company provide the FCC Registration Number and the R...

Page 5: ...ation into your fax machine you should complete the steps on page 2 9 If a Problem Arises If any of your telephone equipment is not operating properly you should immediately remove it from your telephone line as it may cause harm to the telephone network If the telephone company notes a problem it may temporarily discontinue service When practical the telephone company will notify you in advance o...

Page 6: ...acility designated by the supplier Any repairs or alterations made by the user to this equipment or equipment malfunctions may give the telecommunications company cause to request the user to disconnect the equipment Users should ensure for their own protection that the electrical ground connections of the power utility telephone lines and internal metallic water pipe system if present are connect...

Page 7: ...ation d un appareil certifié devrait être effectuée dans un centre d entretien approuvé par le fournisseru Toute réparation ou modification apportée par l utilisateur à son appareil ou tout problème de fonctionnement purrait forcer votre compagnie téléphonique àdébrancher votre appareil L utilisateur devrait s assurer que les raccordements de mise à la terre de l alimentation des lignes téléphoniq...

Page 8: ... Letters 2 10 Keypad Character Assignments 2 11 Chapter 3 The Fax Machine 3 1 Sending a Fax 3 1 Preparing a Document 3 1 Loading a Document 3 2 Dialing a Number 3 3 Confirming the Transmission 3 4 Cancelling Transmission 3 4 Sending a Delayed Transmission 3 5 Cancelling a Delayed Transmission 3 7 Receiving a Fax 3 8 Reception Modes 3 8 Receiving in Fax Mode 3 9 Receiving Manually in TEL Mode 3 9 R...

Page 9: ...ng TONE 4 10 Using MUTE 4 10 Using FLASH 4 11 User Options 4 12 Setting an Option 4 12 Setting Fax Option 4 13 Using Reports 4 14 Printing Reports 4 14 Clearing the Memory 4 16 Chapter 5 Troubleshooting Maintenance 5 1 Clearing Jams 5 1 Paper Jams During Transmission 5 1 Paper Jams During Reception 5 2 Cutter Jams 5 3 LCD Error Messages 5 4 Fixing Fax Problems 5 5 Cleaning the Roller and Scanning ...

Page 10: ...C h a p t e r O n e ...

Page 11: ...ck to make sure that you have all the parts shown here If any piece is missing or broken call your dealer Handset Paper Exit Tray FX1600 only Main Body Thermal Paper Roll Phone Line Cord This Manual Quick Reference Guide Address Label Paper CHAPTER ONE YOUR NEW MACHINE 1 1 ...

Page 12: ...ing Yourself with Your New Machine Take a moment to study the pictures on the next few pages Front Document Tray Paper Exit Tray FXl600 only Handset Document Guide Control Panel Paper Cover Latch 1 2 CHAPTER ONE YOUR NEW MACHINE ...

Page 13: ...one Socket LINE located on the bottom Connectthephone linecord Dial Mode Switch Choose between PULSE or TONE dialing Ringer Volume Switch Use this switch to adjust ringer volume Speaker Extension Socket EXT located on the bottom Connect a normal phone or answering machine CHAPTER ONE YOUR NEW MACHINE 1 3 ...

Page 14: ...t up when something is wrong One Touch Buttons Press to make calls and send documents simply by pressing one button LCD Shows the date and time or what the machine is doing Number Keypad Press to dial numbers manually TONE Press to temporarily switch from pulse to tone dialing HELP Press to print out the HELP LIST The HELP LlST shows the machine s basic functions and commands to use as a quick ref...

Page 15: ...unctions If you do not press any number code within 3 seconds after you press MENU the machine briefly displays each function sequentially and which code to press to enter the function set up mode VOLUME A r Press to change the volume on the speaker Press A to make it louder and v to make it quieter Also press to display the last or the next menu SCROLL CLEAR 4 Press to move right or left through ...

Page 16: ...C h a p t e r T w o ...

Page 17: ...l Its ventilation openings aren t blocked l It is at least 4 inches away from other objects l Its cords won t get in the way l It won t be easily knocked off a table or dropped l Liquids won t be spilled on it Making the Connections 1 1 Connect the coiled handset cord 2 2 Connect the telephone line 3 3 Connect an extension phone or answering machine if desired 4 Plug the coiled handset cord into t...

Page 18: ...e will sound a beep and the message THANK YOU will appear in the LCD There is no power switch on the machine The outlet should be located near the equipment and easily accessible 4 Cover may now be opened completely by pulling it back from machine case 4 If there is an adhesive sticker sealing the new paper roll remove it completely Be sure the paper exits from the top of the roll as shown The cor...

Page 19: ...you have an FX600 1 Unplug the power cord 2 Open the cover by pushing the cover release latch on the right side of the machine 3 Insert the paper roll 4 Push the edge of the paper into the slot which reads Insert the leading edge of the paper as shown and pull the paper out about 10 cm 4 in from the back CHAPTER TWO INSTALLATION AND SETUP 2 3 ...

Page 20: ...ine 5 Close the cover Tear off any extra paper Making a Copy Try copying a document to verify machine operation 1 Choose a page you want to copy 2 Open the document tray if it is dosed 4 For information on preparing a document see page 3 1 2 4 CHAPTER TWO INSTALLATION AND SETUP ...

Page 21: ...ws the message DOCUMENT LOADING 6 Adjust the copy quality 4 You can place up to 10 sheets at a time on the document tray 4 Slide the sheet down the document tray until it s gripped by the machine 4 The print quality is automatically set to FINE when making a copy For more information on contrast mode see page 3 1 D O C U M E N T L O A D I N G You can choose the proper contrast mode by L I G H T A ...

Page 22: ...to PULSE If you aren t sure what kind of service you have move the DIAL MODE switch to the TONE position Lift the handset and press any number except or Ø on the keypad If the dial tone stops you have tone service If the dial tone continues you have pulse service Setting Up the Fax Follow the directions below to set up your fax Adjusting Ringer Volume 1 Set the machine s ringer volume by using the...

Page 23: ...s 2 4 You can also press MENU then A or v to select this mode The LCD shows DATE TIME 2 D A T E T I M E 3 Press START COPY The LCD asks you to set a date format 4 Select the type of date format you want by using or M M D D D D M M CHAPTER TWO INSTALLATION AND SETUP 2 7 ...

Page 24: ... by using the number keypad 7 When the date and time are correct press START COPY 4 The machine uses the 24 hour time format 4 If you enter a wrong number use 4 or to move the flashing line under the number you want to correct then enter the correct number The LCD shows the date and time 0 1 2 5 9 6 1 2 4 5 2 8 CHAPTER TWO INSTALLATION AND SETUP ...

Page 25: ...NU 2 Press 1 The LCD shows TERMINAL ID 1 T E R M I N A L I D 3 Press START COPY The LCD asks you to enter the telephone number T E L 4 Using the number keypad enter the telephone line number to which your machine is connected 4 You can include special characters space hyphen or plus sign in the number to improve readability CHAPTER TWO INSTALLATION AND SETUP 2 9 ...

Page 26: ...mber keypad You can enter a total of up to 20 digits and or letters for the name Press START COPY when your name appears correctly on the LCD Using the Keypad to Enter Letters 1 Press the number button labeled with the letter you want press the button repeatedly until the letter appears in the LCD 4 Press the number button as many times as you want to get the letter or number For a list of letters...

Page 27: ...h the in the display to move the flashing line to next position and enter the next letter letter you want by pressing the number button again The letter appears on the LCD I D S A Select additional letters in the same way 3 When you re finished entering letters press START COPY Keypad Character Assignments Number Assigned numbers letters or characters 1 Space 1 2 A B C 2 3 D E F 3 4 G H I 4 5 J K ...

Page 28: ...C h a p t e r T h r e e ...

Page 29: ...orks with very dark print AUTO works well for normal handwritten typed or printed documents DARK works with light print or faint pencil markings Press MODE to increase sharpness and clarity FINE is good for documents containing a lot of detail SUPER FINE works well for documents containing extremely fine detail SUPER FINE works only if the remote machine also has the SUPER FINE feature PHOTO is us...

Page 30: ...ngs appear in the LCD and you can adjust them if necessary D O C U M E N T L O A D I N G L I G H T A U T O D A R K 4 You can insert up to 10 sheets at a time If you insert more than one sheet make sure the bottom first sheet enters first Stagger the leading edges of the sheets slightly and insert the sheets with a very slight push to ensure smooth feeding 4 If you want to add pages while the fax i...

Page 31: ...e button For more information see page 4 1 The LCD shows the number you are dialing 0 2 2 5 9 2 1 1 4 4 You can cancel the transmission of a 3 3 document at any time by pressing STOP Press START COPY when For more information see page 3 4 you hear the fax tone The LCD shows the message SENDING and the document begins to S E N D I N G feed through the machine 4 Replace the handset 4 You can send or...

Page 32: ...rror messages and their meanings see page 5 4 If you receive an error message press STOP to clear the message and try to send the document again For more information about cancelling transmission see below You can set your machine to print a confirmation report automatically For more information see pages 4 12 Cancelling Transmission 1 Press STOP at any time to cancel transmission The fax transmis...

Page 33: ...en you are not present 1 Load the document 2 Press MENU 3 Press 5 4 For details on how to load a document see page 3 2 The LCD shows DELAY TX 5 D E L A Y T X 4 Press START COPY to set up a delayed transmission The LCD asks you to enter the number of the remote T E L _ machine CHAPTER THREE THE Fax MACHINE 3 5 ...

Page 34: ...he LCD The machine asks you to enter the time when the fax is to be sent T I M E H H M M 1 5 1 4 7 4 Enter the time in 24 hour format For example 11 50 P M is entered as Enter the time by using the number keypad 23 50 The LCD shows the time when the fax will be sent T I M E H H M M 2 3 5 0 6 Press START COPY when the time appears correctly in the LCD 3 6 CHAPTER THREE THE FAX MACHINE ...

Page 35: ...0 1 2 5 9 6 1 2 4 5 Cancelling a Delayed Transmission 1 Press MENU 2 Press 5 4 You can press MENU then V or A to select this mode The LCD shows DELAY TX 5 D E L A Y T X 3 Press START COPY The LCD asks if you want to cancel the T X C A N C E L Y N transmission CHAPTER THREE THE FAX MACHINE 3 7 ...

Page 36: ...ou want to use your phone line for both fax and phone you may want to select this mode If the machine does not sense a fax signal it will continue ringing to tell you it is a phone call You should pick up the handset to answer the call If you do not pick up the handset on your machine it will switch to automatic reception mode In ANS FAX mode you must attach an answering machine to the EXT line so...

Page 37: ...mplete the machine returns to standby mode Receiving Manually in TEL Mode 1 Press RCV repeatedly until all the indicators are off The machine IS now in TEL 2 When the telephone rings pick up the handset and answer it 3 If you hear a fax tone or if the person on the other end asks you to receive a document press START COPY 4 Replace the handset The machine begins receiving and returns to standby mo...

Page 38: ...or lights When your answering machine answers an incoming call it may record a fax tone until it realizes it is a fax coming through Your answering machine may tell you that a voice message has been left when it is actually a fax tone If you have set your machine to ANS FAX and your answering machine is switched off or the answering machine is not connected the fax machine will automatically go in...

Page 39: ... documents hang up the extension telephone 4 Press the buttons slowly in sequence If you still hear the fax tone from the remote machine try pressing 9 once again 9 is the remote receive start code preset at the factory The first and the last asterisks are fixed but you can change the middle number to whatever digit you select For more information see page 4 12 Cancelling Reception 1 Press STOP to...

Page 40: ...ndset and answer it 3 When you are finished replace the handset 4 You cannot talk with the other person and send a fax at the same time The person on the remote end has 10 to 15 seconds to pick up the handset and begin talking to you If no one answers your machine returns to standby mode If you can t seem to alert the other person it may be because the remote fax machine doesn t have the voice req...

Page 41: ...ESSAGE list Using Polling Polling is when one fax machine requests another to send a document This is useful when the person with the original documents is not in the office or is not going to pay for the phone call The person who wants to receive the document calls the machine holding the original and requests that the document be sent 1 Press MENU 2 Press 6 The LCD shows POLLING 6 P O L L I N G ...

Page 42: ...LCD shows the number you are dialing T E L 0 1 9 5 2 2 9 2 0 _ 5 Press START COPY when the number appears correctly in the LCD The LCD shows the message DIALING and RECEIVING POLL D I A L I N G Your machine starts to receive the document from the remote machine R E C E I V I N G P O L L 4 Not all fax machines have polling capability and polling incompatibility sometimes occurs between fax machines...

Page 43: ...Remove clips staples and similar objects from documents before feeding them into the unit Let ink or paste dry completely before you send documents Do not try to load two or more documents into the machine if the documents are too thin or too thick These documents might not go through properly Feed one sheet at a time Check the chart below to see what is acceptable Single sheet Up to five sheets U...

Page 44: ...special features C h a p t e r F o u r ...

Page 45: ...hine s control panel to dial your number automatically Speed Dialing allows you to enter two digits to dial a number Storing a Number for One Touch Dialing 1 Press and hold the One Touch button 01 through 10 that you want to assign The LCD asks if you want to assign a telephone or T E L F A X fax number 2 Choose the type of number you want to store by using or 4 3 Press START COPY You can store up...

Page 46: ...uding and Enter the number you To insert a pause between numbers press want to store by using the REDIAL PAUSE a P appears on the number keypad Display 5 When the number appears correctly in the LCD press START COPY The LCD asks you to enter a name N A M E _ 6 If you want to assign name to the number enter the name 4 For information on how to enter letters using the keypad see page 2 10 If you ass...

Page 47: ... Each location can hold only one number Storing a Number for Speed Dialing 1 Press and hold SPEED until the LCD shows the message INPUT 01 50 _ The LCD asks you to enter the location number you wish to assign I N P U T 0 1 5 0 _ 2 Enter a 2 digit location number 01 through 50 in which you want to store the telephone or fax number The LCD asks you to enter a number 3 Enter the number you want to st...

Page 48: ... you can take advantage of the directory dialing feature of your machine For information about directory dialing see page 4 6 For information on how to enter letters using the number keypad see page 2 10 4 If you don t want to assign a name press v or START COPY 4 If there is no document loaded the telephone number is dialed If a document is loaded in the document tray pressing the One Touch butto...

Page 49: ...umber L O C NO 0 1 5 0 _ 2 Enter the 2 digit Speed Dial number 4 If a document is loaded in the document tray the machine automatically begins to transmit when the remote fax machine answers the phone The LCD shows the speed number or name S 0 1 4 6 0 P 2 1 1 4 3 if you are making a phone call pick up the handset when the other person answers CHAPTER FOUR SPECIAL FEATURES 4 5 ...

Page 50: ...er Searching Sequentially through Memory 1 Press SEARCH The LCD asks you to press v or A or to choose a P R E S S V A letter by pressing a keypad button 2 Press t or A to move backward or forward through the directory until you find the name you want 3 Press or 4 if you want to see the phone number that matches the name in the LCD 4 When the number you want appears in the LCD press START COPY to d...

Page 51: ... not the name you want press V to display the next name in the list or A to display the previous name 4 When the name you want appears in the LCD press START COPY to dial the number 4 For example to find the name SAMSUNG press the 7 button which is labeled with PQRS 4 If a document is loaded in the document tray the machine automatically begins to transmit when the remote fax machine answers the p...

Page 52: ... press START COPY If Press REDIAL PAUSE you want to stop redialing press STOP If you press START COPY the machine automatically redials the number up to three times at the three minute intervals If the number you dial is busy or there is no B U S Y R E T R Y answer the LCD shows the message BUSY To select the redial number 1 Press and hold down REDIAL PAUSE 2 Select the number you want by using th...

Page 53: ...ne before you can dial an outside number In such cases you must insert a pause in the number To insert a pause when storing an automatic dial number 1 When entering the number press REDIAL PAUSE at the position in the number where dialing should pause momentarily For more information on storing and automatically dialing numbers see page 41 A P appears in the number you are entering in the LCD 0 2 ...

Page 54: ...dialing 2 When the remote phone answers press TONE Any numbers you press now will be sent by tone not pulse for the remainder of the call Using MUTE If you mute a call during voice communication you can hear the other party but they cannot hear you 1 Press MUTE while on the phone 2 Press MUTE again to resume the conversation 4 MUTE turns off both the handset and the microphone when you are talking...

Page 55: ...e and hear the call waiting signal press FLASH once The first caller is placed on hold and you are speaking to the second caller 2 Press FLASH to talk to the first caller again 4 If you don t subscribe to a special service that uses the switch hook signal don t press FLASH during a call you could disconnect the line When a call comes in and you want the caller to be connected to another person you...

Page 56: ...t For more information on printing a report see page 4 14 Setting an Option 1 Press MENU 2 Press 3 The LCD shows SYSTEM DATA 3 Press START COPY The LCD sequentially shows the settings you canchange 3 S Y S T E M D A T A 4 You can skip any feature by pressing the v or A until you find the feature you want Use the or 4 to move the flashing line under the items you want G R A Y S C A L E 1 6 3 2 4 12...

Page 57: ...ch time you send a fax Select NO to disable this feature Ring count Select the number of times your machine rings before answering an incoming call If you are using your machine as both a telephone and a fax machine we suggest you set the ring count to at least 4 to give you time to answer Enter a number from 1 to 7 by using 4 or then press START COPY Paper cutting only available on the FX1600 onl...

Page 58: ...on concerning transmission and reception activities the times and dates of the most recent transmissions and receptions phone numbers that were called etc Telephone number list This list shows all numbers currently stored in One Touch and speed dial locations Before changing or adding automatic dial numbers print this report to determine which numbers are currently stored Print this report after m...

Page 59: ...r A The LCD shows the report you selected C O N F I R M R E P O R T 4 Lists available HELP LIST CONFIRM REPORT TX RX JOURNAL TEL NUMBER LIST SYSTEM DATA LIST 5 Press START COPY The machine will print the report you have selected P R I N T I N G CHAPTER FOUR SPECIAL FEATURES 4 15 ...

Page 60: ...NU 2 Press 7 The LCD shows MEMORY CLEAR 7 M E M O R Y C L E A R 3 Press START COPY 4 Select the desired menu by using or The LCD briefly shows the menu you have selected T X R X J O U R N AL 4 Menus available TERMINAL ID SYSTEM DATA ONE TOUCH DIAL SPEED DIAL TX RX JOURNAL 4 16 CHAPTER FOUR SPECIAL FEATURES ...

Page 61: ...you do not want to clear the sure you want to clear the memory select N and press A R E Y O U S U R E Y N START COPY memory 6 If you want to clear the memory press START COPY The LCD shows the message MEMORY CLEARING M E M O R Y C L E A R I N G CHAPTER FOUR SPECIAL FEATURES 4 17 ...

Page 62: ...C h a p t e r F i v e ...

Page 63: ...fax problems and where to call for more help Clearing Jams Paper Jams During Transmission 1 Open the control panel 2 Carefully remove the jammed document If the document is jammed in the white roller pull the jammed document out from the front of the machine 3 Close the control panel firmly CHAPTER FIVE TROUBLESHOOTING MAINTENANCE 5 1 ...

Page 64: ... by pushing the cover latch in the direction of the arrow 2 Remove the paper roll and cut off the jammed part 3 Re insert the paper roll 4 Cut the paper off where the wrinkles start 4 For information on putting the paper roll back in see page 2 2 5 2 CHAPTER FIVE TROUBLESHOOTING MAINTENANCE ...

Page 65: ...tter the display will show CUTTER JAM 1 Unplug the power cord 2 Find the small hole on the rear of the machine 3 Using a screwdriver turn the screw through the hole in the direction of arrow until the paper is completely cut 4 Open the paper cover and then close it again CHAPTER FIVE TROUBLESHOOTING MAINTENANCE 5 3 ...

Page 66: ...ocument jam See page 5 1 You have tried to send a fax and there is no document loaded into the machine Load a document and try again The other machine has not answered after all your attempts to redial Make sure the machine you are sending a fax to is working The machine is out of paper or the paper cover is open The paper on which you receive faxes on has jammed while making copies or receiving a...

Page 67: ...g up the handset before pressing START COPY Can t receive faxes automatically One of the Receive Mode indicators should be on Be sure the handset is in the cradle Is there paper in the machine Can t manually receive Be sure to return the handset to the cradle after pressing START COPY Machine doesn t transmit Check that the document is loaded face down SENDING should show up in the display You may...

Page 68: ... To keep your machine working properly occasionally clean the white roller and scanning glass as shown below If they are dirty documents copied or sent to other fax machines won t be clear 1 Unplug the power cord 2 Open the control panel 3 Remove the white roller 4 Both ends of the white roller have bushings that are snapped shut with small tabs Turn the tabs in the direction of A until they reach...

Page 69: ...n the rubber piece also 7 Replace the roller 8 Close the cover firmly 9 Plug the power cord back i n 4 Dry the roller surface and scanning glass with a soft dry cloth Be careful not to scratch the glass surface 4 Be careful not to scratch the surface 4 Wipe the surface of the rubber with a damp soft cloth then wipe dry CHAPTER FIVE TROUBLESHOOTING MAINTENANCE 5 7 ...

Page 70: ...uce poor results and may even damage your fax machine Contact your dealer for more information on paper Store rolls in a cool dark place at or below 76 F and avoid humidity higher than 65 To keep fax pages from darkening and fading keep them out of direct sunlight Avoid temperatures above 105 F Don t let them come in contact with blueprints diazo copies plastic films or transparent tape Keep store...

Page 71: ......

Page 72: ...S p e c i f i c a t i o n s ...

Page 73: ...g CIS Contact Image Sensor Printer Thermal Input Document Size 8 5 inches 216 millimetres Effective Scanning 8 27 inches 210 millimetres 1 Recording Width 8 5 in 216 millimetres Thermal Paper Roll Size 30 m x 216 millimetres wide core 12 7 millimetres diameter Power Requirement 120V AC 60 Hz Power Consumption Stand by 7 Watt Maximum when in use 115 Watt Temperature Range 50 F to 95 F 10 C to 35 C ...

Page 74: ... customer and is the only acceptable proof of purchase It must be presented to the authorized service center at the time service is requested Exclusions This warranty does not cover damage due to accident fire flood and or other acts of God misuse incorrect line voltage improper or unauthorized repairs commercial use or damage that occurs in shipping Exterior and interior finish batteries lamps an...

Page 75: ......

Page 76: ...ELECTRONICS P N JF68 60010A ...

Reviews: