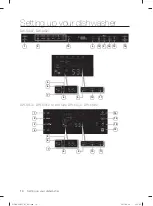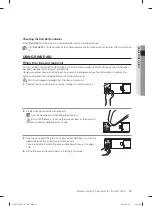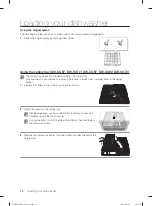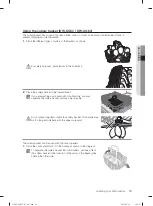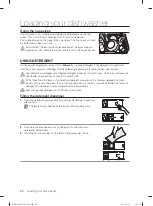
Setting up your dishwasher
_11
01 SETTING UP
1
Power button
9
Wash indicator
2
Programme selection buttons
10
Rinse indicator
3
Half Load button
11
Dry indicator
4
Delay Start button
12
Intensive Zone button (DW-SG97, DW-
SG72 / DW-UG97, DW-UG92, DW-UG72,
DW-UG62)
Prewash button (DW-SG52)
5
Child Lock indicator
13
Sanitize/Child Lock button
6
Salt Refi ll indicator
14
Multi Tabs button
7
Rinse Refi ll indicator
15
Start/Reset button
8
Delay Start indicator
Checking the accessories
• User
manual
• Warranty
card
• Funnel (Refer to the “Filling the salt reservoir” section on page 14)
• Energy
label
• Installation
manual
• Installation
kit
• Kick plate (DW-UG97, DW-UG92, DW-UG72, DW-UG62)
• Felt lower (DW-UG97, DW-UG92, DW-UG72, DW-UG62)
MEETING THE INSTALLATION REQUIREMENTS
Power supply and grounding
Do not use an extension cord.
Only use the power cord that came with the dishwasher.
When preparing for the installation, ensure that your power supply off ers:
• An AC 220-240 V / 50 Hz fuse or a circuit breaker.
• An individual branch circuit serving your dishwasher.
Your dishwasher must be grounded. If your dishwasher malfunctions or breaks down, grounding will reduce
the risk of electric shock by providing a path of least resistance for the electric current.
Your dishwasher comes with a power cord and a grounded, three-prong plug that can be inserted into a
properly installed and grounded outlet.
Do not connect the ground wire to a plastic plumbing line, gas line, or hot water pipe.
Improperly connecting the grounding conductor can result in electric shock.
Check with a qualifi ed electrician or technician if you are unsure whether your dishwasher has been properly
grounded.
Do not modify the plug provided with the dishwasher. If it does not fi t the outlet, have a proper outlet
installed by a qualifi ed electrician.
WARNING
WARNING
CAUTION
DD68-00135C-03_EN.indd 11
DD68-00135C-03_EN.indd 11
2013-06-26
2:56:46
2013-06-26
2:56:46


