background image

6

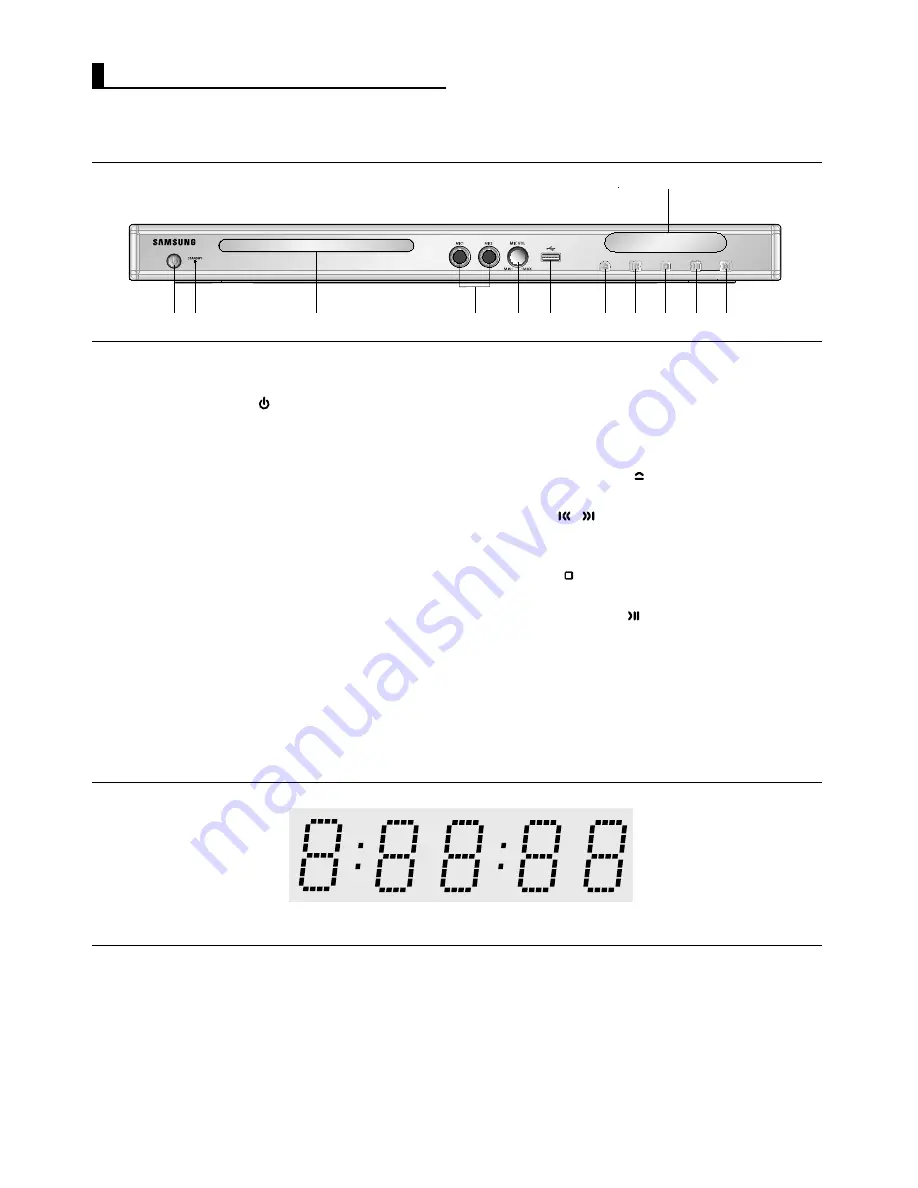
Front Panel Controls

Front Panel Display

Total playing time/Displays various messages concerning operations such as PLAY, 

STOP, LOAD ...

nodSC: No disc loaded.

OPEn: The disc tray is open.

LOAd: Player is loading disc information.

Description

1.

STANDBY/ON (

)

When STANDBY/ON is pressed on, the indicator goes 

out and the player is turned on.

2.

STANDBY indicator

When the unit is first plugged in, this indicator lights.

3.

DISC TRAY

Place the disc here.

4.

MIC 1/2

Connect Microphone for karaoke functions.

5.

MICROPHONE VOLUME

Use to adjust microphone volume level. Use the button

by pressing it. Turn it to the left or right to control the 

volume.

6.

USB Host 

Connect digital still camera, MP3 player, memory stick,

Card reader, or another removable storage devices

7.

OPEN/CLOSE (

)

Press to open and close the disc tray.

8.

SKIP (

/

) SEARCH

Allow you to search forward/backward through 

a disc. Use to skip the title, chapter or track.

9.

STOP (

)

Stops disc play.

10. PLAY/PAUSE (

)

Begin or pause disc play.

11. DISPLAY

Operation indicators are displayed here.

1

7

8

10

2

3

4

5

6

8

9

11

Summary of Contents for DVD-P280K

Page 1: ...DVD Player DVD P280K www samsung com ph AK68 01506L ...

Page 2: ...layer will operate normally When condensation forms inside the player due to sharp changes in temperature the player may not operate correctly If this occurs leave the player at room tempera ture until the inside of the player becomes dry and operational 4 Disc Do not clean the disc using record cleaning sprays benzene thinner or other volatile solvents that may cause damage to the disc surface Do...

Page 3: ...a Connection 9 Basic Functions Playing a Disc 14 Using the Search and Skip Functions 15 Using the Display Function 15 Using the Disc Menu and Title Menu 16 Repeat Play 16 Slow Play 17 Advanced Functions Adjusting the Aspect Ratio EZ View 17 Selecting the Audio Language 18 Selecting the Subtitle Language 18 Changing The Camera Angle 19 Using the Bookmark Function 19 Using the Zoom Function 20 Clips...

Page 4: ... graphics Ability to play back may depend on recording conditions DVD R R CD RW DVD RW RW V mode The unit may not play certain CD R CD RW and DVD R due to the disc type or recording conditions COPY PROTECTION Many DVD discs are encoded with copy protection Because of this you should only connect your DVD player directly to your TV not to a VCR Connecting to a VCR results in a distorted picture fro...

Page 5: ...0 min Single sided 80 min Double sided 160 min Audio Video DVD contains excellent sound and video due to Dolby Digital and MPEG 2 system Various screen and audio functions can be easily selected through the on screen menu Disc Types Logos Recording Types Disc Size Max Playing Time Characteristics DVD 12 Cm 8 Cm 74 min 20 min Audio Video Video with CD sound VHS quality MPEG 1 compression technology...

Page 6: ...Place the disc here 4 MIC 1 2 Connect Microphone for karaoke functions 5 MICROPHONE VOLUME Use to adjust microphone volume level Use the button by pressing it Turn it to the left or right to control the volume 6 USB Host Connect digital still camera MP3 player memory stick Card reader or another removable storage devices 7 OPEN CLOSE Press to open and close the disc tray 8 SKIP SEARCH Allow you to...

Page 7: ... Setup Menu progressive scan mode will work If Component I SCAN Video Output is selected in Setup Menu interlaced scan mode will work 3 AUDIO OUT JACKS Connect to the Audio input jacks of your television or audio video receiver 4 VIDEO OUT JACK Use a video cable to connect to the Video input jack on your television Note Consult your TV User s Manual to find out if your TV supports Progressive Scan...

Page 8: ...AT A B Button Allows you to repeat A B disc 18 STEP Button TV Source Advances play one frame at a time Press this button to select the an available TV source TV mode 19 KARAOKE Button Use to begin Karaoke functions 20 TV CH Buttons Channel selection 21 SUBTITLE Button 22 PLAY PAUSE Button Begin Pause disc play 23 RETURN Button Returns to a previous menu 24 INFO Button Displays the current disc mod...

Page 9: ... white OUT terminals on the rear of the DVD player to the VIDEO yellow AUDIO red and white IN terminals of TV 2 Turn on the DVD player and TV 3 Press the TV VIDEO button on the TV s remote control to select Video Note Noise may be generated if the audio cable is too close to the power cable If you want to connect to an Amplifier please refer to the Amplifier connection page See pages 12 to 13 The ...

Page 10: ... red and white OUT terminals on the rear of the DVD player to the AUDIO red and white IN terminals of TV Turn on the DVD player and TV 3 Press the TV VIDEO button on the TV s remote control to select Component or DVD 4 Set the Video Output to I SCAN in the Display Setup menu See pages 27 to 28 Note If you want to connect to an Amplifier please refer to the Amplifier connection page See pages 12 to...

Page 11: ...See pages 27 to 28 To see the progressive video output You need a TV set supporting the progressive scan input function And you have to set up the TV Consult your TV User s Manual to find out if your TV supports Progressive Scan If Progressive Scan is supported follow the TV User s Manual regarding Progressive Scan settings in the TV s menu system Depending on your TV the connection method may dif...

Page 12: ...NT IN terminal of your TV 3 Turn on the DVD player TV and Amplifier 4 Press the input select button of the Amplifier to select exter nal input in order to hear sound from the DVD player Note Please turn the volume down when you turn on the Amplifier Sudden loud sound may cause damage to the speakers and your ears Please set the audio in the menu screen according to the Amplifier See pages 26 to 27...

Page 13: ... er to the VIDEO or COMPONENT IN terminal of TV 3 Turn on the DVD player TV and Amplifier 4 Press the input select button of the Amplifier to select external input in order to hear sound from the DVD player Note Please turn the volume down when you turn on the Amplifier Sudden loud sound may cause damage to the speakers and your ears Please set the audio in the menu screen according to the Amplifi...

Page 14: ...isc tray When you stop disc play the player remembers where you stopped so when you press PLAY PAUSE button again it will pick up where you left off 4 Stopping Play Press the STOP button during play 6 Pausing Play Press the PLAY PAUSE or STEP button on the remote control during play Screen stops no sound To resume press the PLAY PAUSE button once again 7 Step Motion Play Except CD Press the STEP b...

Page 15: ...mote control 2 Press the buttons to select the desired item Only Menu Off is available for VCD2 0 Each press of the DISC MENU button toggles between Menu On and Menu Off 3 Press the buttons to make the desired setup and then press the ENTER button You may use the number buttons of the remote control to directly access a title chapter or to start the playback from the desired time Note To access th...

Page 16: ...lect Chapter Title or A B then press the ENTER button DVD repeats play by chapter or title VCD repeat play by disc or track Chapter repeats the chapter that is playing Title repeats the title that is playing Disc repeats the disc that is playing Track repeats the track that is playing A B repeats a segment of the disc that you select T Off 01 01 A B REPEAT ENTER T Off 01 01 A B REPEAT ENTER T D DV...

Page 17: ...iscs Normal Wide Displays the content of the DVD title in 16 9 aspect ratio The picture will look horizontally stretched SCREEN FIT The top and bottom portions of the screen are cut off and the full screen appears The picture will look vertically stretched ZOOM FIT The top bottom left and right portions of the screen are cut off and the central portion of the screen is enlarged Vertical Fit When a...

Page 18: ...on Using the AUDIO button 1 Press the AUDIO button The Audio changes when the button is pressed repeatedly The audio languages are represented by abbreviations 2 To remove the AUDIO icon press the CANCEL or RETURN button ENG DOLBYDIGITAL 5 1CH AUDIO DVD When playing a VCD you can select among Stereo Left or Right Stereo AUDIO VCD Note This function depends on audio languages are encoded on the dis...

Page 19: ...ime Using the Bookmark Function DVD VCD 1 During play press the INFO button on the remote control 2 Press the buttons to select Shortcut 3 Press the buttons to select Bookmark Except VCD then press the ENTER button Bookmark Enter Shortcut DVD 4 When you reach the scene you want to mark press the ENTER button Up to three scenes may be marked at a time 1 Note Only Menu Off is available for VCD2 0 Ea...

Page 20: ...g file Current Playback Time Current Playback Mode There are four modes They can be selected in order by pressing the REPEAT button Off Normal Playback Track Repeats the current track Folder Repeats the current folder Random Files in the disc will be played in random order S t o p W M A J P E G M P 3 00 00 00 Return Enter Menu Off MP3 file icon Folder icon WMA file icon Current Folder icon JPEG fi...

Page 21: ...no spaces in the name and avoid the use of special characters including Use a decompression transfer rate of at least 128 Kbps when recording MP3 files Sound quality with MP3 files basically depends on the rate of compression decompression you choose Getting CD audio sound requires an analog digital sampling rate that is conversion to MP3 format of at least 128 Kbps and up to 160 Kbps However choo...

Page 22: ...ovable disk in Windows 2000 or later without additional driver installation 4 USB HDD and USB Flash Drive Devices that support USB2 0 or USB1 1 You may experience a difference in playback quality when you connect a USB1 1 device For a USB HDD make sure to connect an auxiliary power cord to the USB HDD for proper operation 5 USB card Reader One slot USB card reader and Multi slot USB card reader De...

Page 23: ...TER button Press the buttons to select USB then press the ENTER button 2 Press the buttons to select SELECT then press the ENTER button to marked all files to be copying To unmarked copying all files press the ENTER button again UNSELECT Menu If you want to marked several files to be copying press the button then press the ENTER button on the selected file 3 Press the buttons to select START then ...

Page 24: ...recorded files may be played Only CD R discs with JPEG files in ISO 9660 or Joliet format can be played The name of the JPEG file may not be longer than 8 characters and should contain no blank spaces or special characters Only a consecutively written multi session disc can be played If there is a blank segment in the multi session disc the disc can be played only up to the blank segment A maximum...

Page 25: ...buttons to select Setup then press the or ENTER button 3 Press the buttons to select Language Setup then press the or ENTER button 4 Press the buttons to select Disc Menu then press the or ENTER button 5 Press the buttons to select the desired language then press the or ENTER button If the selected language is not recorded on the disc the original pre recorded language is selected The language is ...

Page 26: ...n press the or ENTER button 3 Press the buttons to select Language Setup then press the or ENTER button 4 Press the buttons to select Subtitle then press the or ENTER button 5 Press the buttons to select the desired language then press the or ENTER button Select Automatic if you want the subtitle language to be the same as the language selected as the audio language Some discs may not contain the ...

Page 27: ...16 9 Wide Still Mode Auto Screen Messages On Black Level On TV System NTSC Video Output I SCAN 16 9 Wide 4 3 Pan Scan 4 3 Letter Box TV Aspect Still Mode These options will help prevent picture shake in still mode and display small text clearer Auto When selecting Auto Field Frame mode will be automatically converted Field Select this feature when the screen shakes in the Auto mode Frame Select th...

Page 28: ...vels on a disc Menu Return Enter TV Aspect Wide Still Mode Auto Screen Messages On Black Level Off TV System PAL Video Output COMPOSIT SVID P SCAN I SCAN Video Output Video Output Select Video Output Component I SCAN Select when you want to use Component Interlace 525i Out Component P SCAN Select when you want to use Component Progressive 525p Out If the Yes No selection in the Display Setup sub M...

Page 29: ... button 2 Press the buttons to select Setup then press the or ENTER button Menu Return Enter Note If you have forgotten your password see Forgot Password in the Troubleshooting Guide Enter Password Enter New Password Menu Return Enter Language Setup Audio Setup Display Setup Parental Setup Menu Return Enter Language Setup Audio Setup Display Setup Parental Setup Rating Level Kids Safe Change Passw...

Page 30: ...being played has the 5 1 ch mark on the outside Check if your audio system is connected and working properly In SETUP Menu is the Audio Output set to Bitstream The features or action cannot be completed at this time because 1 The DVD s software restricts it 2 The DVD s software doesn t support the feature e g angles 3 The feature is not available at the moment 4 You ve requested a title or chapter...

Page 31: ...ital Camera Sora PDR T30 Toshiba Digital Camera Coolpix 5900 Nikon Digital Camera Coolpix S1 Nikon Digital Camera Coolpix 7600 Nikon Digital Camera DMC FX7 Panasonic Digital Camera Dimage Xt Minolta Digital Camera AZ 1 Olympus Digital Camera Product Company Type Digital Camera Cruzer Micro Sandisk USB 2 0 USB Flash Drive 128M Cruzer Mini Sandisk USB 2 0 128M Cruzer Mini Sandisk USB 2 0 256M SONY M...

Page 32: ... Single Sided Single Layer Disc 135 min Reading Speed 4 8 5 6 m sec Maximum Play Time 74 min Reading Speed 4 8 5 6 m sec Maximum Play Time 20 min Reading Speed 4 8 5 6 m sec Maximum Play Time 74 min Video Audio 1 channel 1 0 Vp p 75 Ω load Y 1 0 Vp p 75 Ω load Pr 0 70 Vp p 75 Ω load Pb 0 70 Vp p 75 Ω load L 1 L R 2 R 48 kHz Sampling 4 Hz to 22 kHz 96 kHz Sampling 4 Hz to 44 kHz 100 dB General Disc...

Page 33: ...msung com ITALIA 800 SAMSUNG 726 7864 www samsung com LUXEMBURG 0035 0 2 261 03 710 www samsung com be NETHERLANDS 0900 SAMSUNG 726 7864 0 10 Min www samsung com nl NORWAY 815 56 480 www samsung com no POLAND 0 801 801 881 022 607 93 33 www samsung com pl PORTUGAL 80820 SAMSUNG 726 7864 www samsung com pt SLOVAKIA 0800 SAMSUNG 726 7864 www samsung com sk SPAIN 902 10 11 30 www samsung com SWEDEN 0...

Page 34: ...Memo Memo ...

Page 35: ...Memo Memo ...

Page 36: ...Memo Memo ...

Page 37: ...Memo Memo ...

Page 38: ...AK68 01506L Contact SAMSUNG WORLD WIDE If you have any questions or comments relating to Samsung products please contact the SAMSUNG customer care centre 1800 10 SAMSUNG 726 7864 www samsung com ph ...

Reviews: