background image

ENG-9

ENG-8

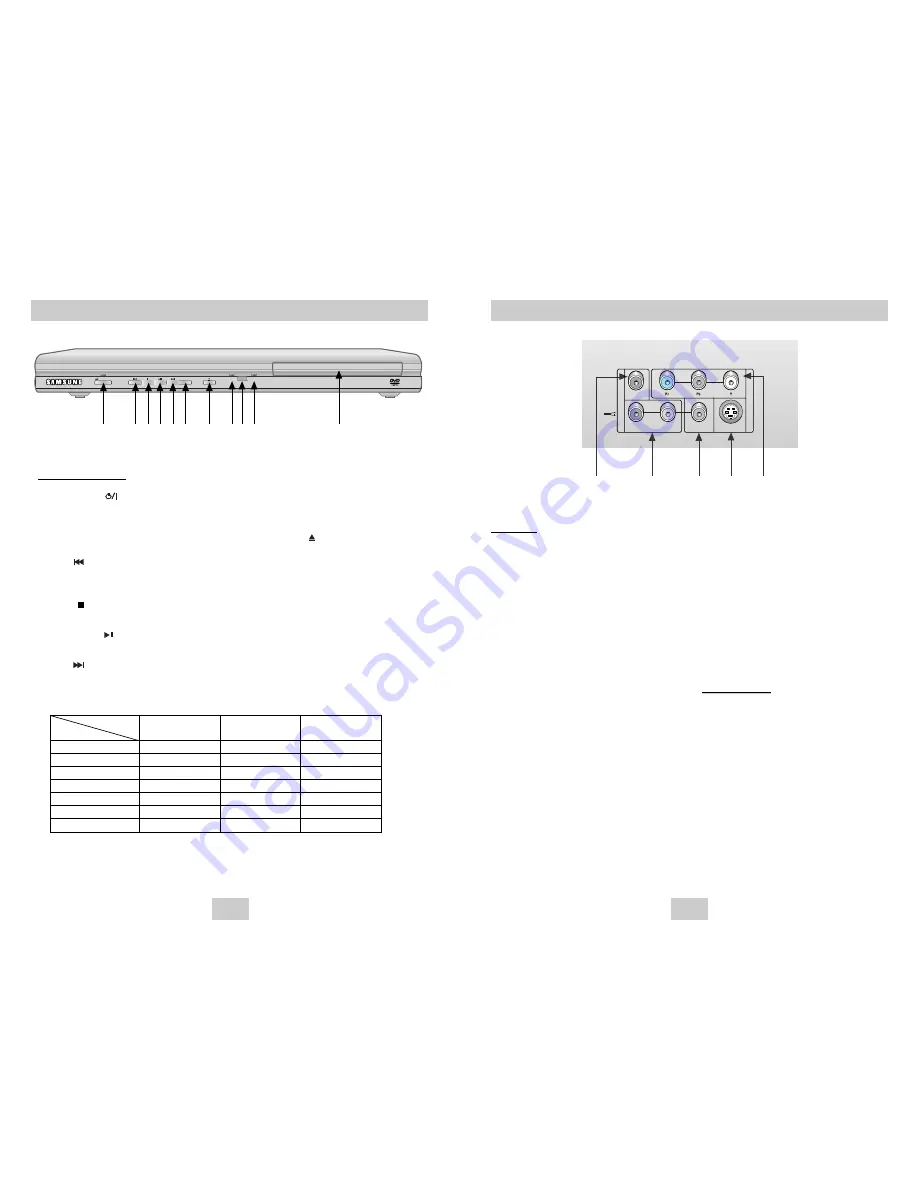
Description-Rear Panel

Description-Front Panel

Rear Panel

1. DIGITAL AUDIO OUT JACKS

• Use either a coaxial digital cable to connect to a

compatible Dolby Digital receiver. 
Use to connect to an A/V Amplifier that contains
a Dolby Digital or DTS decoder.

2. ANALOG AUDIO OUT JACKS

• Connect to the Audio input jacks of your 

television, audio/video receiver.

3. VIDEO OUT JACK

• Use a video cable to connect to the Video input

jack on your television.

• The Video Output in Setup Menu must be set to

the Component (I-SCAN) or S-Video. 

4. S-VIDEO OUT JACK

• Use the S-Video cable to connect this jack to

the S-Video jack on your television for a higher
picture quality. 

• The Video Output in Setup Menu must be set to

the S-Video.

5. COMPONENT VIDEO OUT JACKS

• Use these jacks if you have a TV with

Component Video in jacks. These jacks provide
Pr, Pb and Y video. Along with S-Video,
Component Video provides the best picture
quality.  

• If Component (P-SCAN) Video Output is 

selected in Setup Menu, progressive scan mode
will work.

• If Component (I-SCAN) Video Output is selected

in Setup Menu, interlaced scan mode will work.

Important Note

Important Note

• Consult your TV User’s Manual to find out if your

TV supports Progressive Scan. 
If Progressive Scan is supported, follow the TV
User’s Manual’s instructions regarding Progressive
Scan settings in the TV’s menu system.

• If Component (P-SCAN) Video Output is selected

in Setup Menu, Video and S-Video will not work.

• See page 29~30 to get more information on how

to use the Setup Menu.

Front Panel Controls

1. STANDBY/ON (       )

• When the player is plugged in, the 

Power LED lights. If you press the 
STANDBY/ON button to turn on the player, 
the LED goes out.

2. SKIP (       ) / SEARCH

• Allows you to search backward through a disc.

Use to skip the title, chapter or track.

3. STOP (       )

• Stops disc play.

4. PLAY/PAUSE (       )

• Begin or pause disc play.

5. SKIP (       ) / SEARCH

• Allows you to search forward through a disc. 

Use to skip the title, chapter or track.

6. EZ VIEW

• Easy View can convert Letter Box images to full

screen viewing on your conventional TV.

7. OPEN/CLOSE (      )

• Press to open and close the disc tray.

8. PLAY LED

• When playing the disc, the Play LED lights.

9. REMOCON RECEIVER

10. LOADING LED

• When loading the disc, the Loading LED lights.

11. DISC TRAY

• Place the disc here.

Power LED

Play LED

Loading LED

(Red)

(Green)

(Orange)

Power off/StandbyO

X

X

No disc

X

X

O

Stop

X

X

O

Loading

X

X

Blinks

Play/Skip

X

O

X

Search/Pause

X

Blinks

X

Error

Blinks

Blinks

Blinks

Function

LED

STANDBY/ON

EZ VIEW

LOADING

PLAY

1

2 3 4 5 6

7

8 9 10

11

COAXIAL

A

U

D

 I

O

V

 I

D

 E

O

R   -   AUDIO   -  L

TV

VIDEO

S-VIDEO

1

2

3

4

5

Summary of Contents for DVD-P249

Page 1: ...ENG DVD Player DVD P249 AK68 00412N...

Page 2: ...icates important instructions accompanying the product RISK OF ELECTRIC SHOCK DO NOT OPEN CAUTION DVD PLAYERS USE AN INVISIBLE LASER BEAM WHICH CAN CAUSE HAZARDOUS RADIATION EXPOSURE IF DIRECTED BE SU...

Page 3: ...upply is AC 110 240V 50 60Hz It cannot be used elsewhere This DVD player is designed and manufactured to respond to the Region Management Information If the Region number of a DVD disc does not corres...

Page 4: ...t your DVD player directly to your TV not to a VCR Connecting to a VCR results in a distorted picture from copy protected DVD discs This product incorporates copyright protection technology that is pr...

Page 5: ...r TV supports Progressive Scan If Progressive Scan is supported follow the TV User s Manual s instructions regarding Progressive Scan settings in the TV s menu system If Component P SCAN Video Output...

Page 6: ...layback ahead 10 seconds 15 PLAY PAUSE Button Begin Pause disc play 16 INFO Button Displays the current disc mode 17 DISC MENU Button Brings up the Disc menu 18 ENTER DIRECTION Button UP DOWN or LEFT...

Page 7: ...will stop If the player is left in the stop mode for more than 30 minutes the power will automatically shut off Automatic Power Off Function If the player is left in the stop mode for more than one mi...

Page 8: ...ot work See page 14 Title Chapter Time Audio Subtitle Using the Display Function When Playing a DVD VCD CD 1 During play press the INFO button on the remote 2 Use the UP DOWN buttons to select the des...

Page 9: ...4 PROGRAM RANDOM PROGRAM RANDOM PROGRAM 01 Track 05 06 07 08 09 10 11 12 13 14 15 16 Program Order 01 02 03 04 ENTER RETURN CLEAR Slow Repeat Play Repeat Play Repeat the current track chapter title a...

Page 10: ...cs Wide Screen Displays the content of the DVD title in 16 9 aspect ratio Screen Fit The top and bottom of the screen are cut off When playing a 2 35 1 aspect ratio disc the black bars at the top and...

Page 11: ...hen in VCD 2 0 mode MENU ON mode this function does not work See page 14 Depending on the disc the Bookmark function may not work Using the Instant Replay Skip Function Changing the Camera Angle When...

Page 12: ...SONG FILE 3 MUSIC SONG FILE 1 SONG FILE 2 1st 2nd Parent Folder Current Folder Sub Folders Peer Folders ENG 22 Using the Zoom Function Using the Zoom Function DVD VCD 1 During play or pause mode pres...

Page 13: ...d with Apple s Mac This format is the most widely used When naming your MP3 or WMA files do not exceed 8 characters and enter mp3 wma as the file extension General name format of Title mp3 or Title wm...

Page 14: ...Language Setup using UP DOWN buttons then press the RIGHT or ENTER button 4 Select Subtitle using UP DOWN buttons then press the RIGHT or ENTER button 5 Use the UP DOWN buttons to select English Sele...

Page 15: ...rns to the previous menu Setting Up the Display Options DISPLAY SETUP Still ModeJJJ Auto Screen MessagesJ On Video OutputJJ S Video TV AspectJJJ Wide Black LevelJJ On DISPLAY SETUP Still ModeJJJ Auto...

Page 16: ...LEVEL Level 8 Adult Level 7 Level 6 Level 5 Level 4 Level 3 Level 2 Level 1 Kids Safe e g Setting up in LEVEL6 The Parental Control function works in conjunction with DVDs that have been assigned a r...

Page 17: ...n the unit Press the STOP and PLAY buttons simultaneously on the front panel for three seconds The SELECT MENU LANGUAGE display will appear Select the number button of the desired language Press power...

Reviews: