Samsung DVD-P249 Manual Download Page 15

ENG-29

ENG-28

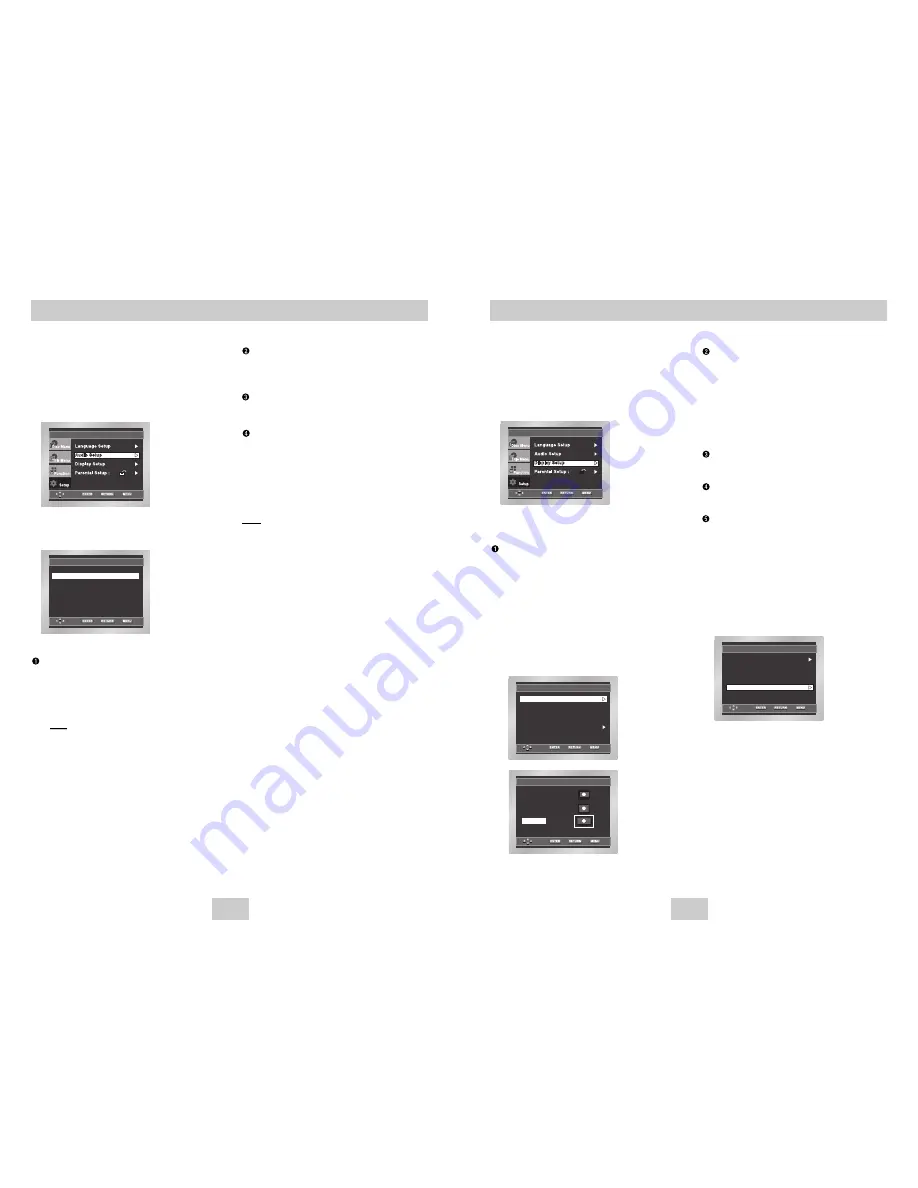
1. With the unit in Stop mode, press the MENU button.

2. Select 

Setup

using UP/DOWN buttons, then

RIGHT or ENTER button.

3. Select 

Display Setup

using UP/DOWN buttons,

then press the RIGHT or ENTER button.

4. Use the UP/DOWN buttons to select the desired

item. Then press the RIGHT or ENTER button.

TV Aspect

Depending on the type of television you have, you may
want to adjust the screen setting (aspect ratio).

1. 4:3 Letter Box : Select when you want to see the total

16:9 ratio screen DVD supplies, even though you
have a TV with a 4:3 ratio screen. Black bars will
appear at the top and bottom of the screen.

2. 4:3 Pan Scan : Select this for conventional size TVs

when you want to see the central portion of the 16:9
screen. (Extreme left and right side of movie picture
will be cut off.)

3. 16:9 Wide : You can view the full 16:9 picture on your

widescreen TV.

Still Mode 

These options will help prevent picture shake in still
mode and display small text clearer.

1. Auto : When selecting Auto, Field/Frame mode will be

automatically converted.

2. Field : Select this feature when the screen shakes in

the Auto mode.

3. Frame : Select this feature when you want to see

small letters more clearly in the Auto mode.

Screen Messages

Use to turn on-screen messages On or Off.

Black Level

Adjusts the brightness of the screen.(On/Off)

Video Output

Select Video Output.

1. S-Video : Select when you want to use Video and 

S-Video Out.

2. Component (I-SCAN) : Select when you want to use

Video and Component 525i(Interlace) Out.

3. Component (P-SCAN) : Select when you want to use

Component 525p(Progressive) Out.

* If the Yes/No selection in the Display Setup sub Menu

is not made within 10 seconds, the screen returns to
the previous menu.

Setting Up the Display Options

DISPLAY SETUP

Still ModeJJJ

:  Auto

Screen MessagesJ

:  On

Video OutputJJ

:  S-Video

TV AspectJJJ

:  Wide

Black LevelJJ

:  On

DISPLAY SETUP

Still ModeJJJ

:  Auto

Screen MessagesJ

:  On

TV AspectJJJ

:  Wide

Black LevelJJ

:  On

Video OutputJJ

:  S-Video

TV ASPECT

4:3 Letter Box

4:3 Pan Scan

16:9 Wide

1. With the unit in Stop mode, press the MENU button.

2. Select 

Setup

using UP/DOWN buttons, then

RIGHT or ENTER button.

3. Select 

Audio Setup

using UP/DOWN buttons,

then press the RIGHT or ENTER button.

4. Use the UP/DOWN buttons to select the desired

item. Then press the RIGHT or ENTER button.

Digital Output

1. PCM : Converts to PCM(2CH) 48kHz audio. Select

PCM when using the Analog Audio Outputs.

2. Bitstream : Converts to Dolby Digital Bitstream

(5.1CH). Select Bitstream when using the
Digital Audio Output.

Note

Note

• Be sure to select the correct Digital Output or

no audio will be heard.

Setting Up the Audio Options

AUDIO SETUP

DTSJJJJJ

:  Off

Dynamic Compression J

:  On

PCM Down Sampling JJ

:  On

Digital OutputJJJ

:  PCM

DTS

1. Off : Doesn’t output digital signal.
2. On : Outputs DTS Bitstream via digital output only. 

Select DTS when connecting to a DTS Decoder.

Dynamic Compression

1. On : To select dynamic compression.
2. Off : To select the standard range.

PCM Down Sampling

1. On : Select this when the amplifier connected to the

player is not 96KHz compatible. In this case, the
96KHz signals will be down converted to 48KHZ.

2. Off : Select this when the amplifier connected to the

player is 96KHz compatible. In this case, all
signals will be output without any changes.

Note

Note

• 

How to make the SETUP menu disappear or
return to menu screen during set up; 

Press RETURN or LEFT button.

• Manufactured under license from Dolby

Laboratories. “Dolby” and the double-D symbol are
trademarks of Dolby Laboratories.

• “DTS” and “DTS Digital Out” are trademarks of

Digital Theater Systems, Inc.

Summary of Contents for DVD-P249

Page 1: ...ENG DVD Player DVD P249 AK68 00412N ...

Page 2: ...icates important instructions accompanying the product RISK OF ELECTRIC SHOCK DO NOT OPEN CAUTION DVD PLAYERS USE AN INVISIBLE LASER BEAM WHICH CAN CAUSE HAZARDOUS RADIATION EXPOSURE IF DIRECTED BE SURE TO OPERATE PLAYER CORRECTLY AS INSTRUCTED Do not install this equipment in a confined space such as a bookcase or similar unit WARNING To prevent damage which may result in fire or electric shock h...

Page 3: ...supply is AC 110 240V 50 60Hz It cannot be used elsewhere This DVD player is designed and manufactured to respond to the Region Management Information If the Region number of a DVD disc does not correspond to the Region number of this DVD player the DVD player cannot play the disc This device is protected by U S patent numbers 4 631 603 4 577 216 4 819 098 and 4 907 093 and other intellectual prop...

Page 4: ...ct your DVD player directly to your TV not to a VCR Connecting to a VCR results in a distorted picture from copy protected DVD discs This product incorporates copyright protection technology that is protected by methods claims of certain U S patents and other intellectual property rights owned by Macrovision Corporation and other rights owners Use of this copyright protection technology must be au...

Page 5: ...ur TV supports Progressive Scan If Progressive Scan is supported follow the TV User s Manual s instructions regarding Progressive Scan settings in the TV s menu system If Component P SCAN Video Output is selected in Setup Menu Video and S Video will not work See page 29 30 to get more information on how to use the Setup Menu Front Panel Controls 1 STANDBY ON When the player is plugged in the Power...

Page 6: ...playback ahead 10 seconds 15 PLAY PAUSE Button Begin Pause disc play 16 INFO Button Displays the current disc mode 17 DISC MENU Button Brings up the Disc menu 18 ENTER DIRECTION Button UP DOWN or LEFT RIGHT Buttons This button functions as a toggle switch 19 EZ VIEW Button Easy View can convert Letter Box images to full screen viewing on your conventional TV 20 REPEAT Button Allows you to repeat p...

Page 7: ... will stop If the player is left in the stop mode for more than 30 minutes the power will automatically shut off Automatic Power Off Function If the player is left in the stop mode for more than one minute without any user interaction a screen saver will be activated Press the PLAY button to resume normal play This icon indicates an invalid button press ENG 12 Choosing a Connection Connection to a...

Page 8: ...not work See page 14 Title Chapter Time Audio Subtitle Using the Display Function When Playing a DVD VCD CD 1 During play press the INFO button on the remote 2 Use the UP DOWN buttons to select the desired item 3 Use the LEFT RIGHT buttons to make the desired setup and then press ENTER You may use the number buttons of the remote control to directly access a title chapter or to start the playback ...

Page 9: ...14 PROGRAM RANDOM PROGRAM RANDOM PROGRAM 01 Track 05 06 07 08 09 10 11 12 13 14 15 16 Program Order 01 02 03 04 ENTER RETURN CLEAR Slow Repeat Play Repeat Play Repeat the current track chapter title a chosen section A B or all of the disc When playing a DVD VCD CD 1 Press the REPEAT button on the remote Repeat screen appears 2 Select Chapter Title or A B using the LEFT RIGHT buttons Chapter repeat...

Page 10: ...scs Wide Screen Displays the content of the DVD title in 16 9 aspect ratio Screen Fit The top and bottom of the screen are cut off When playing a 2 35 1 aspect ratio disc the black bars at the top and bottom of the screen will disappear The picture will look vertically stretched Depending on the type of disc the black bars may not disappear completely Zoom Fit The top bottom left and right of the ...

Page 11: ...When in VCD 2 0 mode MENU ON mode this function does not work See page 14 Depending on the disc the Bookmark function may not work Using the Instant Replay Skip Function Changing the Camera Angle When a DVD contains multiple angles of a particular scene you can select the Angle function Using the ANGLE button Press the ANGLE button to see if an ANGLE mark is present at the upper left hand corner o...

Page 12: ...3 SONG FILE 3 MUSIC SONG FILE 1 SONG FILE 2 1st 2nd Parent Folder Current Folder Sub Folders Peer Folders ENG 22 Using the Zoom Function Using the Zoom Function DVD VCD 1 During play or pause mode press the MENU button on the remote 2 Use the UP DOWN buttons to highlight Function then press the RIGHT or ENTER button 3 Select Zoom using the UP DOWN buttons then press the RIGHT or ENTER button 4 Use...

Page 13: ...nd with Apple s Mac This format is the most widely used When naming your MP3 or WMA files do not exceed 8 characters and enter mp3 wma as the file extension General name format of Title mp3 or Title wma When composing your title make sure that you use 8 characters or less have no spaces in the name and avoid the use of special characters including Use a decompression transfer rate of at least 128 ...

Page 14: ...t Language Setup using UP DOWN buttons then press the RIGHT or ENTER button 4 Select Subtitle using UP DOWN buttons then press the RIGHT or ENTER button 5 Use the UP DOWN buttons to select English Select Automatic if you want the subtitle language to be the same as the language selected as the audio preference Select Others if the language you want is not listed Some discs may not contain the lang...

Page 15: ...urns to the previous menu Setting Up the Display Options DISPLAY SETUP Still ModeJJJ Auto Screen MessagesJ On Video OutputJJ S Video TV AspectJJJ Wide Black LevelJJ On DISPLAY SETUP Still ModeJJJ Auto Screen MessagesJ On TV AspectJJJ Wide Black LevelJJ On Video OutputJJ S Video TV ASPECT 4 3 Letter Box 4 3 Pan Scan 16 9 Wide 1 With the unit in Stop mode press the MENU button 2 Select Setup using U...

Page 16: ...G LEVEL Level 8 Adult Level 7 Level 6 Level 5 Level 4 Level 3 Level 2 Level 1 Kids Safe e g Setting up in LEVEL6 The Parental Control function works in conjunction with DVDs that have been assigned a rating which helps you control the types of DVDs that your family watches There are up to 8 rating levels on a disc 1 With the unit in Stop mode press the MENU button 2 Select Setup using UP DOWN butt...

Page 17: ... unit Press the STOP and PLAY buttons simultaneously on the front panel for three seconds The SELECT MENU LANGUAGE display will appear Select the number button of the desired language Press power on from a cold start with no disc in the unit Press the STOP and PLAY buttons simultaneously on the front panel for three seconds The SELECT MENU LANGUAGE display will appear Select the number button of t...

Reviews: