background image

ENG-11

Playing a Disc

Before Play

• Turn on your TV and press the TV/VIDEO button

to select the video mode.

• Turn on your Audio System and select AUX, CD or

DVD.

After plugging in the player, the first time you press
the DVD POWER button, this screen comes up :
If you want to select the language, press a 
NUMBER button. (This screen will only appear
when you plug in the player for the first time.)

Play

1. Press the OPEN/CLOSE button. 

The STANDBY indicator light goes out and the tray
opens.

2. Place a disc gently into the tray with the disc’s

label facing up.

3. Press the PLAY/PAUSE (       ) button or

OPEN/CLOSE button to close the disc tray.

4. Stopping Play

Press the STOP (      ) button during play.

5. Removing Disc

Press the OPEN/CLOSE button.

6. Pausing Play

Press the PLAY/PAUSE (       ) or STEP button on the
remote during play.
- Screen stops, no sound.
- To resume, press the PLAY/PAUSE (       ) button once

again.  

7. Step Motion Play (DVD only)

Press the STEP button on the remote during play. 
- Each time the button is pressed, a new frame will

appear.

- No sound is heard during STEP mode.
- Press the PLAY/PAUSE (      ) to resume normal play.

(You can only perform step motion play in the forward
direction.)

8. Slow Motion Play (DVD only)

Press and hold the        button to choose the play speed
between 1/8, 1/4 and 1/2 of normal during PAUSE or
STEP mode.

- No sound is heard during slow mode.
- Press the PLAY/PAUSE (      ) to resume normal play.
- Reverse slow motion play will not work.

RESUME function

When you stop disc play, the player remembers
where you stopped, so when you press the 
PLAY (      ) again, it will pick up where you left off.
(unless the disc is removed or the player is
unplugged, or if you press the STOP (      ) button
twice.)

Note

Note

• If the player is left for 5 minutes in pause mode, it

will stop.

• If the player is left in the stop mode for more than

30 minutes, the power will automatically shut off.
(Automatic Power-Off Function)

• If the player is left in the stop mode for more than

one minute without any user interaction, a screen
saver will be activated. Press the PLAY (      ) 
button to resume normal play.

• This       icon indicates an invalid button press.

ENG-10

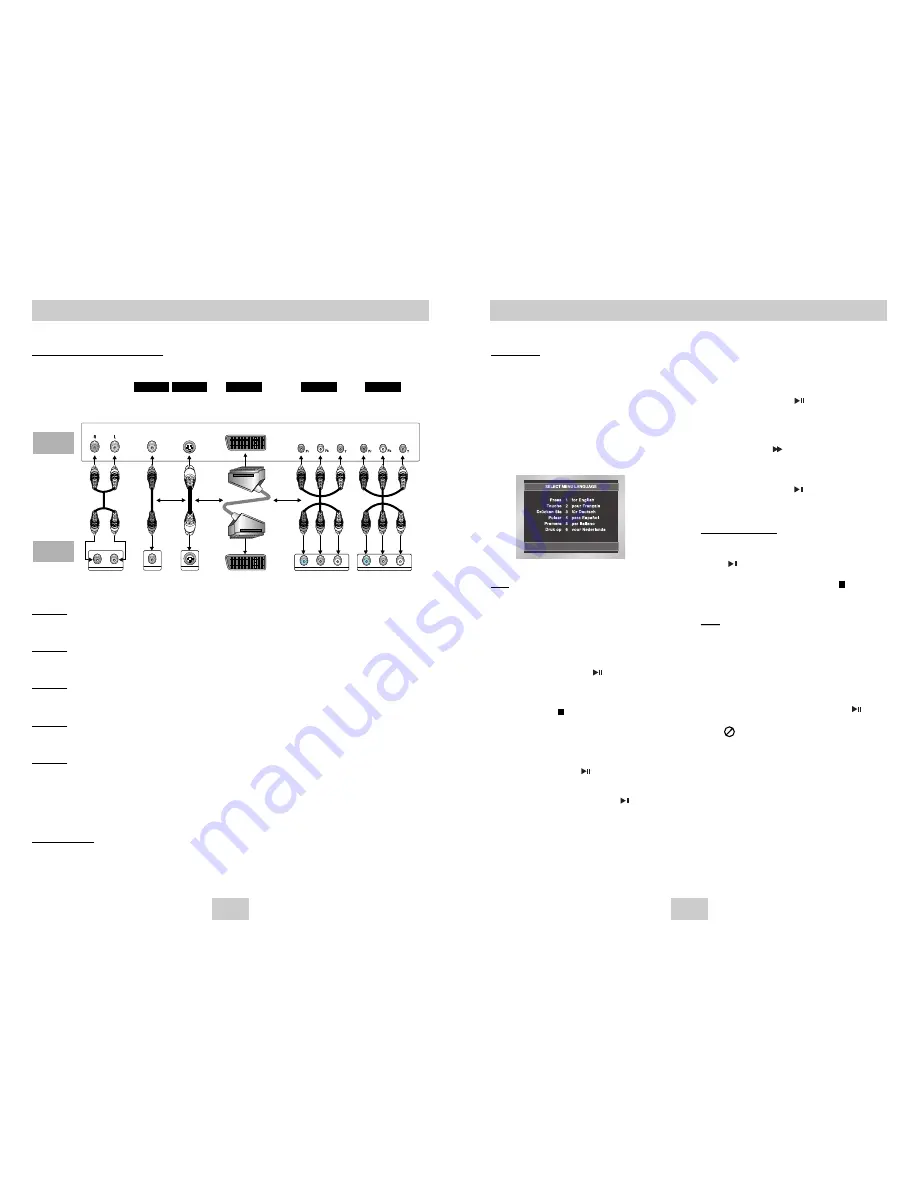
Choosing a Connection

Connection to a TV (For Video)

TV (Normal, Widescreen, Projection, etc..)

Method 1

DVD  TV with Video Input Jack
(The Video Output in Setup Menu must be set to the S-Video or SCART Output.)

Method 2

DVD  TV with S-Video Input Jack 
(The Video Output in Setup Menu must be set to the S-Video.)

Method 3

DVD  TV with Scart Input Jacks (Audio & Video)
(The Video Output in Setup Menu must be set to SCART Output.)

Method 4

DVD  TV with interlace Scan Component Video Jacks 
(The Video Output in Setup Menu must be set to the Component(I-SCAN).)

Method 5

DVD  TV with Progressive Scan Component Video Jacks. 
(The Video Output in Setup Menu must be set to the Component(P-SCAN).)
• If you want to convert Video Output to the Progressive Scan, you have to first connect Video or S-Video on

your TV. Then select Component(P-SCAN) out of Video Output in Setup Menu. Within 10 seconds, change the
TV’s external input to 625p/525p(576p/480p or Component) and select “Yes” (See Page 28).

• If Component(P-SCAN) Video Output is selected in Setup Menu, Video and S-Video will not work.

Important Note

Important Note

• Consult your TV User’s Manual to find out if your TV supports Progressive Scan. 

If Progressive Scan is supported, follow the TV User’s Manual’s instructions regarding Progressive Scan set-
tings in the TV’s menu system.

• Depending on your TV, the Method of connection may differ from the illustration above.

R

L

ANALOG AUDIO OUT

Pr

Pb

Y

S-VIDEO OUT

VIDEO OUT

COMPONENT VIDEO OUT

Pr

Pb

Y

COMPONENT VIDEO OUT

Good 

picture

Better 

picture

Best 

picture

Best 

picture

Optimum  

picture

Basic Audio

AV 

Cable

S-Video

Cable

Scart

Cables

(not 

supplied)

OR

OR

OR

Video

Cables

Audio Output 

Jacks

Video Output

Jack

S-Video 

Jack

SCART Jack

Component Video

Jacks

(Interlace)

Component Video

Jacks

(Progressive)

TV

DVD 

Player

Method 1

Method 2

Method 3

Method 4

Method 5

Summary of Contents for DVD-P142

Page 1: ...UK DVD Player DVD P142 DVD P144 AK68 00375A ...

Page 2: ...r outlet The player will operate normally When condensation forms inside the player due to sharp changes in temperature the player may not operate correctly If this occurs leave the player at room temperature until the inside of the player becomes dry and operational 4 Disc Do not clean record cleaning sprays benzene thinner or other volatile solvents that may cause damage to the disc surface Do n...

Page 3: ...nology that is protected by methods claims of certain U S patents and other intellectual property rights owned by Macrovision Corporation and other rights owners Use of this copyright protection technology must be authorized by Macrovision Corporation and is intended for home and other limited viewing uses only unless otherwise authorized by Macrovision Corporation Reverse engineering or disassemb...

Page 4: ...tant Note Consult your TV User s Manual to find out if your TV supports Progressive Scan If Progressive Scan is supported follow the TV User s Manual s instructions regarding Progressive Scan settings in the TV s menu system If Component P SCAN Video Output is selected in Setup Menu Video and S Video will not work See page 28 to get more information on how to use the Setup Menu 1 2 3 4 5 6 STANDBY...

Page 5: ...head 10 seconds 15 PLAY PAUSE Button Begin Pause disc play 16 INFO Button Displays the current disc mode 17 DISC MENU Button Brings up the Disc menu 18 ENTER DIRECTION Button UP DOWN or LEFT RIGHT Buttons This button functions as a toggle switch 19 EZ VIEW Button Easy View can convert Letter Box images to full screen viewing on your conventional TV 20 REPEAT Button Allows you to repeat play a titl...

Page 6: ...s left in the stop mode for more than one minute without any user interaction a screen saver will be activated Press the PLAY button to resume normal play This icon indicates an invalid button press ENG 10 Choosing a Connection Connection to a TV For Video TV Normal Widescreen Projection etc Method 1 DVD Player TV with Video Input Jack The Video Output in Setup Menu must be set to the S Video or S...

Page 7: ...if you prefer turn them off from the screen A DVD disc can have up to 32 different subtitles Title Chapter Time Audio Subtitle Using the Display Function When Playing a DVD CD 1 During play press the INFO button on the remote 2 Use the UP DOWN buttons to select the desired item 3 Use the LEFT RIGHT buttons to make the desired setup and then press ENTER You may use the number buttons of the remote ...

Page 8: ...t PROGRAM RANDOM PROGRAM RANDOM PROGRAM 01 Track 05 06 07 08 09 10 11 12 13 14 15 16 Program Order 01 02 03 04 ENTER RETURN CLEAR Slow Repeat Play Repeat Play Repeat the current track chapter title a chosen section A B or all of the disc When playing a DVD CD 1 Press the REPEAT button on the remote Repeat screen appears 2 Select Chapter Title or A B using the LEFT RIGHT buttons Chapter repeats the...

Page 9: ...Wide Screen Displays the content of the DVD title in 16 9 aspect ratio Screen Fit The top and bottom of the screen are cut off When playing a 2 35 1 aspect ratio disc the black bars at the top and bottom of the screen will disappear The picture will look vertically stretched Depending on the type of disc the black bars may not disappear completely Zoom Fit The top bottom left and right of the scre...

Page 10: ... may be marked at a time Depending on the disc the Bookmark function may not work Using the Instant Replay Skip Function Changing the Camera Angle When a DVD contains multiple angles of a particular scene you can select the Angle function Using the ANGLE button Press the ANGLE button to see if an ANGLE mark is present at the upper left hand corner of the screen 1 When an ANGLE mark is shown press ...

Page 11: ...rent Folder Root JPEG MP3 SONG FILE 3 MUSIC SONG FILE 1 SONG FILE 2 1st 2nd Parent Folder Current Folder Sub Folders Peer Folders ENG 20 Using the Zoom Function Using the Zoom Function DVD 1 During play or pause mode press the MENU button on the remote 2 Use the UP DOWN buttons to highlight Function then press the RIGHT or ENTER button 3 Select Zoom using the UP DOWN buttons then press the RIGHT o...

Page 12: ...3 discs When you record MP3 files on the CD R please refer to the following Your MP3 files should be ISO 9660 or JOLIET format ISO 9660 format and Joliet MP3 files are compatible with Microsoft s DOS and Windows and with Apple s Mac This format is the most widely used When naming your MP3 files do not exceed 8 characters and enter mp3 as the file extension General name format of Title mp3 When com...

Page 13: ...t Language Setup using UP DOWN buttons then press the RIGHT or ENTER button 4 Select Subtitle using UP DOWN buttons then press the RIGHT or ENTER button 5 Use the UP DOWN buttons to select English Select Automatic if you want the subtitle language to be the same as the language selected as the audio preference Select Others if the language you want is not listed Some discs may not contain the lang...

Page 14: ...PAL Black LevelII Off TV ASPECT 4 3 Pan Scan 16 9 Wide 4 3 Letter Box DISPLAY SETUP Still ModeIII Auto Screen MessagesI On Video OutputII S Video TV AspectIII 4 3 L Box TV SystemIII PAL Black LevelII Off 1 With the unit in Stop mode press the MENU button 2 Select Setup using UP DOWN buttons then RIGHT or ENTER button 3 Select Audio Setup using UP DOWN buttons then press the RIGHT or ENTER button 4...

Page 15: ...ing levels on a disc 1 With the unit in Stop mode press the MENU button 2 Select Setup using UP DOWN buttons then RIGHT or ENTER button 3 Select Parental Setup using UP DOWN buttons then press the RIGHT or ENTER button 4 Use RIGHT or ENTER to select Yes if you want to use a password The Enter Password screen appears 5 Enter your password The Re enter Password screen appears to confirm the password...

Page 16: ...sor inside the remote to reset it Reinstall batteries and try to operate the remote again Ensure that the disc is installed with the label side facing up Check the region number of the DVD 5 1 channel sound is reproduced only when the following condi tions are met 1 The DVD player is connected with the proper amplifier 2 The disc is recorded with 5 1 channel sound Check whether the disc being play...

Page 17: ...rranty 4 This product is not considered to be defective in materials nor workmanship by reason that it requires adaptation in order to conform to national or local technical or safety standards in force in any Country other than the one for which the product was originally designed and manufactured This warranty will not cover and no re imbursement will be made for such adaptation nor any damage w...

Reviews: